本文主要是介绍华为ce12800交换机m-lag(V-STP模式)配置举例,希望对大家解决编程问题提供一定的参考价值,需要的开发者们随着小编来一起学习吧!
配置## 标题思路
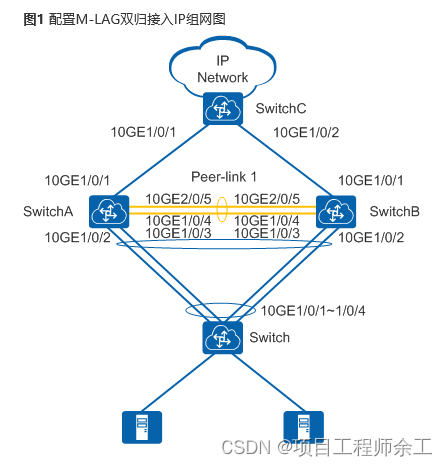
采用如下的思路配置M-LAG双归接入IP网络:
1.在Switch上配置上行接口绑定在一个Eth-Trunk中。
2.分别在SwitchA和SwitchB上配置V-STP、DFS Group、peer-link和M-LAG接口。
3.分别在SwitchA和SwitchB上配置LACP M-LAG的系统优先级、系统ID。
4.分别在SwitchA和SwitchB上配置VLANIF接口IP地址和MAC地址,作为接入设备的双活网关。
5.分别在SwitchA、SwitchB和SwitchC上配置OSPF功能,保证三层互通。
6.分别在SwitchA和SwitchB上配置Monitor Link关联上行接口和下行接口,避免因上行链路故障导致用户侧流量无法转发而丢弃。
在V-STP场景下,为防止接口因生成树协议计算结果被阻塞,可以通过配置主接口实现三层互通或者去使能IP网络侧的生成树协议。
配置Switch。
system-view
[~HUAWEI] sysname Switch
[*HUAWEI] commit
[~Switch] vlan batch 11
[*Switch] interface eth-trunk 20
[*Switch-Eth-Trunk20] mode lacp-static
[*Switch-Eth-Trunk20] port link-type trunk
[*Switch-Eth-Trunk20] port trunk allow-pass vlan 11
[*Switch-Eth-Trunk20] trunkport 10ge 1/0/1 to 1/0/4
[*Switch-Eth-Trunk20] quit
[*Switch] commit
操作步骤
1.在Switch上配置上行接口绑定在一个Eth-Trunk中 # 配置Switch。
system-view
[~HUAWEI] sysname Switch
[*HUAWEI] commit
[~Switch] vlan batch 11
[*Switch] interface eth-trunk 20
[*Switch-Eth-Trunk20] mode lacp-static
[*Switch-Eth-Trunk20] port link-type trunk
[*Switch-Eth-Trunk20] port trunk allow-pass vlan 11
[*Switch-Eth-Trunk20] trunkport 10ge 1/0/1 to 1/0/4
[*Switch-Eth-Trunk20] quit
[*Switch] commit
2.分别标题在SwitchA## 标题和SwitchB上配置V-STP、DFS Group、peer-link和M-LAG接口
配置SwitchA。
system-view
[~HUAWEI] sysname SwitchA
[*HUAWEI] commit
[~SwitchA] stp mode rstp
[*SwitchA] stp v-stp enable
[*SwitchA] interface loopback 0
[*SwitchA-LoopBack0] ip address 10.1.1.1 32
[*SwitchA-LoopBack0] quit
[*SwitchA] dfs-group 1
[*SwitchA-dfs-group-1] source ip 10.1.1.1
[*SwitchA-dfs-group-1] priority 150
[*SwitchA-dfs-group-1] quit
[*SwitchA] interface eth-trunk 1
[*SwitchA-Eth-Trunk1] trunkport 10ge 1/0/4
[*SwitchA-Eth-Trunk1] trunkport 10ge 1/0/5
[*SwitchA-Eth-Trunk1] mode lacp-static
[*SwitchA-Eth-Trunk1] peer-link 1
[*SwitchA-Eth-Trunk1] quit
[*SwitchA] vlan batch 11
[*SwitchA] interface eth-trunk 10
[*SwitchA-Eth-Trunk10] mode lacp-static
[*SwitchA-Eth-Trunk10] port link-type trunk
[*SwitchA-Eth-Trunk10] port trunk allow-pass vlan 11
[*SwitchA-Eth-Trunk10] trunkport 10ge 1/0/2
[*SwitchA-Eth-Trunk10] trunkport 10ge 1/0/3
[*SwitchA-Eth-Trunk10] dfs-group 1 m-lag 1
[*SwitchA-Eth-Trunk10] quit
[*SwitchA] commit
#配置SwitchB。
system-view
[~HUAWEI] sysname SwitchB
[*HUAWEI] commit
[~SwitchB] stp mode rstp
[*SwitchB] stp v-stp enable
[*SwitchB] interface loopback 0
[*SwitchB-LoopBack0] ip address 10.1.1.2 32
[*SwitchB-LoopBack0] quit
[*SwitchB] dfs-group 1
[*SwitchB-dfs-group-1] source ip 10.1.1.2
[*SwitchB-dfs-group-1] priority 120
[*SwitchB-dfs-group-1] quit
[*SwitchB] interface eth-trunk 1
[*SwitchB-Eth-Trunk1] trunkport 10ge 1/0/4
[*SwitchB-Eth-Trunk1] trunkport 10ge 1/0/5
[*SwitchB-Eth-Trunk1] mode lacp-static
[*SwitchB-Eth-Trunk1] peer-link 1
[*SwitchB-Eth-Trunk1] quit
[*SwitchB] vlan batch 11
[*SwitchB] interface eth-trunk 10
[*SwitchB-Eth-Trunk10] mode lacp-static
[*SwitchB-Eth-Trunk10] port link-type trunk
[*SwitchB-Eth-Trunk10] port trunk allow-pass vlan 11
[*SwitchB-Eth-Trunk10] trunkport 10ge 1/0/2
[*SwitchB-Eth-Trunk10] trunkport 10ge 1/0/3
[*SwitchB-Eth-Trunk10] dfs-group 1 m-lag 1
[*SwitchB-Eth-Trunk10] quit
[*SwitchB] commit
3.分别在SwitchA和SwitchB上配置LACP M-LA## 标题G的系统优先级、系统ID
配置SwitchA。[~SwitchA] lacp m-lag priority 10
[*SwitchA] lacp m-lag system-id 00e0-fc00-0000
[*SwitchA] commit
配置SwitchB。[~SwitchB] lacp m-lag priority 10
[*SwitchB] lacp m-lag system-id 00e0-fc00-0000
[*SwitchB] commit
4.分别在SwitchA和SwitchB上配置VLANIF接口IP地址和MAC地址,作为接入设备的双活网关
两端的虚拟IP和虚拟MAC配置要求完全一致,目的是为M-LAG提供相同的虚拟IP和虚拟MAC。
配置SwitchA。[~SwitchA] interface vlanif 11
[*SwitchA-Vlanif11] ip address 10.2.1.1 24
[*SwitchA-Vlanif11] mac-address 0000-5e00-0101
[*SwitchA-Vlanif11] quit
[*SwitchA] commit
配置SwitchB。[~SwitchB] interface vlanif 11
[*SwitchB-Vlanif11] ip address 10.2.1.1 24
[*SwitchB-Vlanif11] mac-address 0000-5e00-0101
[*SwitchB-Vlanif11] quit
[*SwitchB] commit
5.分别在SwitchA、SwitchB和SwitchC上配置OSFP功能,保证三层互通
配置SwitchA。[~SwitchA] interface 10ge 1/0/1
[~SwitchA-10GE1/0/1] undo portswitch
[*SwitchA-10GE1/0/1] ip address 10.3.1.1 24
[*SwitchA-10GE1/0/1] quit
[*SwitchA] ospf 1
[*SwitchA-ospf-1] area 0
[*SwitchA-ospf-1-area-0.0.0.0] network 10.1.1.1 0.0.0.0
[*SwitchA-ospf-1-area-0.0.0.0] network 10.2.1.0 0.0.0.255
[*SwitchA-ospf-1-area-0.0.0.0] network 10.3.1.0 0.0.0.255
[*SwitchA-ospf-1-area-0.0.0.0] quit
[*SwitchA-ospf-1] quit
[*SwitchA] commit
配置SwitchB。[~SwitchB] interface 10ge 1/0/1
[~SwitchB-10GE1/0/1] undo portswitch
[*SwitchB-10GE1/0/1] ip address 10.4.1.1 24
[*SwitchB-10GE1/0/1] quit
[*SwitchB] ospf 1
[*SwitchB-ospf-1] area 0
[*SwitchB-ospf-1-area-0.0.0.0] network 10.1.1.2 0.0.0.0
[*SwitchB-ospf-1-area-0.0.0.0] network 10.2.1.0 0.0.0.255
[*SwitchB-ospf-1-area-0.0.0.0] network 10.4.1.0 0.0.0.255
[*SwitchB-ospf-1-area-0.0.0.0] quit
[*SwitchB-ospf-1] quit
[*SwitchB] commit
配置SwitchC。
system-view
[~HUAWEI] sysname SwitchC
[*HUAWEI] commit
[~SwitchC] interface 10ge 1/0/1
[~SwitchC-10GE1/0/1] undo portswitch
[*SwitchC-10GE1/0/1] ip address 10.3.1.2 24
[*SwitchC-10GE1/0/1] quit
[*SwitchC] interface 10ge 1/0/2
[*SwitchC-10GE1/0/2] undo portswitch
[*SwitchC-10GE1/0/2] ip address 10.4.1.2 24
[*SwitchC-10GE1/0/2] quit
[*SwitchC] ospf 1
[*SwitchC-ospf-1] area 0
[*SwitchC-ospf-1-area-0.0.0.0] network 10.3.1.0 0.0.0.255
[*SwitchC-ospf-1-area-0.0.0.0] network 10.4.1.0 0.0.0.255
[*SwitchC-ospf-1-area-0.0.0.0] quit
[*SwitchC-ospf-1] quit
6.分别在SwitchA和SwitchB上配置Monitor Link关联上行接口和下行接口
配置SwitchA。[~SwitchA] monitor-link group 1
[*SwitchA-mtlk-group1] port 10ge 1/0/1 uplink
[*SwitchA-mtlk-group1] port eth-trunk 10 downlink 1
[*SwitchA-mtlk-group1] quit
[*SwitchA] commit
配置SwitchB。[~SwitchB] monitor-link group 1
[*SwitchB-mtlk-group1] port 10ge 1/0/1 uplink
[*SwitchB-mtlk-group1] port eth-trunk 10 downlink 1
[*SwitchB-mtlk-group1] quit
[*SwitchB] commit
结果查看
查看DFS Group编号为1的M-LAG信息。
[~SwitchA] display dfs-group 1 m-lag
-
: Local node
Heart beat state : OK
Node 1 *
Dfs-Group ID : 1
Priority : 150
Address : ip address 10.1.1.1
State : Master
Causation : -
System ID : 0025-9e95-7c31
SysName : SwitchA
Version : V100R006C00
Device Type : CE12800
Node 2
Dfs-Group ID : 1
Priority : 120
Address : ip address 10.1.1.2
State : Backup
Causation : -
System ID : 0025-9e95-7c11
SysName : SwitchB
Version : V100R006C00
Device Type : CE12800
查看SwitchA上的M-LAG信息。
[~SwitchA] display dfs-group 1 node 1 m-lag brief
-
- Local node
M-Lag ID Interface Port State Status
1 Eth-Trunk 10 Up active(*)-active
查看SwitchB上的M-LAG信息。
[~SwitchA] display dfs-group 1 node 2 m-lag brief
-
- Local node
M-Lag ID Interface Port State Status
1 Eth-Trunk 10 Up active-active(*)
通过以上显示信息可以看到,“Heart beat state”的状态是“OK”,表明心跳状态正常;SwitchA作为Node 1,优先级为150,“State”的状态是“Master”;SwitchB作为Node 2,优先级为120,“State”的状态是“Backup”。同时“Causation”的状态是“-”,Node 1的“Port State”状态为“Up”,Node 2的“Port State”状态为“Up”,且Node 1和Node 2的M-LAG状态均为“active”,表明M-LAG的配置正确。
这篇关于华为ce12800交换机m-lag(V-STP模式)配置举例的文章就介绍到这儿,希望我们推荐的文章对编程师们有所帮助!


