本文主要是介绍【C++学习手札】模拟实现list,希望对大家解决编程问题提供一定的参考价值,需要的开发者们随着小编来一起学习吧!
🎬慕斯主页:修仙—别有洞天
♈️今日夜电波:リナリア—まるりとりゅうが
0:36━━━━━━️💟──────── 3:51
🔄 ◀️ ⏸ ▶️ ☰
💗关注👍点赞🙌收藏您的每一次鼓励都是对我莫大的支持😍
目录
一、list实际的底层原理
二、list的模拟实现
写在前面
各层封装的实现
节点类
迭代器类
list类
list类详解
迭代器实现
list的修改操作
Insert
erase
swap
复用操作(push_back/front、pop_back/front、clear)
list的构造
建立头节点
构造函数
拷贝构造和‘=’重载
析构函数
list的空间管理
list的访问相关
三、整体代码
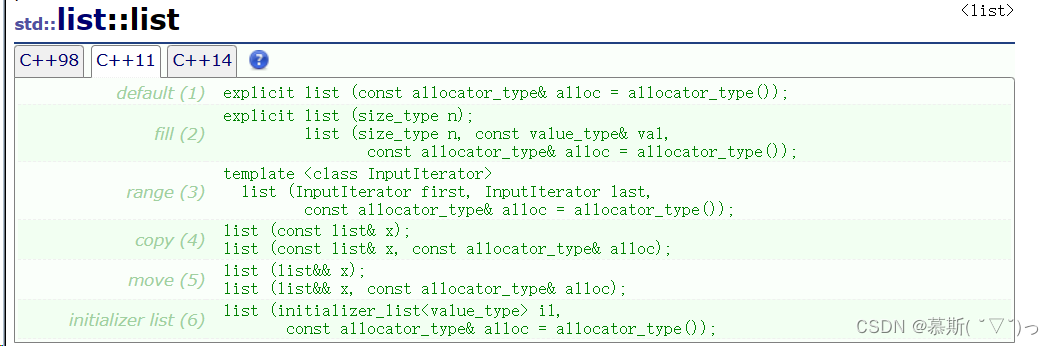
一、list实际的底层原理
C++的STL库中的list是使用带头的双向循环链表实现的。list中存储的每个元素包含了两个指针,一个指向前一个节点,一个指向后一个节点,这样就可以方便地在list中进行插入和删除操作,这些操作的时间复杂度都是O(1)。
大致的结构如下:
如多大家对于这个数据结构不太熟悉的话,不妨看看作者之前写的一篇关于带头双向循环链表的文章:🌀【数据结构】—C语言实现双向链表(超详细!)
二、list的模拟实现
写在前面
list的底层虽然是带头双向循环链表,但是对于它的实际实现不只是简单的链表而已,当然了,我们肯定会有链表的数据结构。但是,这个“结构”,经过了三层的封装才得以实现,分别是: 第一层:list的节点类
第二层:list的迭代器类
第三层:list类
本文目前只实现正向的迭代器,反向迭代器会在后面的文章统一vector、string、list一起实现。
各层封装的实现
节点类
主要是包括:对于两个双向指针的定义以及数据的定义,再是通过初始化列表对于节点的初始化。
// List的节点类template<class T>struct ListNode{ListNode(const T& val = T())//通过初始化列表初始化值:_val(val), _pPre(nullptr), _pNext(nullptr){}ListNode<T>* _pPre;ListNode<T>* _pNext;T _val;};迭代器类
迭代器实际上是对于指针进行操作,因此我们实例化并且重新命名了节点类的指针PNode,由于迭代器分为是否常量正向迭代器,对此我们额外定义了两个模板参数Ref、Ptr用于控制其中重载运算符 T& operator*() 和 T* operator->()。后面的list类中会有体现。在迭代器中,其中,operator*和operator->返回指向节点的指针,operator++和operator--实现前后缀++/--运算符,operator==和operator!=用来比较两个迭代器是否指向同一个节点。
//List的迭代器类template<class T, class Ref, class Ptr>class ListIterator{typedef ListNode<T>* PNode;typedef ListIterator<T, Ref, Ptr> Self;public:ListIterator(PNode pNode = nullptr):_pNode(pNode){}ListIterator(const Self& l):_pNode(l._pNode){}//T& operator*()//{// return _pNode->_val;//}//T* operator->()//{// return &*this;//}Ref operator*(){return _pNode->_val;}Ptr operator->(){return &*this;}Self& operator++(){_pNode = _pNode->_pNext;return *this;}Self operator++(int){Self temp(*this);_pNode = _pNode->_pNext;return temp;}Self& operator--(){_pNode = _pNode->_pPre;return *this;}Self& operator--(int){Self temp(*this);_pNode = _pNode->_pPre;return temp;}bool operator!=(const Self& l){return _pNode != l._pNode;}bool operator==(const Self& l){return !(*this != l);}private:PNode _pNode;};list类
这里先给出主要的封装,具体的实现后面详解。可以看到我们又对于节点类进行了实例化并且重新命名,并且定义了一个数据变量。下面是重点了:我们对于迭代器类也进行了实例化并且重新命名,特别是对于上面我们所提到的Ref和Ptr是有做变动的注意看:对于是否常量正向迭代器分别做出了如下定义:T&, T*和const T&, const T*。这里所这的一些变动也是为了后续简化代码,避免我们因为动静态多一份代码。
请结合上面我们迭代器类中我们所提到的operator==和operator!=理解。
class list{typedef ListNode<T> Node;typedef Node* PNode;public:typedef ListIterator<T, T&, T*> iterator;//普通迭代器重命名typedef ListIterator<T, const T&, const T*> const_iterator;//静态迭代器重命名public://...private:PNode _pHead;};list类详解
在C++中我们通常会进行各类函数的复用,以减少代码量和增加可读性。对此,我们尽量做到复用。
迭代器实现
返回头以及尾的迭代器,注意区分动静态 。
// List Iteratoriterator begin(){return iterator(_pHead->_pNext);}iterator end(){return iterator(_pHead);}const_iterator begin()const{return const_iterator(_pHead->_pNext);}const_iterator end()const{return const_iterator(_pHead);}list的修改操作
Insert
实现在pos位置前插入值为val的节点,开辟空间->保存原位置节点->新节点的前指针指向原节点的前一个节点->后节点指向原节点->该边原节点的前一个节点的后指针指向,指向新节点->原节点的前指针指向新节点->返回性节点的迭代器。
// 在pos位置前插入值为val的节点iterator insert(iterator pos, const T& val){PNode pNewNode = new Node(val);PNode pCur = pos._pNode;pNewNode->_pPre = pCur->_pPre;pNewNode->_pNext = pCur;pNewNode->_pPre->_pNext = pNewNode;pCur->_pPre = pNewNode;return iterator(pNewNode);}erase
删除pos位置的节点,返回该节点的下一个位置,保存删除j节点,保存原节点的下一个节点(用于返回)->一些列删除解链接操作->返回原节点的下一个节点的迭代器
// 删除pos位置的节点,返回该节点的下一个位置iterator erase(iterator pos){PNode pDel = pos._pNode;PNode pRet = pDel->_pNext;pDel->_pPre->_pNext = pDel->_pNext;pDel->_pNext->_pPre = pDel->_pPre;delete pDel;return iterator(pRet);}swap
void swap(list<T>& l){pNode tmp = _pHead;_pHead = l._pHead;l._pHead = tmp;}复用操作(push_back/front、pop_back/front、clear)
void push_back(const T& val){ insert(end(), val);}void pop_back(){ erase(--end()); }void push_front(const T& val) { insert(begin(), val); }void pop_front() { erase(begin());}void clear(){iterator p = begin();while (p != end()){p = erase(p);}_pHead->_pPre = _pHead;_pHead->_pNext = _pHead;}list的构造
建立头节点
因为我们在构造、 拷贝等很多的场景中都会用到对于头结点的初始化,对此额外写一个函数用于减少代码量。
void CreateHead(){_pHead = new Node;_pHead->_pPre = _pHead;_pHead->_pNext = _pHead;}构造函数
实现无参、含参初始化、迭代器构造。
// List的构造list(){CreateHead();}list(int n, const T& value = T()){CreateHead();for (int i = 0; i < n; ++i){push_back(value);}}template <class Iterator>list(Iterator first, Iterator last){CreateHead();while (first != last){push_back(*first);++first;}}拷贝构造和‘=’重载
list(const list<T>& l){CreateHead();list<T> temp(l.begin(), l.end());this->swap(temp);}list<T>& operator=(const list<T> l){this->swap(l);return *this;}析构函数
~list(){clear();delete _pHead;_pHead = nullptr;}list的空间管理
size_t size()const{size_t size = 0;ListNode* p = _pHead->_pNext;while (p != _pHead){size++;p = p->_pNext;}return size;}bool empty()const{return size() == 0;}
list的访问相关
主要还是要区分是否为动静态相关。
T& front(){assert(!empty());return _pHead->_pNext->_val;}const T& front()const{assert(!empty());return _pHead->_pNext->_val;}T& back(){assert(!empty());return _pHead->_pPre->_val;}const T& back()const{assert(!empty());return _pHead->_pPre->_val;}三、整体代码
#pragma once
#include<iostream>
#include<assert.h>using namespace std;namespace lt
{// List的节点类template<class T>struct ListNode{ListNode(const T& val = T())//通过初始化列表初始化值:_val(val), _pPre(nullptr), _pNext(nullptr){}ListNode<T>* _pPre;ListNode<T>* _pNext;T _val;};//List的迭代器类template<class T, class Ref, class Ptr>class ListIterator{typedef ListNode<T>* PNode;typedef ListIterator<T, Ref, Ptr> Self;public:ListIterator(PNode pNode = nullptr):_pNode(pNode){}ListIterator(const Self& l):_pNode(l._pNode){}T& operator*(){return _pNode->_val;}T* operator->(){return &*this;}Self& operator++(){_pNode = _pNode->_pNext;return *this;}Self operator++(int){Self temp(*this);_pNode = _pNode->_pNext;return temp;}Self& operator--(){_pNode = _pNode->_pPre;return *this;}Self& operator--(int){Self temp(*this);_pNode = _pNode->_pPre;return temp;}bool operator!=(const Self& l){return _pNode != l._pNode;}bool operator==(const Self& l){return !(*this != l);}private:PNode _pNode;};//list类template<class T>class list{typedef ListNode<T> Node;typedef Node* PNode;public:typedef ListIterator<T, T&, T*> iterator;//普通迭代器重命名typedef ListIterator<T, const T&, const T*> const_iterator;//静态迭代器重命名public:///// List的构造list(){CreateHead();}list(int n, const T& value = T()){CreateHead();for (int i = 0; i < n; ++i){push_back(value);}}template <class Iterator>list(Iterator first, Iterator last){CreateHead();while (first != last){push_back(*first);++first;}}list(const list<T>& l){CreateHead();list<T> temp(l.begin(), l.end());this->swap(temp);}list<T>& operator=(const list<T> l){this->swap(l);return *this;}~list(){clear();delete _pHead;_pHead = nullptr;}///// List Iteratoriterator begin(){return iterator(_pHead->_pNext);}iterator end(){return iterator(_pHead);}const_iterator begin()const{return const_iterator(_pHead->_pNext);}const_iterator end()const{return const_iterator(_pHead);}///// List Capacitysize_t size()const{size_t size = 0;ListNode* p = _pHead->_pNext;while (p != _pHead){size++;p = p->_pNext;}return size;}bool empty()const{return size() == 0;}// List AccessT& front(){assert(!empty());return _pHead->_pNext->_val;}const T& front()const{assert(!empty());return _pHead->_pNext->_val;}T& back(){assert(!empty());return _pHead->_pPre->_val;}const T& back()const{assert(!empty());return _pHead->_pPre->_val;}// List Modifyvoid push_back(const T& val){ insert(end(), val);}void pop_back(){ erase(--end()); }void push_front(const T& val) { insert(begin(), val); }void pop_front() { erase(begin());}// 在pos位置前插入值为val的节点iterator insert(iterator pos, const T& val){PNode pNewNode = new Node(val);PNode pCur = pos._pNode;pNewNode->_pPre = pCur->_pPre;pNewNode->_pNext = pCur;pNewNode->_pPre->_pNext = pNewNode;pCur->_pPre = pNewNode;return iterator(pNewNode);}// 删除pos位置的节点,返回该节点的下一个位置iterator erase(iterator pos){PNode pDel = pos._pNode;PNode pRet = pDel->_pNext;pDel->_pPre->_pNext = pDel->_pNext;pDel->_pNext->_pPre = pDel->_pPre;delete pDel;return iterator(pRet);}void clear(){iterator p = begin();while (p != end()){p = erase(p);}_pHead->_pPre = _pHead;_pHead->_pNext = _pHead;}void swap(list<T>& l){pNode tmp = _pHead;_pHead = l._pHead;l._pHead = tmp;}private:void CreateHead(){_pHead = new Node;_pHead->_pPre = _pHead;_pHead->_pNext = _pHead;}PNode _pHead;};
};
感谢你耐心的看到这里ღ( ´・ᴗ・` )比心,如有哪里有错误请踢一脚作者o(╥﹏╥)o!

给个三连再走嘛~
这篇关于【C++学习手札】模拟实现list的文章就介绍到这儿,希望我们推荐的文章对编程师们有所帮助!


