本文主要是介绍vmware虚拟机centos中/dev/cl_server8/root 空间不够,希望对大家解决编程问题提供一定的参考价值,需要的开发者们随着小编来一起学习吧!
在使用vmware时发现自己的虚拟机的/dev/cl_server8/root空间不够了,没办法安装新的服务。所以查了一下改空间的办法。
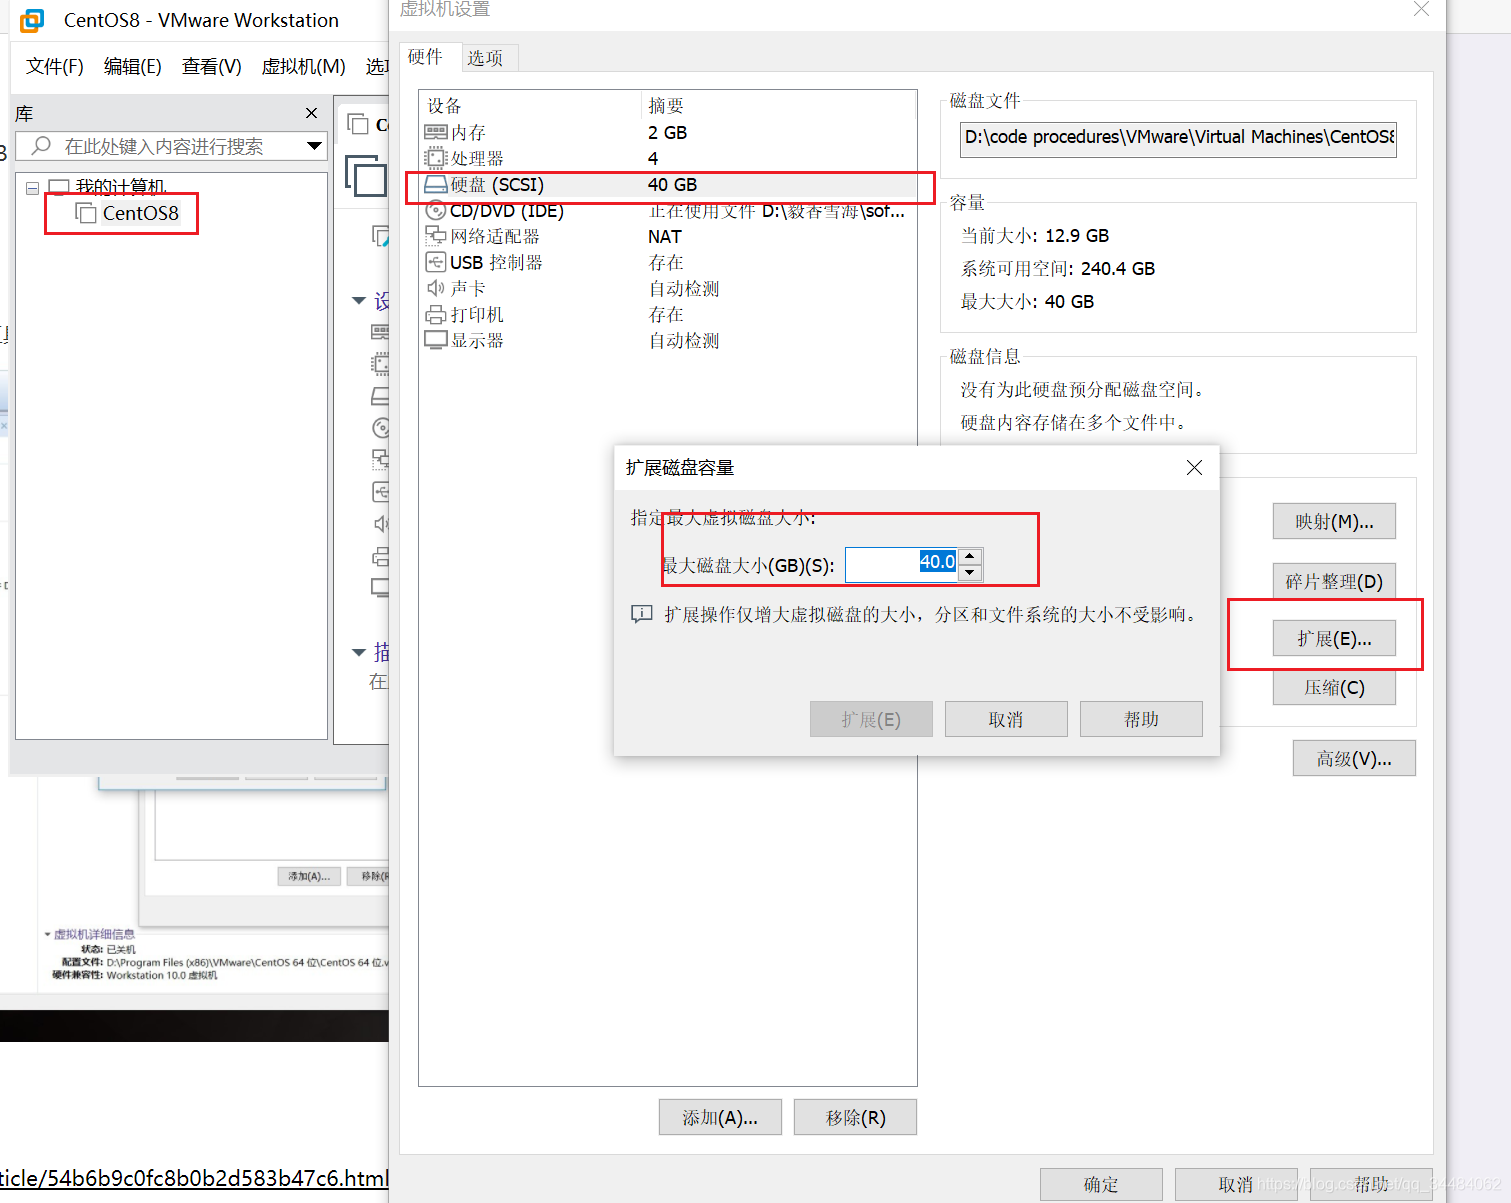
1.在虚拟机关闭的状态下,选中需要扩容的虚拟机->设置->硬件-> 硬盘->扩展->填写扩大到的值。
2.打开虚拟机, 对新增的硬盘空间做新增分区(硬盘数没有增加,增加的是空间)
参考:https://jingyan.baidu.com/article/54b6b9c0fc8b0b2d583b47c6.html
# fdisk /dev/sda
Welcome to fdisk (util-linux 2.23.2).Changes will remain in memory only, until you decide to write them.
Be careful before using the write command.
Command (m for help): n
Partition type:
p primary (2 primary, 0 extended, 2 free)
e extended
Select (default p): p
Partition number (3,4, default 3): 3
First sector (20971520-41943039, default 20971520):
Using default value 20971520
Last sector, +sectors or +size{K,M,G} (20971520-41943039, default 41943039):
Using default value 41943039
Partition 3 of type Linux and of size 10 GiB is setCommand (m for help): t
Partition number (1-3, default 3): 3
Hex code (type L to list all codes): 8e
Changed type of partition 'Linux' to 'Linux LVM'Command (m for help): p
Disk /dev/sda: 21.5 GB, 21474836480 bytes, 41943040 sectors
Units = sectors of 1 * 512 = 512 bytes
Sector size (logical/physical): 512 bytes / 512 bytes
I/O size (minimum/optimal): 512 bytes / 512 bytes
Disk label type: dos
Disk identifier: 0x000bc924Device Boot Start End Blocks Id System
/dev/sda1 * 2048 2099199 1048576 83 Linux
/dev/sda2 2099200 20971519 9436160 8e Linux LVM
/dev/sda3 20971520 41943039 10485760 8e Linux LVMCommand (m for help): w
The partition table has been altered!Calling ioctl() to re-read partition table.
WARNING: Re-reading the partition table failed with error 16: Device or resource busy.
The kernel still uses the old table. The new table will be used at
the next reboot or after you run partprobe(8) or kpartx(8)
Syncing disks.
3. reboot重启系统,查看当前分区类型,本例类型为xfs
# df -T /dev/sda1
Filesystem Type 1K-blocks Used Available Use% Mounted on
/dev/sda1 xfs 1038336 188240 850096 19% /boot
4. 在新磁盘上创建xfs文件系统
# mkfs.xfs /dev/sda3
meta-data=/dev/sda3 isize=512 agcount=4, agsize=655360 blks
= sectsz=512 attr=2, projid32bit=1
= crc=1 finobt=0, sparse=0
data = bsize=4096 blocks=2621440, imaxpct=25
= sunit=0 swidth=0 blks
naming =version 2 bsize=4096 ascii-ci=0 ftype=1
log =internal log bsize=4096 blocks=2560, version=2
= sectsz=512 sunit=0 blks, lazy-count=1
realtime =none extsz=4096 blocks=0, rtextents=0
5. 创建PV
# pvcreate /dev/sda3
WARNING: xfs signature detected on /dev/sda3 at offset 0. Wipe it? [y/n]: yWiping xfs signature on /dev/sda3.Physical volume "/dev/sda3" successfully created.
# pvdisplay--- Physical volume ---PV Name               /dev/sda2VG Name               cl_server8PV Size               9.00 GiB / not usable 3.00 MiBAllocatable           yes (but full)PE Size               4.00 MiBTotal PE              2303Free PE               0Allocated PE          2303PV UUID               MlRwjY-TmVF-H8PV-heSz-ALGL-Q7sp-jFU6Al"/dev/sda3" is a new physical volume of "14.00 GiB"--- NEW Physical volume ---PV Name               /dev/sda3VG Name               PV Size               14.00 GiBAllocatable           NOPE Size               0   Total PE              0Free PE               0Allocated PE          0PV UUID               0hmgH0-0wVg-jWUW-65WX-1TYb-sUGH-6jF1qm
6. PV加入VG,vgextend后接VG Name,我的系统中为cl_server8
# vgdisplay--- Volume group ---VG Name clSystem ID Format lvm2Metadata Areas 1Metadata Sequence No 3VG Access read/writeVG Status resizableMAX LV 0Cur LV 2Open LV 2Max PV 0Cur PV 1Act PV 1VG Size 9.00 GiBPE Size 4.00 MiBTotal PE 2303Alloc PE / Size 2303 / 9.00 GiBFree PE / Size 0 / 0 VG UUID dYdb4l-wMUh-e2xv-WiaJ-Oa52-NvdF-s5ICJC# vgextend cl /dev/sda37. VG加入LV
# lvextend -l +6416 /dev/cl_server8/root
Size of logical volume cl/root changed from 14.00 GiB (2047 extents) to 17.99 GiB (4606 extents). Logical volume cl/root successfully resized.
+6416 ”和“/dev/cl_server8/root”来源详解:
“+6416 ”来自于vgdisplay命令的Free PE/Size字段:
# vgdisplay--- Volume group ---VG Name cl...VG Size 25.99 GiBPE Size 4.00 MiBTotal PE 4862Alloc PE / Size 2303 / 9.00 GiBFree PE / Size 6416 / 14.00 GiBVG UUID dYdb4l-wMUh-e2xv-WiaJ-Oa52-NvdF-s5ICJC“/dev/cl_server8/root”来自于lvdisplay命令的LV Path字段。
# lvdisplay--- Logical volume ---LV Path /dev/cl_server8/rootLV Name rootVG Name cl_server8LV UUID 1Y1Lm8-nEvY-pqyA-y4C4-eIZ5-Ix38-OgAUNSLV Write Access read/writeLV Creation host, time server8, 2021-05-07 20:16:24 +0800LV Status available# open 2LV Size 4.00 GiBCurrent LE 1024Segments 1Allocation inheritRead ahead sectors auto- currently set to 8192Block device 253:1
8. 调整文件系统大小,本例中是xfs文件系统使用xfs_growfs命令调整,若其他文件系统,如ext4使用resize2fs命令,注意区分。
# xfs_growfs /dev/cl/root
meta-data=/dev/mapper/cl-root    isize=512    agcount=4, agsize=524032 blks=                       sectsz=512   attr=2, projid32bit=1=                       crc=1        finobt=0 spinodes=0
data     =                       bsize=4096   blocks=2096128, imaxpct=25=                       sunit=0      swidth=0 blks
naming   =version 2              bsize=4096   ascii-ci=0 ftype=1
log      =internal               bsize=4096   blocks=2560, version=2=                       sectsz=512   sunit=0 blks, lazy-count=1
realtime =none                   extsz=4096   blocks=0, rtextents=0
data blocks changed from 2096128 to 4716544
9. 使用 df查看可以得到已经修改了
# df -h
Filesystem                   Size  Used Avail Use% Mounted on
devtmpfs                     866M     0  866M   0% /dev
tmpfs                        896M     0  896M   0% /dev/shm
tmpfs                        896M   18M  878M   2% /run
tmpfs                        896M     0  896M   0% /sys/fs/cgroup
/dev/mapper/cl_server8-root   36G  8.4G   27G  24% /
vmhgfs-fuse                  344G  105G  239G  31% /mnt/hgfs
/dev/sda1                    947M  239M  708M  26% /boot
tmpfs                        180M  1.2M  178M   1% /run/user/42
tmpfs                        180M  4.6M  175M   3% /run/user/1000
/dev/sr0                     8.7G  8.7G     0 100% /run/media/zsc/CentOS-8-3-2011-x86_64-dvd
这篇关于vmware虚拟机centos中/dev/cl_server8/root 空间不够的文章就介绍到这儿,希望我们推荐的文章对编程师们有所帮助!


