本文主要是介绍实例:NX二次开发抽取平面以及标准柱面中心线,希望对大家解决编程问题提供一定的参考价值,需要的开发者们随着小编来一起学习吧!
一、概述
最近体验许多外挂,包括胡波外挂、星空外挂及模圣等都有抽取面的中心线,由于刚刚学习,我尝试看看能不能做出来,本博客代码没有封装函数,代码有待改进,但基本可以实现相应的功能。
二、案例实现的功能
1、可以抽取平面的中心线,主要利用面上的UV线;
2、可以抽取柱面的中心线,这里方法有很多我的思路是识别柱面上的两个圆弧,获得两段圆弧的中心坐标,然后连线。
3、适用范围:目前有三类

图1 平面类型
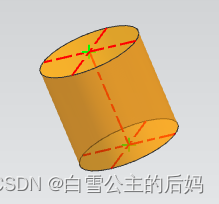
图2 圆柱面类型

图3 标准圆弧类型
非标准圆弧类型目前只想到用抽取虚拟曲线来实现,下一篇博客写
三、代码说明以及详细注解
//NXOpen_CreateFaceCentreLine// Mandatory UF Includes
#include <uf.h>
#include <uf_object_types.h>// Internal Includes
#include <NXOpen/ListingWindow.hxx>
#include <NXOpen/NXMessageBox.hxx>
#include <NXOpen/UI.hxx>// Internal+External Includes
#include <NXOpen/Annotations.hxx>
#include <NXOpen/Assemblies_Component.hxx>
#include <NXOpen/Assemblies_ComponentAssembly.hxx>
#include <NXOpen/Body.hxx>
#include <NXOpen/BodyCollection.hxx>
#include <NXOpen/Face.hxx>
#include <NXOpen/Line.hxx>
#include <NXOpen/NXException.hxx>
#include <NXOpen/NXObject.hxx>
#include <NXOpen/Part.hxx>
#include <NXOpen/PartCollection.hxx>
#include <NXOpen/Session.hxx>// Std C++ Includes
#include <iostream>
#include <sstream>//用户定义
#include "uf_all.h"
#include <vector>
using namespace NXOpen;
using std::string;
using std::exception;
using std::stringstream;
using std::endl;
using std::cout;
using std::cerr;static  int   init_proc(UF_UI_selection_p_t select, void *user_data)
{int  errorCode = 0;int  num_triples = 1; //选择类型 数量UF_UI_mask_t mask_triples[1] = { { UF_face_type , 0,0 }    //定义选择面类型};errorCode = UF_UI_set_sel_mask(select,UF_UI_SEL_MASK_CLEAR_AND_ENABLE_SPECIFIC,num_triples,mask_triples);if (errorCode == 0){return UF_UI_SEL_SUCCESS;}else{return UF_UI_SEL_FAILURE;}
}
//------------------------------------------------------------------------------
// NXOpen c++ test class
//------------------------------------------------------------------------------
class MyClass
{// class members
public:static Session *theSession;static UI *theUI;MyClass();~MyClass();void do_it();void print(const NXString &);void print(const string &);void print(const char*);private:BasePart *workPart, *displayPart;NXMessageBox *mb;ListingWindow *lw;LogFile *lf;
};//------------------------------------------------------------------------------
// Initialize static variables
//------------------------------------------------------------------------------
Session *(MyClass::theSession) = NULL;
UI *(MyClass::theUI) = NULL;//------------------------------------------------------------------------------
// Constructor
//------------------------------------------------------------------------------
MyClass::MyClass()
{// Initialize the NX Open C++ API environmentMyClass::theSession = NXOpen::Session::GetSession();MyClass::theUI = UI::GetUI();mb = theUI->NXMessageBox();lw = theSession->ListingWindow();lf = theSession->LogFile();workPart = theSession->Parts()->BaseWork();displayPart = theSession->Parts()->BaseDisplay();}//------------------------------------------------------------------------------
// Destructor
//------------------------------------------------------------------------------
MyClass::~MyClass()
{
}//------------------------------------------------------------------------------
// Print string to listing window or stdout
//------------------------------------------------------------------------------
void MyClass::print(const NXString &msg)
{if(! lw->IsOpen() ) lw->Open();lw->WriteLine(msg);
}
void MyClass::print(const string &msg)
{if(! lw->IsOpen() ) lw->Open();lw->WriteLine(msg);
}
void MyClass::print(const char * msg)
{if(! lw->IsOpen() ) lw->Open();lw->WriteLine(msg);
}//------------------------------------------------------------------------------
// Do something
//------------------------------------------------------------------------------
void MyClass::do_it()
{// TODO: add your code hereL10:// TODO: add your code hereint response = 0;tag_t object = NULL_TAG;double cursor[3];tag_t view = NULL_TAG;UF_UI_select_with_single_dialog("提示:请选择面", "选择面", UF_UI_SEL_SCOPE_WORK_PART, init_proc, NULL, &response, &object, cursor, &view);if (response == UF_UI_OK || response == UF_UI_OBJECT_SELECTED || response == UF_UI_OBJECT_SELECTED_BY_NAME){UF_DISP_set_highlight(object, 0);//判断面的类型int faceType = 0;UF_MODL_ask_face_type(object, &faceType);if (faceType == UF_MODL_CYLINDRICAL_FACE){//面找边uf_list_p_t list;tag_t edge1Tag = NULL_TAG;tag_t edge1Tag2 = NULL_TAG;UF_CURVE_line_t line1;tag_t line1TAG = NULL_TAG;int count = 0;UF_MODL_ask_face_edges(object, &list);//得到面的边UF_MODL_ask_list_count(list, &count);//查询链表数量std::vector<tag_t> edgeTAG;for (int j = 0; j < count; j++){UF_MODL_ask_list_item(list, j, &edge1Tag);//得到边的tag//判断边的类型int edge_type;UF_MODL_ask_edge_type(edge1Tag, &edge_type);if (edge_type == UF_MODL_CIRCULAR_EDGE){/*****************************************UF_MODL_LINEAR_EDGE					线性边UF_MODL_CIRCULAR_EDGE				圆形边UF_MODL_ELLIPTICAL_EDGE				椭圆形边		UF_MODL_INTERSECTION_EDGE			相交边UF_MODL_SPLINE_EDGE					样条边UF_MODL_SP_CURVE_EDGE				曲线边UF_MODL_FOREIGN_EDGE				外边缘UF_MODL_CONST_PARAMETER_EDGE		参数边UF_MODL_TRIMMED_CURVE_EDGE			裁剪曲线边******************************************/edgeTAG.push_back(edge1Tag);}			if (edgeTAG.size() == 2){//UF_CURVE_ask_centroid(edgeTAG[0], centroid1);//得到第一条边的中心坐标//UF_CURVE_ask_centroid(edgeTAG[1], centroid2);//得到第二条边的中心坐标UF_CURVE_arc_t arc_coords1, arc_coords2;UF_CURVE_ask_arc_data(edgeTAG[0], &arc_coords1);UF_CURVE_ask_arc_data(edgeTAG[1], &arc_coords2);double douMatrixValue1[9];UF_CSYS_ask_matrix_values(arc_coords1.matrix_tag, douMatrixValue1);double douPoint1[3];UF_MTX3_vec_multiply_t(arc_coords1.arc_center, douMatrixValue1, douPoint1);double douMatrixValue2[9];UF_CSYS_ask_matrix_values(arc_coords2.matrix_tag, douMatrixValue2);double douPoint2[3];UF_MTX3_vec_multiply_t(arc_coords2.arc_center, douMatrixValue2, douPoint2);//画直线line1.start_point[0] = douPoint1[0];line1.start_point[1] = douPoint1[1];line1.start_point[2] = douPoint1[2];line1.end_point[0] = douPoint2[0];line1.end_point[1] = douPoint2[1];line1.end_point[2] = douPoint2[2];UF_CURVE_create_line(&line1, &line1TAG);UF_OBJ_set_color(line1TAG, 186);UF_OBJ_set_font(line1TAG, UF_OBJ_FONT_CENTERLINE);//移动放置图层UF_OBJ_set_layer(line1TAG, 5);					}}UF_free(list);goto L10;}else if (faceType == UF_MODL_PLANAR_FACE){double uv_min_max1[4];UF_MODL_ask_face_uv_minmax(object, uv_min_max1);double parameter1 = (uv_min_max1[0] + uv_min_max1[1]) / 2;double parameter2 = (uv_min_max1[2] + uv_min_max1[3]) / 2;tag_t * isocurve_id1, *isocurve_id2;int isocurve_cnt1 = 0;int isocurve_cnt2 = 0;UF_MODL_create_isocurve(object, 1, parameter1, 0.01, &isocurve_id1, &isocurve_cnt1);UF_MODL_create_isocurve(object, 2, parameter2, 0.01, &isocurve_id2, &isocurve_cnt2);UF_OBJ_set_color(isocurve_id1[0], 186);UF_OBJ_set_color(isocurve_id2[0], 186);UF_OBJ_set_font(isocurve_id1[0], UF_OBJ_FONT_CENTERLINE);UF_OBJ_set_font(isocurve_id2[0], UF_OBJ_FONT_CENTERLINE);//移动放置图层UF_OBJ_set_layer(isocurve_id1[0], 5);UF_OBJ_set_layer(isocurve_id2[0], 5);UF_free(isocurve_id1);UF_free(isocurve_id2);double param[2] = { 0 };param[0] = parameter1;param[1] = parameter2;double point[3] = { 0 };double u1[3] = { 0 };double v1[3] = { 0 };double u2[3] = { 0 };double v2[3] = { 0 };double unit_norm[3] = { 0 };double radii[2] = { 0 };UF_MODL_ask_face_props(object, param, point, u1, v1, u2, v2, unit_norm, radii);tag_t facePoint;UF_CURVE_create_point(point, &facePoint);goto L10;}else{uc1601("请正确选择面!", 1);goto L10;}}
}//------------------------------------------------------------------------------
// Entry point(s) for unmanaged internal NXOpen C/C++ programs
//------------------------------------------------------------------------------
//  Explicit Execution
extern "C" DllExport void ufusr( char *parm, int *returnCode, int rlen )
{UF_initialize();try{// Create NXOpen C++ class instanceMyClass *theMyClass;theMyClass = new MyClass();theMyClass->do_it();delete theMyClass;}catch (const NXException& e1){UI::GetUI()->NXMessageBox()->Show("NXException", NXOpen::NXMessageBox::DialogTypeError, e1.Message());}catch (const exception& e2){UI::GetUI()->NXMessageBox()->Show("Exception", NXOpen::NXMessageBox::DialogTypeError, e2.what());}catch (...){UI::GetUI()->NXMessageBox()->Show("Exception", NXOpen::NXMessageBox::DialogTypeError, "Unknown Exception.");}UF_terminate();
}//------------------------------------------------------------------------------
// Unload Handler
//------------------------------------------------------------------------------
extern "C" DllExport int ufusr_ask_unload()
{return (int)NXOpen::Session::LibraryUnloadOptionImmediately;
}
这篇关于实例:NX二次开发抽取平面以及标准柱面中心线的文章就介绍到这儿,希望我们推荐的文章对编程师们有所帮助!


