本文主要是介绍Unity之PUN2插件实现多人联机射击游戏,希望对大家解决编程问题提供一定的参考价值,需要的开发者们随着小编来一起学习吧!
目录
📖一、准备工作
📺二、UI界面处理
📱2.1 登录UI并连接PUN2服务器
📱2.2 游戏大厅界面UI
📱2.3 创建房间UI
📱2.4 进入房间UI
📱2.5 玩家准备状态
📱2.6 加载战斗场景
📱2.7 死亡UI界面和复活按钮
🎮三、角色控制器
💣3.1 生成角色
💣3.2 角色控制和战斗系统
💣3.3 枪的脚本
⚒️四、项目打包导出
周五的下午永远要比周六幸福,周五好啊大家有在认真摸鱼吗。前两天我突发奇想想做联机游戏,就去找教程,肝了一天终于做出来了。
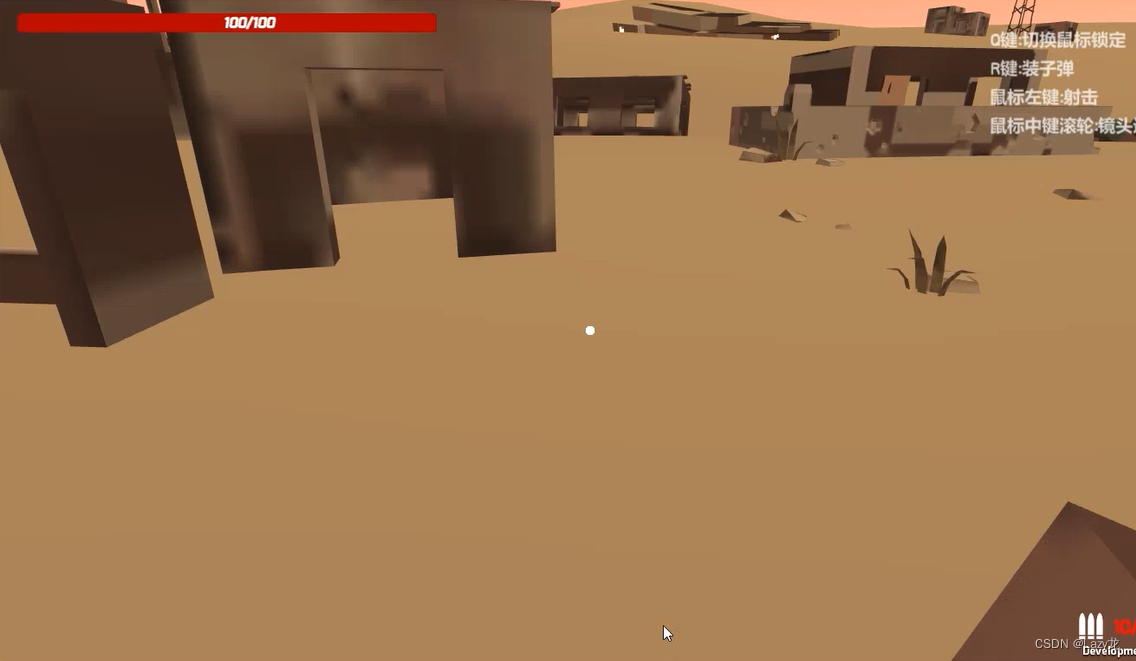
做的这个实例是通过PUN2实现的,看一下效果:

先说一下搜寻资料过程中找到的实现游戏联机的方式:暂时就记录了这11个。
- Unity自带的UNET(Unity Networking)
- PUN(Photon Unity Networking)
- Mirror:Mirror是UNET的现代替代品
- 自定义网络解决方案
- Socket编程:系统级的API,通过调用这些API就可以实现网络通讯
- WebSocket:是一种在单个TCP连接上进行双工通信的协议,可用于实现多人联机游戏的数据传输和实时通信。
- MirrorLite:MirrorLite是Mirror的轻量级版本
- 树莓派及LAN连接
- UnityMultiplayer
- 自建基于TCP/IP的服务器
- WebRTC
个人感觉这套模型和这个教程泰裤辣,能跟着做完这个游戏Demo也是很开心的,下面依然以博客的形式记录实现这个游戏的过程。
一、准备工作
首先新建一个U3D项目导入素材包。
https://download.csdn.net/download/qq_48512649/88858525![]() https://download.csdn.net/download/qq_48512649/88858525去Unity官方资源商店下载PUN2插件导入到项目中
https://download.csdn.net/download/qq_48512649/88858525去Unity官方资源商店下载PUN2插件导入到项目中

要去PUN2官网申请PUN2账号获取AppID,获取AppID教程参考下面这篇文章:不同的是Photon Type要改为PUN
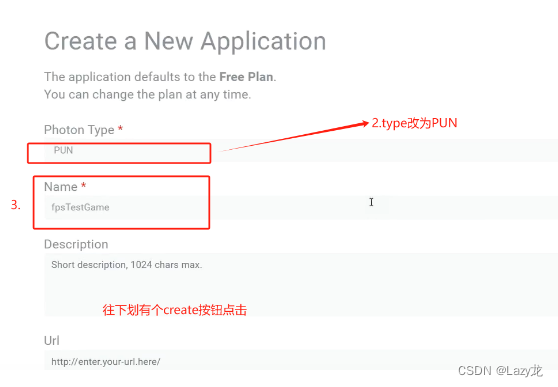
PUN-注册账号以及创建应用(1)_photon 注册不了-CSDN博客文章浏览阅读898次。PUN注册账号及创建应用_photon 注册不了https://blog.csdn.net/weixin_38484443/article/details/125629797
photon pun2 设置中国区_photon中国区-CSDN博客文章浏览阅读1.9k次,点赞2次,收藏14次。pun2 中国区设置_photon中国区https://blog.csdn.net/qq_37350725/article/details/124657623?ops_request_misc=%257B%2522request%255Fid%2522%253A%2522170865675116800225534042%2522%252C%2522scm%2522%253A%252220140713.130102334..%2522%257D&request_id=170865675116800225534042&biz_id=0&utm_medium=distribute.pc_search_result.none-task-blog-2~all~baidu_landing_v2~default-1-124657623-null-null.142%5Ev99%5Epc_search_result_base3&utm_term=PUN2%E8%AE%BE%E7%BD%AE%E6%88%90%E4%B8%AD%E5%9B%BD%E5%8C%BA&spm=1018.2226.3001.4187 哎,小编的国区申请还没回应,目前我只测试了在局域网内的联机。
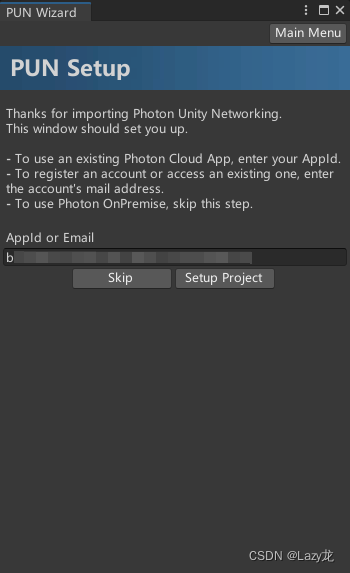
生成AppID后把它复制到插件中去

粘贴生成好的AppID:
二、UI界面处理
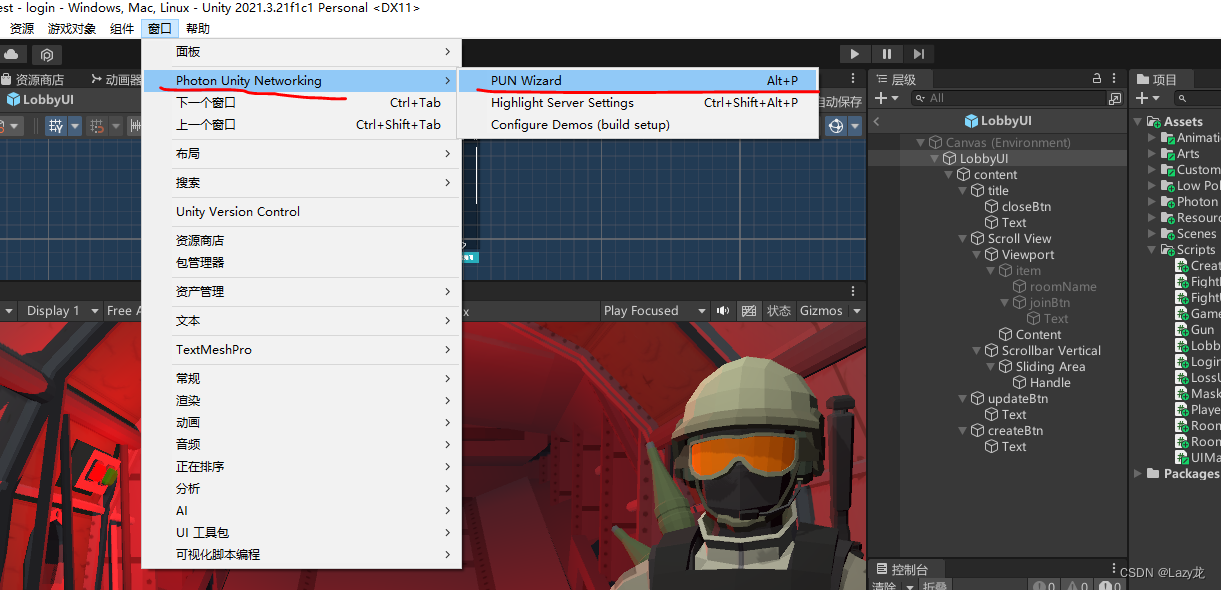
2.1 登录UI并连接PUN2服务器
玩家登录场景是login,战斗场景是game

双击登录场景,编写Game脚本挂载到Game上

using System.Collections;
using System.Collections.Generic;
using UnityEngine;
using Photon.Pun;public class Game : MonoBehaviour
{public static UIManager uiManager;public static bool isLoaded = false;private void Awake(){if (isLoaded == true){Destroy(gameObject);}else{isLoaded = true;DontDestroyOnLoad(gameObject);   //跳转场景当前游戏物体不删除uiManager = new UIManager();uiManager.Init();//设置发送  接收消息频率 降低延迟PhotonNetwork.SendRate = 50;PhotonNetwork.SerializationRate = 50;}}// Start is called before the first frame updatevoid Start(){//显示登录界面uiManager.ShowUI<LoginUI>("LoginUI");}// Update is called once per framevoid Update(){}
}LoginUI脚本,对开始游戏和退出游戏按键的处理
using System.Collections;
using System.Collections.Generic;
using UnityEngine;
using UnityEngine.UI;
using Photon.Pun;
using Photon.Realtime;//登录界面
public class LoginUI : MonoBehaviour,IConnectionCallbacks
{// Start is called before the first frame updatevoid Start(){transform.Find("startBtn").GetComponent<Button>().onClick.AddListener(onStartBtn);transform.Find("quitBtn").GetComponent<Button>().onClick.AddListener(onQuitBtn);}private void OnEnable(){PhotonNetwork.AddCallbackTarget(this);  //注册pun2事件}private void OnDisable(){PhotonNetwork.RemoveCallbackTarget(this);  //注销pun2事件}public void onStartBtn(){Game.uiManager.ShowUI<MaskUI>("MaskUI").ShowMsg("正在连接服务器...");//连接pun2服务器PhotonNetwork.ConnectUsingSettings();   //成功后会执行OnConnectedToMaster函数}public void onQuitBtn(){Application.Quit();}public void OnConnected(){}//连接成功后执行的函数public void OnConnectedToMaster(){//关闭所有界面Game.uiManager.CloseAllUI();Debug.Log("连接成功");//显示大厅界面Game.uiManager.ShowUI<LobbyUI>("LobbyUI");}//断开服务器执行的函数public void OnDisconnected(DisconnectCause cause){Game.uiManager.CloseUI("MaskUI");}public void OnRegionListReceived(RegionHandler regionHandler){}public void OnCustomAuthenticationResponse(Dictionary<string, object> data){}public void OnCustomAuthenticationFailed(string debugMessage){}}
MaskUI脚本提供遮罩界面文字显示的公共调用方法
 using System.Collections;
using System.Collections.Generic;
using UnityEngine;using UnityEngine.UI;//遮罩界面
public class MaskUI : MonoBehaviour
{// Start is called before the first frame updatevoid Start(){}public void ShowMsg(string msg){transform.Find("msg/bg/Text").GetComponent<Text>().text = msg;}
}
连接服务器成功可以看到控制台打印并输出
2.2 游戏大厅界面UI
编写脚本 LobbyUI 处理游戏大厅界面

 using System.Collections;
using System.Collections.Generic;
using UnityEngine;
using Photon.Pun;
using Photon.Realtime;using UnityEngine.UI;//大厅界面
public class LobbyUI : MonoBehaviourPunCallbacks
{private TypedLobby lobby;  //大厅对象private Transform contentTf;private GameObject roomPrefab;void Start(){//关闭按钮transform.Find("content/title/closeBtn").GetComponent<Button>().onClick.AddListener(onCloseBtn);//创建房间按钮transform.Find("content/createBtn").GetComponent<Button>().onClick.AddListener(onCreateRoomBtn);//刷新按钮transform.Find("content/updateBtn").GetComponent<Button>().onClick.AddListener(onUpdateRoomBtn);contentTf = transform.Find("content/Scroll View/Viewport/Content");roomPrefab = transform.Find("content/Scroll View/Viewport/item").gameObject;lobby = new TypedLobby("fpsLobby", LobbyType.SqlLobby); //1.大厅名字  2.大厅类型(可搜索)//进入大厅PhotonNetwork.JoinLobby(lobby);}//进入大厅回调public override void OnJoinedLobby(){ Debug.Log("进入大厅...");}//创建房间public void onCreateRoomBtn(){Game.uiManager.ShowUI<CreateRoomUI>("CreateRoomUI");}//关闭大厅界面public void onCloseBtn(){//断开连接PhotonNetwork.Disconnect();Game.uiManager.CloseUI(gameObject.name);//显示登录界面Game.uiManager.ShowUI<LoginUI>("LoginUI");}//刷新房间列表public void onUpdateRoomBtn(){Game.uiManager.ShowUI<MaskUI>("MaskUI").ShowMsg("刷新中...");PhotonNetwork.GetCustomRoomList(lobby, "1");   //执行该方法后会触发OnRoomListUpdate回调}//清除已经存在的房间物体private void ClearRoomList(){while (contentTf.childCount != 0){DestroyImmediate(contentTf.GetChild(0).gameObject);}}//刷新房间后的回调public override void OnRoomListUpdate(List<RoomInfo> roomList){Game.uiManager.CloseUI("MaskUI");Debug.Log("房间刷新");ClearRoomList();for (int i = 0; i < roomList.Count; i++){GameObject obj = Instantiate(roomPrefab, contentTf);obj.SetActive(true);string roomName = roomList[i].Name;  //房间名称obj.transform.Find("roomName").GetComponent<Text>().text = roomName;obj.transform.Find("joinBtn").GetComponent<Button>().onClick.AddListener(delegate(){Debug.Log(roomName);//加入房间Game.uiManager.ShowUI<MaskUI>("MaskUI").ShowMsg("加入中...");PhotonNetwork.JoinRoom(roomName); //加入房间});}}public override void OnJoinedRoom(){//加入房间回调Game.uiManager.CloseAllUI();Game.uiManager.ShowUI<RoomUI>("RoomUI");}public override void OnJoinRoomFailed(short returnCode, string message){//加入房间失败Game.uiManager.CloseUI("MaskUI");}
}
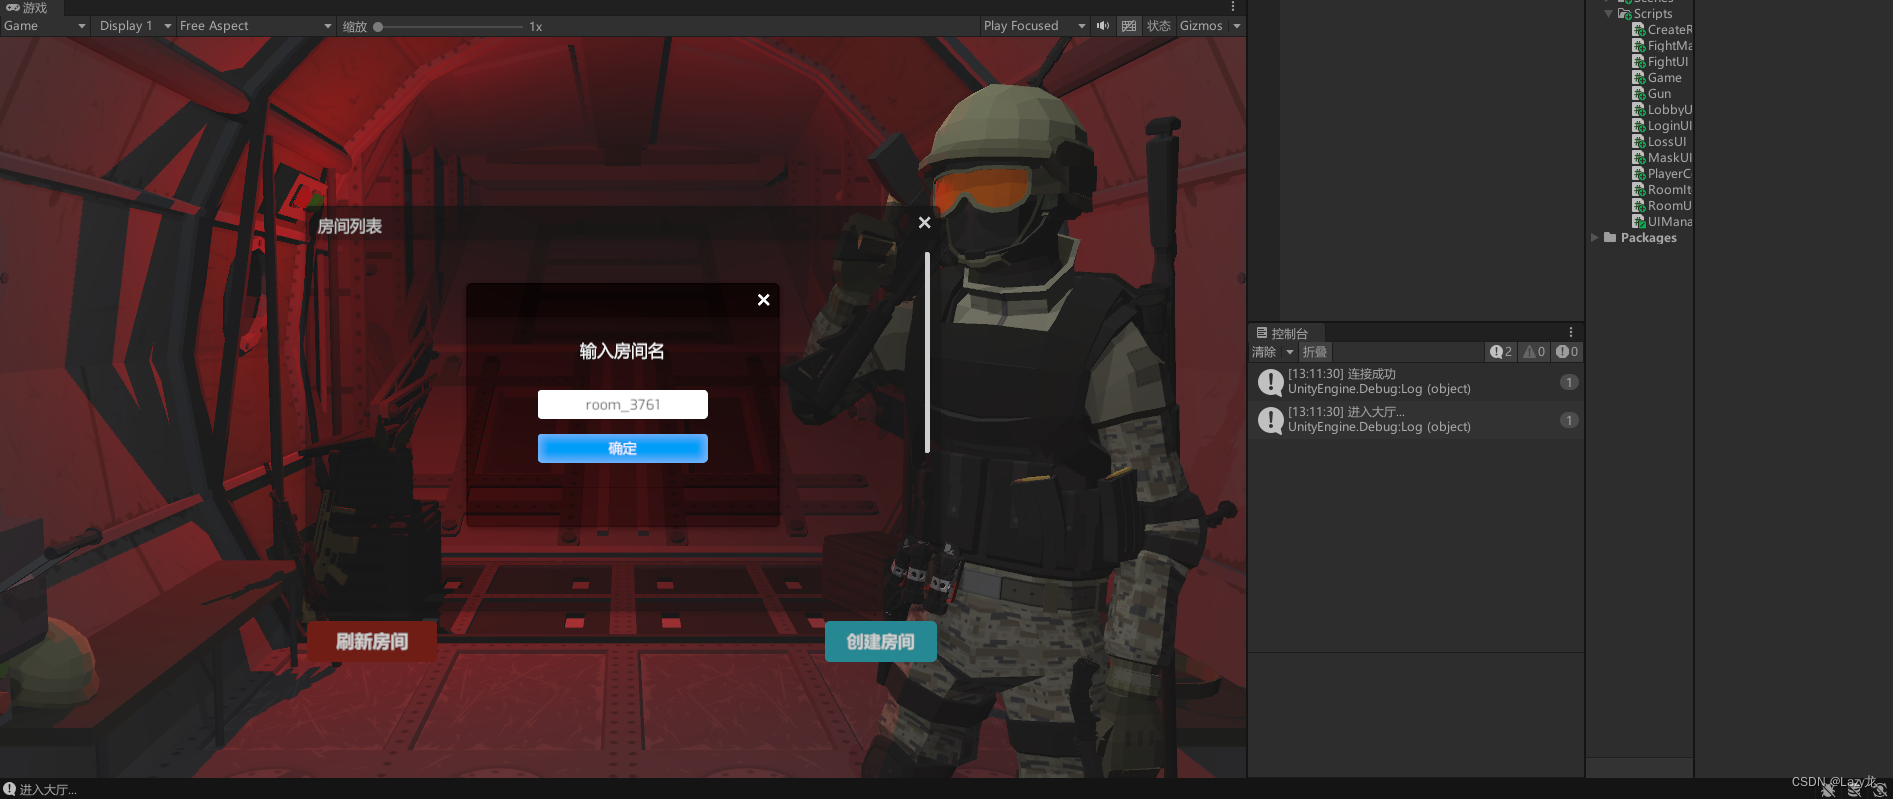
2.3 创建房间UI
创建房间脚本 CreateRoomUI
using System.Collections;
using System.Collections.Generic;
using UnityEngine;
using Photon.Pun;
using Photon.Realtime;
using UnityEngine.UI;public class CreateRoomUI : MonoBehaviourPunCallbacks
{private InputField roomNameInput;  //房间名称void Start(){transform.Find("bg/title/closeBtn").GetComponent<Button>().onClick.AddListener(onCloseBtn);transform.Find("bg/okBtn").GetComponent<Button>().onClick.AddListener(onCreateBtn);roomNameInput = transform.Find("bg/InputField").GetComponent<InputField>();//随机一个房间名称roomNameInput.text = "room_" + Random.Range(1, 9999); }//创建房间public void onCreateBtn(){Game.uiManager.ShowUI<MaskUI>("MaskUI").ShowMsg("创建中...");RoomOptions room = new RoomOptions();room.MaxPlayers = 8;  //房间最大玩家数PhotonNetwork.CreateRoom(roomNameInput.text, room);  //1.房间名称 2.房间的对象参数}//关闭按钮public void onCloseBtn(){Game.uiManager.CloseUI(gameObject.name);}//创建成功后回调public override void OnCreatedRoom(){Debug.Log("创建成功");Game.uiManager.CloseAllUI();//显示房间UIGame.uiManager.ShowUI<RoomUI>("RoomUI");}//创建失败public override void OnCreateRoomFailed(short returnCode, string message){Game.uiManager.CloseUI("MaskUI");}
}
2.4 进入房间UI
创建房间完成后会进入到房间里 编写RoomUI脚本

using System.Collections;
using System.Collections.Generic;
using UnityEngine;
using Photon.Pun;
using Photon.Realtime;
using UnityEngine.UI;public class RoomUI : MonoBehaviour,IInRoomCallbacks
{Transform startTf; Transform contentTf;GameObject roomPrefab;public List<RoomItem> roomList;private void Awake(){roomList = new List<RoomItem>();contentTf = transform.Find("bg/Content");roomPrefab = transform.Find("bg/roomItem").gameObject;transform.Find("bg/title/closeBtn").GetComponent<Button>().onClick.AddListener(onCloseBtn);startTf = transform.Find("bg/startBtn");startTf.GetComponent<Button>().onClick.AddListener(onStartBtn);PhotonNetwork.AutomaticallySyncScene = true; //执行PhotonNetwork.LoadLevel加载场景的时候 其他玩家也跳转相同的场景}void Start(){//生成房间里的玩家项for (int i = 0; i < PhotonNetwork.PlayerList.Length; i++){Player p = PhotonNetwork.PlayerList[i];CreateRoomItem(p);}}private void OnEnable(){PhotonNetwork.AddCallbackTarget(this);}private void OnDisable(){PhotonNetwork.RemoveCallbackTarget(this);}//生成玩家public void CreateRoomItem(Player p){GameObject obj = Instantiate(roomPrefab, contentTf);obj.SetActive(true);RoomItem item = obj.AddComponent<RoomItem>();item.owerId = p.ActorNumber;  //玩家编号roomList.Add(item);object val;if (p.CustomProperties.TryGetValue("IsReady", out val)){item.IsReady = (bool)val;}}//删除离开房间的玩家public void DeleteRoomItem(Player p){RoomItem item = roomList.Find((RoomItem _item) => { return p.ActorNumber == _item.owerId; });if (item != null){Destroy(item.gameObject);roomList.Remove(item);}}//关闭void onCloseBtn(){//断开连接PhotonNetwork.Disconnect();Game.uiManager.CloseUI(gameObject.name);Game.uiManager.ShowUI<LoginUI>("LoginUI");}//开始游戏void onStartBtn(){//加载场景 让房间里的玩家也加载场景PhotonNetwork.LoadLevel("game");}//新玩家进入房间public void OnPlayerEnteredRoom(Player newPlayer){CreateRoomItem(newPlayer);}//房间里的其他玩家离开房间public void OnPlayerLeftRoom(Player otherPlayer){DeleteRoomItem(otherPlayer);}public void OnRoomPropertiesUpdate(ExitGames.Client.Photon.Hashtable propertiesThatChanged){}//玩家自定义参数更新回调public void OnPlayerPropertiesUpdate(Player targetPlayer, ExitGames.Client.Photon.Hashtable changedProps){RoomItem item = roomList.Find((_item) => { return _item.owerId == targetPlayer.ActorNumber; });if (item != null){item.IsReady = (bool)changedProps["IsReady"];item.ChangeReady(item.IsReady);}//如果是主机玩家判断所有玩家的准备状态if (PhotonNetwork.IsMasterClient){bool isAllReady = true;for (int i = 0; i < roomList.Count; i++){if (roomList[i].IsReady == false){isAllReady = false;break;}}startTf.gameObject.SetActive(isAllReady); //开始按钮是否显示}}public void OnMasterClientSwitched(Player newMasterClient){}
}
2.5 玩家准备状态
玩家进入房间后会显示信息和准备状况,编写RoomItem脚本实现。只有房间内所有玩家都处于准备状态房主才能开始游戏。

using System.Collections;
using System.Collections.Generic;
using UnityEngine;
using Photon.Pun;
using Photon.Realtime;
using UnityEngine.UI;public class RoomItem : MonoBehaviour
{public int owerId;  //玩家编号public bool IsReady = false; //是否准备void Start(){if (owerId == PhotonNetwork.LocalPlayer.ActorNumber){transform.Find("Button").GetComponent<Button>().onClick.AddListener(OnReadyBtn);}else{transform.Find("Button").GetComponent<Image>().color = Color.black;}ChangeReady(IsReady);}public void OnReadyBtn(){IsReady = !IsReady;ExitGames.Client.Photon.Hashtable table = new ExitGames.Client.Photon.Hashtable();table.Add("IsReady", IsReady);PhotonNetwork.LocalPlayer.SetCustomProperties(table); //设置自定义参数ChangeReady(IsReady);}public void ChangeReady(bool isReady){transform.Find("Button/Text").GetComponent<Text>().text = isReady == true ? "已准备" : "未准备";}
}
2.6 加载战斗场景
双击切换到战斗场景game中,编写FightManager脚本挂载到fight上

using System.Collections;
using System.Collections.Generic;
using UnityEngine;
using Photon.Pun;public class FightManager : MonoBehaviour
{private void Awake(){//隐藏鼠标Cursor.lockState = CursorLockMode.Locked;Cursor.visible = false;//关闭所有界面Game.uiManager.CloseAllUI();//显示战斗界面Game.uiManager.ShowUI<FightUI>("FightUI");Transform pointTf = GameObject.Find("Point").transform;Vector3 pos = pointTf.GetChild(Random.Range(0, pointTf.childCount)).position;//实例化角色PhotonNetwork.Instantiate("Player", pos, Quaternion.identity);  //实例化的资源要放在Resources文件夹}
}编写战斗场景UI界面处理脚本FightUI
using System.Collections;
using System.Collections.Generic;
using UnityEngine;
using UnityEngine.UI;public class FightUI : MonoBehaviour
{private Image bloodImg;void Start(){bloodImg = transform.Find("blood").GetComponent<Image>();}//更新子弹个数显示public void UpdateBulletCount(int count){transform.Find("bullet/Text").GetComponent<Text>().text = count.ToString();}//更新血量public void UpdateHp(float cur, float max){transform.Find("hp/fill").GetComponent<Image>().fillAmount = cur / max;transform.Find("hp/Text").GetComponent<Text>().text = cur + "/" + max;}public void UpdateBlood(){StopAllCoroutines();StartCoroutine(UpdateBloodCo());}public IEnumerator UpdateBloodCo(){bloodImg.color = Color.white;Color color = bloodImg.color;float t = 0.35f;while (t >= 0){t -= Time.deltaTime;color.a = Mathf.Abs(Mathf.Sin(Time.realtimeSinceStartup));bloodImg.color = color;yield return null;}color.a = 0;bloodImg.color = color;}
}
2.7 死亡UI界面和复活按钮
编写脚本 LossUI

using System.Collections;
using System.Collections.Generic;
using UnityEngine;
using UnityEngine.UI;public class LossUI : MonoBehaviour
{public System.Action onClickCallBack;// Start is called before the first frame updatevoid Start(){transform.Find("resetBtn").GetComponent<Button>().onClick.AddListener(OnClickBtn);}public void OnClickBtn(){if (onClickCallBack != null){onClickCallBack();}Game.uiManager.CloseUI(gameObject.name);}
}
三、角色控制器
3.1 生成角色
给角色Player挂载Photon View组件,实例化生成玩家的代码我们已经在FightManager脚本中实现了。

3.2 角色控制和战斗系统
编写角色控制脚本PlayerController挂载到角色上,战斗系统的逻辑也在这个脚本里,其中的参数数值可以参考下图:

using System.Collections;
using System.Collections.Generic;
using UnityEngine;
using Photon.Pun;
using Photon.Realtime;//角色控制器
public class PlayerController : MonoBehaviourPun,IPunObservable
{//组件public Animator ani;public Rigidbody body;public Transform camTf;  //跟随的相机//数值public int CurHp = 10;public int MaxHp = 10;public float MoveSpeed = 5f;public float H; //水平值public float V; //垂直值public Vector3 dir; //移动方向public Vector3 offset; //摄像机与角色之间的偏移值public float Mouse_X; //鼠标偏移值public float Mouse_Y;public float scroll; //鼠标滚轮值public float Angle_X; //x轴的旋转角度public float Angle_Y; //y轴的旋转角度public Quaternion camRotation; //摄像机旋转的四元数public Gun gun; //枪的脚本//声音public AudioClip reloadClip;public AudioClip shootClip;public bool isDie = false;public Vector3 currentPos;public Quaternion currentRotation;void Start(){Angle_X = transform.eulerAngles.x;Angle_Y = transform.eulerAngles.y;ani = GetComponent<Animator>();body = GetComponent<Rigidbody>();gun = GetComponentInChildren<Gun>();camTf = Camera.main.transform;currentPos = transform.position;currentRotation = transform.rotation;if (photonView.IsMine){Game.uiManager.GetUI<FightUI>("FightUI").UpdateHp(CurHp, MaxHp);}}void Update(){//判断是否是本机玩家  只能操作本机角色if (photonView.IsMine){if (isDie == true){return;}UpdatePosition();UpdateRotation();InputCtl();}else{UpdateLogic();}}//其他角色更新发送过来的数据(位置 旋转)public void UpdateLogic(){transform.position = Vector3.Lerp(transform.position, currentPos, Time.deltaTime * MoveSpeed * 10);transform.rotation = Quaternion.Slerp(transform.rotation, currentRotation, Time.deltaTime * 500);}private void LateUpdate(){ani.SetFloat("Horizontal", H);ani.SetFloat("Vertical", V);ani.SetBool("isDie", isDie);}//更新位置public void UpdatePosition(){H = Input.GetAxisRaw("Horizontal");V = Input.GetAxisRaw("Vertical");dir = camTf.forward * V + camTf.right * H;body.MovePosition(transform.position + dir * Time.deltaTime * MoveSpeed);}//更新旋转(同时设置摄像机的位置的旋转值)public void UpdateRotation(){Mouse_X = Input.GetAxisRaw("Mouse X");Mouse_Y = Input.GetAxisRaw("Mouse Y");scroll = Input.GetAxis("Mouse ScrollWheel");Angle_X = Angle_X - Mouse_Y;Angle_Y = Angle_Y + Mouse_X;Angle_X = ClampAngle(Angle_X, -60, 60);Angle_Y = ClampAngle(Angle_Y, -360, 360);camRotation = Quaternion.Euler(Angle_X, Angle_Y, 0);camTf.rotation = camRotation;offset.z += scroll;camTf.position = transform.position + camTf.rotation * offset;transform.eulerAngles = new Vector3(0, camTf.eulerAngles.y, 0);}//角色操作public void InputCtl(){if (Input.GetMouseButtonDown(0)){//判断子弹个数if (gun.BulletCount > 0){//如果正在播放填充子弹的动作不能开枪if (ani.GetCurrentAnimatorStateInfo(1).IsName("Reload")){return;}gun.BulletCount--;Game.uiManager.GetUI<FightUI>("FightUI").UpdateBulletCount(gun.BulletCount);//播放开火动画ani.Play("Fire", 1, 0);StopAllCoroutines();StartCoroutine(AttackCo());}}if (Input.GetKeyDown(KeyCode.R)){//填充子弹AudioSource.PlayClipAtPoint(reloadClip, transform.position); //播放填充子弹的声音ani.Play("Reload");gun.BulletCount = 10;Game.uiManager.GetUI<FightUI>("FightUI").UpdateBulletCount(gun.BulletCount);}}//攻击协同程序IEnumerator AttackCo(){//延迟0.1秒才发射子弹yield return new WaitForSeconds(0.1f);//播放射击音效AudioSource.PlayClipAtPoint(shootClip, transform.position);//射线检测 鼠标中心点发送射线Ray ray = Camera.main.ScreenPointToRay(new Vector3(Screen.width * 0.5f, Screen.height * 0.5f,Input.mousePosition.z));//射线可以改成在枪口位置为起始点 发送,避免射线射到自身RaycastHit hit;if (Physics.Raycast(ray, out hit, 10000, LayerMask.GetMask("Player"))){Debug.Log("射到角色");hit.transform.GetComponent<PlayerController>().GetHit();}photonView.RPC("AttackRpc", RpcTarget.All);  //所有玩家执行 AttackRpc 函数}[PunRPC]public void AttackRpc(){gun.Attack();}//受伤public void GetHit(){if (isDie == true){return;}//同步所有角色受伤photonView.RPC("GetHitRPC", RpcTarget.All);}[PunRPC]public void GetHitRPC(){CurHp -= 1;  //扣一滴血if (CurHp <= 0){CurHp = 0;isDie = true;}if (photonView.IsMine){Game.uiManager.GetUI<FightUI>("FightUI").UpdateHp(CurHp, MaxHp);Game.uiManager.GetUI<FightUI>("FightUI").UpdateBlood();if (CurHp == 0){Invoke("gameOver", 3);  //3秒后显示失败界面       }}}private void gameOver(){//显示鼠标Cursor.visible = true;Cursor.lockState = CursorLockMode.None;//显示失败界面Game.uiManager.ShowUI<LossUI>("LossUI").onClickCallBack = OnReset;}//复活public void OnReset(){//隐藏鼠标Cursor.visible = false;Cursor.lockState = CursorLockMode.Locked;photonView.RPC("OnResetRPC", RpcTarget.All);}[PunRPC]public void OnResetRPC(){isDie = false;CurHp = MaxHp;if (photonView.IsMine){Game.uiManager.GetUI<FightUI>("FightUI").UpdateHp(CurHp, MaxHp);}}//限制角度在-360 到 360之间public float ClampAngle(float val, float min, float max){if (val > 360){val -= 360;}if (val < -360){val += 360;}return Mathf.Clamp(val, min, max);}private void OnAnimatorIK(int layerIndex){if (ani != null){Vector3 angle = ani.GetBoneTransform(HumanBodyBones.Chest).localEulerAngles;angle.x = Angle_X;ani.SetBoneLocalRotation(HumanBodyBones.Chest, Quaternion.Euler(angle));}}public void OnPhotonSerializeView(PhotonStream stream, PhotonMessageInfo info){if (stream.IsWriting){//发送数据stream.SendNext(H);stream.SendNext(V);stream.SendNext(Angle_X);stream.SendNext(transform.position);stream.SendNext(transform.rotation);}else{//接收数据H = (float)stream.ReceiveNext();V = (float)stream.ReceiveNext();Angle_X = (float)stream.ReceiveNext();currentPos = (Vector3)stream.ReceiveNext();currentRotation = (Quaternion)stream.ReceiveNext();}}
}
3.3 枪的脚本
编写枪的脚本Gun,挂载到Assault_Rifle_02上,并按下图把参数填充好

using System.Collections;
using System.Collections.Generic;
using UnityEngine;//枪的脚本
public class Gun : MonoBehaviour
{public int BulletCount = 10;public GameObject bulletPrefab;public GameObject casingPreafab;public Transform bulletTf;public Transform casingTf;void Start(){}public void Attack(){GameObject bulletObj = Instantiate(bulletPrefab);bulletObj.transform.position = bulletTf.transform.position;bulletObj.GetComponent<Rigidbody>().AddForce(transform.forward * 500, ForceMode.Impulse);  //子弹速度   让中心点跟枪口位置可自行调整摄像机的偏移值GameObject casingObj = Instantiate(casingPreafab);casingObj.transform.position = casingTf.transform.position;}
}
四、项目打包导出
- 文件 ——》 生成设置

- 点击生成选择文件夹打包
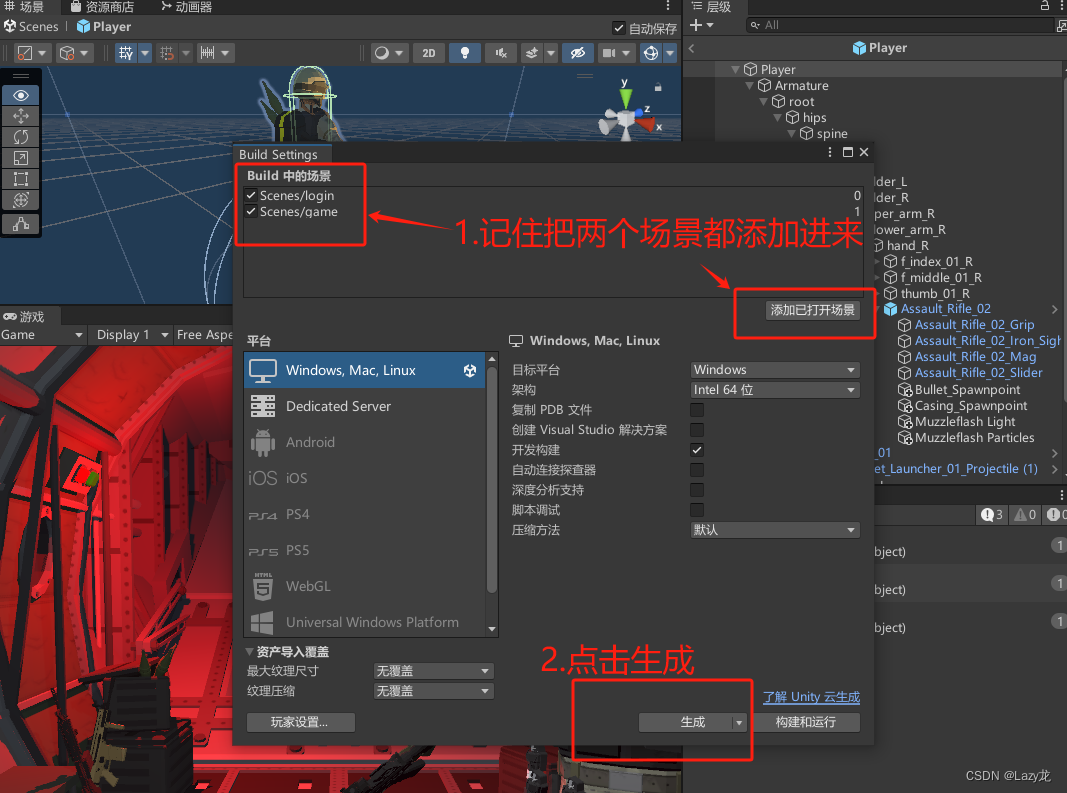
- 打包好后也可以发给自己的小伙伴,双击直接可以运行


这篇关于Unity之PUN2插件实现多人联机射击游戏的文章就介绍到这儿,希望我们推荐的文章对编程师们有所帮助!


