本文主要是介绍KubeKey一键部署:轻松安装Kubernetes与KubeSphere,希望对大家解决编程问题提供一定的参考价值,需要的开发者们随着小编来一起学习吧!
本文主要参考“在 Linux 上以 All-in-One 模式安装 KubeSphere”进行实践测试部署。
通过KubeKey工具实现Kubernetes(k8s)和KubeSphere的一键式安装,极大地简化了安装过程。用户无需手动预先安装Docker和Kubernetes,只需按照以下步骤操作:
- 关闭防火墙,确保安装环境的安全性。
- 关闭分区,确保系统的稳定性和兼容性。
- 安装依赖组件,为后续的KubeKey和Kubernetes安装做好准备。
- 下载KubeKey工具,这是实现一键安装的关键。
- 使用KubeKey的./kk命令创建Kubernetes和KubeSphere集群,整个安装过程将自动完成。
通过以上步骤,用户可以轻松完成Kubernetes和KubeSphere的安装,无需深入了解复杂的安装过程。
1. 准备资源
一台干净的服务器: Centos 7.6 系统,内核版本:3.10.0-1160.71.1.el7.x86_64。
| IP | host | 内存 | CPU |
| 10.8.3.246 | master | 8Gi | 6cores |
2. 准备网络
如果服务器已经可以上网,可忽略此步骤。
检查DNS:cat /etc/resolv.conf
若为空,则配置vi /etc/resolv.conf
插入内容:nameserver 61.139.2.69 (具体根据公司情况添加)
3. 环境准备
关闭防火墙、关闭分区、安装依赖组件。
[root@master home]#hostnamectl --static set-hostname master
[root@master home]#cat >> /etc/hosts << EOF
10.8.3.246 master
EOF
[root@master home]### 关闭防火墙或者开放必要的[防火墙端口](https://v3-0.docs.kubesphere.io/docs/installing-on-linux/introduction/port-firewall/)
[root@master home]#systemctl disable firewalld
[root@master home]#systemctl stop firewalld
[root@master home]#systemctl status firewalld
[root@master home]### 查看并关闭swap分区
[root@master home]#swapoff -a
[root@master home]#echo "vm.swappiness=0" >> /etc/sysctl.conf
[root@master home]#sysctl -p /etc/sysctl.conf
net.ipv6.conf.eth0.accept_dad = 0
net.ipv6.conf.eth0.accept_ra = 1
net.ipv6.conf.eth0.accept_ra_defrtr = 1
net.ipv6.conf.eth0.accept_ra_rtr_pref = 1
net.ipv6.conf.eth0.accept_ra_rt_info_max_plen = 1
vm.swappiness = 0
[root@master home]#sed -i 's$/dev/mapper/centos-swap$#/dev/mapper/centos-swap$g' /etc/fstab
[root@master home]#sed -i "s/^SELINUX=enforcing/SELINUX=disabled/g" /etc/sysconfig/selinux
[root@master home]#sed -i "s/^SELINUX=enforcing/SELINUX=disabled/g" /etc/selinux/config
[root@master home]#sed -i "s/^SELINUX=permissive/SELINUX=disabled/g" /etc/sysconfig/selinux
[root@master home]#sed -i "s/^SELINUX=permissive/SELINUX=disabled/g" /etc/selinux/config
[root@master home]#free -m
totalusedfreeshared  buff/cache   available
Mem:  32011 300 31168  16 542 31354
Swap:     0   0   0
[root@master home]### 查看Selinux状态
[root@master home]#getenforce
Disabled
[root@master home]### 安装依赖组件
[root@master home]#yum install -y ebtables socat ipset conntrack
Loaded plugins: fastestmirror
...........
Complete!
4. 使用kubekey一键安装
4.1. 下载kubekey
[root@master home]#yum install -y wget
Loaded plugins: fastestmirror
...........
Complete!
[root@master home]#export KKZONE=cn
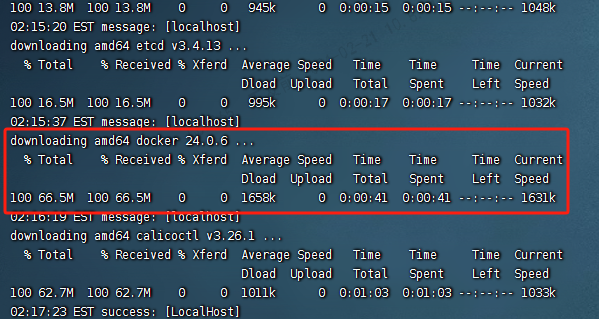
[root@master home]#curl -sfL https://get-kk.kubesphere.io | sh -
[root@master home]#chmod +x kk #如果无法下载?
#1.可以从https://github.com/kubesphere/kubekey/releases/tag/v3.0.13手动下载
#2.下载后解压:tar -zxvf kubekey-v3.0.13-linux-amd64.tar.gz
#3.授权chmod +x kk 4.2. 方法1:高级安装(使用配置文件创建的集群)
参考:https://github.com/kubesphere/kubekey/blob/master/README_zh-CN.md#%E9%AB%98%E7%BA%A7%E7%94%A8%E6%B3%95
4.2.1. 创建配置文件
[root@master home]# ./kk create config --with-kubesphere
##需要修改上一条命令在当前目录生成的配置文件:config-sample.yaml,详见下文!
💡 Tips:./kk create config 后面带上--with-kubesphere,否则在安装时,只会安装k8s,不会安装KubeSphere。
4.2.2. 修改配置文件
apiVersion: kubekey.kubesphere.io/v1alpha2
kind: Cluster
metadata:name: sample
spec:hosts:- {name: master, address:10.8.3.246,port: 444, internalAddress: 10.8.3.246, user: root, password: "服务器密码"}#- {name: node2, address: 172.16.0.3, internalAddress: 172.16.0.3, user: ubuntu, password: "Qcloud@123"}roleGroups:etcd:- mastercontrol-plane: - masterworker:- master#- node2controlPlaneEndpoint:## Internal loadbalancer for apiservers # internalLoadbalancer: haproxydomain: lb.kubesphere.localaddress: ""port: 6443kubernetes:version: v1.23.10clusterName: cluster.localautoRenewCerts: truecontainerManager: dockeretcd:type: kubekeynetwork:plugin: calicokubePodsCIDR: 10.233.64.0/18kubeServiceCIDR: 10.233.0.0/18## multus support. https://github.com/k8snetworkplumbingwg/multus-cnimultusCNI:enabled: falseregistry:privateRegistry: ""namespaceOverride: ""registryMirrors: []insecureRegistries: []addons: []---
apiVersion: installer.kubesphere.io/v1alpha1
kind: ClusterConfiguration
metadata:name: ks-installernamespace: kubesphere-systemlabels:version: v3.4.1
spec:persistence:storageClass: ""authentication:jwtSecret: ""local_registry: ""# dev_tag: ""etcd:monitoring: falseendpointIps: localhostport: 2379tlsEnable: truecommon:core:console:enableMultiLogin: trueport: 30880type: NodePort# apiserver:#  resources: {}# controllerManager:#  resources: {}redis:enabled: falseenableHA: falsevolumeSize: 2Giopenldap:enabled: falsevolumeSize: 2Giminio:volumeSize: 20Gimonitoring:# type: externalendpoint: http://prometheus-operated.kubesphere-monitoring-system.svc:9090GPUMonitoring:enabled: falsegpu:kinds:- resourceName: "nvidia.com/gpu"resourceType: "GPU"default: truees:# master:#   volumeSize: 4Gi#   replicas: 1#   resources: {}# data:#   volumeSize: 20Gi#   replicas: 1#   resources: {}enabled: falselogMaxAge: 7elkPrefix: logstashbasicAuth:enabled: falseusername: ""password: ""externalElasticsearchHost: ""externalElasticsearchPort: ""opensearch:# master:#   volumeSize: 4Gi#   replicas: 1#   resources: {}# data:#   volumeSize: 20Gi#   replicas: 1#   resources: {}enabled: truelogMaxAge: 7opensearchPrefix: whizardbasicAuth:enabled: trueusername: "admin"password: "admin"externalOpensearchHost: ""externalOpensearchPort: ""dashboard:enabled: falsealerting:enabled: false# thanosruler:#   replicas: 1#   resources: {}auditing:enabled: false# operator:#   resources: {}# webhook:#   resources: {}devops:enabled: falsejenkinsCpuReq: 0.5jenkinsCpuLim: 1jenkinsMemoryReq: 4GijenkinsMemoryLim: 4GijenkinsVolumeSize: 16Gievents:enabled: false# operator:#   resources: {}# exporter:#   resources: {}ruler:enabled: truereplicas: 2#   resources: {}logging:enabled: falselogsidecar:enabled: truereplicas: 2# resources: {}metrics_server:enabled: falsemonitoring:storageClass: ""node_exporter:port: 9100# resources: {}# kube_rbac_proxy:#   resources: {}# kube_state_metrics:#   resources: {}# prometheus:#   replicas: 1#   volumeSize: 20Gi#   resources: {}#   operator:#     resources: {}# alertmanager:#   replicas: 1#   resources: {}# notification_manager:#   resources: {}#   operator:#     resources: {}#   proxy:#     resources: {}gpu:nvidia_dcgm_exporter:enabled: false# resources: {}multicluster:clusterRole: nonenetwork:networkpolicy:enabled: falseippool:type: nonetopology:type: noneopenpitrix:store:enabled: falseservicemesh:enabled: falseistio:components:ingressGateways:- name: istio-ingressgatewayenabled: falsecni:enabled: falseedgeruntime:enabled: falsekubeedge:enabled: falsecloudCore:cloudHub:advertiseAddress:- ""service:cloudhubNodePort: "30000"cloudhubQuicNodePort: "30001"cloudhubHttpsNodePort: "30002"cloudstreamNodePort: "30003"tunnelNodePort: "30004"# resources: {}# hostNetWork: falseiptables-manager:enabled: truemode: "external"# resources: {}# edgeService:#   resources: {}gatekeeper:enabled: false# controller_manager:#   resources: {}# audit:#   resources: {}terminal:timeout: 600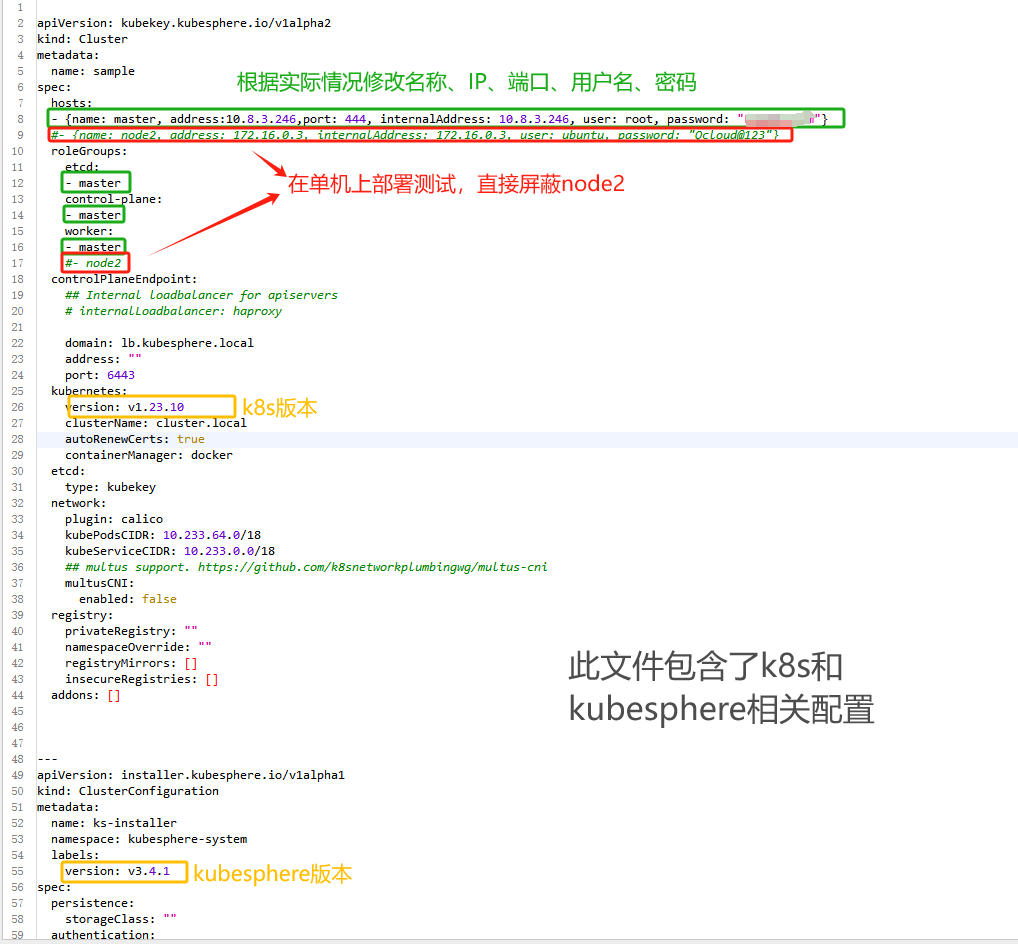
4.2.3. 执行安装
##通过指定配置文件来创建集群
[root@master home]# ./kk create cluster -f config-sample.yaml
##等待完成即可!
4.3. 方法2:快速入门(all-in-one)
参考:在 Linux 上以 All-in-One 模式安装 KubeSphere
[root@master home]# ./kk create cluster --with-kubernetes v1.22.12 --with-kubesphere v3.4.1
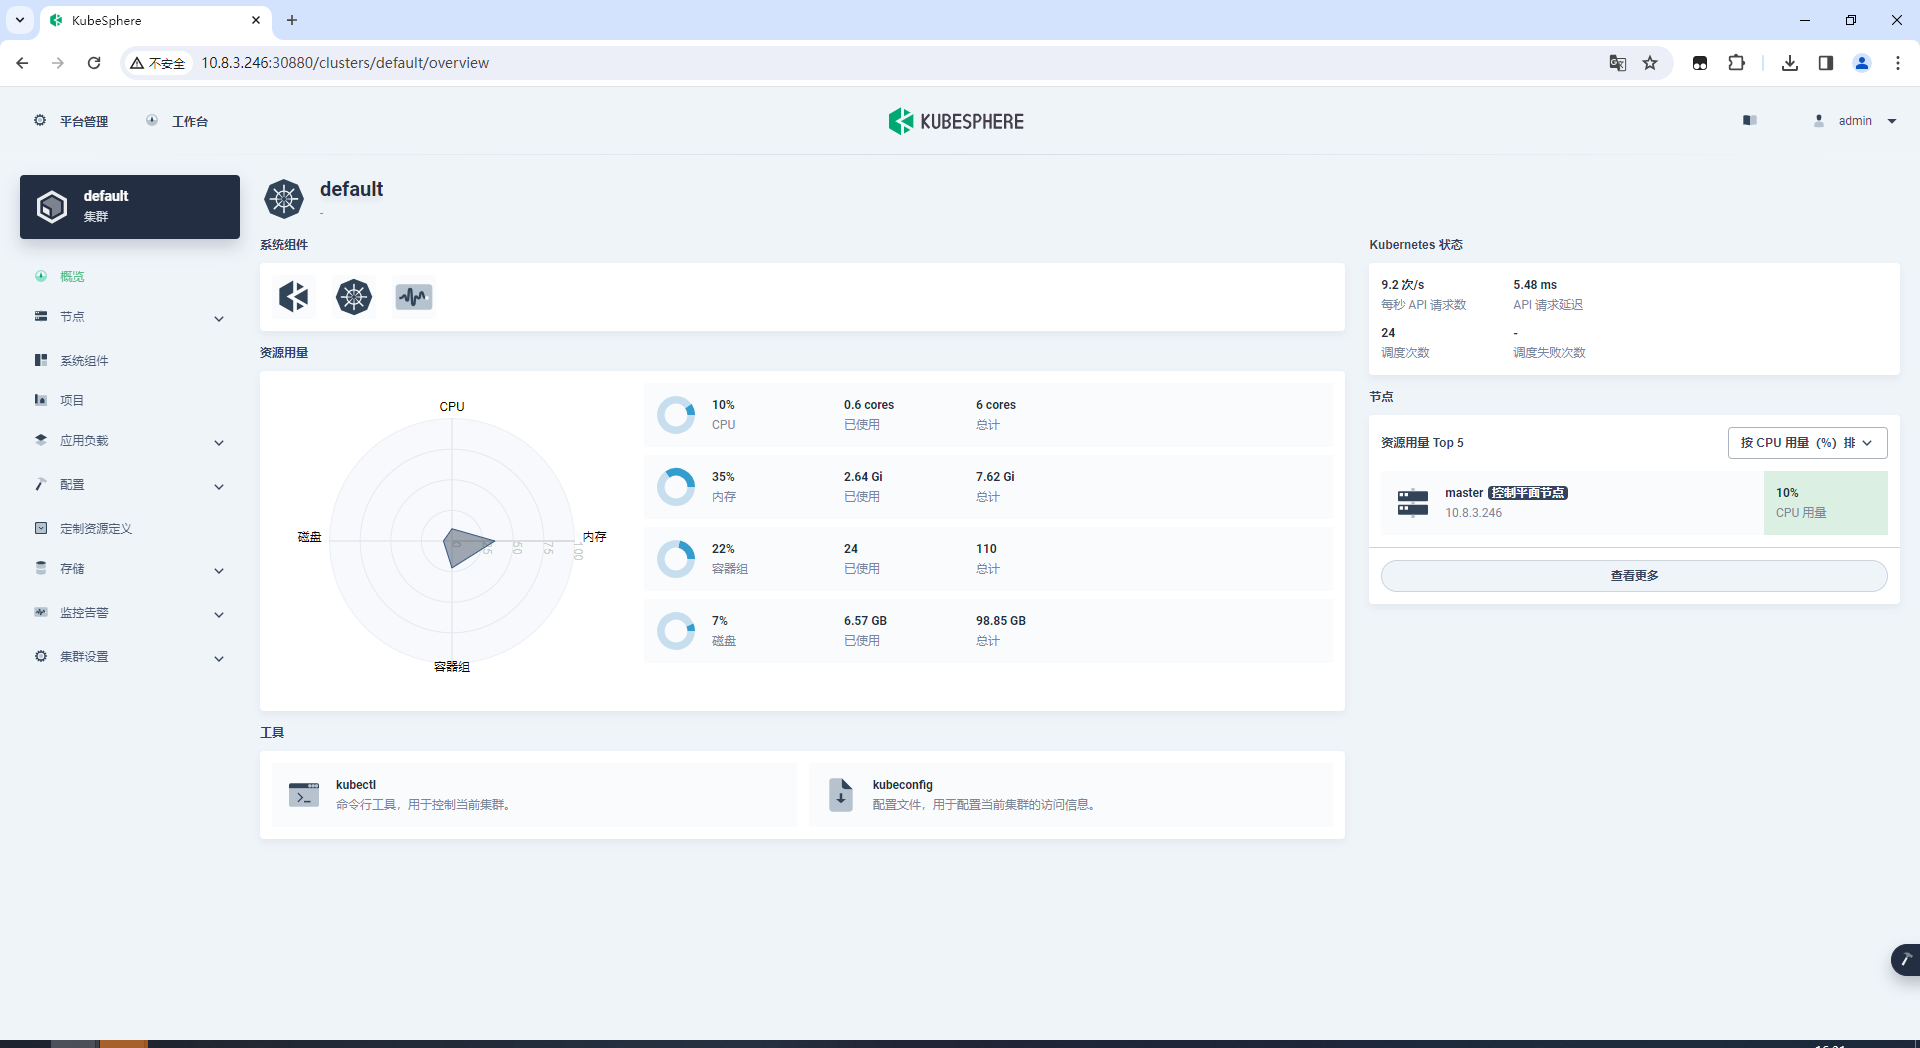
#等待完成即可!5. 验证安装结果
5.1. 等待安装并最终看到如下日志输出
#####################################################
### Welcome to KubeSphere! ###
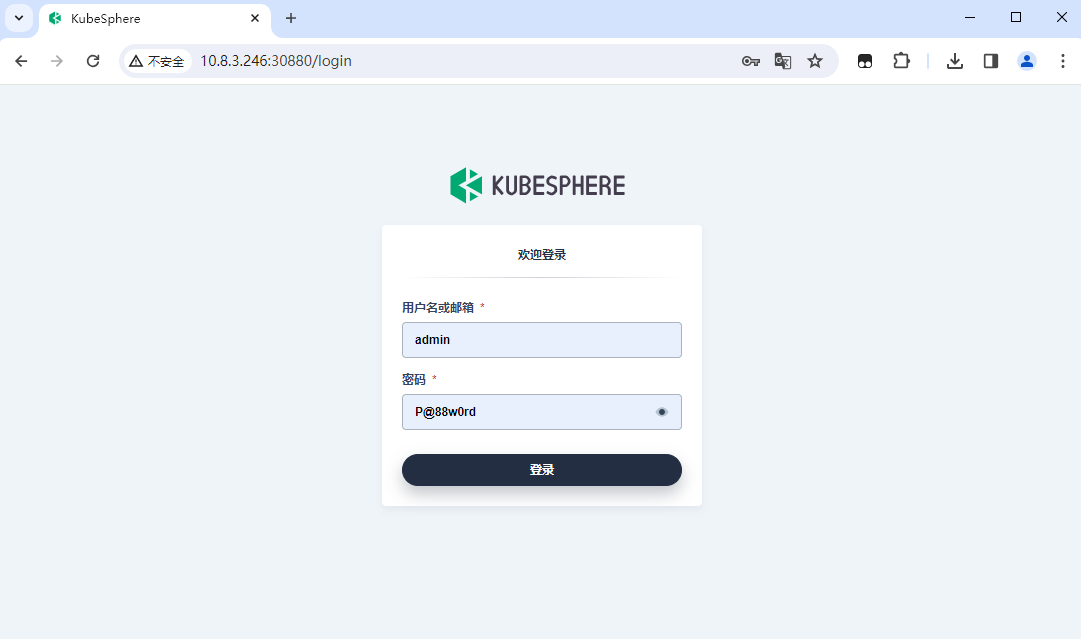
#####################################################Console: http://10.8.3.246:30880
Account: admin
Password: P@88w0rd
NOTES:1. After you log into the console, please check themonitoring status of service components in"Cluster Management". If any service is notready, please wait patiently until all components are up and running.2. Please change the default password after login.#####################################################
https://kubesphere.io 2024-02-21 03:06:10
#####################################################
03:06:11 EST success: [master]
03:06:11 EST Pipeline[CreateClusterPipeline] execute successfully
Installation is complete.Please check the result using the command:kubectl logs -n kubesphere-system $(kubectl get pod -n kubesphere-system -l 'app in (ks-install, ks-installer)' -o jsonpath='{.items[0].metadata.name}') -f
5.2. 命令查看安装结果
kubectl logs -n kubesphere-system $(kubectl get pod -n kubesphere-system -l 'app in (ks-install, ks-installer)' -o jsonpath='{.items[0].metadata.name}') -f5.3. 浏览器访问
http://10.8.3.246:30880/
Account: admin
Password: P@88w0rd
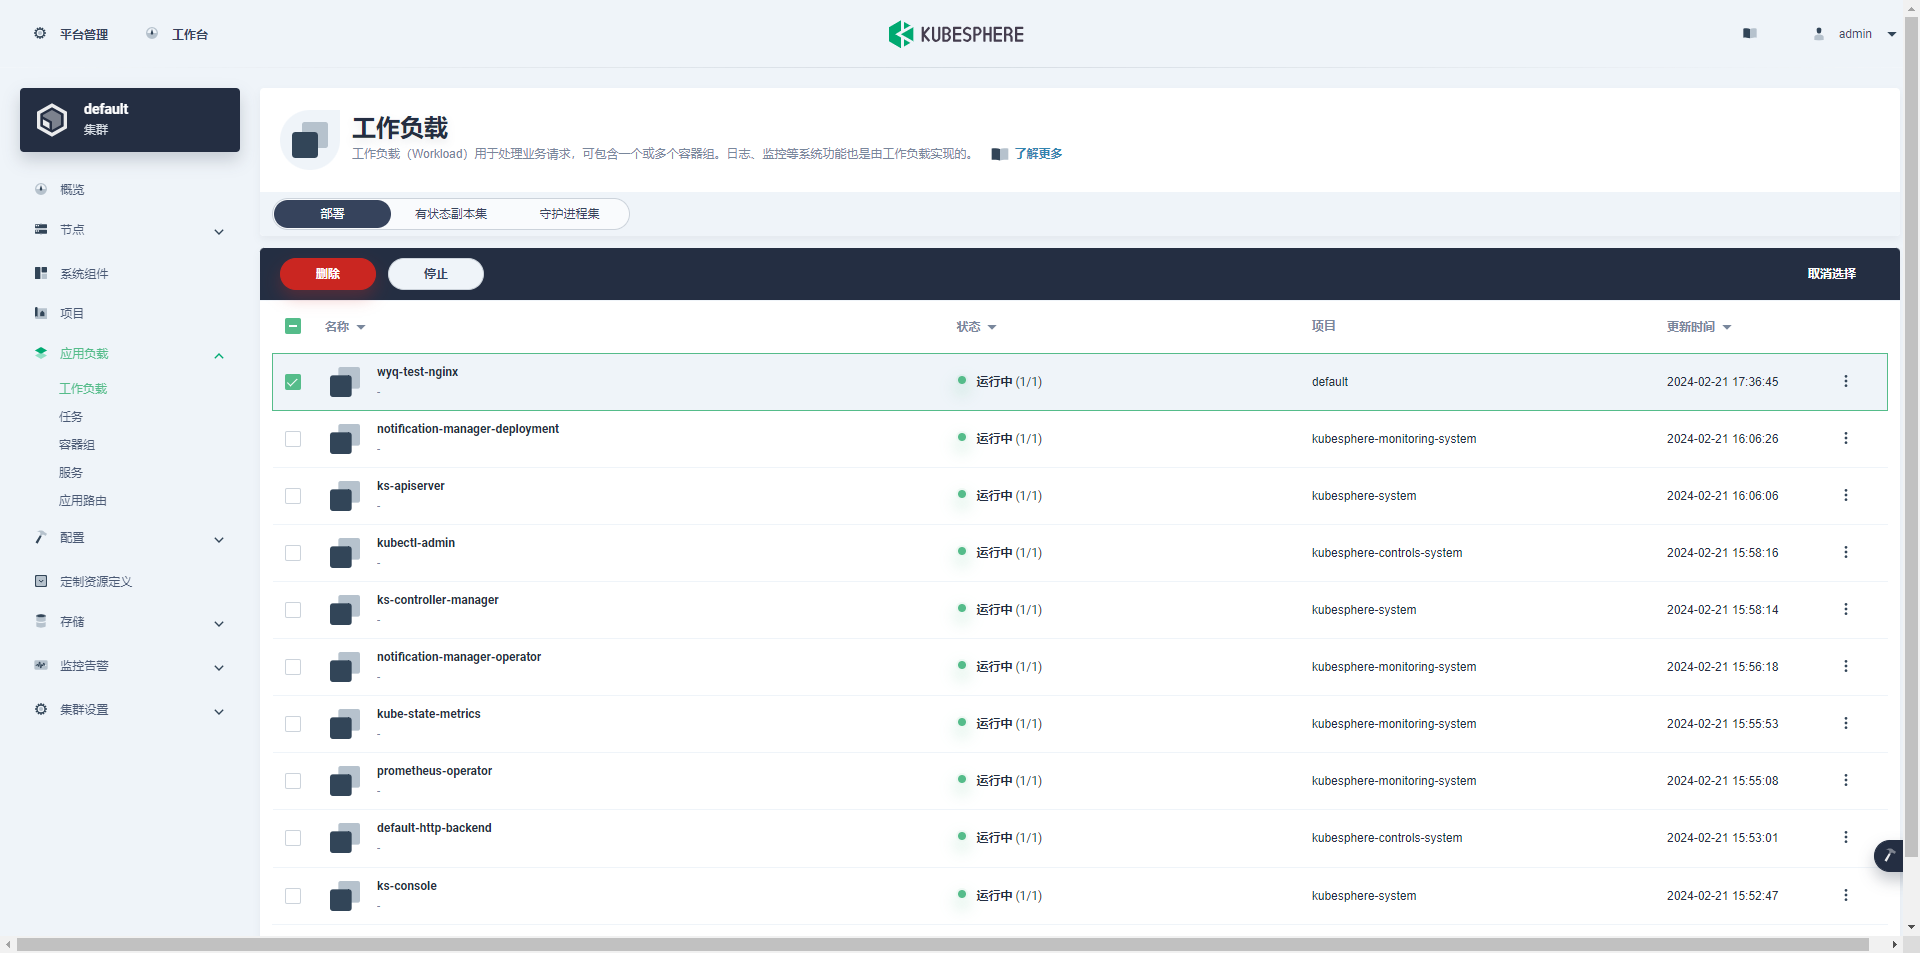
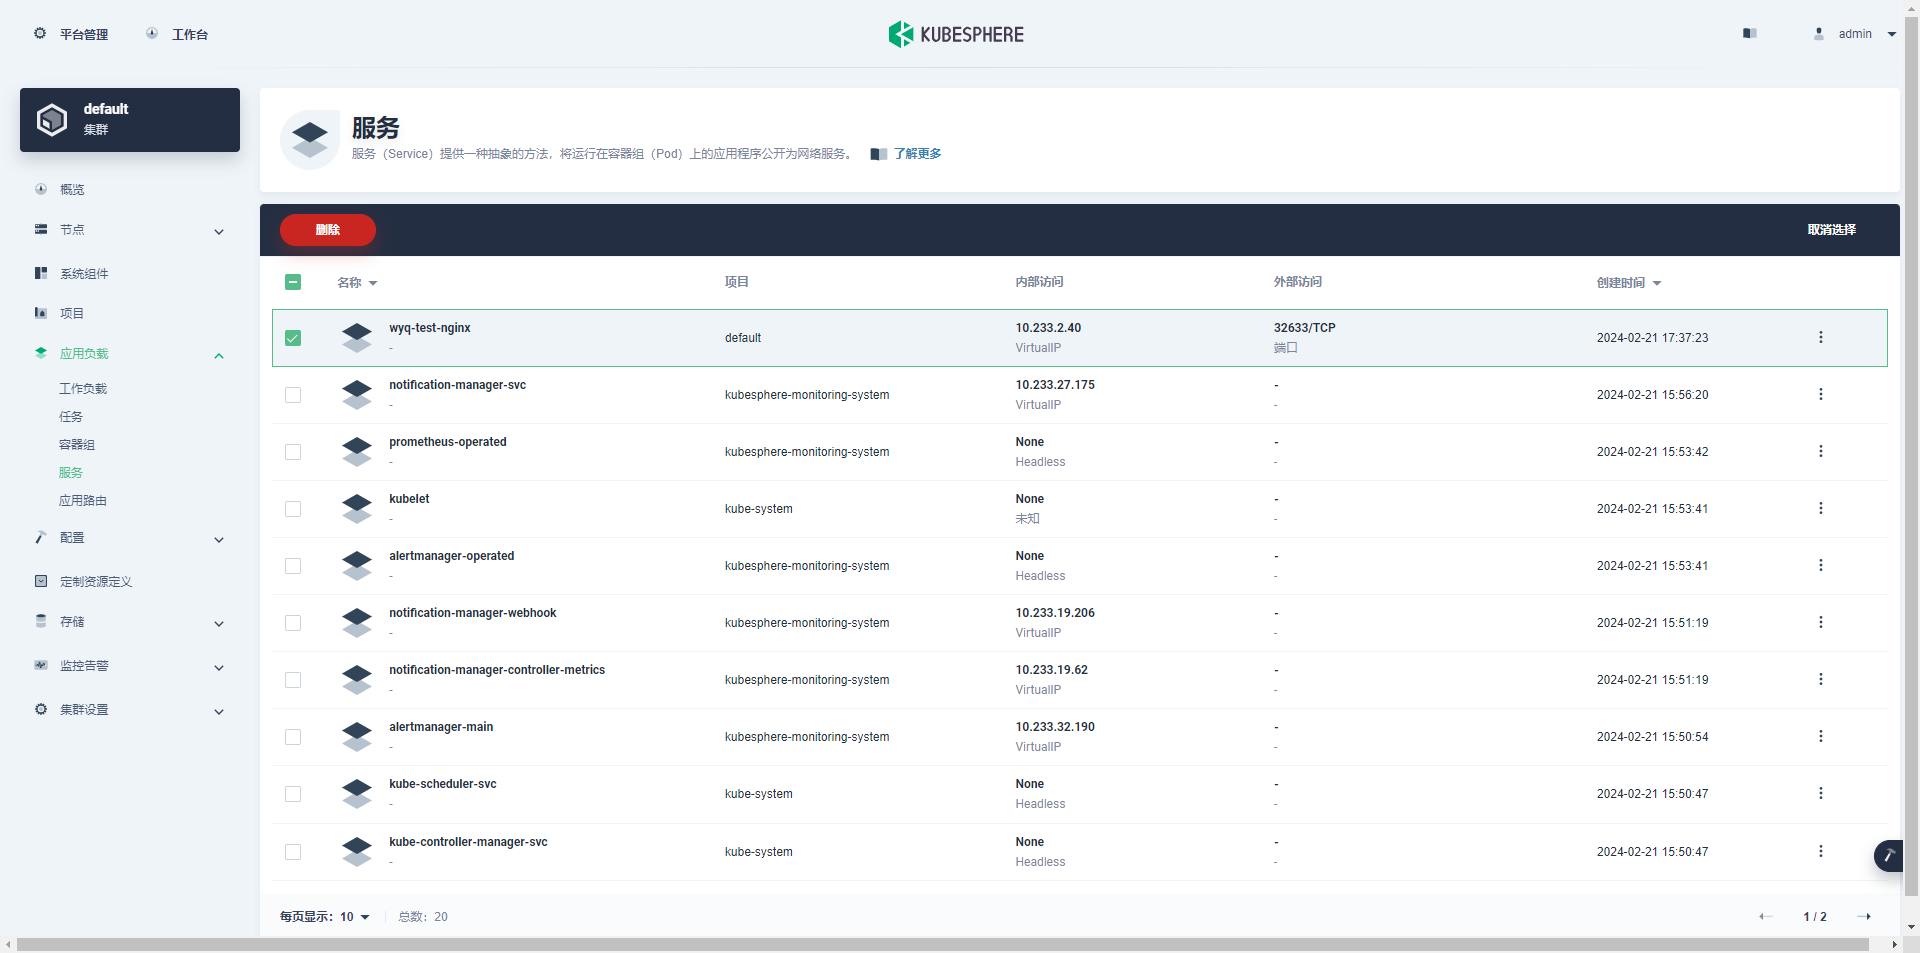
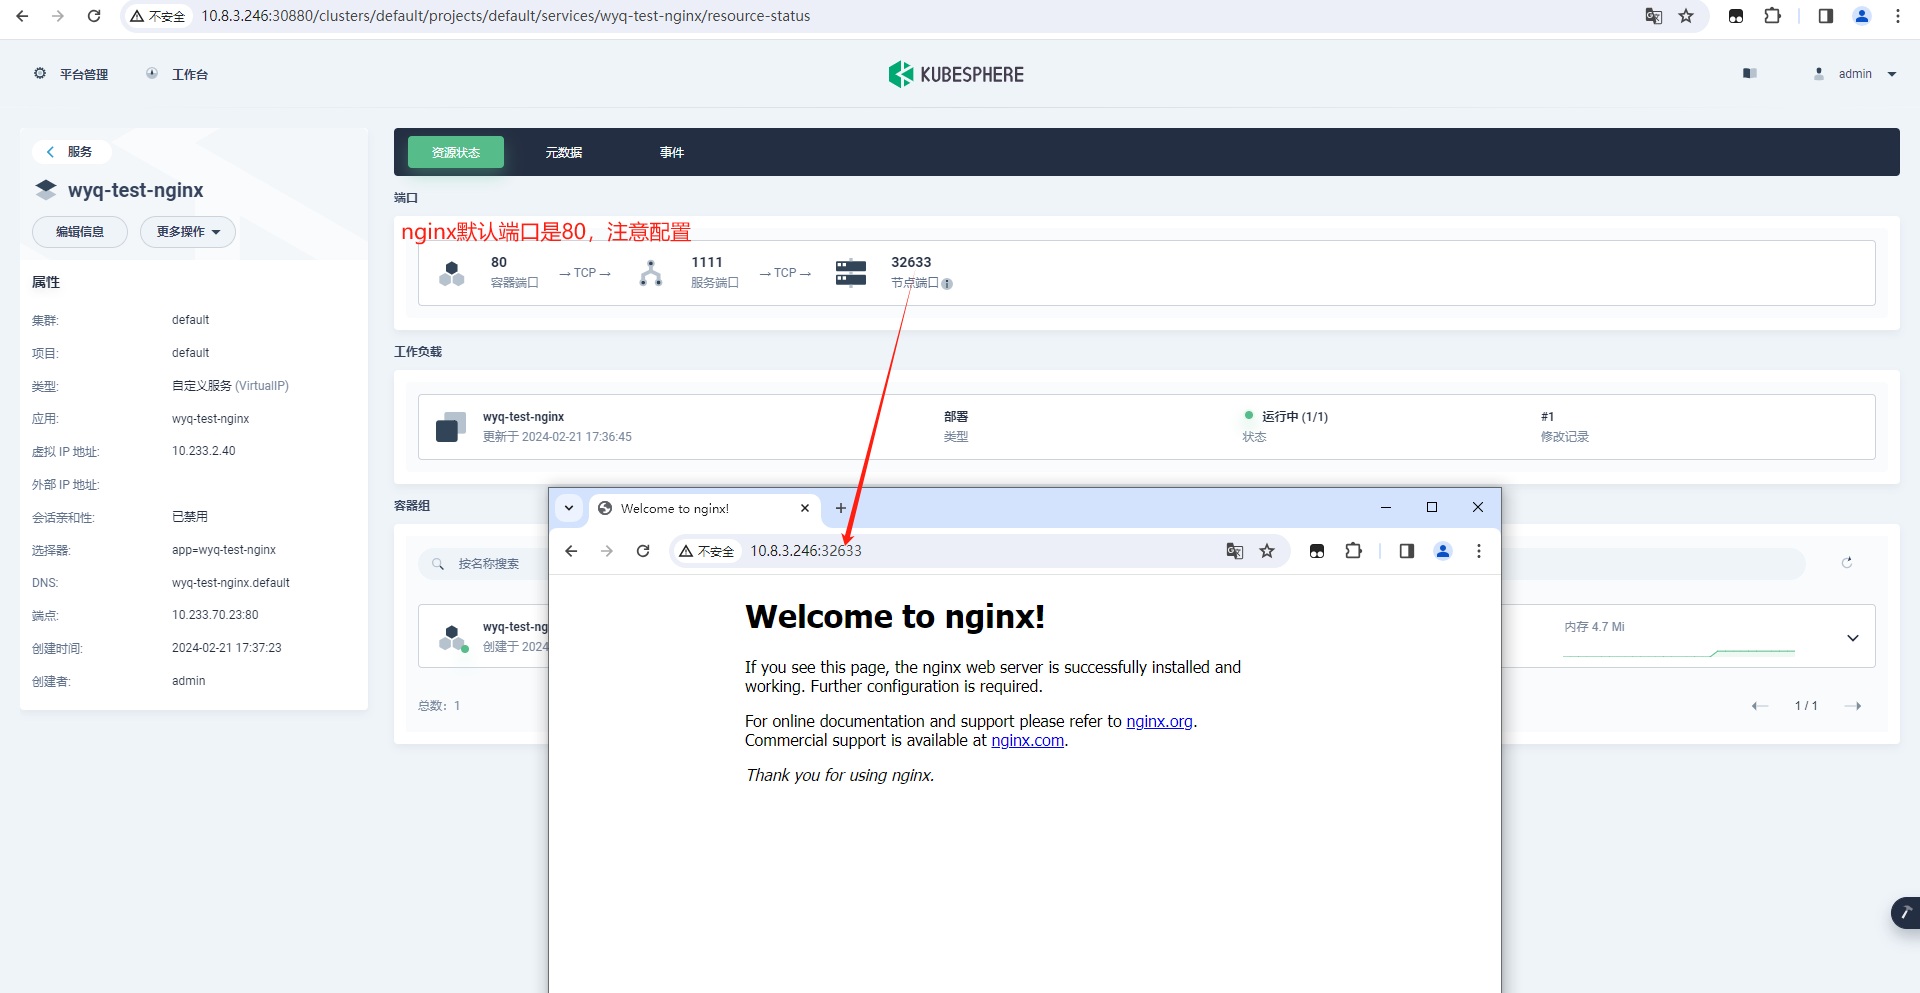
6. 部署一个nginx
7. 卸载
#如果是使用高级模式安装的 KubeSphere(使用配置文件创建的),则使用以下命令卸载:
./kk delete cluster -f config-sample.yaml#如果是普通的,直接使用以下命令卸载:
./kk delete cluster
8. 问题
8.1. 还需要单独安装Docker吗?
KubeKey 会默认安装最新版本的 Docker。当然,也可以在创建集群前手动安装 Docker 或其他容器运行时。

上文安装创建过程中可以看到,默认已经下载并安装docker。
8.2. 使用方法2时,执行./kk create时报错?
错误信息:
21:54:16 EST [GreetingsModule] Greetings
21:54:16 EST failed: [node1]
error: Pipeline[CreateClusterPipeline] execute failed: Module[GreetingsModule] exec failed:failed: [node1] failed to connect to 10.8.3.246: could not establish connection to 10.8.3.246:22: dial tcp 10.8.3.246:22: connect: connection refused
原因:
kubekey默认用22端口!
而当前你的服务器ssh不是22端口,而是444或其他端口(看看远程服务器用的什么端口)!
解决办法:
方法1:改ssh端口,vi /etc/ssh/sshd_config改成22端口,重启ssh:systemctl restart sshd,再重试方法2。
方法2:使用上文方法1:高级安装(使用配置文件创建的集群)。
9. 参考文献
官网地址:在 Linux 上以 All-in-One 模式安装 KubeSphere
github:https://github.com/kubesphere/kubekey
这篇关于KubeKey一键部署:轻松安装Kubernetes与KubeSphere的文章就介绍到这儿,希望我们推荐的文章对编程师们有所帮助!


