本文主要是介绍我的NPI项目之Android USB 系列(一) - 遥望和USB的相识,希望对大家解决编程问题提供一定的参考价值,需要的开发者们随着小编来一起学习吧!
和USB应该是老朋友了,从2011年接触Android开发开始,就天天和USB打交道了。那时候还有不
对称扁头的usb/方口的usb,直到如今使用广泛的防反插USB3.0 type-C。
但是,一直有一个不是很清楚的问题萦绕在心头,那就是。先有USB协议还是先有USB connector定义?
什么USB1.0,USB2.0,USB3.0 , USB PD, 等等。这些协议和接口又是一个什么样的关系?今天就来简单整理一下。但是重心会放在移动设备上广泛使用的USB2.0/USB OTG/ USB3.0,Type-B和Type-C。
认识USB设备,带USB插槽的Laptop,U盘,USB鼠标/键盘,USB移动硬盘,USB充电宝,USB Type-C。
USB 设备分类
通常USB设备分为主设备和从设备。通常,笔记本会充当主设备,而其它接在笔记本上的设备为从设备,也可以统一称为外设。
通信过程
以U盘为例:
Powering on the Laptop: When you power on the laptop, the system boots up, and the operating system (such as Windows, macOS, or Linux) is loaded into the laptop's memory (RAM). The operating system takes control of the laptop's hardware and manages the execution of software applications.
Connecting the USB Interface Disk: You connect the USB interface disk (such as a USB flash drive or an external hard drive) to one of the available USB ports on the laptop. The USB port provides both power and data connectivity for the attached device.
Device Recognition(枚举的过程): The operating system detects the presence of the connected USB interface disk. It identifies the device and loads the appropriate device drivers if necessary. Device drivers are software components that enable the operating system to communicate with and control the connected device.
Mounting the Disk: Once the USB interface disk is recognized, the operating system "mounts" it(挂在文件系统), which means it makes the storage space on the disk accessible to the laptop's file system. The operating system assigns a drive letter or mount point to the disk, allowing you to access its contents.
File System Access: With the USB interface disk mounted, you can interact with its contents through the file manager or file explorer of the operating system. You can browse files, copy, move, delete, or perform other file operations on the disk, similar to how you would interact with files on the laptop's internal storage.
Data Transfer: You can transfer data between the laptop and the USB interface disk by simply dragging and dropping files or using copy-paste operations. The operating system manages the data transfer process, ensuring that the data is written to or read from the appropriate locations on the disk.
Safe Removal: To safely remove the USB interface disk, you should use the operating system's "eject" or "safely remove" feature. This ensures that all pending write operations are completed and the file system is properly unmounted from the disk. Following this procedure helps prevent data corruption or loss.
Disconnecting the Disk: After safely removing the USB interface disk, you can physically disconnect it from the laptop's USB port.
协议上 通信过程:
In USB communication, the transfer process is typically initiated by the USB master device.(所有的通信都应该由主设备法起)。 The USB master device, also known as the host, is responsible for controlling the USB bus and managing communication with connected USB devices.
The USB master device takes the initiative to initiate various USB transactions such as data(数据) transfers, control commands(命令), and enumeration(枚举). It sends requests to the connected USB devices, instructing them to perform specific actions or transfer data.
On the other hand, USB slave devices, also called peripherals(通称为外设), respond to the commands and requests from the USB master device. They do not initiate communication actively but instead wait for commands or requests from the master device.
When you connect a USB interface disk (a slave device) to a laptop (the master device), the laptop's operating system, acting as the USB host, recognizes the presence of the USB device and initiates the communication. It sends commands and requests to the USB interface disk to perform actions such as reading or writing data.
The USB master device controls the entire transfer process, including the direction of data flow (from the host to the device or vice versa), the type of transfer (bulk, control, isochronous, or interrupt), and the timing and coordination of the transfer.
总而言之,USB主设备控制一切通信过程!
电气差异,作为主设备时候
- 4-Pin USB2.0
- 5-Pin USB2.0 OTG

- 9-Pin USB 3.0 USB3.0向后兼容USB2.0,另外支持一个SuperSeepd bus。

电气差异,作为从设备时候
1. 4-Pin USB2.0
2. 4-Pin USB2.0 OTG
3. 9-Pin USB3.0
USB3.0 Type A 对应的引脚说明

USB3.0 Type-B的长下面的样子

USB3.0 Type-C,24Pin

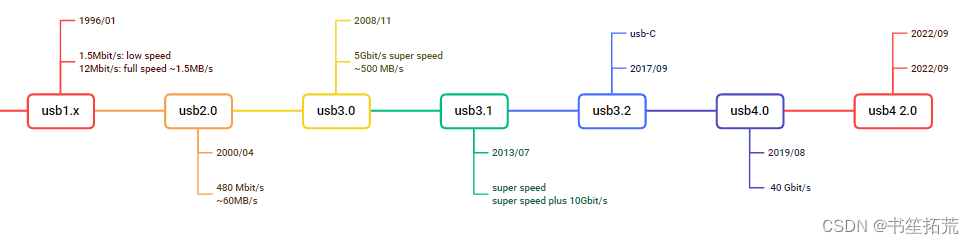
发展时间
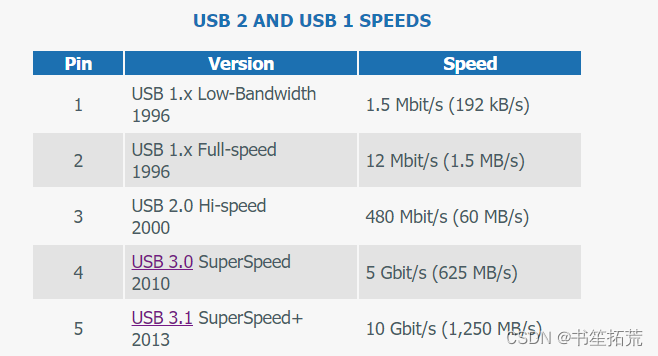
速度对比
总结
USB的协议发展很快,从USB协议1.0/2.0/3.0/4.0 ...对应的connector也是4pin/5pin/9pin/24pin的演化。
如果9pin的USB3.0 需要支持OTG,那么要将上图中的一路GND_DRAIN设备ID pin. 而我的使用case是设备作为USB3.0 prepherial 和USB2.0 host(支持OTG,并对外供电,5pin)。
当我们使用USB3.0时候,不建议带OTG,因为USB2.0已经支持,3.0追求的是更快/更大电流!
万能的WWW,什么知识都有,就看你是否愿意花时间了。Serial port, RS232 and RS485 software. Data logging and monitoring software for COM, RS232, USB and TCP ports, OPC and DDE interfaces
这篇关于我的NPI项目之Android USB 系列(一) - 遥望和USB的相识的文章就介绍到这儿,希望我们推荐的文章对编程师们有所帮助!


