本文主要是介绍QEMU源码全解析 —— virtio(20),希望对大家解决编程问题提供一定的参考价值,需要的开发者们随着小编来一起学习吧!
接前一篇文章:
上回书重点解析了virtio_pci_modern_probe函数。再来回顾一下其中相关的数据结构:
- struct virtio_pci_device
struct virtio_pci_device的定义在Linux内核源码/drivers/virtio/virtio_pci_common.h中,如下:
/* Our device structure */
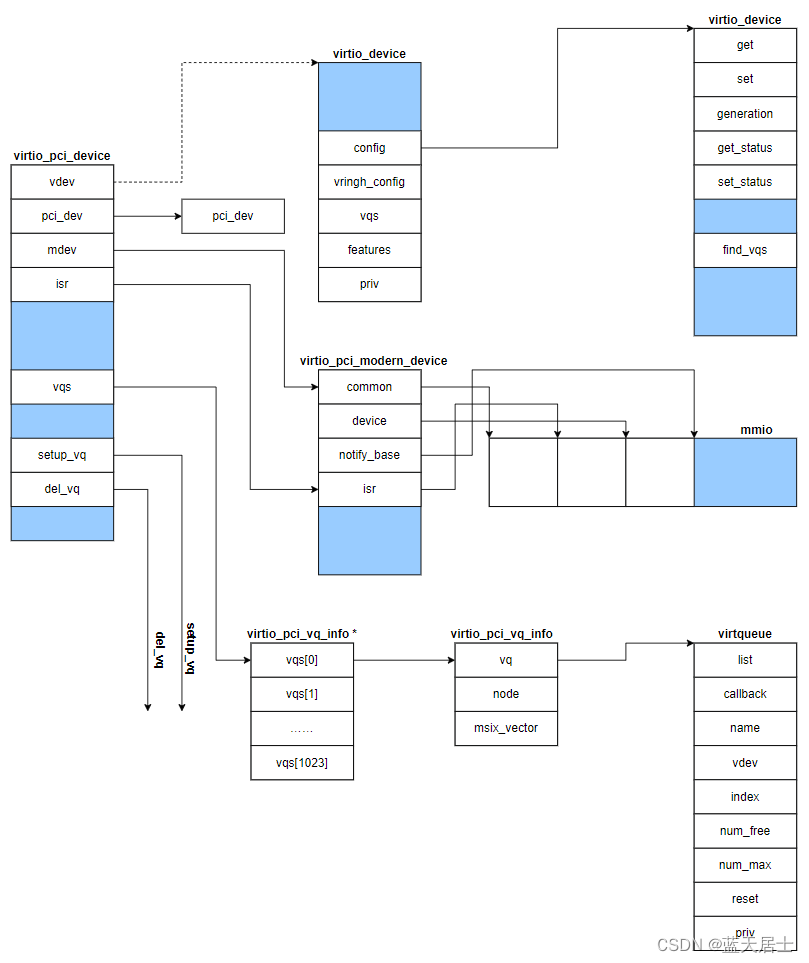
struct virtio_pci_device {struct virtio_device vdev;struct pci_dev *pci_dev;union {struct virtio_pci_legacy_device ldev;struct virtio_pci_modern_device mdev;};bool is_legacy;/* Where to read and clear interrupt */u8 __iomem *isr;/* a list of queues so we can dispatch IRQs */spinlock_t lock;struct list_head virtqueues;/* array of all queues for house-keeping */struct virtio_pci_vq_info **vqs;/* MSI-X support */int msix_enabled;int intx_enabled;cpumask_var_t *msix_affinity_masks;/* Name strings for interrupts. This size should be enough,* and I'm too lazy to allocate each name separately. */char (*msix_names)[256];/* Number of available vectors */unsigned int msix_vectors;/* Vectors allocated, excluding per-vq vectors if any */unsigned int msix_used_vectors;/* Whether we have vector per vq */bool per_vq_vectors;struct virtqueue *(*setup_vq)(struct virtio_pci_device *vp_dev,struct virtio_pci_vq_info *info,unsigned int idx,void (*callback)(struct virtqueue *vq),const char *name,bool ctx,u16 msix_vec);void (*del_vq)(struct virtio_pci_vq_info *info);u16 (*config_vector)(struct virtio_pci_device *vp_dev, u16 vector);
};virtio_pci_modern_probe执行完成后,相关数据结构如下图所示:
回到virtio_pci_probe函数。在Linux内核源码/drivers/virtio/virtio_pci_common.c中,代码如下:
static int virtio_pci_probe(struct pci_dev *pci_dev,const struct pci_device_id *id)
{struct virtio_pci_device *vp_dev, *reg_dev = NULL;int rc;/* allocate our structure and fill it out */vp_dev = kzalloc(sizeof(struct virtio_pci_device), GFP_KERNEL);if (!vp_dev)return -ENOMEM;pci_set_drvdata(pci_dev, vp_dev);vp_dev->vdev.dev.parent = &pci_dev->dev;vp_dev->vdev.dev.release = virtio_pci_release_dev;vp_dev->pci_dev = pci_dev;INIT_LIST_HEAD(&vp_dev->virtqueues);spin_lock_init(&vp_dev->lock);/* enable the device */rc = pci_enable_device(pci_dev);if (rc)goto err_enable_device;if (force_legacy) {rc = virtio_pci_legacy_probe(vp_dev);/* Also try modern mode if we can't map BAR0 (no IO space). */if (rc == -ENODEV || rc == -ENOMEM)rc = virtio_pci_modern_probe(vp_dev);if (rc)goto err_probe;} else {rc = virtio_pci_modern_probe(vp_dev);if (rc == -ENODEV)rc = virtio_pci_legacy_probe(vp_dev);if (rc)goto err_probe;}pci_set_master(pci_dev);rc = register_virtio_device(&vp_dev->vdev);reg_dev = vp_dev;if (rc)goto err_register;return 0;err_register:if (vp_dev->is_legacy)virtio_pci_legacy_remove(vp_dev);elsevirtio_pci_modern_remove(vp_dev);
err_probe:pci_disable_device(pci_dev);
err_enable_device:if (reg_dev)put_device(&vp_dev->vdev.dev);elsekfree(vp_dev);return rc;
}
接QEMU源码全解析 —— virtio(18)中的内容,前文书讲到了virtio_pci_probe函数的第5步,
“(5)调用virtio_pci_legacy_probe或者virtio_pci_modern_probe函数来初始化该PCI设备对应的virtio设备。”,继续往下进行。
(6)virtio_pci_probe函数在调用virtio_pci_modern_probe函数之后,接下来会调用register_virtio_device。代码片段如下:
rc = register_virtio_device(&vp_dev->vdev);reg_dev = vp_dev;if (rc)goto err_register;register_virtio_device函数在Linux内核源码/drivers/virtio/virtio.c中,代码如下:
/*** register_virtio_device - register virtio device* @dev        : virtio device to be registered** On error, the caller must call put_device on &@dev->dev (and not kfree),* as another code path may have obtained a reference to @dev.** Returns: 0 on suceess, -error on failure*/
int register_virtio_device(struct virtio_device *dev)
{int err;dev->dev.bus = &virtio_bus;device_initialize(&dev->dev);/* Assign a unique device index and hence name. */err = ida_alloc(&virtio_index_ida, GFP_KERNEL);if (err < 0)goto out;dev->index = err;err = dev_set_name(&dev->dev, "virtio%u", dev->index);if (err)goto out_ida_remove;err = virtio_device_of_init(dev);if (err)goto out_ida_remove;spin_lock_init(&dev->config_lock);dev->config_enabled = false;dev->config_change_pending = false;INIT_LIST_HEAD(&dev->vqs);spin_lock_init(&dev->vqs_list_lock);/* We always start by resetting the device, in case a previous* driver messed it up.  This also tests that code path a little. */virtio_reset_device(dev);/* Acknowledge that we've seen the device. */virtio_add_status(dev, VIRTIO_CONFIG_S_ACKNOWLEDGE);/** device_add() causes the bus infrastructure to look for a matching* driver.*/err = device_add(&dev->dev);if (err)goto out_of_node_put;return 0;out_of_node_put:of_node_put(dev->dev.of_node);
out_ida_remove:ida_free(&virtio_index_ida, dev->index);
out:virtio_add_status(dev, VIRTIO_CONFIG_S_FAILED);return err;
}
EXPORT_SYMBOL_GPL(register_virtio_device);
前文已提到,vp_dev->vdev的类型为struct virtio_device,而传给register_virtio_device函数的实参为vp_dev->vdev的地址,即&vp_dev->vdev。从函数名以及参数类型就能看出,register_virtio_device函数的作用是将一个virtio device注册到系统中。具体步骤如下:
(1)设置virtio设备的Bus为virtio_bus。代码片段如下:
dev->dev.bus = &virtio_bus;virtio_bus在系统初始化的时候会注册到系统中。
virtio_bus在Linux内核源码/drivers/virtio/virtio.c中初始化,代码如下:
static struct bus_type virtio_bus = {.name  = "virtio",.match = virtio_dev_match,.dev_groups = virtio_dev_groups,.uevent = virtio_uevent,.probe = virtio_dev_probe,.remove = virtio_dev_remove,
};int register_virtio_driver(struct virtio_driver *driver)
{/* Catch this early. */BUG_ON(driver->feature_table_size && !driver->feature_table);driver->driver.bus = &virtio_bus;return driver_register(&driver->driver);
}
EXPORT_SYMBOL_GPL(register_virtio_driver);
在系统初始化的时候,通过register_virtio_driver函数注册到系统中。
(2)设置virtio设备的名字为类似"virtio0"、"virtio1"的字符串。代码片段如下:
/* Assign a unique device index and hence name. */err = ida_alloc(&virtio_index_ida, GFP_KERNEL);if (err < 0)goto out;dev->index = err;err = dev_set_name(&dev->dev, "virtio%u", dev->index);if (err)goto out_ida_remove;dev_set_name函数在Linux内核源码/drivers/base/core.c中,代码如下:
/*** dev_set_name - set a device name* @dev: device* @fmt: format string for the device's name*/
int dev_set_name(struct device *dev, const char *fmt, ...)
{va_list vargs;int err;va_start(vargs, fmt);err = kobject_set_name_vargs(&dev->kobj, fmt, vargs);va_end(vargs);return err;
}
EXPORT_SYMBOL_GPL(dev_set_name);(3)然后调用virtio_reset_device函数重置设备。代码片段如下:
/* We always start by resetting the device, in case a previous* driver messed it up. This also tests that code path a little. */virtio_reset_device(dev);(4)最后,调用device_add函数,将设备注册到系统中。代码片段如下:
/** device_add() causes the bus infrastructure to look for a matching* driver.*/err = device_add(&dev->dev);if (err)goto out_of_node_put;这里,老版本代码中是调用的是device_register函数。device_register函数跟设备驱动相关性较大,在此简单介绍一下其作用。
device_register函数在Linux内核源码/drivers/base/core.c中,代码如下:
/*** device_register - register a device with the system.* @dev: pointer to the device structure** This happens in two clean steps - initialize the device* and add it to the system. The two steps can be called* separately, but this is the easiest and most common.* I.e. you should only call the two helpers separately if* have a clearly defined need to use and refcount the device* before it is added to the hierarchy.** For more information, see the kerneldoc for device_initialize()* and device_add().** NOTE: _Never_ directly free @dev after calling this function, even* if it returned an error! Always use put_device() to give up the* reference initialized in this function instead.*/
int device_register(struct device *dev)
{device_initialize(dev);return device_add(dev);
}
EXPORT_SYMBOL_GPL(device_register);
device_register函数向系统注册一个设备。其分为两个简单的步骤——初始化设备(device_initialize(dev))并将其添加到系统中(device_add(dev))。这两个步骤可以分别调用,但放在一起即使用device_register函数是最简单和最常见的。例如,如果有明确的需求在其添加到层级之前使用和重新计数设备,那么应该分别独立地调用这两个助手(函数)。
从此处的代码就可以知道,老版本的内核代码中确实是直接调用了device_register函数,而新版本内核代码在此处则是在register_virtio_device函数的前边先调用了device_initialize(&dev->dev),而后在这里调用了device_add(&dev->dev)。即采用了分开调用的方式。
device_register函数会调用device_add函数,将设备加到系统中,并且会发送一个uevent消息到用户空间,这个uevent消息中包含了virtio设备的vendor id、device id。 udev接收到此消息之后,会加载virtio设备对应的驱动。然后,device_add函数会调用bus_probe_device函数,最终调用到Bus的probe函数和设备的probe函数,也就是virtio_dev_probe函数和virtballoon_probe函数。
device_add函数也在Linux内核源码/drivers/base/core.c中,就在device_register函数上边,代码如下:
/*** device_add - add device to device hierarchy.* @dev: device.** This is part 2 of device_register(), though may be called* separately _iff_ device_initialize() has been called separately.** This adds @dev to the kobject hierarchy via kobject_add(), adds it* to the global and sibling lists for the device, then* adds it to the other relevant subsystems of the driver model.** Do not call this routine or device_register() more than once for* any device structure.  The driver model core is not designed to work* with devices that get unregistered and then spring back to life.* (Among other things, it's very hard to guarantee that all references* to the previous incarnation of @dev have been dropped.)  Allocate* and register a fresh new struct device instead.** NOTE: _Never_ directly free @dev after calling this function, even* if it returned an error! Always use put_device() to give up your* reference instead.** Rule of thumb is: if device_add() succeeds, you should call* device_del() when you want to get rid of it. If device_add() has* *not* succeeded, use *only* put_device() to drop the reference* count.*/
int device_add(struct device *dev)
{struct subsys_private *sp;struct device *parent;struct kobject *kobj;struct class_interface *class_intf;int error = -EINVAL;struct kobject *glue_dir = NULL;dev = get_device(dev);if (!dev)goto done;if (!dev->p) {error = device_private_init(dev);if (error)goto done;}/** for statically allocated devices, which should all be converted* some day, we need to initialize the name. We prevent reading back* the name, and force the use of dev_name()*/if (dev->init_name) {error = dev_set_name(dev, "%s", dev->init_name);dev->init_name = NULL;}if (dev_name(dev))error = 0;/* subsystems can specify simple device enumeration */else if (dev->bus && dev->bus->dev_name)error = dev_set_name(dev, "%s%u", dev->bus->dev_name, dev->id);elseerror = -EINVAL;if (error)goto name_error;pr_debug("device: '%s': %s\n", dev_name(dev), __func__);parent = get_device(dev->parent);kobj = get_device_parent(dev, parent);if (IS_ERR(kobj)) {error = PTR_ERR(kobj);goto parent_error;}if (kobj)dev->kobj.parent = kobj;/* use parent numa_node */if (parent && (dev_to_node(dev) == NUMA_NO_NODE))set_dev_node(dev, dev_to_node(parent));/* first, register with generic layer. *//* we require the name to be set before, and pass NULL */error = kobject_add(&dev->kobj, dev->kobj.parent, NULL);if (error) {glue_dir = kobj;goto Error;}/* notify platform of device entry */device_platform_notify(dev);error = device_create_file(dev, &dev_attr_uevent);if (error)goto attrError;error = device_add_class_symlinks(dev);if (error)goto SymlinkError;error = device_add_attrs(dev);if (error)goto AttrsError;error = bus_add_device(dev);if (error)goto BusError;error = dpm_sysfs_add(dev);if (error)goto DPMError;device_pm_add(dev);if (MAJOR(dev->devt)) {error = device_create_file(dev, &dev_attr_dev);if (error)goto DevAttrError;error = device_create_sys_dev_entry(dev);if (error)goto SysEntryError;devtmpfs_create_node(dev);}/* Notify clients of device addition.  This call must come* after dpm_sysfs_add() and before kobject_uevent().*/bus_notify(dev, BUS_NOTIFY_ADD_DEVICE);kobject_uevent(&dev->kobj, KOBJ_ADD);/** Check if any of the other devices (consumers) have been waiting for* this device (supplier) to be added so that they can create a device* link to it.** This needs to happen after device_pm_add() because device_link_add()* requires the supplier be registered before it's called.** But this also needs to happen before bus_probe_device() to make sure* waiting consumers can link to it before the driver is bound to the* device and the driver sync_state callback is called for this device.*/if (dev->fwnode && !dev->fwnode->dev) {dev->fwnode->dev = dev;fw_devlink_link_device(dev);}bus_probe_device(dev);/** If all driver registration is done and a newly added device doesn't* match with any driver, don't block its consumers from probing in* case the consumer device is able to operate without this supplier.*/if (dev->fwnode && fw_devlink_drv_reg_done && !dev->can_match)fw_devlink_unblock_consumers(dev);if (parent)klist_add_tail(&dev->p->knode_parent,&parent->p->klist_children);sp = class_to_subsys(dev->class);if (sp) {mutex_lock(&sp->mutex);/* tie the class to the device */klist_add_tail(&dev->p->knode_class, &sp->klist_devices);/* notify any interfaces that the device is here */list_for_each_entry(class_intf, &sp->interfaces, node)if (class_intf->add_dev)class_intf->add_dev(dev);mutex_unlock(&sp->mutex);subsys_put(sp);}
done:put_device(dev);return error;SysEntryError:if (MAJOR(dev->devt))device_remove_file(dev, &dev_attr_dev);DevAttrError:device_pm_remove(dev);dpm_sysfs_remove(dev);DPMError:dev->driver = NULL;bus_remove_device(dev);BusError:device_remove_attrs(dev);AttrsError:device_remove_class_symlinks(dev);SymlinkError:device_remove_file(dev, &dev_attr_uevent);attrError:device_platform_notify_remove(dev);kobject_uevent(&dev->kobj, KOBJ_REMOVE);glue_dir = get_glue_dir(dev);kobject_del(&dev->kobj);Error:cleanup_glue_dir(dev, glue_dir);
parent_error:put_device(parent);
name_error:kfree(dev->p);dev->p = NULL;goto done;
}
EXPORT_SYMBOL_GPL(device_add);
其中的代码片段:
/* Notify clients of device addition. This call must come* after dpm_sysfs_add() and before kobject_uevent().*/bus_notify(dev, BUS_NOTIFY_ADD_DEVICE);kobject_uevent(&dev->kobj, KOBJ_ADD);和
bus_probe_device(dev);就是上边所讲到的:
device_register函数会调用device_add函数,将设备加到系统中,并且会发送一个uevent消息到用户空间,这个uevent消息中包含了virtio设备的vendor id、device id。 udev接收到此消息之后,会加载virtio设备对应的驱动。
然后,device_add函数会调用bus_probe_device函数,最终调用到Bus的probe函数和设备的probe函数,也就是virtio_dev_probe函数和virtballoon_probe函数。
欲知后事如何,且看下回分解。
这篇关于QEMU源码全解析 —— virtio(20)的文章就介绍到这儿,希望我们推荐的文章对编程师们有所帮助!


