本文主要是介绍VTK 三维场景的基本要素(相机) vtkCamera 相机的运动,希望对大家解决编程问题提供一定的参考价值,需要的开发者们随着小编来一起学习吧!
相机的运动
当物体在处于静止位置时,相机可以在物体周围移动,摄取不同角度的图像
移动
移动分为相机的移动,和相机焦点的移动;移动改变了相机相对焦点的位置,离焦点更近或者更远;这样就会改变被渲染的物体在视野中的部分;
相机的移动可以有水平上的移动,垂直方向的移动,前后的移动;
 vtkCamera::Dolly(double value);将相机与焦点的距离除以给定的推拉值。使用大于1的值向焦点推拉,
使用小于1的值远离焦点推拉。(缩放)
旋转
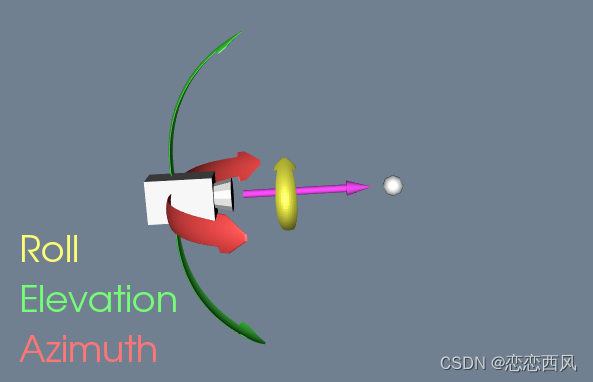
相机的旋转:是相机在以焦点为中心的圆球面上移动,因为相机可以水平旋转和垂直旋转;水平旋转就是在相机围绕球心过朝上方向这个轴旋转,也可以说是在球面上的维度进行旋转,但相机的镜头始终指向焦点;水平旋转就是在相机绕球面上的经线向上或者向下旋转;
围绕投影方向旋转相机。这将使摄影机绕其轴旋转:
vtkCamera::Roll(double angle);
围绕以焦点为中心的视图向上矢量旋转相机
请注意,视图向上矢量是通过SetViewUp设置的,不一定垂直于投影方向。结果是相机的水平旋转(纬度)
vtkCamera::Azimuth(double angle);
使用焦点作为旋转中心,围绕投影方向的负值与视图向上向量的叉积旋转相机。结果是场景的垂直旋转(经度)
vtkCamera::Elevation(double angle);
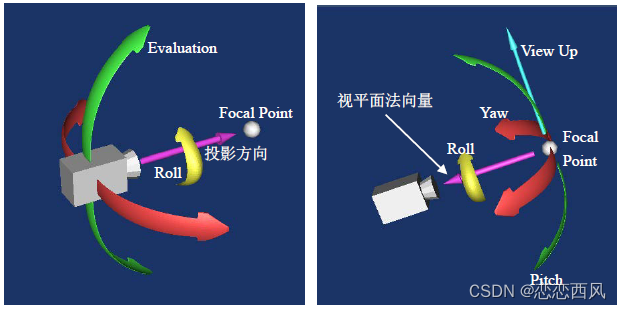
使用相机的位置作为旋转中心,围绕视图向上矢量旋转焦点
请注意,视图向上矢量是通过SetViewUp设置的,不一定垂直于投影方向。结果是场景的水平旋转(纬度)。
vtkCamera::Yaw(double angle);
使用相机的位置作为旋转中心,围绕视图向上矢量和投影方向的叉积旋转焦点。
结果是摄影机垂直旋转(经度)。
vtkCamera::Pitch(double angle);
缩放:
    vtkCamera::Zoom(double factor);在透视模式下,将视角减小指定的因子。在平行模式下,将平行比例减小指定的因子。
值大于1表示放大,
值小于1表示缩小@注意:当UseExplicitProjectionTransformMatrix为true时,
将忽略此设置。
重置相机参数 :
void ResetCamera();视频:
相机的旋转:
vtkCameraTest
视频代码:
注意这个只有初始时,旋转是对的;一但旋转后,再旋转可能是错的;
#pragma once
//#include "vtk_include.h"
#include <vtkAppendFilter.h>
#include <vtkCamera.h>
#include <vtkCellArray.h>
#include <vtkConeSource.h>
#include <vtkContourFilter.h>
#include <vtkCubeSource.h>
#include <vtkDataSetMapper.h>
#include <vtkImplicitModeller.h>
#include <vtkLODActor.h>
#include <vtkNamedColors.h>
#include <vtkNew.h>
#include <vtkPoints.h>
#include <vtkPolyData.h>
#include <vtkPolyDataMapper.h>
#include <vtkProperty.h>
#include <vtkRenderWindow.h>
#include <vtkRenderWindowInteractor.h>
#include <vtkRenderer.h>
#include <vtkRotationalExtrusionFilter.h>
#include <vtkSphereSource.h>
#include <vtkTextActor.h>
#include <vtkTextProperty.h>
#include <vtkTransform.h>
#include <vtkTransformFilter.h>
#include <vtkTransformPolyDataFilter.h>
#include <vtkWarpTo.h>
#include <algorithm>
#include <vtkInteractorStyleTrackballCamera.h>
#include <array>#include<stdio.h>
#include<iostream>
using namespace std;class Normal3DCameraStyle : public vtkInteractorStyleTrackballCamera
{
public:static Normal3DCameraStyle* New();vtkTypeMacro(Normal3DCameraStyle, vtkInteractorStyleTrackballCamera);//virtual void OnLeftButtonDown(void);//virtual void OnLeftButtonUp(void);//virtual void OnRightButtonDown(void);//virtual void OnRightButtonUp(void);//virtual void OnMiddleButtonDown(void);//virtual void OnMiddleButtonUp(void);//virtual void OnMouseWheelForward(void);//virtual void OnMouseWheelBackward(void);//virtual void OnMouseMove(void);//	/**//* OnChar is triggered when an ASCII key is pressed. Some basic key presses//* are handled here ('q' for Quit, 'p' for Pick, etc)//*///virtual void OnChar();OnKeyDown is triggered by pressing any key (identical to OnKeyPress()).An empty implementation is provided. The behavior of this function shouldbe specified in the subclass.//virtual void OnKeyDown();OnKeyUp is triggered by releaseing any key (identical to OnKeyRelease()).An empty implementation is provided. The behavior of this function shouldbe specified in the subclass.//virtual void OnKeyUp();OnKeyPress is triggered by pressing any key (identical to OnKeyDown()).An empty implementation is provided. The behavior of this function shouldbe specified in the subclass.//virtual void OnKeyPress();OnKeyRelease is triggered by pressing any key (identical to OnKeyUp()).An empty implementation is provided. The behavior of this function shouldbe specified in the subclass.//virtual void OnKeyRelease();void  OnKeyPress(){switch (this->Interactor->GetKeyCode()){case 'a':case 'A':cout << "A " << endl;m_Camera->Azimuth(1);break;case 'b':case 'B':m_Camera->Roll(1);cout << "b " << endl;break;case 'v':case 'V':m_Camera->Elevation(1);cout << "v " << endl;break;}m_RenderWindows->Render();}public:vtkCamera * m_Camera;vtkRenderWindow* m_RenderWindows;
};vtkStandardNewMacro(Normal3DCameraStyle);//必须加!!!!void main(){vtkNew<vtkNamedColors> colors;// Set the colors.std::array<unsigned char, 4> azArrowColor{ {255, 77, 77} };colors->SetColor("AzimuthArrowColor", azArrowColor.data());std::array<unsigned char, 4> elevArrowColor{ {77, 255, 77} };colors->SetColor("ElevationArrowColor", elevArrowColor.data());std::array<unsigned char, 4> rollArrowColor{ {255, 255, 77} };colors->SetColor("RollArrowColor", rollArrowColor.data());std::array<unsigned char, 4> spikeColor{ {255, 77, 255} };colors->SetColor("SpikeColor", spikeColor.data());// Set the background color.std::array<unsigned char, 4> bkg{ {26, 51, 102} };colors->SetColor("BkgColor", bkg.data());// Create the RenderWindow, Renderer and both ActorsvtkNew<vtkRenderer> ren1;vtkNew<vtkRenderWindow> renWin;renWin->AddRenderer(ren1);vtkNew<vtkRenderWindowInteractor> iren;iren->SetRenderWindow(renWin);// create a camera modelvtkNew<vtkConeSource> camCS;camCS->SetHeight(1.5);camCS->SetResolution(12);camCS->SetRadius(0.4);vtkNew<vtkCubeSource> camCBS;camCBS->SetXLength(1.5);camCBS->SetZLength(0.8);camCBS->SetCenter(0.4, 0, 0);vtkNew<vtkAppendFilter> camAPD;camAPD->AddInputConnection(camCS->GetOutputPort());camAPD->AddInputConnection(camCBS->GetOutputPort());vtkNew<vtkDataSetMapper> camMapper;camMapper->SetInputConnection(camAPD->GetOutputPort());vtkNew<vtkLODActor> camActor;camActor->SetMapper(camMapper);camActor->SetScale(2, 2, 2);// draw the arrowsvtkNew<vtkPolyData> pd;vtkNew<vtkCellArray> ca;vtkNew<vtkPoints> fp;fp->InsertNextPoint(0, 1, 0);fp->InsertNextPoint(8, 1, 0);fp->InsertNextPoint(8, 2, 0);fp->InsertNextPoint(10, 0.01, 0);fp->InsertNextPoint(8, -2, 0);fp->InsertNextPoint(8, -1, 0);fp->InsertNextPoint(0, -1, 0);ca->InsertNextCell(7);ca->InsertCellPoint(0);ca->InsertCellPoint(1);ca->InsertCellPoint(2);ca->InsertCellPoint(3);ca->InsertCellPoint(4);ca->InsertCellPoint(5);ca->InsertCellPoint(6);pd->SetPoints(fp);pd->SetPolys(ca);vtkNew<vtkPolyData> pd2;vtkNew<vtkCellArray> ca2;vtkNew<vtkPoints> fp2;fp2->InsertNextPoint(0, 1, 0);fp2->InsertNextPoint(8, 1, 0);fp2->InsertNextPoint(8, 2, 0);fp2->InsertNextPoint(10, 0.01, 0);ca2->InsertNextCell(4);ca2->InsertCellPoint(0);ca2->InsertCellPoint(1);ca2->InsertCellPoint(2);ca2->InsertCellPoint(3);pd2->SetPoints(fp2);pd2->SetLines(ca2);vtkNew<vtkImplicitModeller> arrowIM;arrowIM->SetInputData(pd);arrowIM->SetSampleDimensions(50, 20, 8);vtkNew<vtkContourFilter> arrowCF;arrowCF->SetInputConnection(arrowIM->GetOutputPort());arrowCF->SetValue(0, 0.2);vtkNew<vtkWarpTo> arrowWT;arrowWT->SetInputConnection(arrowCF->GetOutputPort());arrowWT->SetPosition(5, 0, 5);arrowWT->SetScaleFactor(0.85);arrowWT->AbsoluteOn();vtkNew<vtkTransform> arrowT;arrowT->RotateY(60);arrowT->Translate(-1.33198, 0, -1.479);arrowT->Scale(1, 0.5, 1);vtkNew<vtkTransformFilter> arrowTF;arrowTF->SetInputConnection(arrowWT->GetOutputPort());arrowTF->SetTransform(arrowT);vtkNew<vtkDataSetMapper> arrowMapper;arrowMapper->SetInputConnection(arrowTF->GetOutputPort());arrowMapper->ScalarVisibilityOff();// draw the azimuth arrowsvtkNew<vtkLODActor> a1Actor;a1Actor->SetMapper(arrowMapper);a1Actor->RotateZ(180);a1Actor->SetPosition(1, 0, -1);a1Actor->GetProperty()->SetColor(colors->GetColor3d("AzimuthArrowColor").GetData());a1Actor->GetProperty()->SetSpecularColor(colors->GetColor3d("White").GetData());a1Actor->GetProperty()->SetSpecular(0.3);a1Actor->GetProperty()->SetSpecularPower(20);a1Actor->GetProperty()->SetAmbient(0.2);a1Actor->GetProperty()->SetDiffuse(0.8);vtkNew<vtkLODActor> a2Actor;a2Actor->SetMapper(arrowMapper);a2Actor->RotateZ(180);a2Actor->RotateX(180);a2Actor->SetPosition(1, 0, 1);a2Actor->GetProperty()->SetColor(colors->GetColor3d("AzimuthArrowColor").GetData());a2Actor->GetProperty()->SetSpecularColor(colors->GetColor3d("White").GetData());a2Actor->GetProperty()->SetSpecular(0.3);a2Actor->GetProperty()->SetSpecularPower(20);a2Actor->GetProperty()->SetAmbient(0.2);a2Actor->GetProperty()->SetDiffuse(0.8);// draw the elevation arrowsvtkNew<vtkLODActor> a3Actor;a3Actor->SetMapper(arrowMapper);a3Actor->RotateZ(180);a3Actor->RotateX(90);a3Actor->SetPosition(1, -1, 0);a3Actor->GetProperty()->SetColor(colors->GetColor3d("ElevationArrowColor").GetData());a3Actor->GetProperty()->SetSpecularColor(colors->GetColor3d("White").GetData());a3Actor->GetProperty()->SetSpecular(0.3);a3Actor->GetProperty()->SetSpecularPower(20);a3Actor->GetProperty()->SetAmbient(0.2);a3Actor->GetProperty()->SetDiffuse(0.8);vtkNew<vtkLODActor> a4Actor;a4Actor->SetMapper(arrowMapper);a4Actor->RotateZ(180);a4Actor->RotateX(-90);a4Actor->SetPosition(1, 1, 0);a4Actor->GetProperty()->SetColor(colors->GetColor3d("ElevationArrowColor").GetData());a4Actor->GetProperty()->SetSpecularColor(colors->GetColor3d("White").GetData());a4Actor->GetProperty()->SetSpecular(0.3);a4Actor->GetProperty()->SetSpecularPower(20);a4Actor->GetProperty()->SetAmbient(0.2);a4Actor->GetProperty()->SetDiffuse(0.8);// draw the DOPvtkNew<vtkTransform> arrowT2;arrowT2->Scale(1, 0.6, 1);arrowT2->RotateY(90);vtkNew<vtkTransformPolyDataFilter> arrowTF2;arrowTF2->SetInputData(pd2);arrowTF2->SetTransform(arrowT2);vtkNew<vtkRotationalExtrusionFilter> arrowREF;arrowREF->SetInputConnection(arrowTF2->GetOutputPort());arrowREF->CappingOff();arrowREF->SetResolution(30);vtkNew<vtkPolyDataMapper> spikeMapper;spikeMapper->SetInputConnection(arrowREF->GetOutputPort());vtkNew<vtkLODActor> a5Actor;a5Actor->SetMapper(spikeMapper);a5Actor->SetScale(.3, .3, .6);a5Actor->RotateY(90);a5Actor->SetPosition(-2, 0, 0);a5Actor->GetProperty()->SetColor(colors->GetColor3d("SpikeColor").GetData());a5Actor->GetProperty()->SetAmbient(0.2);a5Actor->GetProperty()->SetDiffuse(0.8);// focal pointvtkNew<vtkSphereSource> fps;fps->SetRadius(0.5);vtkNew<vtkPolyDataMapper> fpMapper;fpMapper->SetInputConnection(fps->GetOutputPort());vtkNew<vtkLODActor> fpActor;fpActor->SetMapper(fpMapper);fpActor->SetPosition(-9, 0, 0);fpActor->GetProperty()->SetSpecularColor(colors->GetColor3d("White").GetData());fpActor->GetProperty()->SetSpecular(0.3);fpActor->GetProperty()->SetAmbient(0.2);fpActor->GetProperty()->SetDiffuse(0.8);fpActor->GetProperty()->SetSpecularPower(20);// create the roll arrowsvtkNew<vtkWarpTo> arrowWT2;arrowWT2->SetInputConnection(arrowCF->GetOutputPort());arrowWT2->SetPosition(5, 0, 2.5);arrowWT2->SetScaleFactor(0.95);arrowWT2->AbsoluteOn();vtkNew<vtkTransform> arrowT3;arrowT3->Translate(-2.50358, 0, -1.70408);arrowT3->Scale(0.5, 0.3, 1);vtkNew<vtkTransformFilter> arrowTF3;arrowTF3->SetInputConnection(arrowWT2->GetOutputPort());arrowTF3->SetTransform(arrowT3);vtkNew<vtkDataSetMapper> arrowMapper2;arrowMapper2->SetInputConnection(arrowTF3->GetOutputPort());arrowMapper2->ScalarVisibilityOff();// draw the roll arrowsvtkNew<vtkLODActor> a6Actor;a6Actor->SetMapper(arrowMapper2);a6Actor->RotateZ(90);a6Actor->SetPosition(-4, 0, 0);a6Actor->SetScale(1.5, 1.5, 1.5);a6Actor->GetProperty()->SetColor(colors->GetColor3d("RollArrowColor").GetData());a6Actor->GetProperty()->SetSpecularColor(colors->GetColor3d("White").GetData());a6Actor->GetProperty()->SetSpecular(0.3);a6Actor->GetProperty()->SetSpecularPower(20);a6Actor->GetProperty()->SetAmbient(0.2);a6Actor->GetProperty()->SetDiffuse(0.8);// Add the actors to the renderer, set the background and sizeren1->AddActor(camActor);ren1->AddActor(a1Actor);ren1->AddActor(a2Actor);ren1->AddActor(a3Actor);ren1->AddActor(a4Actor);ren1->AddActor(a5Actor);ren1->AddActor(a6Actor);ren1->AddActor(fpActor);ren1->SetBackground(colors->GetColor3d("BkgColor").GetData());ren1->SetBackground(colors->GetColor3d("SlateGray").GetData());renWin->SetSize(640, 480);renWin->SetWindowName("CameraModel1");// render the imagevtkCamera* cam1 = (ren1->GetActiveCamera());ren1->ResetCamera();cam1->Azimuth(150);cam1->Elevation(30);cam1->Dolly(1.5);ren1->ResetCameraClippingRange();// Create a TextActor for azimuth  (a1 and a2 actor's color)vtkNew<vtkTextActor> text;text->SetInput("Azimuth");vtkTextProperty* tprop = text->GetTextProperty();tprop->SetFontFamilyToArial();tprop->ShadowOff();tprop->SetLineSpacing(1.0);tprop->SetFontSize(36);tprop->SetColor(a1Actor->GetProperty()->GetColor());text->SetDisplayPosition(20, 50);ren1->AddActor2D(text);// Create a TextActor for elevation  (a3 and a4 actor's color)vtkNew<vtkTextActor> text2;text2->SetInput("Elevation");tprop = text2->GetTextProperty();tprop->SetFontFamilyToArial();tprop->ShadowOff();tprop->SetLineSpacing(1.0);tprop->SetFontSize(36);tprop->SetColor(a3Actor->GetProperty()->GetColor());text2->SetDisplayPosition(20, 100);ren1->AddActor2D(text2);// Create a TextActor for roll (a6 actor's color)vtkNew<vtkTextActor> text3;text3->SetInput("Roll");tprop = text3->GetTextProperty();tprop->SetFontFamilyToArial();tprop->ShadowOff();tprop->SetLineSpacing(1.0);tprop->SetFontSize(36);tprop->SetColor(a6Actor->GetProperty()->GetColor());text3->SetDisplayPosition(20, 150);ren1->AddActor2D(text3);vtkNew<Normal3DCameraStyle> style;cam1->SetFocalPoint(fpActor->GetPosition());cam1->SetPosition(camActor->GetPosition());style->m_Camera = cam1;style->m_RenderWindows = renWin;iren->SetInteractorStyle(style);renWin->Render();iren->Initialize();iren->Start();}
这篇关于VTK 三维场景的基本要素(相机) vtkCamera 相机的运动的文章就介绍到这儿,希望我们推荐的文章对编程师们有所帮助!


