本文主要是介绍Linux 36.2@Jetson Orin Nano之Hello AI World!,希望对大家解决编程问题提供一定的参考价值,需要的开发者们随着小编来一起学习吧!
Linux 36.2@Jetson Orin Nano之Hello AI World!
- 1. 源由
- 2. Hello AI World!
- 3. 步骤
- 3.1 准备阶段
- 3.2 获取代码
- 3.3 Python环境
- 3.4 重点环节
- 3.5 软件配置
- 3.6 PyTorch安装
- 3.7 编译链接
- 3.8 安装更新
- 4. 测试
- 4.1 video-viewer
- 4.2 detectnet
- 4.3 演示命令
- 5. 参考资料
- 6. 附录 AI模型
1. 源由
AI到底有多神奇???
记得神奇的年代有神奇的语言:“人有多大胆,地有多大产;不怕想不到,就怕做不到。“
暂且不去讨论这句话的背景,深意,以及各种解说。在这里,抓一个发散思维的要点,要能想,要感想!
好了,废话不多说,既然我们有了《Linux 36.2@Jetson Orin Nano基础环境构建》,就来看看用这些AI技术可以有些什么好玩的!
2. Hello AI World!
大体所有的新事物都会有个类似“Hello AI World”的介绍,让更加贴心的让我们快速接触和理解新事物。
- Linux应用程序之Helloworld入门
- ubuntu22.04@laptop OpenCV Get Started: 000_hello_opencv
这里也有一个Jetson AI的Hello AI World!。
大致有三种方法:
- Setting up Jetson with JetPack
- Running the Docker Container
- Building the Project from Source
通常来说,最难的就是从源代码来构建。因为程序对于环境的依赖关系,不是三言两语能够简单概括的。
3. 步骤
注:长城防火墙永远是技术的一种疼。遇到麻烦,请大家参考:Github操作网络异常笔记。
3.1 准备阶段
git用来获取最新github上的代码;而cmake主要用来做编译、链接的。
$ sudo apt-get update
$ sudo apt-get install git cmake
3.2 获取代码
获取最新的代码,通常是一个好的方法。不过也未必,最新不等于最好用。
不过我们的习惯是“不买合适的,不买最好的,就买最贵的;不用好用的,就用最新的。”
$ git clone https://github.com/dusty-nv/jetson-inference
$ cd jetson-inference
$ git submodule update --init
3.3 Python环境
Python在AI程序应用上是非常便捷的方法,当然讲效率那就去用C++。这里都Hello World,谁知道有没有Python示例代码。
$ sudo apt-get install libpython3-dev python3-numpy
3.4 重点环节
这里为什么说是重点,因为按照指南做,死活会出现各种编译、链接问题。经过笔者的牛刀小试,已经给各位解决了问题。
以下这些是Hello World必备的编译链接环境:
$ sudo apt-get install nvidia-cuda-dev tensorrt-dev nvidia-jetpack
3.5 软件配置
注:要按照笔者的方式进行CUDA_TOOLKIT_ROOT宏定义,切记!
$ cd jetson-inference    # omit if working directory is already jetson-inference/ from above
$ mkdir build
$ cd build
$ cmake -D CUDA_TOOLKIT_ROOT=/usr/local/cuda ..
3.6 PyTorch安装
注:这个步骤好像并非必须,笔者就没有做。也许是用到的这个demo用不到吧。
$ cd jetson-inference/build
$ ./install-pytorch.sh
3.7 编译链接
$ cd jetson-inference/build          # omit if working directory is already build/ from above
$ make -j$(nproc)  # 多核编译,加快速度
3.8 安装更新
注:在没有完全搞清楚软件包安装路径前,不建议安装。其实在build目录下也可以用。
$ sudo make install
$ sudo ldconfig
编译好的应用程序都在aarch64下。
jetson-inference$ tree build/ -L 1
build/
├── aarch64
├── CMakeCache.txt
├── CMakeFiles
├── cmake_install.cmake
├── docs
├── examples
├── install-pytorch.rc
├── install-pytorch.sh
├── Makefile
├── python
├── tools
├── torch-2.1.0-cp310-cp310-linux_aarch64.whl
├── torchvision-310
└── utils8 directories, 6 files
4. 测试
Jetson Orin Nano的板子用在AI上,最好的应用就是视频图像分析、物体跟踪。
不再献丑了,网上有大佬dusty-nv的讲座,大家自己看下:
S3E1 - Hello AI World Setup
不过,这种东西不过瘾,对吧。所以,我们先介绍两个常用的命令,弄个好玩的视频分析:
4.1 video-viewer
应用与视频的获取,比如:文件/RTP/RTSP/CSI/MIPI等等。
$ ./video-viewer --help
usage: video-viewer [--help] input_URI [output_URI]View/output a video or image stream.
See below for additional arguments that may not be shown above.positional arguments:input_URI       resource URI of input stream  (see videoSource below)output_URI      resource URI of output stream (see videoOutput below)videoSource arguments: input                resource URI of the input stream, for example:* /dev/video0               (V4L2 camera #0)* csi://0                   (MIPI CSI camera #0)* rtp://@:1234              (RTP stream)* rtsp://user:pass@ip:1234  (RTSP stream)* webrtc://@:1234/my_stream (WebRTC stream)* file://my_image.jpg       (image file)* file://my_video.mp4       (video file)* file://my_directory/      (directory of images)--input-width=WIDTH    explicitly request a width of the stream (optional)--input-height=HEIGHT  explicitly request a height of the stream (optional)--input-rate=RATE      explicitly request a framerate of the stream (optional)--input-save=FILE      path to video file for saving the input stream to disk--input-codec=CODEC    RTP requires the codec to be set, one of these:* h264, h265* vp8, vp9* mpeg2, mpeg4* mjpeg--input-decoder=TYPE   the decoder engine to use, one of these:* cpu* omx  (aarch64/JetPack4 only)* v4l2 (aarch64/JetPack5 only)--input-flip=FLIP      flip method to apply to input:* none (default)* counterclockwise* rotate-180* clockwise* horizontal* vertical* upper-right-diagonal* upper-left-diagonal--input-loop=LOOP      for file-based inputs, the number of loops to run:* -1 = loop forever*  0 = don't loop (default)* >0 = set number of loopsvideoOutput arguments: output               resource URI of the output stream, for example:* file://my_image.jpg       (image file)* file://my_video.mp4       (video file)* file://my_directory/      (directory of images)* rtp://<remote-ip>:1234    (RTP stream)* rtsp://@:8554/my_stream   (RTSP stream)* webrtc://@:1234/my_stream (WebRTC stream)* display://0               (OpenGL window)--output-codec=CODEC   desired codec for compressed output streams:* h264 (default), h265* vp8, vp9* mpeg2, mpeg4* mjpeg--output-encoder=TYPE  the encoder engine to use, one of these:* cpu* omx  (aarch64/JetPack4 only)* v4l2 (aarch64/JetPack5 only)--output-save=FILE     path to a video file for saving the compressed streamto disk, in addition to the primary output above--bitrate=BITRATE      desired target VBR bitrate for compressed streams,in bits per second. The default is 4000000 (4 Mbps)--headless             don't create a default OpenGL GUI windowlogging arguments: --log-file=FILE        output destination file (default is stdout)--log-level=LEVEL      message output threshold, one of the following:* silent* error* warning* success* info* verbose (default)* debug--verbose              enable verbose logging (same as --log-level=verbose)--debug                enable debug logging   (same as --log-level=debug)
4.2 detectnet
基于DNN的物体分析。
$ ./detectnet --help
usage: detectnet [--help] [--network=NETWORK] [--threshold=THRESHOLD] ...input [output]Locate objects in a video/image stream using an object detection DNN.
See below for additional arguments that may not be shown above.positional arguments:input           resource URI of input stream  (see videoSource below)output          resource URI of output stream (see videoOutput below)detectNet arguments: --network=NETWORK     pre-trained model to load, one of the following:* ssd-mobilenet-v1* ssd-mobilenet-v2 (default)* ssd-inception-v2* peoplenet* peoplenet-pruned* dashcamnet* trafficcamnet* facedetect--model=MODEL         path to custom model to load (caffemodel, uff, or onnx)--prototxt=PROTOTXT   path to custom prototxt to load (for .caffemodel only)--labels=LABELS       path to text file containing the labels for each class--input-blob=INPUT    name of the input layer (default is 'data')--output-cvg=COVERAGE name of the coverage/confidence output layer (default is 'coverage')--output-bbox=BOXES   name of the bounding output layer (default is 'bboxes')--mean-pixel=PIXEL    mean pixel value to subtract from input (default is 0.0)--confidence=CONF     minimum confidence threshold for detection (default is 0.5)--clustering=CLUSTER  minimum overlapping area threshold for clustering (default is 0.75)--alpha=ALPHA         overlay alpha blending value, range 0-255 (default: 120)--overlay=OVERLAY     detection overlay flags (e.g. --overlay=box,labels,conf)valid combinations are:  'box', 'lines', 'labels', 'conf', 'none'--profile             enable layer profiling in TensorRTobjectTracker arguments: --tracking               flag to enable default tracker (IOU)--tracker=TRACKER        enable tracking with 'IOU' or 'KLT'--tracker-min-frames=N   the number of re-identified frames for a track to be considered valid (default: 3)--tracker-drop-frames=N  number of consecutive lost frames before a track is dropped (default: 15)--tracker-overlap=N      how much IOU overlap is required for a bounding box to be matched (default: 0.5)videoSource arguments: input                resource URI of the input stream, for example:* /dev/video0               (V4L2 camera #0)* csi://0                   (MIPI CSI camera #0)* rtp://@:1234              (RTP stream)* rtsp://user:pass@ip:1234  (RTSP stream)* webrtc://@:1234/my_stream (WebRTC stream)* file://my_image.jpg       (image file)* file://my_video.mp4       (video file)* file://my_directory/      (directory of images)--input-width=WIDTH    explicitly request a width of the stream (optional)--input-height=HEIGHT  explicitly request a height of the stream (optional)--input-rate=RATE      explicitly request a framerate of the stream (optional)--input-save=FILE      path to video file for saving the input stream to disk--input-codec=CODEC    RTP requires the codec to be set, one of these:* h264, h265* vp8, vp9* mpeg2, mpeg4* mjpeg--input-decoder=TYPE   the decoder engine to use, one of these:* cpu* omx  (aarch64/JetPack4 only)* v4l2 (aarch64/JetPack5 only)--input-flip=FLIP      flip method to apply to input:* none (default)* counterclockwise* rotate-180* clockwise* horizontal* vertical* upper-right-diagonal* upper-left-diagonal--input-loop=LOOP      for file-based inputs, the number of loops to run:* -1 = loop forever*  0 = don't loop (default)* >0 = set number of loopsvideoOutput arguments: output               resource URI of the output stream, for example:* file://my_image.jpg       (image file)* file://my_video.mp4       (video file)* file://my_directory/      (directory of images)* rtp://<remote-ip>:1234    (RTP stream)* rtsp://@:8554/my_stream   (RTSP stream)* webrtc://@:1234/my_stream (WebRTC stream)* display://0               (OpenGL window)--output-codec=CODEC   desired codec for compressed output streams:* h264 (default), h265* vp8, vp9* mpeg2, mpeg4* mjpeg--output-encoder=TYPE  the encoder engine to use, one of these:* cpu* omx  (aarch64/JetPack4 only)* v4l2 (aarch64/JetPack5 only)--output-save=FILE     path to a video file for saving the compressed streamto disk, in addition to the primary output above--bitrate=BITRATE      desired target VBR bitrate for compressed streams,in bits per second. The default is 4000000 (4 Mbps)--headless             don't create a default OpenGL GUI windowlogging arguments: --log-file=FILE        output destination file (default is stdout)--log-level=LEVEL      message output threshold, one of the following:* silent* error* warning* success* info* verbose (default)* debug--verbose              enable verbose logging (same as --log-level=verbose)--debug                enable debug logging   (same as --log-level=debug)
4.3 演示命令
- 网络RTSP摄像头拉流&分析
$ cd jetson-inference/build
$ ./video-viewer --input-codec=h264 rtsp://192.168.78.201:8554/basesoci2c0muxi2c1ov564736
$ ./detectnet --input-codec=h264 rtsp://192.168.78.201:8554/basesoci2c0muxi2c1ov564736
- 视频文件播放&分析
$ cd jetson-inference/build
$ ./video-viewer --input-codec=h264  ../../../../TrackingBike.mp4
$ ./detectnet ../../../../TrackingBike.mp4 ../../../../TrackingBike_Detect.mp4
Extreme Mountain Biking FPV Drone Chasing
5. 参考资料
【1】Linux 36.2@Jetson Orin Nano基础环境构建
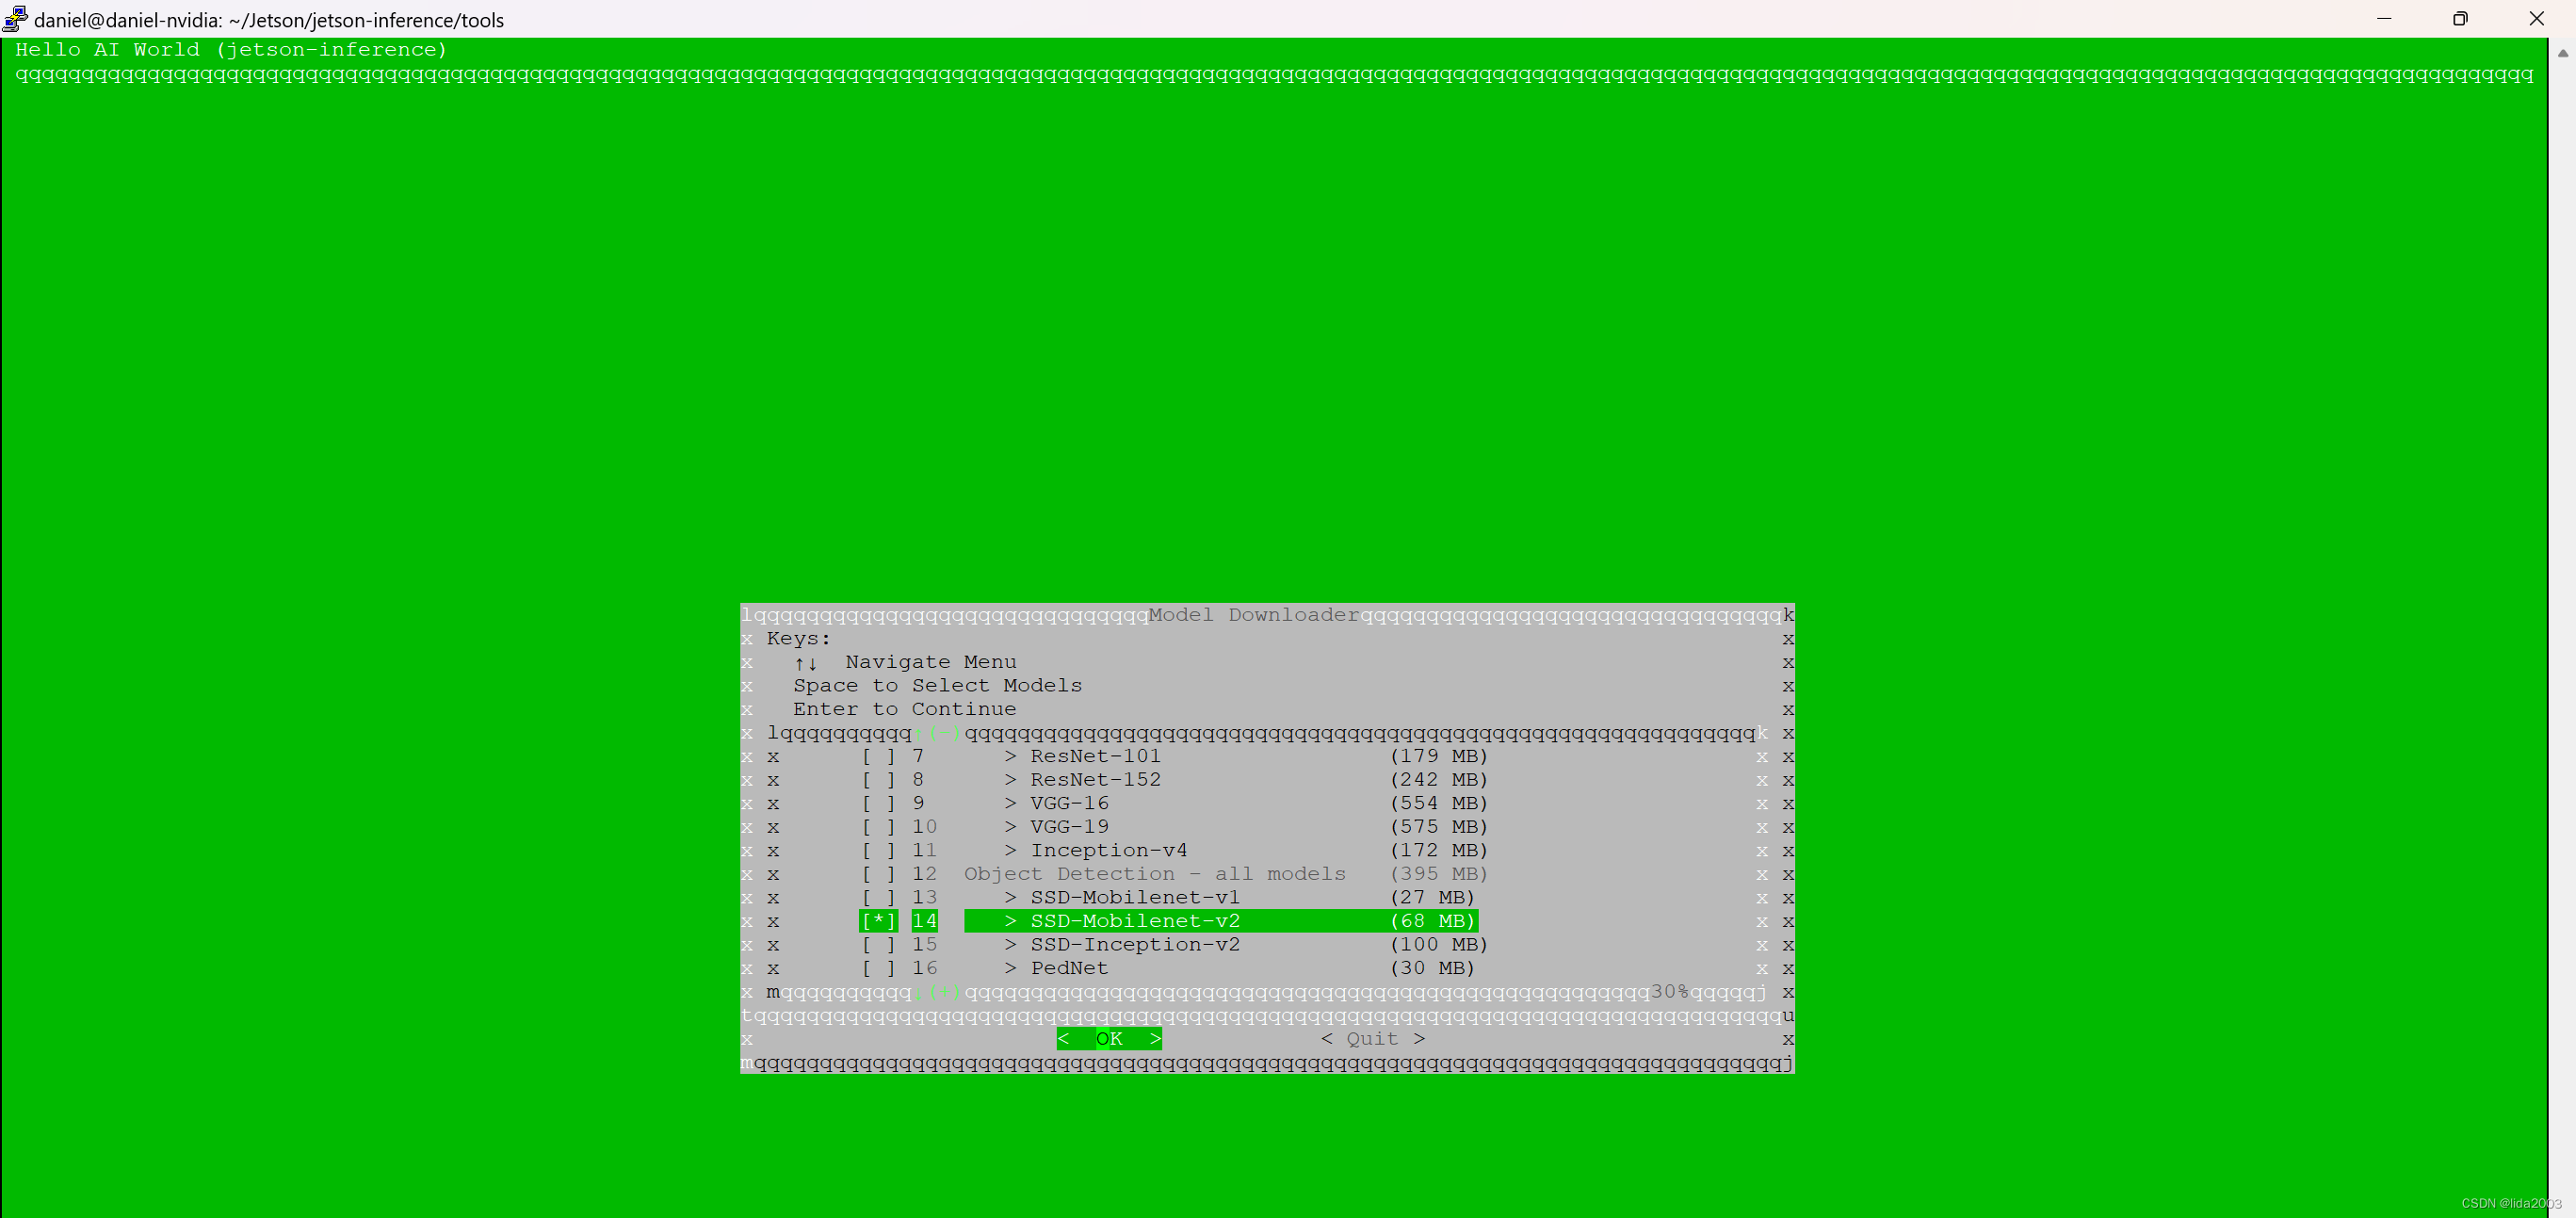
6. 附录 AI模型
detectNet 中有不少模型可供选择,默认情况: ssd-mobilenet-v2
- ssd-mobilenet-v1
- ssd-mobilenet-v2 (default)
- ssd-inception-v2
- peoplenet
- peoplenet-pruned
- dashcamnet
- trafficcamnet
- facedetect
$ cd jetson-inference/tools
$ ./download-models.sh
这篇关于Linux 36.2@Jetson Orin Nano之Hello AI World!的文章就介绍到这儿,希望我们推荐的文章对编程师们有所帮助!


