本文主要是介绍Android简易电话簿,希望对大家解决编程问题提供一定的参考价值,需要的开发者们随着小编来一起学习吧!
修改应用图标
打开AndroidManifest.xml,修改icon为minmip下保存的图标

记录登录次数
通过SharedPreferences保存一个变量count记录登录次数,每当进入一次电话簿时,count加1并显示到屏幕上
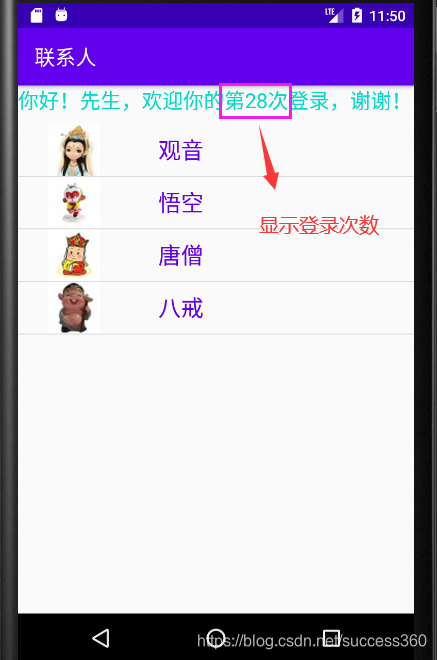
//记录登录次数private void login(){SharedPreferences sharedPreferences = getSharedPreferences("count",MODE_PRIVATE);SharedPreferences.Editor editor = sharedPreferences.edit();//如果要寻找的变量不存在,那么就创建它,并且默认值int count = sharedPreferences.getInt("count",1);textView.setText("你好!先生,欢迎你的第"+count+"次登录,谢谢!");//每登录一次,count就加1editor.putInt("count",++count);editor.commit();//每次进行数据修改,都要执行commit()方法,提交已修改的结果}
修改联系人信息
通过listview绑定setOnItemClickListener,当点击某一个联系人时,弹出联系人的详细信息。修改信息,点击保存,信息更新。

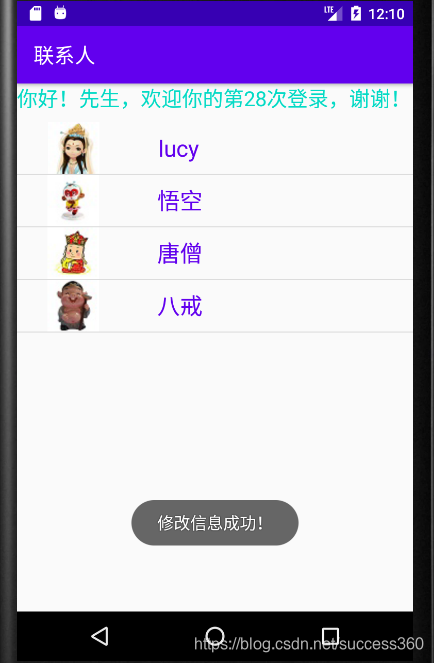
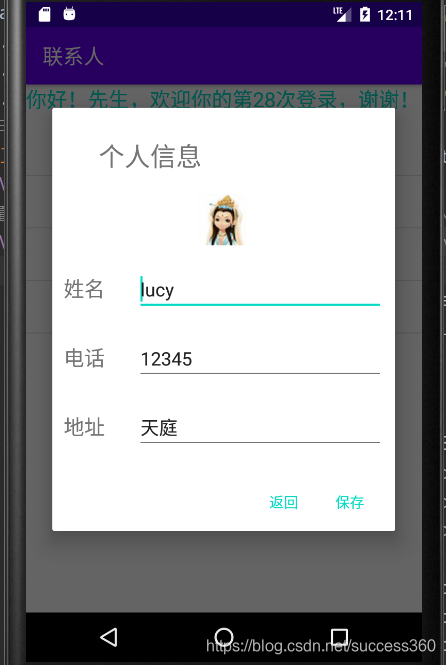
listView.setOnItemClickListener(new AdapterView.OnItemClickListener() {@Overridepublic void onItemClick(AdapterView<?> parent, View view, final int position, long id) {//自定义对话框,显示联系人详情AlertDialog.Builder builder = new AlertDialog.Builder(MainActivity.this);View view1 = View.inflate(MainActivity.this,R.layout.activity_contact_detail,null);//为对话框设置自定义的视图builder.setView(view1);//绑定控件ImageView imageView = view1.findViewById(R.id.imageView);final EditText editText1 = view1.findViewById(R.id.editText1);final EditText editText2 = view1.findViewById(R.id.editText2);final EditText editText3 = view1.findViewById(R.id.editText3);imageView.setImageResource((Integer) list.get(position).getImage());editText1.setText((String) list.get(position).getName());editText2.setText((String) list.get(position).getPhone());editText3.setText((String) list.get(position).getAddress());//添加按钮builder.setPositiveButton("保存", new DialogInterface.OnClickListener() {@Overridepublic void onClick(DialogInterface dialog, int which) {list.get(position).setName(editText1.getText().toString());list.get(position).setPhone(editText2.getText().toString());list.get(position).setAddress(editText3.getText().toString());//更新数据adapter.notifyDataSetChanged();Toast.makeText(MainActivity.this,"修改信息成功!",Toast.LENGTH_SHORT).show();}});builder.setNegativeButton("返回",null);//显示对话框builder.create().show();}});
删除联系人
通过listview绑定setOnItemLongClickListener,长按某一联系人,提示是否删除联系人
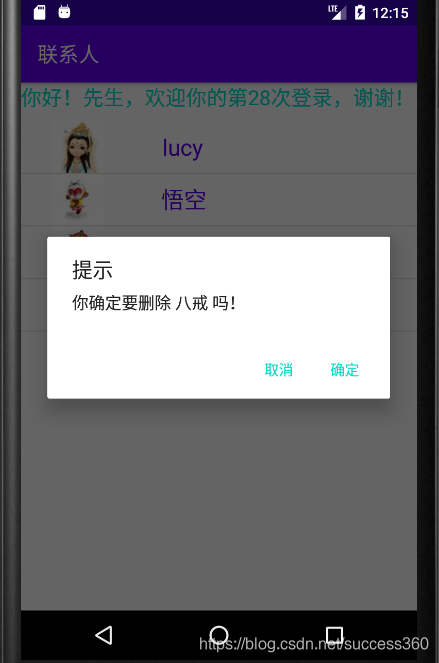
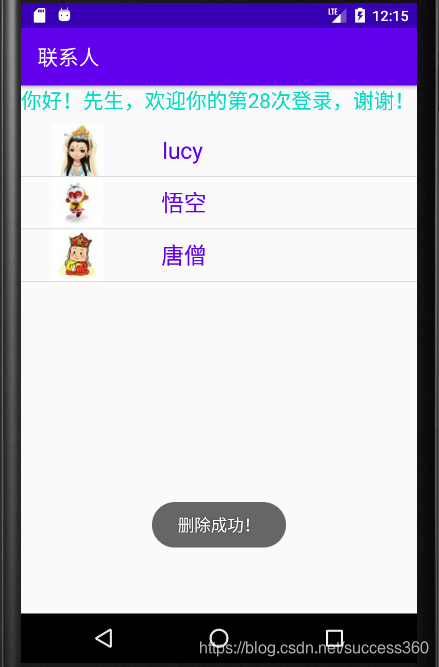
listView.setOnItemLongClickListener(new AdapterView.OnItemLongClickListener() {@Overridepublic boolean onItemLongClick(AdapterView<?> parent, View view, final int position, long id) {new AlertDialog.Builder(MainActivity.this).setTitle("提示").setMessage("你确定要删除 "+list.get(position).getName()+" 吗!").setPositiveButton("确定", new DialogInterface.OnClickListener() {@Overridepublic void onClick(DialogInterface dialog, int which) {//将要删除的联系人的信息从list中移除list.remove(position);//更新数据adapter.notifyDataSetChanged();Toast.makeText(MainActivity.this,"删除成功!",Toast.LENGTH_SHORT).show();}}).setNegativeButton("取消",null).create().show();/*因为android默认的优先响应ItemClickListener,所以当返回值为false时,ItemLongClickListener和ItemClickListener都会响应点击事件,因此应该返回true,提高ItemLongClickListener响应的优先级。*/return true;}});
完整代码
定义联系人的类
public class Person {private Object image;private String name;private String phone;private String address;public Person(Object image,String name,String phone,String address){this.image = image;this.name = name;this.phone = phone;this.address = address;}public Object getImage() {return image;}public void setImage(Object image) {this.image = image;}public String getName() {return name;}public void setName(String name) {this.name = name;}public String getPhone() {return phone;}public void setPhone(String phone) {this.phone = phone;}public String getAddress() {return address;}public void setAddress(String address) {this.address = address;}
}
主界面
public class MainActivity extends AppCompatActivity {private List<Person> list;private ListView listView;private TextView textView;protected void onCreate(Bundle savedInstanceState) {super.onCreate(savedInstanceState);setContentView(R.layout.activity_main);listView = findViewById(R.id.listView);textView = findViewById(R.id.textView);//记录登录次数login();list = new ArrayList<>();//new四位联系人list.add(new Person(R.mipmap.guanyin,"观音","123","天庭"));list.add(new Person(R.mipmap.sunwukong,"悟空","234","花果山"));list.add(new Person(R.mipmap.tangseng,"唐僧","345","大唐"));list.add(new Person(R.mipmap.zhubajie,"八戒","456","高老庄"));//使用自定义适配器final CustomAdapter adapter = new CustomAdapter(this,list);listView.setAdapter(adapter);//设置监听器,当点击联系人列表的每一行时,显示联系人的详细信息listView.setOnItemClickListener(new AdapterView.OnItemClickListener() {@Overridepublic void onItemClick(AdapterView<?> parent, View view, final int position, long id) {//自定义对话框,显示联系人详情AlertDialog.Builder builder = new AlertDialog.Builder(MainActivity.this);View view1 = View.inflate(MainActivity.this,R.layout.activity_contact_detail,null);//为对话框设置自定义的视图builder.setView(view1);//绑定控件ImageView imageView = view1.findViewById(R.id.imageView);final EditText editText1 = view1.findViewById(R.id.editText1);final EditText editText2 = view1.findViewById(R.id.editText2);final EditText editText3 = view1.findViewById(R.id.editText3);imageView.setImageResource((Integer) list.get(position).getImage());editText1.setText((String) list.get(position).getName());editText2.setText((String) list.get(position).getPhone());editText3.setText((String) list.get(position).getAddress());//添加按钮builder.setPositiveButton("保存", new DialogInterface.OnClickListener() {@Overridepublic void onClick(DialogInterface dialog, int which) {list.get(position).setName(editText1.getText().toString());list.get(position).setPhone(editText2.getText().toString());list.get(position).setAddress(editText3.getText().toString());//更新数据adapter.notifyDataSetChanged();Toast.makeText(MainActivity.this,"修改信息成功!",Toast.LENGTH_SHORT).show();}});builder.setNegativeButton("返回",null);//显示对话框builder.create().show();}});//当长时间点击时,弹出对话框,提示是否要删除联系人listView.setOnItemLongClickListener(new AdapterView.OnItemLongClickListener() {@Overridepublic boolean onItemLongClick(AdapterView<?> parent, View view, final int position, long id) {new AlertDialog.Builder(MainActivity.this).setTitle("提示").setMessage("你确定要删除 "+list.get(position).getName()+" 吗!").setPositiveButton("确定", new DialogInterface.OnClickListener() {@Overridepublic void onClick(DialogInterface dialog, int which) {//将要删除的联系人的信息从list中移除list.remove(position);//更新数据adapter.notifyDataSetChanged();Toast.makeText(MainActivity.this,"删除成功!",Toast.LENGTH_SHORT).show();}}).setNegativeButton("取消",null).create().show();/*因为android默认的优先响应ItemClickListener,所以当返回值为false时,ItemLongClickListener和ItemClickListener都会响应点击事件,因此应该返回true,提高ItemLongClickListener响应的优先级。*/return true;}});}//记录登录次数private void login(){SharedPreferences sharedPreferences = getSharedPreferences("count",MODE_PRIVATE);SharedPreferences.Editor editor = sharedPreferences.edit();//如果要寻找的变量不存在,那么就创建它,并且默认值int count = sharedPreferences.getInt("count",1);textView.setText("你好!先生,欢迎你的第"+count+"次登录,谢谢!");//每登录一次,count就加1editor.putInt("count",++count);editor.commit();//每次进行数据修改,都要执行commit()方法,提交已修改的结果}
}
通过重写BaseAdapter里的方法,实现自定义的adapter
public class CustomAdapter extends BaseAdapter {private Context context;private List<Person> list;public CustomAdapter(Context context,List<Person> list){this.context = context;this.list = list;}@Override//列表的长度public int getCount() {return list.size();}@Overridepublic Object getItem(int position) {return list.get(position);}@Overridepublic long getItemId(int position) {return position;}@Override//获取每一行的viewpublic View getView(int position, View convertView, ViewGroup parent) {ViewItems viewItems = null;if (convertView == null){viewItems = new ViewItems();//获取自定义的布局convertView = LayoutInflater.from(context).inflate(R.layout.activity_contact_person,null);viewItems.imageView = convertView.findViewById(R.id.imageView);viewItems.textView = convertView.findViewById(R.id.textView);convertView.setTag(viewItems);}else {//如果布局不为空,直接使用getTag()获取viewItems = (ViewItems) convertView.getTag();}//为控件设置内容viewItems.imageView.setImageResource((Integer) list.get(position).getImage());viewItems.textView.setText((String) list.get(position).getName());return convertView;}//每一行所使用的控件public static class ViewItems{private ImageView imageView;private TextView textView;}
}
主界面布局
<?xml version="1.0" encoding="utf-8"?>
<androidx.constraintlayout.widget.ConstraintLayout xmlns:android="http://schemas.android.com/apk/res/android"xmlns:app="http://schemas.android.com/apk/res-auto"android:layout_width="match_parent"android:layout_height="match_parent"><ListViewandroid:id="@+id/listView"android:layout_width="417dp"android:layout_height="624dp"android:layout_marginTop="10dp"app:layout_constraintBottom_toBottomOf="parent"app:layout_constraintEnd_toEndOf="parent"app:layout_constraintStart_toStartOf="parent"app:layout_constraintTop_toBottomOf="@+id/textView" /><TextViewandroid:id="@+id/textView"android:layout_width="0dp"android:layout_height="wrap_content"android:layout_marginTop="40dp"android:textColor="@color/colorAccent"android:textSize="20sp"app:layout_constraintBottom_toTopOf="@+id/listView"app:layout_constraintEnd_toEndOf="parent"app:layout_constraintHorizontal_bias="0.0"app:layout_constraintStart_toStartOf="parent"app:layout_constraintTop_toTopOf="parent"app:layout_constraintVertical_bias="0.21" />
</androidx.constraintlayout.widget.ConstraintLayout>
联系人列表布局
<?xml version="1.0" encoding="utf-8"?>
<androidx.constraintlayout.widget.ConstraintLayout xmlns:android="http://schemas.android.com/apk/res/android"xmlns:app="http://schemas.android.com/apk/res-auto"xmlns:tools="http://schemas.android.com/tools"android:layout_width="match_parent"android:layout_height="match_parent"tools:context=".MainActivity"><LinearLayoutandroid:layout_width="409dp"android:layout_height="0dp"android:gravity="center"android:orientation="horizontal"app:layout_constraintEnd_toEndOf="parent"app:layout_constraintHorizontal_bias="1.0"app:layout_constraintStart_toStartOf="parent"app:layout_constraintTop_toTopOf="parent"><ImageViewandroid:id="@+id/imageView"android:layout_width="wrap_content"android:layout_height="wrap_content"android:layout_weight="1"app:srcCompat="@mipmap/ic_launcher" /><TextViewandroid:id="@+id/textView"android:layout_marginLeft="20sp"android:layout_width="wrap_content"android:layout_height="wrap_content"android:layout_weight="3"android:textColor="@color/colorPrimary"android:textSize="22sp" /></LinearLayout>
</androidx.constraintlayout.widget.ConstraintLayout>
自定义对话框的布局,显示联系人详细信息
<?xml version="1.0" encoding="utf-8"?>
<androidx.constraintlayout.widget.ConstraintLayout xmlns:android="http://schemas.android.com/apk/res/android"xmlns:app="http://schemas.android.com/apk/res-auto"android:layout_width="match_parent"android:layout_height="match_parent"><TextViewandroid:id="@+id/textView"android:layout_width="wrap_content"android:layout_height="wrap_content"android:layout_marginTop="30dp"android:text="个人信息"android:textSize="25sp"app:layout_constraintEnd_toEndOf="parent"app:layout_constraintHorizontal_bias="0.194"app:layout_constraintStart_toStartOf="parent"app:layout_constraintTop_toTopOf="parent" /><ImageViewandroid:id="@+id/imageView"android:layout_width="wrap_content"android:layout_height="wrap_content"android:layout_marginTop="20dp"app:layout_constraintEnd_toEndOf="parent"app:layout_constraintHorizontal_bias="0.498"app:layout_constraintStart_toStartOf="parent"app:layout_constraintTop_toBottomOf="@+id/textView"app:srcCompat="@mipmap/ic_launcher" /><LinearLayoutandroid:layout_width="311dp"android:layout_height="201dp"android:layout_marginStart="1dp"android:layout_marginLeft="1dp"android:layout_marginTop="20dp"android:layout_marginEnd="1dp"android:layout_marginRight="1dp"android:orientation="vertical"app:layout_constraintEnd_toEndOf="parent"app:layout_constraintStart_toStartOf="parent"app:layout_constraintTop_toBottomOf="@+id/imageView"><LinearLayoutandroid:layout_width="match_parent"android:layout_height="match_parent"android:layout_weight="1"android:orientation="horizontal" ><TextViewandroid:id="@+id/textView3"android:layout_width="wrap_content"android:layout_height="wrap_content"android:layout_weight="1"android:textSize="20sp"android:text="姓名" /><EditTextandroid:id="@+id/editText1"android:layout_width="wrap_content"android:layout_height="wrap_content"android:textSize="18dp"android:layout_weight="1"android:ems="10"android:inputType="textEmailAddress" /></LinearLayout><LinearLayoutandroid:layout_width="match_parent"android:layout_height="match_parent"android:layout_weight="1"android:orientation="horizontal"><TextViewandroid:id="@+id/textView4"android:layout_width="wrap_content"android:textSize="20sp"android:layout_height="wrap_content"android:layout_weight="1"android:text="电话" /><EditTextandroid:id="@+id/editText2"android:layout_width="wrap_content"android:textSize="18dp"android:layout_height="wrap_content"android:layout_weight="1"android:ems="10"android:inputType="phone" /></LinearLayout><LinearLayoutandroid:layout_width="match_parent"android:layout_height="match_parent"android:layout_weight="1"android:orientation="horizontal"><TextViewandroid:id="@+id/textView5"android:layout_width="wrap_content"android:layout_height="wrap_content"android:textSize="20sp"android:layout_weight="1"android:text="地址" /><EditTextandroid:id="@+id/editText3"android:layout_width="wrap_content"android:layout_height="wrap_content"android:textSize="18dp"android:layout_weight="1"android:ems="10"android:inputType="textPostalAddress" /></LinearLayout></LinearLayout></androidx.constraintlayout.widget.ConstraintLayout>
这篇关于Android简易电话簿的文章就介绍到这儿,希望我们推荐的文章对编程师们有所帮助!


