本文主要是介绍svg基础(六)滤镜-图像,光照效果(漫反射,镜面反射),组合,希望对大家解决编程问题提供一定的参考价值,需要的开发者们随着小编来一起学习吧!
1 feImage:图像滤镜
feImage 滤镜从外部来源取得图像数据,并提供像素数据作为输出(意味着如果外部来源是一个 SVG 图像,这个图像将被栅格化。)
1.1 用法:
<feImage x="" y="" width="" height="" externalResourcesRequired =""
preserveAspectRatio="" xlink:href=""/>
1.2 属性:
- x: 用户坐标系中定义x轴坐标
- y: 用户坐标系中定义y轴坐标
- width: foreignObject的宽度
- height: foreignObject的高度
- externalResourcesRequired: 当前文档中是否需要外部资源。默认值为false
- preserveAspectRatio: 指示具有提供给定纵横比的viewBox的元素如何必须适合具有不同纵横比的视口
- xlink:href: 定义对资源的引用
- crossorigin: 通知浏览器请求具有cross-origin权限的图像文件

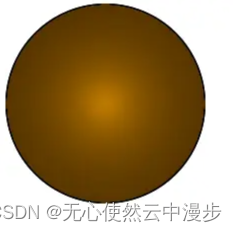
2 feDiffuseLighting:漫反射
2.1 用法:
 <feDiffuseLighting in="SourceGraphic"lighting-color=""surfaceScale=""diffuseConstant=""result="">
</feDiffuseLighting>
2.2 属性:
- 阿尔法乘积因子(surfaceScale)
- RGB乘积因子(diffuseConstant)
- 灯光颜色(lighting-color)
<svg xmlns="http://www.w3.org/2000/svg" version="1.1" width="200" height="200"><defs><filter id="diff-light" color-interpolate-filter="sRGB" x="0" y="0"><feDiffuseLighting in="SourceGraphic"lighting-color="orange"surfaceScale="1"diffuseConstant="0.5"result="diffuseOutput"><fePointLight x="100" y="100" z="20"/></feDiffuseLighting><feComposite in1="diffuseOutput" in2="SourceGraphic" operator="in" result="diffuseOutput"></feComposite><feBlend in1="diffuseOutput" in2="SourceGraphic" mode="screen"></feBlend></filter></defs><circle cx="100" cy="100" r="100" filter=url(#diff-light)></circle></svg>
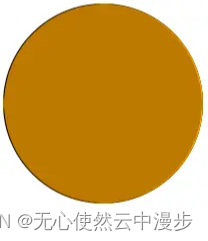
3 feSpecularLighting:镜面反射
3.1 用法:
 <feSpecularLighting in="SourceGraphic"lighting-color=""surfaceScale=""specularConstant=""specularExponent=""result="">
</feSpecularLighting>
3.2 属性:
- 阿尔法乘积因子(surfaceScale)
- specularConstant
- 灯光颜色(lighting-color)
<svg xmlns="http://www.w3.org/2000/svg" version="1.1" width="200" height="200"><defs><filter id="spec-light" color-interpolate-filter="sRGB" x="0" y="0"><feSpecularLighting in="SourceGraphic"lighting-color="orange"surfaceScale="1"specularConstant="1"specularExponent="4"result="specOutput"><feDistantLight elevation="25" azimuth="0"/></feSpecularLighting><feComposite in1="specOutput" in2="SourceGraphic" operator="in" result="specOutput"></feComposite></filter></defs><circle cx="100" cy="100" r="100" filter=url(#spec-light)></circle></svg>
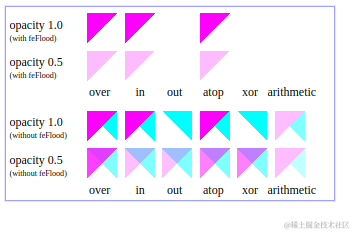
4 # feComposite:组合滤镜
该滤镜执行两个输入图像的智能像素组合,在图像空间中使用以下 Porter-Duff 合成操作之一:over、in、atop、xor。另外,还可以应用一个智能组件arithmetic 操作(结果被压到 [0,1] 范围内)。
该 arithmetic 操作对组合来自<feDiffuseLighting>滤镜和来自<feSpecularLighting> 滤镜的输出以及组合纹理数据很有用。如果选择了arithmetic操作,每个结果像素都要经过下面的方程式的计算:
result = k1i1i2 + k2i1 + k3i2 + k4
在这里:
i1和i2标示了输入图像相应的像素通道值,分别映射到in和in2 (en-US)`。k1、k2、k3和k4标示了同名的属性值。
这里有一个例子可以参考:
<svg width="330" height="195" viewBox="0 0 1100 650" version="1.1"xmlns="http://www.w3.org/2000/svg" xmlns:xlink="http://www.w3.org/1999/xlink"><title>Example feComposite - Examples of feComposite operations</title><desc>Four rows of six pairs of overlapping triangles depictingthe six different feComposite operators under differentopacity values and different clearing of the background.</desc><defs><desc>Define two sets of six filters for each of the six compositing operators.The first set wipes out the background image by flooding with opaque white.The second set does not wipe out the background, with the resultthat the background sometimes shines through and is other casesis blended into itself (i.e., "double-counting").</desc><filter id="overFlood" filterUnits="objectBoundingBox" x="-5%" y="-5%" width="110%" height="110%"><feFlood flood-color="#ffffff" flood-opacity="1" result="flood"/><feComposite in="SourceGraphic" in2="BackgroundImage" operator="over" result="comp"/><feMerge> <feMergeNode in="flood"/> <feMergeNode in="comp"/> </feMerge></filter><filter id="inFlood" filterUnits="objectBoundingBox" x="-5%" y="-5%" width="110%" height="110%"><feFlood flood-color="#ffffff" flood-opacity="1" result="flood"/><feComposite in="SourceGraphic" in2="BackgroundImage" operator="in" result="comp"/><feMerge> <feMergeNode in="flood"/> <feMergeNode in="comp"/> </feMerge></filter><filter id="outFlood" filterUnits="objectBoundingBox" x="-5%" y="-5%" width="110%" height="110%"><feFlood flood-color="#ffffff" flood-opacity="1" result="flood"/><feComposite in="SourceGraphic" in2="BackgroundImage" operator="out" result="comp"/><feMerge> <feMergeNode in="flood"/> <feMergeNode in="comp"/> </feMerge></filter><filter id="atopFlood" filterUnits="objectBoundingBox" x="-5%" y="-5%" width="110%" height="110%"><feFlood flood-color="#ffffff" flood-opacity="1" result="flood"/><feComposite in="SourceGraphic" in2="BackgroundImage" operator="atop" result="comp"/><feMerge> <feMergeNode in="flood"/> <feMergeNode in="comp"/> </feMerge></filter><filter id="xorFlood" filterUnits="objectBoundingBox" x="-5%" y="-5%" width="110%" height="110%"><feFlood flood-color="#ffffff" flood-opacity="1" result="flood"/><feComposite in="SourceGraphic" in2="BackgroundImage" operator="xor" result="comp"/><feMerge> <feMergeNode in="flood"/> <feMergeNode in="comp"/> </feMerge></filter><filter id="arithmeticFlood" filterUnits="objectBoundingBox"x="-5%" y="-5%" width="110%" height="110%"><feFlood flood-color="#ffffff" flood-opacity="1" result="flood"/><feComposite in="SourceGraphic" in2="BackgroundImage" result="comp"operator="arithmetic" k1=".5" k2=".5" k3=".5" k4=".5"/><feMerge> <feMergeNode in="flood"/> <feMergeNode in="comp"/> </feMerge></filter><filter id="overNoFlood" filterUnits="objectBoundingBox" x="-5%" y="-5%" width="110%" height="110%"><feComposite in="SourceGraphic" in2="BackgroundImage" operator="over" result="comp"/></filter><filter id="inNoFlood" filterUnits="objectBoundingBox" x="-5%" y="-5%" width="110%" height="110%"><feComposite in="SourceGraphic" in2="BackgroundImage" operator="in" result="comp"/></filter><filter id="outNoFlood" filterUnits="objectBoundingBox" x="-5%" y="-5%" width="110%" height="110%"><feComposite in="SourceGraphic" in2="BackgroundImage" operator="out" result="comp"/></filter><filter id="atopNoFlood" filterUnits="objectBoundingBox" x="-5%" y="-5%" width="110%" height="110%"><feComposite in="SourceGraphic" in2="BackgroundImage" operator="atop" result="comp"/></filter><filter id="xorNoFlood" filterUnits="objectBoundingBox" x="-5%" y="-5%" width="110%" height="110%"><feComposite in="SourceGraphic" in2="BackgroundImage" operator="xor" result="comp"/></filter><filter id="arithmeticNoFlood" filterUnits="objectBoundingBox"x="-5%" y="-5%" width="110%" height="110%"><feComposite in="SourceGraphic" in2="BackgroundImage" result="comp"operator="arithmetic" k1=".5" k2=".5" k3=".5" k4=".5"/></filter><path id="Blue100" d="M 0 0 L 100 0 L 100 100 z" fill="#00ffff" /><path id="Red100" d="M 0 0 L 0 100 L 100 0 z" fill="#ff00ff" /><path id="Blue50" d="M 0 125 L 100 125 L 100 225 z" fill="#00ffff" fill-opacity=".5" /><path id="Red50" d="M 0 125 L 0 225 L 100 125 z" fill="#ff00ff" fill-opacity=".5" /><g id="TwoBlueTriangles"><use xlink:href="#Blue100"/><use xlink:href="#Blue50"/></g><g id="BlueTriangles"><use transform="translate(275,25)" xlink:href="#TwoBlueTriangles"/><use transform="translate(400,25)" xlink:href="#TwoBlueTriangles"/><use transform="translate(525,25)" xlink:href="#TwoBlueTriangles"/><use transform="translate(650,25)" xlink:href="#TwoBlueTriangles"/><use transform="translate(775,25)" xlink:href="#TwoBlueTriangles"/><use transform="translate(900,25)" xlink:href="#TwoBlueTriangles"/></g></defs><rect fill="none" stroke="blue" x="1" y="1" width="1098" height="648"/><g font-family="Verdana" font-size="40" shape-rendering="crispEdges"><desc>Render the examples using the filters that draw on top ofan opaque white surface, thus obliterating the background.</desc><g enable-background="new"><text x="15" y="75">opacity 1.0</text><text x="15" y="115" font-size="27">(with feFlood)</text><text x="15" y="200">opacity 0.5</text><text x="15" y="240" font-size="27">(with feFlood)</text><use xlink:href="#BlueTriangles"/><g transform="translate(275,25)"><use xlink:href="#Red100" filter="url(#overFlood)" /><use xlink:href="#Red50" filter="url(#overFlood)" /><text x="5" y="275">over</text></g><g transform="translate(400,25)"><use xlink:href="#Red100" filter="url(#inFlood)" /><use xlink:href="#Red50" filter="url(#inFlood)" /><text x="35" y="275">in</text></g><g transform="translate(525,25)"><use xlink:href="#Red100" filter="url(#outFlood)" /><use xlink:href="#Red50" filter="url(#outFlood)" /><text x="15" y="275">out</text></g><g transform="translate(650,25)"><use xlink:href="#Red100" filter="url(#atopFlood)" /><use xlink:href="#Red50" filter="url(#atopFlood)" /><text x="10" y="275">atop</text></g><g transform="translate(775,25)"><use xlink:href="#Red100" filter="url(#xorFlood)" /><use xlink:href="#Red50" filter="url(#xorFlood)" /><text x="15" y="275">xor</text></g><g transform="translate(900,25)"><use xlink:href="#Red100" filter="url(#arithmeticFlood)" /><use xlink:href="#Red50" filter="url(#arithmeticFlood)" /><text x="-25" y="275">arithmetic</text></g></g><g transform="translate(0,325)" enable-background="new"><desc>Render the examples using the filters that do not obliteratethe background, thus sometimes causing the background to continueto appear in some cases, and in other cases the backgroundimage blends into itself ("double-counting").</desc><text x="15" y="75">opacity 1.0</text><text x="15" y="115" font-size="27">(without feFlood)</text><text x="15" y="200">opacity 0.5</text><text x="15" y="240" font-size="27">(without feFlood)</text><use xlink:href="#BlueTriangles"/><g transform="translate(275,25)"><use xlink:href="#Red100" filter="url(#overNoFlood)" /><use xlink:href="#Red50" filter="url(#overNoFlood)" /><text x="5" y="275">over</text></g><g transform="translate(400,25)"><use xlink:href="#Red100" filter="url(#inNoFlood)" /><use xlink:href="#Red50" filter="url(#inNoFlood)" /><text x="35" y="275">in</text></g><g transform="translate(525,25)"><use xlink:href="#Red100" filter="url(#outNoFlood)" /><use xlink:href="#Red50" filter="url(#outNoFlood)" /><text x="15" y="275">out</text></g><g transform="translate(650,25)"><use xlink:href="#Red100" filter="url(#atopNoFlood)" /><use xlink:href="#Red50" filter="url(#atopNoFlood)" /><text x="10" y="275">atop</text></g><g transform="translate(775,25)"><use xlink:href="#Red100" filter="url(#xorNoFlood)" /><use xlink:href="#Red50" filter="url(#xorNoFlood)" /><text x="15" y="275">xor</text></g><g transform="translate(900,25)"><use xlink:href="#Red100" filter="url(#arithmeticNoFlood)" /><use xlink:href="#Red50" filter="url(#arithmeticNoFlood)" /><text x="-25" y="275">arithmetic</text></g></g></g>
</svg>
这篇关于svg基础(六)滤镜-图像,光照效果(漫反射,镜面反射),组合的文章就介绍到这儿,希望我们推荐的文章对编程师们有所帮助!


