本文主要是介绍【代码能力提升 | 代码阅读学习】分析 VoxelNet 的 主干,希望对大家解决编程问题提供一定的参考价值,需要的开发者们随着小编来一起学习吧!
文章目录
- 前言
- 代码分析
- VoxelNet model
- 2.数据处理
- 2.1单个样本处理
- 2.2处理成batch
- 最后,附上我一步步调试代码,到3D-conv
前言
代码来自:https://github.com/skyhehe123/VoxelNet-pytorch
其中 测试数据来自:https://github.com/gakkiri/simple-pointpillar
代码分析
VoxelNet model
-
model
forward()就是模型的输入,voxel_features,voxel_coords是一个 batch 的数据。voxel_features: [P, T, C],voxel_coords: [P, 4]。如何知道是 batch中的第几个样本? voxel_coords中的[P, 0]维度告诉了,其中的数据巧妙处理在 文件kitti.py和train.py, 稍后我们介绍- 转换为grid tensor:
voxel_indexing(), 其中sparse_features.t()应该有.t(), 不然维度不匹配报错,原代码错了。经过这一步,输出维度为[B, C, D, H, W]。【这个函数妙啊,一个索引匹配就完成了 点云=> 规则张量,美中不足的是原代码写错了,需要加个转置.t()】- 一个小样例测试这段代码 正确与否
import torchsparse_features = torch.tensor([[1.0, 1, 1], [2, 2, 2]]) coords = torch.IntTensor([[0,0,0,1], [1,0,0,2]]) # [P, 4(id,x,y,z)]dense_feature = torch.zeros(3, 2, 3,3,3) # [dim, B, D, H, W] dense_feature[:, coords[:,0], coords[:,1], coords[:,2], coords[:,3]]= sparse_features.t() print(dense_feature[:, 0, 0, 0, 1]) print(dense_feature[:, 1, 0, 0, 2])输出, 刚好索引回来 tensor([1., 1., 1.]) tensor([2., 2., 2.])- 然后可以经过3D-Conv,后续接你需要的 任务头head,上面才是 VoxelNet的主干,也是最难理解的地方。
class VoxelNet(nn.Module):def __init__(self):super(VoxelNet, self).__init__()self.svfe = SVFE()self.cml = CML()# self.rpn = RPN()def voxel_indexing(self, sparse_features, coords):"""sparse_features: [P, C]coords:[P, 4]"""dim = sparse_features.shape[-1]device = sparse_features.devicedense_feature = Variable(torch.zeros(dim, cfg.N, cfg.D, cfg.H, cfg.W).to(device))dense_feature[:, coords[:,0], coords[:,1], coords[:,2], coords[:,3]]= sparse_features.t()dense_feature = dense_feature.transpose(0, 1)# print(f"dense_feature.shape = {dense_feature.shape}")# return dense_feature.transpose(0, 1) # dense_feature.transpose(0, 1):[ B, C, D, H, W]return dense_featuredef forward(self, voxel_features, voxel_coords):"""P: 一个batch合计的 voxel的数量T:一个voxel的点数 35C:每个点 的维度 7(=4 + 3)voxel_features: [P, T, C]voxel_coords: [P, 4(1+3)] => 每个voxel_coords 含4个维度,分别为 1+3,这个1就是指代这个 voxel 原来在 batch的第几个(就是这样来区分的),3表示grid的坐标"""print(f"forward=============>")print(f'voxel_features.shape = {voxel_features.shape}, voxel_coords.shape = {voxel_coords.shape}') # voxel_features.shape = (20284, 35, 7), voxel_coords.shape = (20284, 4)# feature learning networkvwfs = self.svfe(voxel_features) # vwfs:[P, C]print(f'=> vwfs.shape = {vwfs.shape}') # vwfs.shape = torch.Size([20284, 128])vwfs = self.voxel_indexing(vwfs,voxel_coords)print(f'voxel_indexing ==> vwfs.shape = {vwfs.shape}') # voxel_indexing ==> vwfs.shape = torch.Size([2, 128, 10, 400, 352]) [B, C, D, H, W]# convolutional middle networkcml_out = self.cml(vwfs)print(f"cml_out.shape = {cml_out.shape}") # cml_out.shape = torch.Size([2, 64, 2, 400, 352])# # region proposal network# # merge the depth and feature dim into one, output probability score map and regression map# psm,rm = self.rpn(cml_out.view(cfg.N,-1,cfg.H, cfg.W))# return psm, rm
2.数据处理
2.1单个样本处理
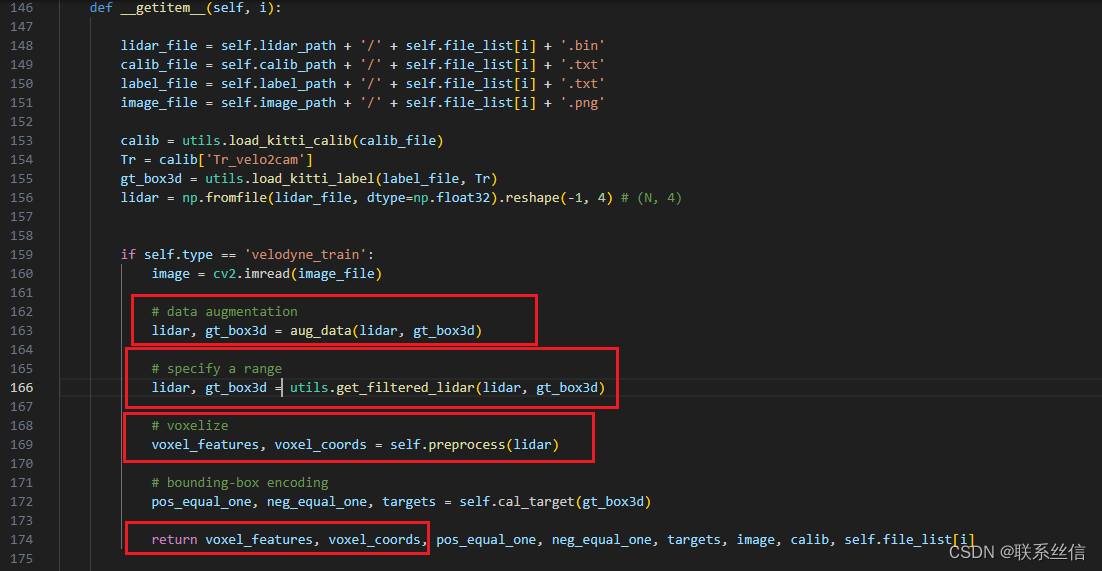
在kitti.py文件的 def __getitem__(self, i):
可以看到,每帧lidar:[N, C],读取后经过这样处理:
- 数据增强,
- 范围过滤,
- 处理成规则张量preprocess, 维度从 [N, C] 变为 [P, T, C], 其中,P不定,T=35,C=7
它是这样 处理的,可以学习代码:
其实,我不是很明白,这里为什么要 换维度?按理说3D-Conv都一样。
# convert to (D, H, W)voxel_coords = voxel_coords[:,[2,1,0]]
def preprocess(self, lidar):# shuffling the pointsnp.random.shuffle(lidar)voxel_coords = ((lidar[:, :3] - np.array([self.xrange[0], self.yrange[0], self.zrange[0]])) / (self.vw, self.vh, self.vd)).astype(np.int32)# convert to (D, H, W)voxel_coords = voxel_coords[:,[2,1,0]]voxel_coords, inv_ind, voxel_counts = np.unique(voxel_coords, axis=0, \return_inverse=True, return_counts=True)voxel_features = []for i in range(len(voxel_coords)):voxel = np.zeros((self.T, 7), dtype=np.float32)pts = lidar[inv_ind == i]if voxel_counts[i] > self.T:pts = pts[:self.T, :]voxel_counts[i] = self.T# augment the pointsvoxel[:pts.shape[0], :] = np.concatenate((pts, pts[:, :3] - np.mean(pts[:, :3], 0)), axis=1)voxel_features.append(voxel)return np.array(voxel_features), voxel_coords
2.2处理成batch
在train.py文件中
处理流程:从batch中取出每个样本sample,给 每个样本sample 的coord的第0列添加序号,标记 是batch的第几个样本,方便后面转换为规则张量【主要是这个】。
def detection_collate(batch):voxel_features = []voxel_coords = []for i, sample in enumerate(batch):voxel_features.append(sample[0])voxel_coords.append(np.pad(sample[1], ((0, 0), (1, 0)),mode='constant', constant_values=i))return np.concatenate(voxel_features), \np.concatenate(voxel_coords), \
最后,附上我一步步调试代码,到3D-conv
import torch.nn as nn
import torch.nn.functional as F
import torch
from torch.autograd import Variable
from config import config as cfg##### from my_kitti.py
import sys
sys.path.append(r"D:\workspace\【代码能力提升-深度学习】\voxel_and_pillar_code\VoxelNet-pytorch-master\VoxelNet-pytorch-master")import os
import os.path
import torch.utils.data as data
import utils
from utils import box3d_corner_to_center_batch, anchors_center_to_corner, corner_to_standup_box2d_batch
from data_aug import aug_data
# from box_overlaps import bbox_overlaps
import numpy as np
import cv2#### conv2d + bn + relu
class Conv2d(nn.Module):def __init__(self,in_channels,out_channels,k,s,p, activation=True, batch_norm=True):super(Conv2d, self).__init__()self.conv = nn.Conv2d(in_channels,out_channels,kernel_size=k,stride=s,padding=p)if batch_norm:self.bn = nn.BatchNorm2d(out_channels)else:self.bn = Noneself.activation = activationdef forward(self,x):x = self.conv(x)if self.bn is not None:x=self.bn(x)if self.activation:return F.relu(x,inplace=True)else:return x# conv3d + bn + relu
class Conv3d(nn.Module):def __init__(self, in_channels, out_channels, k, s, p, batch_norm=True):super(Conv3d, self).__init__()self.conv = nn.Conv3d(in_channels, out_channels, kernel_size=k, stride=s, padding=p)if batch_norm:self.bn = nn.BatchNorm3d(out_channels)else:self.bn = Nonedef forward(self, x):x = self.conv(x)if self.bn is not None:x = self.bn(x)return F.relu(x, inplace=True)# Fully Connected Network
class FCN(nn.Module):def __init__(self,cin,cout):super(FCN, self).__init__()self.cout = coutself.linear = nn.Linear(cin, cout)self.bn = nn.BatchNorm1d(cout)def forward(self,x):# KK is the stacked k across batchkk, t, _ = x.shape # x:[P, T, C]x = self.linear(x.view(kk*t,-1))x = F.relu(self.bn(x))return x.view(kk,t,-1)# Voxel Feature Encoding layer
class VFE(nn.Module):def __init__(self,cin,cout):super(VFE, self).__init__()assert cout % 2 == 0self.units = cout // 2self.fcn = FCN(cin,self.units)def forward(self, x, mask):# point-wise feauturepwf = self.fcn(x) # pwf:[P, T, C]#locally aggregated featurelaf = torch.max(pwf,1)[0].unsqueeze(1).repeat(1,cfg.T,1)# point-wise concat featurepwcf = torch.cat((pwf,laf),dim=2) # point-wise and locally, cat起来# apply maskmask = mask.unsqueeze(2).repeat(1, 1, self.units * 2)pwcf = pwcf * mask.float()return pwcf# Stacked Voxel Feature Encoding
class SVFE(nn.Module):def __init__(self):super(SVFE, self).__init__()self.vfe_1 = VFE(7,32)self.vfe_2 = VFE(32,128)self.fcn = FCN(128,128)def forward(self, x): # x:[P, T, C]mask = torch.ne(torch.max(x,2)[0], 0)x = self.vfe_1(x, mask)x = self.vfe_2(x, mask)x = self.fcn(x)# element-wise max poolingx = torch.max(x,1)[0] # x: [P, C], 相当于 只取每个voxel 的max featurereturn x# Convolutional Middle Layer
class CML(nn.Module):def __init__(self):super(CML, self).__init__()self.conv3d_1 = Conv3d(128, 64, 3, s=(2, 1, 1), p=(1, 1, 1))self.conv3d_2 = Conv3d(64, 64, 3, s=(1, 1, 1), p=(0, 1, 1))self.conv3d_3 = Conv3d(64, 64, 3, s=(2, 1, 1), p=(1, 1, 1))def forward(self, x):x = self.conv3d_1(x)x = self.conv3d_2(x)x = self.conv3d_3(x)return x# Region Proposal Network
# class RPN(nn.Module):
#     def __init__(self):
#         super(RPN, self).__init__()
#         self.block_1 = [Conv2d(128, 128, 3, 2, 1)]
#         self.block_1 += [Conv2d(128, 128, 3, 1, 1) for _ in range(3)]
#         self.block_1 = nn.Sequential(*self.block_1)#         self.block_2 = [Conv2d(128, 128, 3, 2, 1)]
#         self.block_2 += [Conv2d(128, 128, 3, 1, 1) for _ in range(5)]
#         self.block_2 = nn.Sequential(*self.block_2)#         self.block_3 = [Conv2d(128, 256, 3, 2, 1)]
#         self.block_3 += [nn.Conv2d(256, 256, 3, 1, 1) for _ in range(5)]
#         self.block_3 = nn.Sequential(*self.block_3)#         self.deconv_1 = nn.Sequential(nn.ConvTranspose2d(256, 256, 4, 4, 0),nn.BatchNorm2d(256))
#         self.deconv_2 = nn.Sequential(nn.ConvTranspose2d(128, 256, 2, 2, 0),nn.BatchNorm2d(256))
#         self.deconv_3 = nn.Sequential(nn.ConvTranspose2d(128, 256, 1, 1, 0),nn.BatchNorm2d(256))#         self.score_head = Conv2d(768, cfg.anchors_per_position, 1, 1, 0, activation=False, batch_norm=False)
#         self.reg_head = Conv2d(768, 7 * cfg.anchors_per_position, 1, 1, 0, activation=False, batch_norm=False)#     def forward(self,x):
#         x = self.block_1(x)
#         x_skip_1 = x
#         x = self.block_2(x)
#         x_skip_2 = x
#         x = self.block_3(x)
#         x_0 = self.deconv_1(x)
#         x_1 = self.deconv_2(x_skip_2)
#         x_2 = self.deconv_3(x_skip_1)
#         x = torch.cat((x_0,x_1,x_2),1)
#         return self.score_head(x),self.reg_head(x)class VoxelNet(nn.Module):def __init__(self):super(VoxelNet, self).__init__()self.svfe = SVFE()self.cml = CML()# self.rpn = RPN()def voxel_indexing(self, sparse_features, coords):"""sparse_features: [P, C]coords:[P, 4]"""dim = sparse_features.shape[-1]device = sparse_features.devicedense_feature = Variable(torch.zeros(dim, cfg.N, cfg.D, cfg.H, cfg.W).to(device))dense_feature[:, coords[:,0], coords[:,1], coords[:,2], coords[:,3]]= sparse_features.t()dense_feature = dense_feature.transpose(0, 1)# print(f"dense_feature.shape = {dense_feature.shape}")# return dense_feature.transpose(0, 1) # dense_feature.transpose(0, 1):[ B, C, D, H, W]return dense_featuredef forward(self, voxel_features, voxel_coords):"""P: 一个batch合计的 voxel的数量T:一个voxel的点数 35C:每个点 的维度 7(=4 + 3)voxel_features: [P, T, C]voxel_coords: [P, 4(1+3)] => 每个voxel_coords 含4个维度,分别为 1+3,这个1就是指代这个 voxel 原来在 batch的第几个(就是这样来区分的),3表示grid的坐标"""print(f"forward=============>")print(f'voxel_features.shape = {voxel_features.shape}, voxel_coords.shape = {voxel_coords.shape}') # voxel_features.shape = (20284, 35, 7), voxel_coords.shape = (20284, 4)# feature learning networkvwfs = self.svfe(voxel_features) # vwfs:[P, C]print(f'=> vwfs.shape = {vwfs.shape}') # vwfs.shape = torch.Size([20284, 128])vwfs = self.voxel_indexing(vwfs,voxel_coords)print(f'voxel_indexing ==> vwfs.shape = {vwfs.shape}') # voxel_indexing ==> vwfs.shape = torch.Size([2, 128, 10, 400, 352]) [B, C, D, H, W]# convolutional middle networkcml_out = self.cml(vwfs)print(f"cml_out.shape = {cml_out.shape}") # cml_out.shape = torch.Size([2, 64, 2, 400, 352])# # region proposal network# # merge the depth and feature dim into one, output probability score map and regression map# psm,rm = self.rpn(cml_out.view(cfg.N,-1,cfg.H, cfg.W))# return psm, rmif __name__ == '__main__':class My_dataset(data.Dataset):def __init__(self, cfg):self.T = cfg.Tself.vd = cfg.vdself.vh = cfg.vhself.vw = cfg.vwself.xrange = cfg.xrangeself.yrange = cfg.yrangeself.zrange = cfg.zrangedef preprocess(self, lidar):# shuffling the pointsnp.random.shuffle(lidar)voxel_coords = ((lidar[:, :3] - np.array([self.xrange[0], self.yrange[0], self.zrange[0]])) / (self.vw, self.vh, self.vd)).astype(np.int32)# convert to  (D, H, W)voxel_coords = voxel_coords[:,[2,1,0]]voxel_coords, inv_ind, voxel_counts = np.unique(voxel_coords, axis=0, \return_inverse=True, return_counts=True)voxel_features = []for i in range(len(voxel_coords)):voxel = np.zeros((self.T, 7), dtype=np.float32)pts = lidar[inv_ind == i]if voxel_counts[i] > self.T:pts = pts[:self.T, :]voxel_counts[i] = self.T# augment the pointsvoxel[:pts.shape[0], :] = np.concatenate((pts, pts[:, :3] - np.mean(pts[:, :3], 0)), axis=1)voxel_features.append(voxel)return np.array(voxel_features), voxel_coords def detection_collate(batch):voxel_features = []voxel_coords = []for i, sample in enumerate(batch):voxel_features.append(sample[0])voxel_coords.append(np.pad(sample[1], ((0, 0), (1, 0)),mode='constant', constant_values=i))return np.concatenate(voxel_features), \np.concatenate(voxel_coords), \from config import config as cfg    my_dataset = My_dataset(cfg)        # lidar_file = self.lidar_path + '/' + self.file_list[i] + '.bin'lidar_file = r"D:\workspace\【代码能力提升-深度学习】\voxel_and_pillar_code\simple-pointpillar-main\simple-pointpillar-main\kitti_test_data\000000.bin"lidar = np.fromfile(lidar_file, dtype=np.float32).reshape(-1, 4) # (N, 4)print(f'lidar.shape = {lidar.shape}') # lidar.shape = (115384, 4)# 对单个样本lidar进行数据处理,包括数据增强,限制范围,预处理# 这里我们没有 gt_box3d ,所以忽略 aug_data# data augmentation# lidar, gt_box3d = aug_data(lidar, gt_box3d) # specify a rangelidar = utils.get_filtered_lidar(lidar )print(f'get_filtered_lidar => lidar.shape = {lidar.shape}') # get_filtered_lidar => lidar.shape = (62853, 4)voxel_features, voxel_coords = my_dataset.preprocess(lidar)print(f'voxel_features.shape = {voxel_features.shape}, voxel_coords.shape = {voxel_coords.shape}') print(f'type(voxel_features) = {type(voxel_features)}, type(voxel_coords) = {type(voxel_coords)}')# voxel_features.shape = (10142, 35, 7) = (P, T, C(4 + 3)), voxel_coords.shape = (10142, 3) (P, C(xyz))# type(voxel_features) = <class 'numpy.ndarray'>, type(voxel_coords) = <class 'numpy.ndarray'># 模拟一个 batch 两个样本batch = []batch.append((voxel_features, voxel_coords))batch.append((voxel_features, voxel_coords))batch_voxel_features, batch_voxel_coords = detection_collate(batch)# batch_voxel_features = Variable(torch.cuda.FloatTensor(batch_voxel_features)) # 变为 tensor类型batch_voxel_features = Variable(torch.FloatTensor(batch_voxel_features)) # 变为 tensor类型# print(f'batch_voxel_features.shape = {batch_voxel_features.shape}')# print(batch_voxel_coords[-5:])    model = VoxelNet()y = model(batch_voxel_features, batch_voxel_coords)
这篇关于【代码能力提升 | 代码阅读学习】分析 VoxelNet 的 主干的文章就介绍到这儿,希望我们推荐的文章对编程师们有所帮助!


