本文主要是介绍luceda ipkiss教程 59:画圆形螺旋线2,希望对大家解决编程问题提供一定的参考价值,需要的开发者们随着小编来一起学习吧!
案例分享:画同端口螺旋线
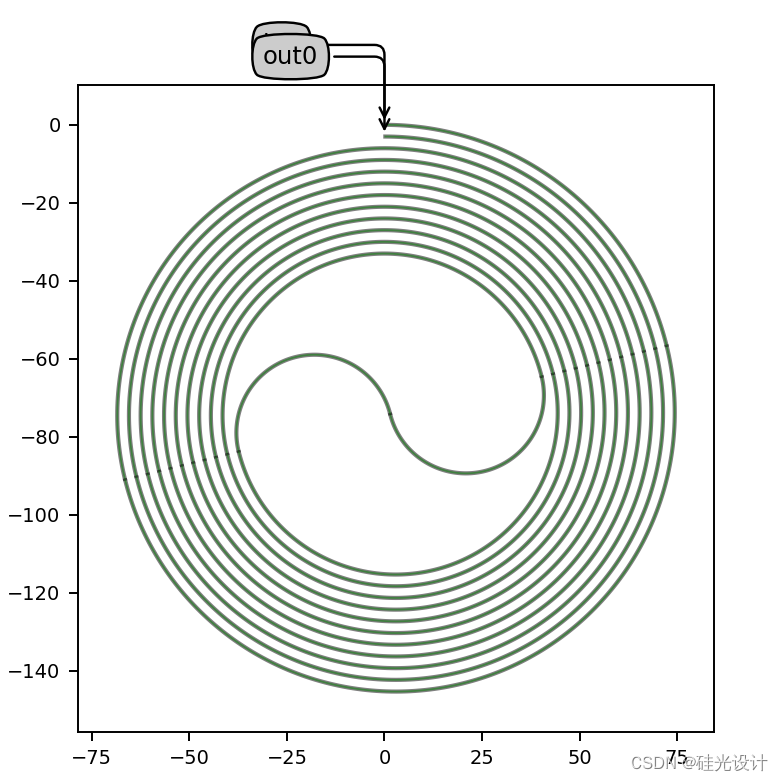
代码如下:
from si_fab import all as pdk
from ipkiss3 import all as i3
import numpy as npclass Spiral(i3.PCell):_name_prefix = "Spiral_C"width = i3.PositiveNumberProperty(doc="Core width of the bend waveguide", default=1.0)radius = i3.PositiveNumberProperty(doc="Horizontal length of the waveguide", default=20.0)decouple = i3.PositiveNumberProperty(doc="Separation between adjacent waveguides", default=2.0)length = i3.PositiveNumberProperty(doc="Length of the total snp.piral waveguide", default=4000.0)layout_properties = i3.NumpyArrayProperty(doc="Calculated layout properties of the snp.piral.", locked=True)def _default_layout_properties(self):r = self.radiusw = self.widthtot_sep = self.decouple + wb_val = 0.5 + 2.0 * r / tot_sepc_val = (4.0 * r + 0.5 * tot_sep - self.length / np.pi) / tot_sepn_o_loops_act = -b_val + np.sqrt(b_val**2.0 - c_val)n_o_loops = np.floor(n_o_loops_act)theta_nom = (self.length- 4.0 * r * np.pi * (1.0 + n_o_loops)- 0.5 * tot_sep * np.pi- (n_o_loops + n_o_loops**2.0) * tot_sep * np.pi)theta_denom = 4.0 * self.radius + (2.0 * n_o_loops + 2.0) * tot_septheta_m = theta_nom / theta_denomdy0 = ((n_o_loops + 1.0) * tot_sep+ (2.0 * r + tot_sep * 0.5) * (1.0 - np.cos(theta_m))+ 2.0 * self.radius * np.cos(theta_m))dx0 = tot_sep * 0.5 * np.sin(theta_m)radius_in = 2.0 * r + (2.0 * n_o_loops + 3.0) * tot_sep * 0.5radius_out = 2.0 * r + (2.0 * n_o_loops + 1.0) * tot_sep * 0.5return np.array([r, w, tot_sep, n_o_loops, theta_m, dx0, dy0, radius_in, radius_out])class Layout(i3.LayoutView):def _generate_instances(self, insts):(r,w,tot_sep,n_o_loops,theta_m,dx0,dy0,radius_in,radius_out,) = self.layout_properties# snp.piral waveguidefor index in range(int(n_o_loops + 2)):sign = 1.0 if index % 2 == 0 else -1.0if index == 0:radius, dy = r, 0.0else:radius, dy = (2.0 * r + (2.0 * index - 1.0) * tot_sep * 0.5,2.0 * r + (index - 1.0) * tot_sep,)shape_wg1 = [(0.0, -sign * dy),(sign * radius, -sign * dy),(sign * radius, -sign * (dy - radius)),(sign * radius, -sign * (dy - 2.0 * radius)),(0.0, -sign * (dy - 2.0 * radius)),]shape_wg2 = [(0.0, sign * dy),(-sign * radius, sign * dy),(-sign * radius, sign * (dy - radius)),(-sign * radius, sign * (dy - 2.0 * radius)),(0.0, sign * (dy - 2.0 * radius)),]wg1 = i3.RoundedWaveguide(trace_template=pdk.SWG450())wg2 = i3.RoundedWaveguide(trace_template=pdk.SWG450())wg1.Layout(bend_radius=radius,shape=shape_wg1,)wg2.Layout(bend_radius=radius,shape=shape_wg2,)transf = i3.Rotation(rotation=theta_m * (-180.0 / np.pi)) + i3.Translation(translation=(dx0, -dy0))if index == int(n_o_loops + 1):if n_o_loops % 2 == 0:insts += i3.SRef(wg2, transformation=transf)else:insts += i3.SRef(wg1, transformation=transf)else:insts += i3.SRef(wg1, transformation=transf)insts += i3.SRef(wg2, transformation=transf)# output waveguideswg_in = i3.RoundedWaveguide(trace_template=pdk.SWG450())wg_out = i3.RoundedWaveguide(trace_template=pdk.SWG450())if theta_m <= np.pi / 2.0:shape_wg_in = [(0.0, 0.0),(radius_in * np.tan(theta_m / 2.0), 0.0),(radius_in * np.sin(theta_m), -radius_in * (1.0 - np.cos(theta_m))),]shape_wg_out = [(0.0, -tot_sep),(radius_out * np.tan(theta_m / 2.0), -tot_sep),(radius_out * np.sin(theta_m),-tot_sep - radius_out * (1.0 - np.cos(theta_m)),),]else:shape_wg_in = [(0.0, 0.0),(radius_in, 0.0),(radius_in, -radius_in),(radius_in,-radius_in - radius_in * np.tan((theta_m - np.pi / 2.0) / 2.0),),(radius_in * np.sin(theta_m), -radius_in * (1.0 - np.cos(theta_m))),]shape_wg_out = [(0.0, -tot_sep),(radius_out, -tot_sep),(radius_out, -tot_sep - radius_out),(radius_out,-tot_sep- radius_out- radius_out * np.tan((theta_m - np.pi / 2.0) / 2.0),),(radius_out * np.sin(theta_m),-tot_sep - radius_out * (1.0 - np.cos(theta_m)),),]wg_in.Layout(bend_radius=radius_in,shape=shape_wg_in,)wg_out.Layout(bend_radius=radius_out,shape=shape_wg_out,)insts += i3.SRef(wg_in, name="wg_in")insts += i3.SRef(wg_out, name="wg_out")return instsdef _generate_ports(self, ports):w = self.layout_properties[1]tot_sep = self.layout_properties[2]ports += i3.OpticalPort(name="in0",position=(0.0, 0.0),angle=180.0,trace_template=pdk.SWG450(),)ports += i3.OpticalPort(name="out0",position=(0.0, -tot_sep),angle=180.0,trace_template=pdk.SWG450(),)return portsif __name__ == "__main__":Spiral().Layout().visualize(legacy=True, annotate=True)
这篇关于luceda ipkiss教程 59:画圆形螺旋线2的文章就介绍到这儿,希望我们推荐的文章对编程师们有所帮助!


