本文主要是介绍【Linux】3、文件系统、mount、Rootfs、overlayfs、squashfs,希望对大家解决编程问题提供一定的参考价值,需要的开发者们随着小编来一起学习吧!
文章目录
- 一、文件系统
- 1.1 mount
- 1.2 umount
- 二、Rootfs
- 2.1 各目录约定
- 2.1.1 /bin
- 4.2 /boot
- 4.3 /dev
- 4.4 /etc
- 4.5 /home
- 4.6 /lib
- 4.7 /media
- 4.8 /mnt
- 4.9 /opt
- 4.10 /root
- 4.11 /run
- 4.12 /sbin
- 4.13 /srv
- 4.14 /tmp
- 4.15 /usr
- 4.16 /var
- 三、overlayfs
- 3.1 概念
- 3.2 使用
- 3.2.1 upperdir 和 workdir 有什么区别
- 3.2.2 mount --bind 含义
- 四、squashfs
- 五、其他文件系统
- 5.1 devtmpfs
- 5.2 devpts
- 6.3 tmpfs
- 6.3.1 /dev/shm
- 6.3.1.1 docker
一、文件系统
Linux 的文件系统遵循 HFS 设计,有如下实现:
Ext (Extended Filesystem), Ext2, Ext3, Ext4
JFS (Journaling Filesystem)
ReiserFS
XFS (Extent Filesystem)
Btrfs (B Tree Filesystem)
Swap
1.1 mount
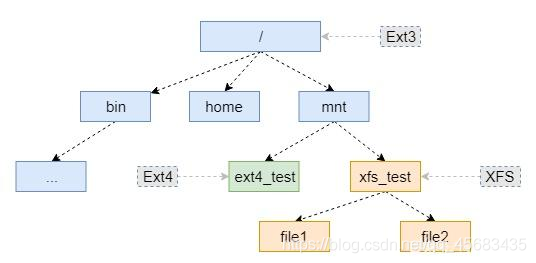
unix 有树状的文件系统,根节点是 /,每个节点可能来自不同的 devices。mount 将 device 上的某文件系统放在树的某节点上。
- 标准格式是
mount -t type device dir,会把类型为type的device挂载到dir目录上,之前dir目录的内容还在而只是被隐藏了。 - 如果
mount /dir则会在 /etc/fstab 中找挂载点 - 也可以
mount --target /mountpoint mount [-l] [-t type]会列出已挂载的设备
mount–bind
通过更改 /etc/fstab 文件可以挂载,内容如下:
- Device: usually the given name or UUID of the mounted device (sda1/sda2/etc).
- Mount Point: designates the directory where the device is/will be mounted.
- File System Type: nothing trick here, shows the type of filesystem in use.
- Options: lists any active mount options. If using multiple options they must be separated by commas.
- Backup Operation: (the first digit) this is a binary system where 1 = dump utility backup of a partition. 0 = no backup. This is an outdated backup method and should NOT be used.
- File System Check Order: (second digit) Here we can see three possible outcomes. 0 means that fsck will not check the filesystem. Numbers higher than this represent the check order. The root filesystem should be set to 1 and other partitions set to 2.
/dev/mapper/rhel-root   					/     xfs     defaults        0 0
UUID=64351209-b3d4-421d-8900-7d940ca56fea 	/boot xfs     defaults        0 0
/dev/mapper/rhel-swap   					swap  swap    defaults        0 0
1.2 umount
先停服务,再 umount,再 mkfs.ext4,再 mount
二、Rootfs
rootfs 是什么
Rootfs 位于分层文件树的顶部(也称为‘/’)。Linux内核通过配置参数‘ROOT=’直接挂载 Rootfs。
根文件系统还具有 mount point(挂载点),我们也可在挂载点上挂载其他文件系统,以便将它们连接到此文件系统层次结构。它有许多目录,其中包含对引导系统和系统操作至关重要的文件。
2.1 各目录约定
2.1.1 /bin
The /bin directory contains binaries of essential user commands that can be used by all users of the system. Here we can find ready-to-execute Linux commands like ls, cp, and echo, and shells like bash and csh. Moreover, /bin also contains the ready-to-run executables that may be required in order to boot or repair a system.
4.2 /boot
In the /boot directory we can find files used for booting an operating system, usually kernel images, bootloader (for example LILO, GRUB) related files, configuration files, and map installer. Generally, we can find vmlinuz, System.map, initrd, and config files here. Among them, vmlinuz is our actual kernel. The bootloader loads this kernel and executes it. The System.map file has a list of kernel symbols and respective addresses. The initial ramdisk (initrd) file is useful in loading drivers that are necessary for the initial booting process. The config file contains a list of kernel options, a list of devices, and device options.
4.3 /dev
The /dev directory is where all device files are stored. The device files residing in this directory represent devices attached to our system. Applications can interact with them using system calls to perform I/O operations. The majority of the device drivers that correspond to the hardware devices are one of two types: block device drivers or character device drivers.
4.4 /etc
Configuration files specific to the local machine are contained in the /etc directory. This directory holds most global config files. However, larger software packages can have their own subdirectories under /etc. Some examples are /etc/X11, /etc/sgml, and /etc/xml.
4.5 /home
The /home directory is the default location to create home directories for different users. For example, let’s say there’s a user with the username “Sam“. Then, the default home directory of Sam will be /home/Sam. In other words, directories under /home provide a personal workspace to regular users who don’t have root privileges.
4.6 /lib
The /lib directory contains essential shared libraries for system boot. Device drivers necessary for system boot are placed under subdirectory /lib/modules/’kernel-version’. It also contains the libraries needed by binaries from /bin and /sbin to run the commands in the root filesystem.
4.7 /media
The /media directory contains subdirectories that are utilized as mount points when we connect any removable media devices to the system. We can find subdirectories or symbolic links to directories representing different removable media devices like CD-ROMs and USB sticks. For example, on inserting a CD into our Linux system, a directory will automatically be created inside the /media directory. We can use this to access the contents of the CD inside this directory.
4.8 /mnt
The /mnt directory is a mount point where we can mount a temporary filesystem that resides on a storage device like a hard-disk drive, USB stick, or CD-ROM. Unlike /media, where the system mounts removable media automatically, under /mnt we need to mount manually. This directory can be empty or may have subdirectories to mount individual devices.
4.9 /opt
The /opt directory contains optional software packages. In this context, optional software packages are those that are not part of the system — for instance, third-party software that we install as add-ons.
4.10 /root
The /root directory is the home directory of the root user of the system.
4.11 /run
The /run directory stores the system information data describing the system since its booting. Applications store their transient files like process IDs, socket descriptors, and more in this directory.
4.12 /sbin
Similar to the /bin directory, the /sbin (system binaries) directory contains ready-to-run executables needed to boot our Linux system. However, unlike /bin binaries, /sbin contents are intended to be executed by the root user.
4.13 /srv
The /srv directory has service data. In other words, site-specific data served by our system is likely to be stored here. For instance, if we’re using an HTTP server to serve a website, then we may store files related to our website inside this directory.
4.14 /tmp
The /tmp directory contains files that are temporary. Many of these files are created by currently running processes on our system that store their temporary data under this directory. Therefore, a clearing out of this directory may happen at booting or at system shutdown.
4.15 /usr
The /usr directory contains executables and read-only data. In contrast with files that are used by the system, files under this directory are used by users. So, /usr/sbin and /usr/bin directories contain non-essential /bin and /sbin binaries, respectively. The default installation location for locally compiled applications is under /usr/local.
4.16 /var
The /var (variable) directory contains transient files and temporary files whose size may change. We can find a number of spools and log files here.
三、overlayfs
参考
3.1 概念
OverlayFS伪文件系统最初包含在Linux内核3.18版本中:它允许我们以一种对用户完全透明的方式组合两个目录树或文件系统(“上层”和“下层”),它能够访问“合并”层上的文件和目录,就像在标准文件系统上所做的那样。
我们都应该熟悉Linux内核在挂载文件系统时采用的标准行为:作为挂载点的目录中存在的文件和目录被屏蔽,并且对用户不可用,而挂载的文件系统上存在的文件和目录被显示。只有在卸载文件系统后,才能再次访问原始文件。当我们在同一目录上挂载多个文件系统时,也会发生这种情况。相反,当使用OverlayFS伪文件系统时,不同层上存在的文件被「组合」在一起,生成的文件系统可以自己挂载。
OverlayFS通常用于运行在嵌入式设备(如OpenWRT)上的系统,在这种情况下,保留基本配置集并同时允许用户执行修改非常有用。OverlayFS也是“overlay”和“overlay2”Docker存储驱动程序的基础。让我们来看看背后的主要逻辑是什么。
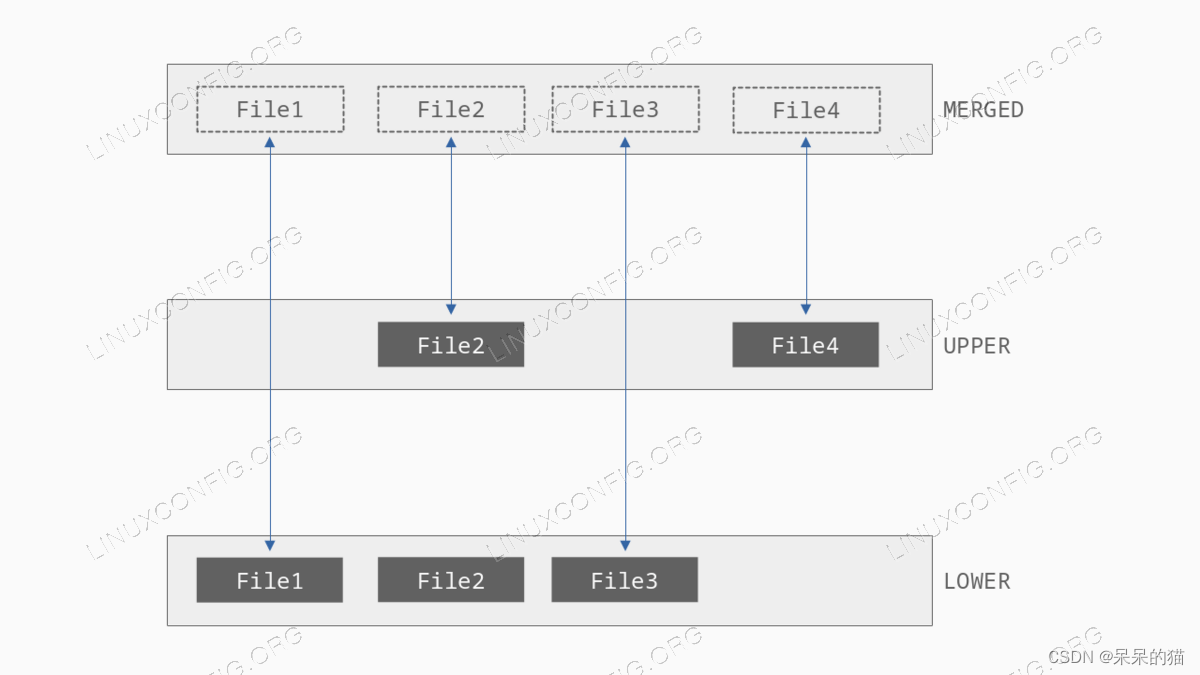
OverlayFS的工作涉及两层:lower 和 upper。lower 通常以 readonly 模式 mount。使用此设置时,由于不可能对其上托管的文件和目录进行直接更改,因此可以将其用作安全的备用设置。相反,upper 可以以 read/write 模式安装。存在于这两个层上的文件被 combine 在一起,并且可以在我们所称的 merged 层中进行访问,该层本身可以作为标准文件系统来挂载。
正如我们在下图中所观察到的,存在于 lower 中的文件被存在于 upper 中的同名文件“obscured 遮挡” 或 “masked 屏蔽”。当用户修改属于前者的文件时,在后者的 writable 层中创建该文件的副本(该策略被称为:“copy-up 复制”):该文件在对用户透明的过程中屏蔽原始文件。类似的事情也发生在被合并的目录上:
What happens when delete a file or a directory? If the file we delete belongs to the upper layer, it is deleted in place; if it belongs to the lower layer, instead, the deletion is simulated by using a whiteout file (or an opaque directory – a directory with the trusted.overlay.opaque extended attribute), which is created in the writable layer and obscures the original element.
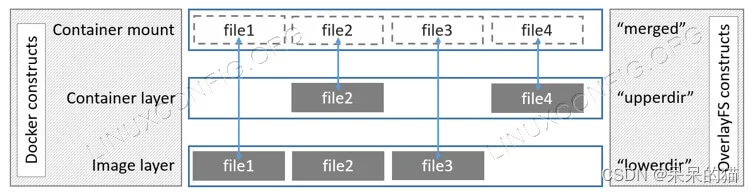
The OverlayFS is the base of the Docker overlay and overlay2 drivers. On such implementation the lower, read-only layer is represented by images; the writable, upper layer, instead, is represented by the containers based on them. Images are immutable: all changes happen inside containers and are lost when containers are deleted (that is why volumes are used for persistence):
3.2 使用
Let’s see how to use the OverlayFS. For the sake of this example I will assume we want to combine two filesystems: the lower one existing on the /dev/sda1 partition, and the one to be used in read-write mode to be on the /dev/sda2 partition. The first thing we want to do, is to create the directories which we will use as mount points:
mount -t overlay -o lowerdir=${lower_dir},upperdir=${upper_dir},workdir=${work_dir},rw overlay ${merged_dir}
这个命令是使用OverlayFS来挂载一个overlay文件系统。OverlayFS是一种联合文件系统(unified filesystem),它可以把多个不同的目录层叠在一起,形成一个单一、统一的视图。
各组成部分的详细解释如下:
mount:Linux系统的命令,用于挂载文件系统。-t overlay:指定挂载的文件系统类型是overlay。-o:指定挂载选项,后面跟的是各种选项,用逗号分隔。lowerdir=${lower_dir}:指定lower directory,也就是底层目录,这个目录的内容是只读的。upperdir=${upper_dir}:指定upper directory,也就是上层目录,这个目录的内容是可读写的,所有的修改都会在这个目录中进行。workdir=${work_dir}:指定工作目录,这个目录用于存储一些必要的元数据,以支持overlay文件系统的操作。这个目录必须要和upper directory在同一个文件系统下。rw:指定文件系统是可读写的。
overlay:这是挂载的文件系统类型。${merged_dir}:这是挂载点,overlay文件系统会在这个位置被挂载,你可以在这个位置看到整个overlay文件系统的内容,也就是lower directory和upper directory合并之后的结果。
这个命令最常见的使用场景是在Docker等容器技术中,用来创建容器的文件系统。
完整使用示例如下:
mount -t overlay -o lowerdir=${lower_dir},upperdir=${upper_dir},workdir=${work_dir},rw overlay ${merged_dir}
chroot ${merged_dir} /myapp/run.sh
3.2.1 upperdir 和 workdir 有什么区别
在 Overlay 文件系统中,upperdir 和 workdir 有着不同的作用:
upperdir:这是 Overlay 文件系统中的“上层”目录,用于存储所有的写入操作结果。也就是说,如果你对 Overlay 文件系统进行修改(例如,创建文件,修改文件,删除文件等),所有的修改都会在这个upperdir目录中体现。这个目录是可读写的。workdir:这是 Overlay 文件系统中的“工作”目录,主要用于存储一些在合并(mount)过程中需要的元数据和临时文件。这个目录也必须是可读写的,且需要和upperdir在同一个文件系统下。在实际操作中,你通常不会直接操作这个目录,它主要是为 Overlay 文件系统的内部操作服务的。
简单来说,upperdir 是用来存储你对文件系统做出的实际修改,而 workdir 是 Overlay 文件系统在执行这些修改时,用来存储临时数据的地方。
3.2.2 mount --bind 含义
mount --bind 是一种在 Linux 系统中用来创建一个现有目录或文件的别名或镜像的命令。它允许你将一个目录或文件系统挂载到另一个位置,这样你就可以从另一个位置访问原来的文件或目录。
这是一个例子:
mount --bind /old/dir /new/dir
在这个例子中,/old/dir 是原始的目录,/new/dir 是你想要挂载的位置。命令执行后,你就可以通过访问 /new/dir 来访问到 /old/dir 的内容。这个操作并不会移动或复制任何数据,它只是在文件系统中创建了一个新的入口点。
这个命令常常在需要从不同的路径访问相同数据,或者在容器中访问主机上的数据时使用。
四、squashfs
Squashfs is a highly compressed read-only filesystem for Linux. It uses either gzip/xz/lzo/lz4/zstd compression to compress both files, inodes and directories. Inodes in the system are very small and all blocks are packed to minimise data overhead. Block sizes greater than 4K are supported up to a maximum of 1Mbytes (default block size 128K).
Squashfs is intended for general read-only filesystem use, for archival use (i.e. in cases where a .tar.gz file may be used), and in constrained block device/memory systems (e.g. embedded systems) where low overhead is needed.
squashfs-tools 内含四个命令:
- mksquashfs
- sqfscat
- sqfstar
- unsquashfs
mksquashfs myapp myapp.apk -all-root
unsquashfs myapp.apk # 得到 myapp 文件夹
五、其他文件系统
# 挂载常用的文件系统
mount -t devtmpfs devtmpfs ${merged_dir}/dev
mount -t devpts devpts ${merged_dir}/dev/pts
mount -t sysfs sysfs ${merged_dir}/sys
mount -t proc proc ${merged_dir}/proc
mount -t tmpfs tmpfs ${merged_dir}/tmp
mount -t tmpfs tmpfs ${merged_dir}/run
mount -t tmpfs tmpfs ${merged_dir}/dev/shm
5.1 devtmpfs
mount -t devtmpfs devtmpfs ${merged_dir}/dev 这个命令是在 Linux 系统中用于挂载一个类型为 devtmpfs 的文件系统的。devtmpfs 是 Linux 内核提供的一种特殊的临时文件系统,主要用于存储设备文件。
mount -t devtmpfs devtmpfs ${merged_dir}/dev 命令的具体解析如下:
-
mount:Linux 的命令,用于挂载文件系统。 -
-t devtmpfs:指定挂载的文件系统类型为devtmpfs。 -
devtmpfs:这是文件系统的名字。在这里,名字也被设定为devtmpfs。 -
${merged_dir}/dev:这是挂载点的路径,即devtmpfs文件系统将在此处被挂载,你可以在这个位置看到所有的设备文件。
这条命令的常见用途是在创建 Linux 容器时,为新容器挂载设备文件,使得容器内的应用可以正确地访问系统设备。
5.2 devpts
mount -t devpts devpts ${merged_dir}/dev/pts 这个命令在 Linux 系统中用于挂载一个类型为 devpts 的文件系统。devpts 是用于管理伪终端设备的文件系统。
这个命令的具体解析如下:
-
mount:这是 Linux 系统中的命令,用于挂载文件系统。 -
-t devpts:这是指定挂载的文件系统类型为devpts。 -
devpts:这是文件系统的名字。在这里,名字也被设定为devpts。 -
${merged_dir}/dev/pts:这是挂载点的路径,devpts文件系统将在这个位置被挂载,你可以在这个位置看到所有的伪终端设备。
这条命令的常见用途是在创建 Linux 容器时,为新容器挂载伪终端设备文件系统,使得容器内的应用可以正确地访问伪终端设备。伪终端设备通常用于实现如 SSH 这样的远程登录服务。
6.3 tmpfs
6.3.1 /dev/shm
Linux下一切皆文件。GPU、硬盘、扫描仪、鼠标等都以文件或目录的形式,呈现在Linux的/dev下。比如服务器中第一块NVIDIA的GPU是/dev/nvidia0;某块硬盘是/dev/sda等。
/dev/shm是一个特殊的目录,它表示是一块共享内存(Share Memory)。这个目录可以用来在进程间进行数据的通信和共享。比如,第一个进程创建一块内存区域,另外一个进程去访问该内存区域,两个进程之间可以快速分享数据和信息。/dev/shm使用了tmpfs,tmpfs是Linux上基于内存的文件系统,可以达到内存级别的读写速度。
/dev/shm的性质决定了,它可以用于高性能IPC(Inter-process communication)。很多高性能场景计算应用会使用这几个函数操作这块内存区域。
在Linux中,如果想要使用/dev/shm,可以用以下几个方法:
int shm_open(const char *name, int oflag, mode_t mode);
void *mmap(void *addr, size_t length, int prot, int flags,int fd, off_t offset);
int munmap(void *addr, size_t length);
int shm_unlink(const char *name);
int ftruncate(int fd, off_t length);
默认情况下,/dev/shm的大小是服务器大小的一半。
6.3.1.1 docker
对于Docker容器,情况却不一样了!默认情况下,Docker容器启动后/dev/shm只有64M!
前段时间,在使用Docker部署GitLab时,发现GitLab Docker中的监控模块Prometheus会对/dev/shm进行操作,调用了前面所提到的mmap()等方法。而Metrics监控数据越来越大,很快就将Docker默认自带的64M写满,于是就产生了大量报错日志。GitLab服务以约每分钟20M的速度生成日志,没过几天就将服务器的硬盘写爆,直接导致服务器宕机。
查看生成的日志,发现了日志中不断出现mmap()的字样,这才知道,原来是出现了报错。
解决方案是:或者在Docker GitLab中关掉Prometheus的Metrics,或者增大Docker容器的/dev/shm目录。
如果想增大Docker的/dev/shm目录大小,需要在启动容器时加上–shm-size参数,设置这块内存大小,比如
docker run --shm-size 1024M ...
比如,网上就有文章发现,因为Docker默认的/dev/shm过小,导致PyTorch等机器学习训练崩溃。
参考
root@6ba6bb859c88:/# df -h /dev/shm
Filesystem      Size  Used Avail Use% Mounted on
shm              64M  988K   64M   2% /dev/shm
这篇关于【Linux】3、文件系统、mount、Rootfs、overlayfs、squashfs的文章就介绍到这儿,希望我们推荐的文章对编程师们有所帮助!


