本文主要是介绍鸿蒙开发笔记(二十): 常用组件 TextInput/TextArea, 弹窗,视频播放Video,希望对大家解决编程问题提供一定的参考价值,需要的开发者们随着小编来一起学习吧!
1. 文本输入 TextInput/TextArea
TextInput为单行输入框、TextArea为多行输入框。通过以下接口来创建。
TextArea(value?:{placeholder?: ResourceStr, text?: ResourceStr, controller?: TextAreaController})TextInput(value?:{placeholder?: ResourceStr, text?: ResourceStr, controller?: TextInputController})
多行输入框文字超出一行时会自动折行。
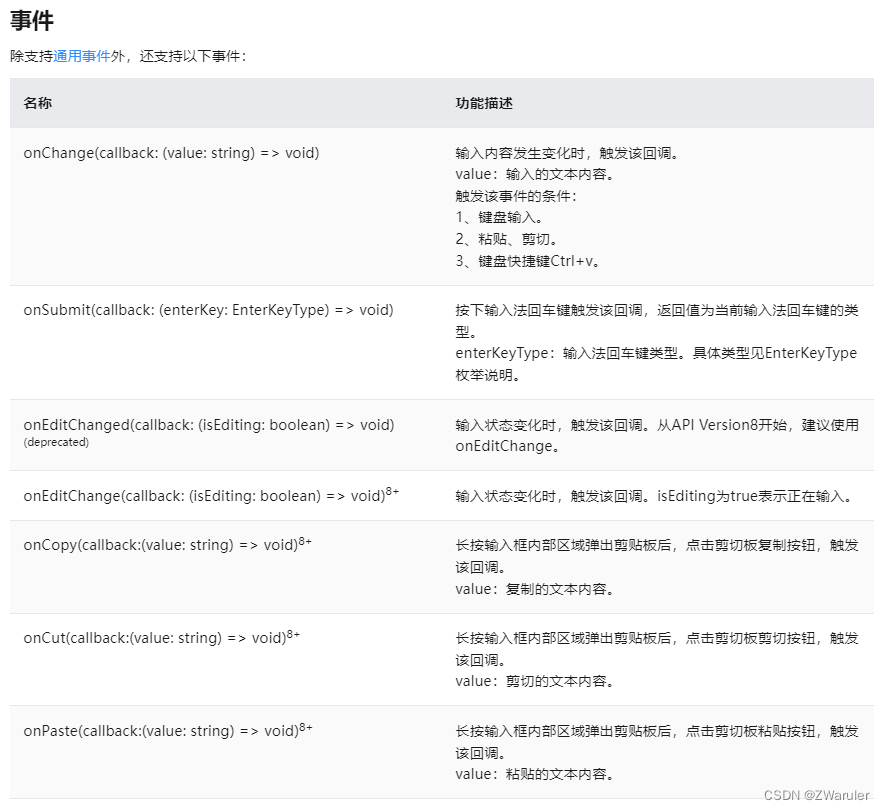
1.1 TextInput
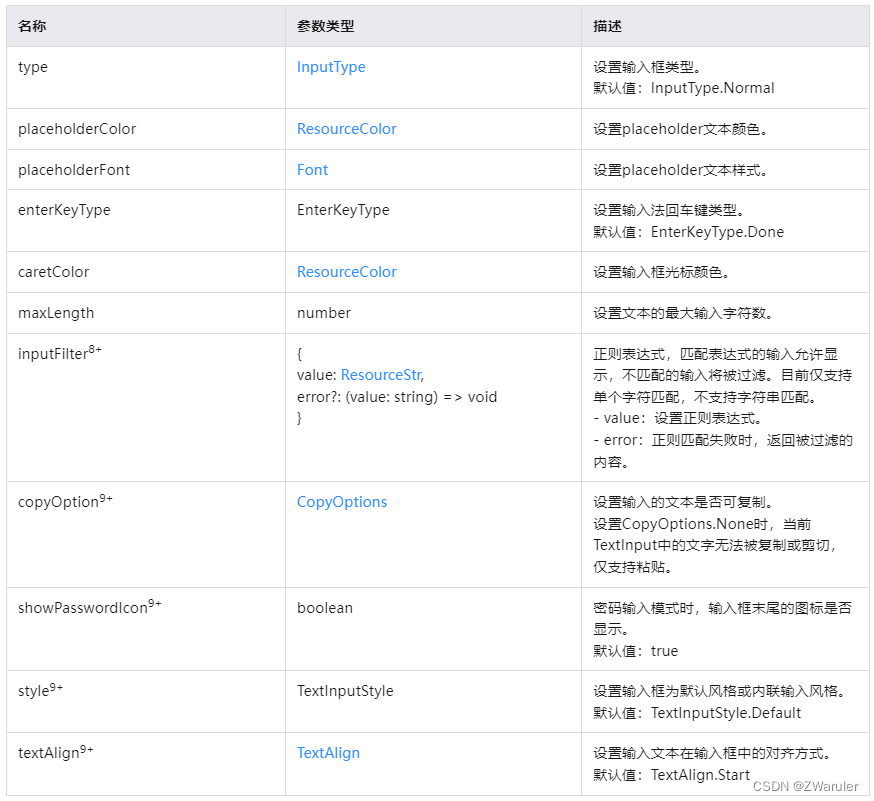
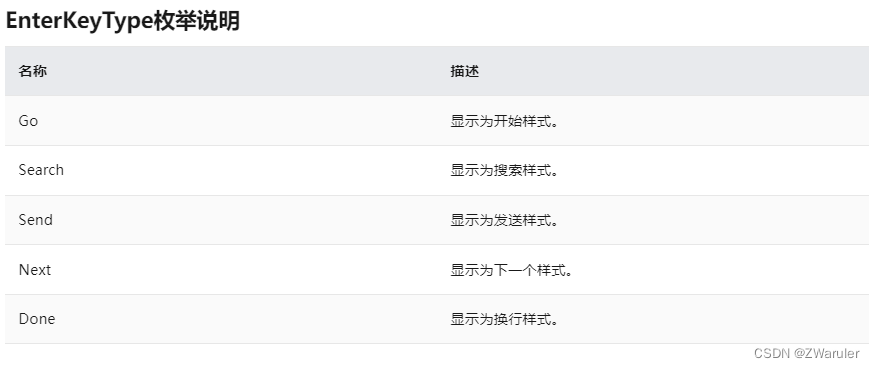
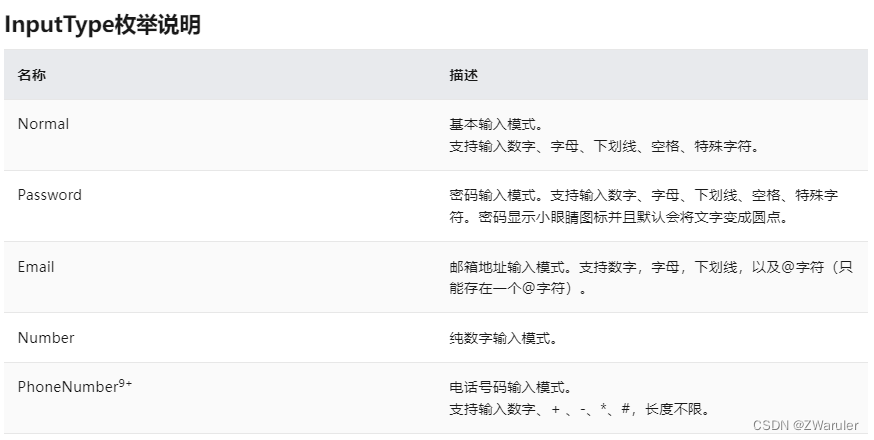
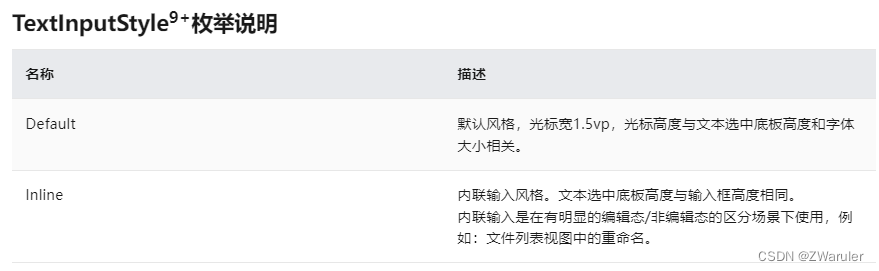
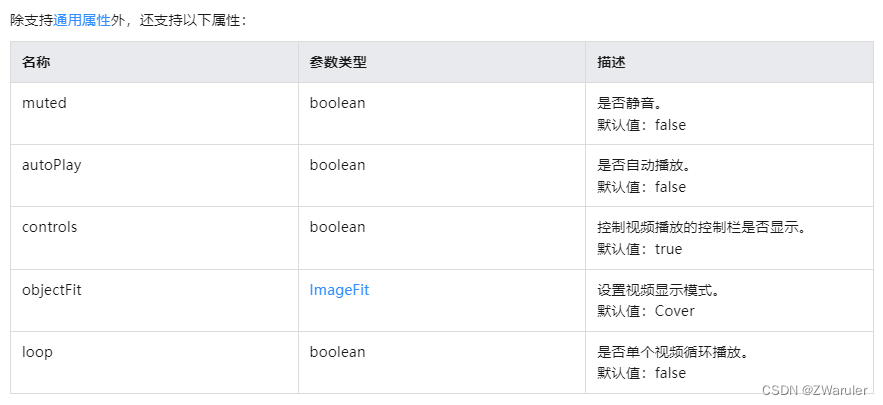
除支持通用属性外,还支持以下属性:
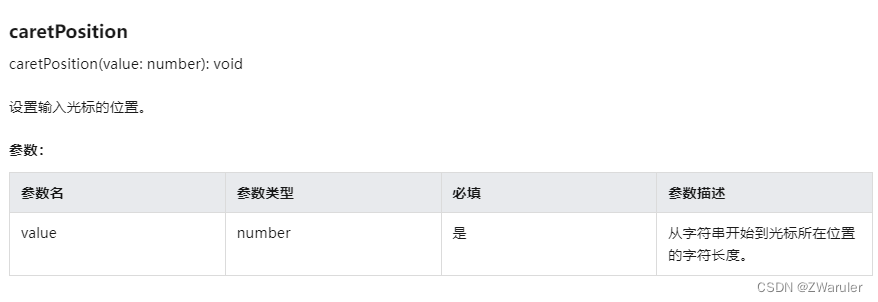
1.2 TextInputController
controller: TextInputController = new TextInputController()
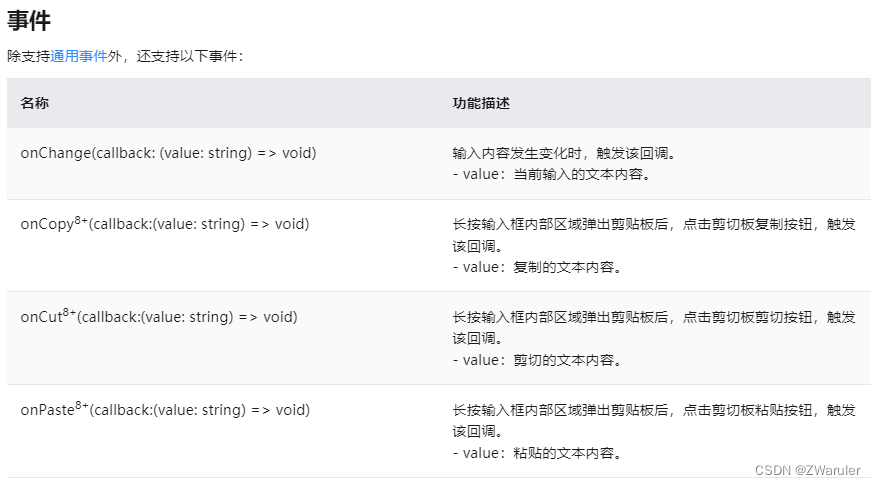
1.3 TextArea
2. 弹窗
2.1 警告弹窗
AlertDialog.show()
// xxx.ets
@Entry
@Component
struct AlertDialogExample {build() {Column({ space: 5 }) {Button('one button dialog').onClick(() => {AlertDialog.show({title: 'title',message: 'text',autoCancel: true,alignment: DialogAlignment.Bottom,offset: { dx: 0, dy: -20 },gridCount: 3,confirm: {value: 'button',action: () => {console.info('Button-clicking callback')}},cancel: () => {console.info('Closed callbacks')}})}).backgroundColor(0x317aff)Button('two button dialog').onClick(() => {AlertDialog.show({title: 'title',message: 'text',autoCancel: true,alignment: DialogAlignment.Bottom,gridCount: 4,offset: { dx: 0, dy: -20 },primaryButton: {value: 'cancel',action: () => {console.info('Callback when the first button is clicked')}},secondaryButton: {value: 'ok',action: () => {console.info('Callback when the second button is clicked')}},cancel: () => {console.info('Closed callbacks')}})}).backgroundColor(0x317aff)}.width('100%').margin({ top: 5 })}
}
2.2 列表选择弹窗
ActionSheet.show()
@Entry
@Component
struct ActionSheetExample {build() {Flex({ direction: FlexDirection.Column, alignItems: ItemAlign.Center, justifyContent: FlexAlign.Center }) {Button('Click to Show ActionSheet').onClick(() => {ActionSheet.show({title: 'ActionSheet title',message: 'message',autoCancel: true,confirm: {value: 'Confirm button',action: () => {console.log('Get Alert Dialog handled')}},cancel: () => {console.log('actionSheet canceled')},alignment: DialogAlignment.Bottom,offset: { dx: 0, dy: -10 },sheets: [{title: 'apples',action: () => {console.log('apples')}},{title: 'bananas',action: () => {console.log('bananas')}},{title: 'pears',action: () => {console.log('pears')}}]})})}.width('100%').height('100%')}
}
2.3 日期滑动选择器弹窗
DatePickerDialog.show()
// xxx.ets
@Entry
@Component
struct DatePickerDialogExample {selectedDate: Date = new Date("2010-1-1")build() {Column() {Button("DatePickerDialog").margin(20).onClick(() => {DatePickerDialog.show({start: new Date("2000-1-1"),end: new Date("2100-12-31"),selected: this.selectedDate,onAccept: (value: DatePickerResult) => {// 通过Date的setFullYear方法设置按下确定按钮时的日期,这样当弹窗再次弹出时显示选中的是上一次确定的日期this.selectedDate.setFullYear(value.year, value.month, value.day)console.info("DatePickerDialog:onAccept()" + JSON.stringify(value))},onCancel: () => {console.info("DatePickerDialog:onCancel()")},onChange: (value: DatePickerResult) => {console.info("DatePickerDialog:onChange()" + JSON.stringify(value))}})})Button("Lunar DatePickerDialog").margin(20).onClick(() => {DatePickerDialog.show({start: new Date("2000-1-1"),end: new Date("2100-12-31"),selected: this.selectedDate,lunar: true,onAccept: (value: DatePickerResult) => {this.selectedDate.setFullYear(value.year, value.month, value.day)console.info("DatePickerDialog:onAccept()" + JSON.stringify(value))},onCancel: () => {console.info("DatePickerDialog:onCancel()")},onChange: (value: DatePickerResult) => {console.info("DatePickerDialog:onChange()" + JSON.stringify(value))}})})}.width('100%')}
}
2.4 时间滑动选择器弹窗
TimePickerDialog.show()
// xxx.ets
@Entry
@Component
struct TimePickerDialogExample {private selectTime: Date = new Date('2020-12-25T08:30:00')build() {Column() {Button("TimePickerDialog 12小时制").margin(20).onClick(() => {TimePickerDialog.show({selected: this.selectTime,onAccept: (value: TimePickerResult) => {// 设置selectTime为按下确定按钮时的时间,这样当弹窗再次弹出时显示选中的为上一次确定的时间this.selectTime.setHours(value.hour, value.minute)console.info("TimePickerDialog:onAccept()" + JSON.stringify(value))},onCancel: () => {console.info("TimePickerDialog:onCancel()")},onChange: (value: TimePickerResult) => {console.info("TimePickerDialog:onChange()" + JSON.stringify(value))}})})Button("TimePickerDialog 24小时制").margin(20).onClick(() => {TimePickerDialog.show({selected: this.selectTime,useMilitaryTime: true,onAccept: (value: TimePickerResult) => {this.selectTime.setHours(value.hour, value.minute)console.info("TimePickerDialog:onAccept()" + JSON.stringify(value))},onCancel: () => {console.info("TimePickerDialog:onCancel()")},onChange: (value: TimePickerResult) => {console.info("TimePickerDialog:onChange()" + JSON.stringify(value))}})})}.width('100%')}
}
2.5 文本滑动选择器弹窗
TextPickerDialog.show()
// xxx.ets
@Entry
@Component
struct TextPickerDialogExample {private select: number | number[] = 2private fruits: string[] = ['apple1', 'orange2', 'peach3', 'grape4', 'banana5']build() {Row() {Column() {Button("TextPickerDialog").margin(20).onClick(() => {TextPickerDialog.show({range: this.fruits,selected: this.select,onAccept: (value: TextPickerResult) => {// 设置select为按下确定按钮时候的选中项index,这样当弹窗再次弹出时显示选中的是上一次确定的选项this.select = value.indexconsole.info("TextPickerDialog:onAccept()" + JSON.stringify(value))},onCancel: () => {console.info("TextPickerDialog:onCancel()")},onChange: (value: TextPickerResult) => {console.info("TextPickerDialog:onChange()" + JSON.stringify(value))}})})}.width('100%')}.height('100%')}
}
2.6 自定义弹窗(CustomDialog)
-
使用@CustomDialog装饰器装饰自定义弹窗。
-
@CustomDialog装饰器用于装饰自定义弹框,此装饰器内进行自定义内容(也就是弹框内容)。
-
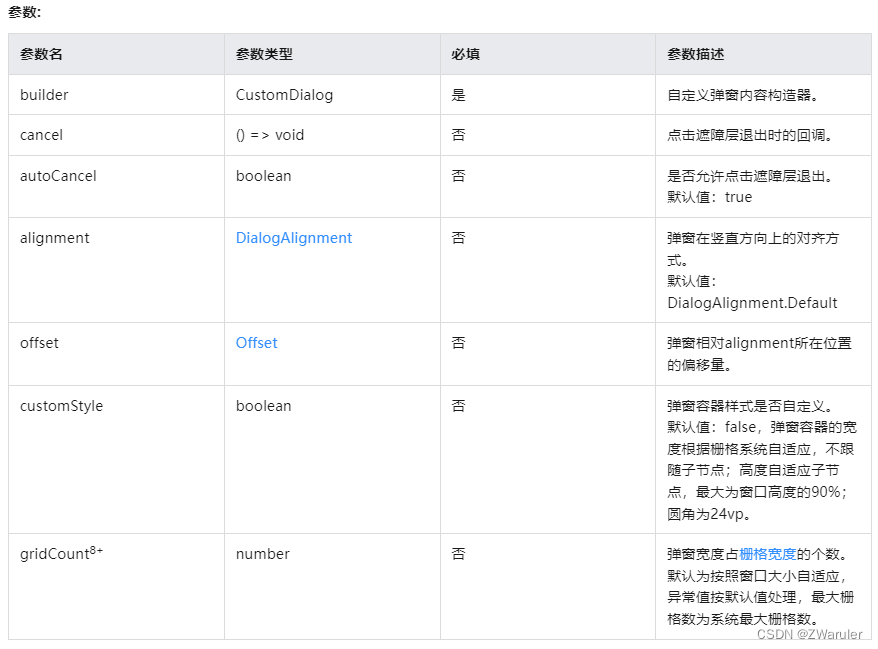
创建构造器,与装饰器呼应相连。CustomDialogController仅在作为@CustomDialog和@Component struct的成员变量,且在@Component struct内部定义时赋值才有效,具体用法可看下方示例。CustomDialogController参数如下
// xxx.ets
@CustomDialog
struct CustomDialogExample {@Link textValue: string@Link inputValue: stringcontroller: CustomDialogController// 若尝试在CustomDialog中传入多个其他的Controller,以实现在CustomDialog中打开另一个或另一些CustomDialog,那么此处需要将指向自己的controller放在最后cancel: () => voidconfirm: () => voidbuild() {Column() {Text('Change text').fontSize(20).margin({ top: 10, bottom: 10 })TextInput({ placeholder: '', text: this.textValue }).height(60).width('90%').onChange((value: string) => {this.textValue = value})Text('Whether to change a text?').fontSize(16).margin({ bottom: 10 })Flex({ justifyContent: FlexAlign.SpaceAround }) {Button('cancel').onClick(() => {this.controller.close()this.cancel()}).backgroundColor(0xffffff).fontColor(Color.Black)Button('confirm').onClick(() => {this.inputValue = this.textValuethis.controller.close()this.confirm()}).backgroundColor(0xffffff).fontColor(Color.Red)}.margin({ bottom: 10 })}// dialog默认的borderRadius为24vp,如果需要使用border属性,请和borderRadius属性一起使用。}
}@Entry
@Component
struct CustomDialogUser {@State textValue: string = ''@State inputValue: string = 'click me'dialogController: CustomDialogController = new CustomDialogController({builder: CustomDialogExample({cancel: this.onCancel,confirm: this.onAccept,textValue: $textValue,inputValue: $inputValue}),cancel: this.existApp,autoCancel: true,alignment: DialogAlignment.Bottom,offset: { dx: 0, dy: -20 },gridCount: 4,customStyle: false})// 在自定义组件即将析构销毁时将dialogController置空aboutToDisappear() {this.dialogController = undefined // 将dialogController置空}onCancel() {console.info('Callback when the first button is clicked')}onAccept() {console.info('Callback when the second button is clicked')}existApp() {console.info('Click the callback in the blank area')}build() {Column() {Button(this.inputValue).onClick(() => {if (this.dialogController != undefined) {this.dialogController.open()}}).backgroundColor(0x317aff)}.width('100%').margin({ top: 5 })}
}
3. 视频播放 Video
3.1 组件创建
Video通过调用接口来创建,接口调用形式如下:
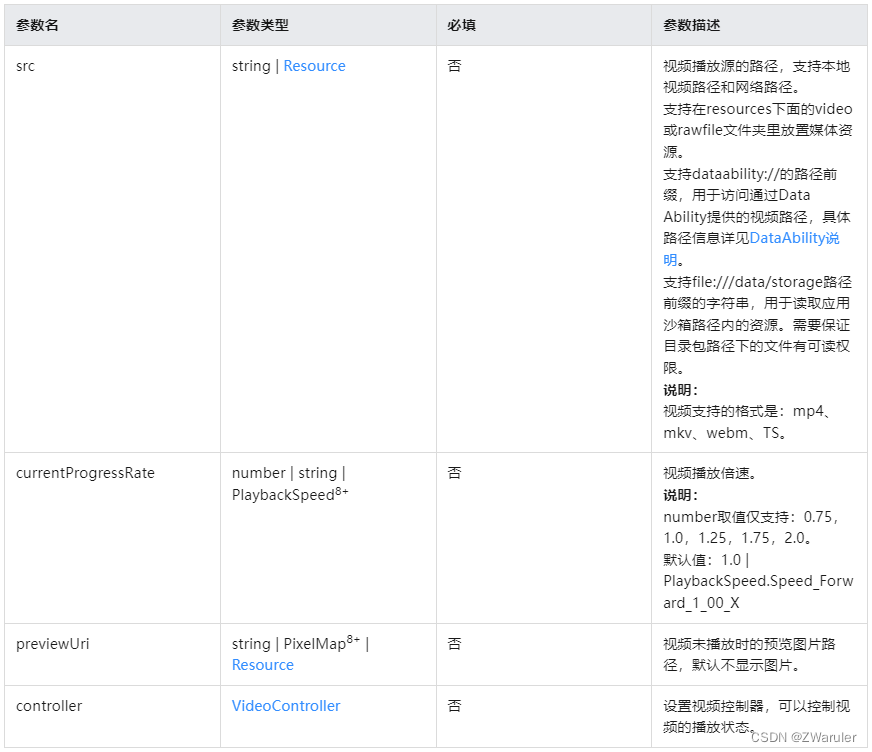
Video(value: {src?: string | Resource, currentProgressRate?: number | string | PlaybackSpeed, previewUri?: string | PixelMap | Resource, controller?: VideoController})
3.2 视频加载
- 加载本地视频时,首先在本地rawfile目录指定对应的文件,如下图所示。
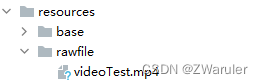
再使用资源访问符$rawfile()引用视频资源。
@Component
export struct VideoPlayer{private controller:VideoController;private previewUris: Resource = $r ('app.media.preview');private innerResource: Resource = $rawfile('videoTest.mp4');build(){Column() {Video({src: this.innerResource,previewUri: this.previewUris,controller: this.controller})}}
}
- Data Ability提供的视频路径带有dataability://前缀,使用时确保对应视频资源存在即可。
@Component
export struct VideoPlayer{private controller:VideoController;private previewUris: Resource = $r ('app.media.preview');private videoSrc: string = 'dataability://device_id/com.domainname.dataability.videodata/video/10'build(){Column() {Video({src: this.videoSrc,previewUri: this.previewUris,controller: this.controller})}}
}
- 加载沙箱路径视频
支持file:///data/storage路径前缀的字符串,用于读取应用沙箱路径内的资源。需要保证应用沙箱目录路径下的文件存在并且有可读权限。
@Component
export struct VideoPlayer {private controller: VideoController;private videoSrc: string = 'file:///data/storage/el2/base/haps/entry/files/show.mp4'build() {Column() {Video({src: this.videoSrc,controller: this.controller})}}
}
- 加载网络视频
加载网络视频时,需要申请权限ohos.permission.INTERNET,具体申请方式请参考权限申请声明。此时,Video的src属性为网络视频的链接。
@Component
export struct VideoPlayer{private controller:VideoController;private previewUris: Resource = $r ('app.media.preview');private videoSrc: string= 'https://www.example.com/example.mp4' // 使用时请替换为实际视频加载网址build(){Column() {Video({src: this.videoSrc,previewUri: this.previewUris,controller: this.controller})}}
}
3.3 VideoController
一个VideoController对象可以控制一个或多个video
controller: VideoController = new VideoController()
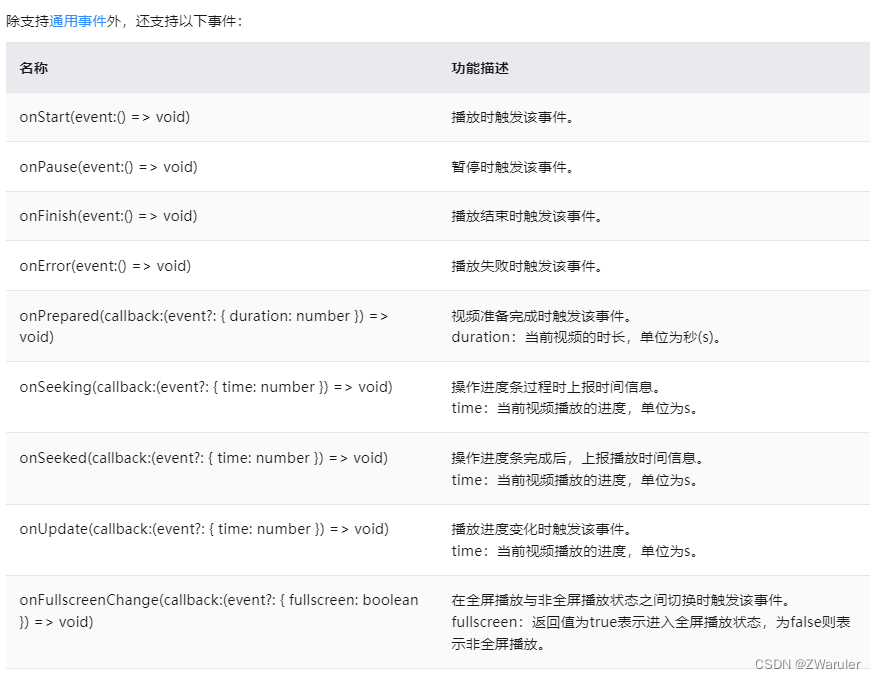
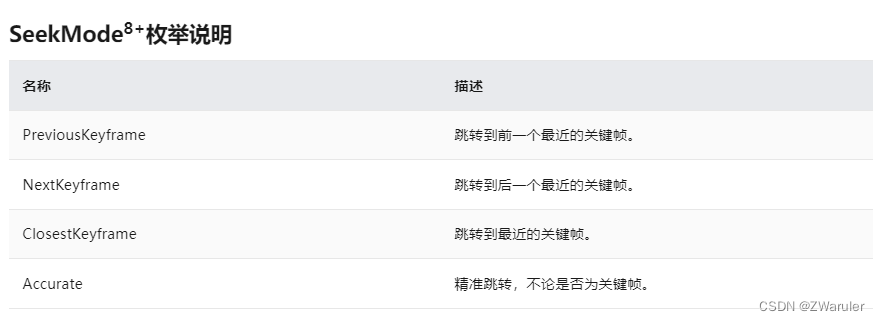
提供了start(), stop(), pause(),setCurrentTime()指定视频播放的进度位置(单位为s), requestFullscreen(), exitFullscreen(), setCurrentTime(value: number, seekMode: SeekMode)控制方法.
// xxx.ets
@Entry
@Component
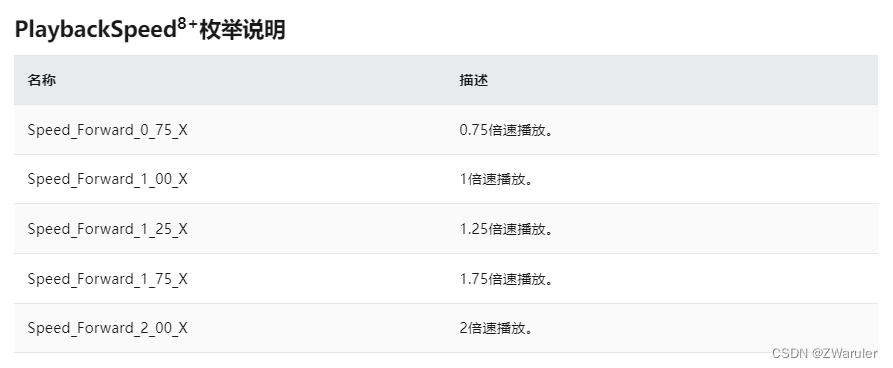
struct VideoCreateComponent {@State videoSrc: Resource = $rawfile('video1.mp4')@State previewUri: Resource = $r('app.media.poster1')@State curRate: PlaybackSpeed = PlaybackSpeed.Speed_Forward_1_00_X@State isAutoPlay: boolean = false@State showControls: boolean = truecontroller: VideoController = new VideoController()build() {Column() {Video({src: this.videoSrc,previewUri: this.previewUri,currentProgressRate: this.curRate,controller: this.controller}).width('100%').height(600).autoPlay(this.isAutoPlay).controls(this.showControls).onStart(() => {console.info('onStart')}).onPause(() => {console.info('onPause')}).onFinish(() => {console.info('onFinish')}).onError(() => {console.info('onError')}).onPrepared((e) => {console.info('onPrepared is ' + e.duration)}).onSeeking((e) => {console.info('onSeeking is ' + e.time)}).onSeeked((e) => {console.info('onSeeked is ' + e.time)}).onUpdate((e) => {console.info('onUpdate is ' + e.time)})Row() {Button('src').onClick(() => {this.videoSrc = $rawfile('video2.mp4') // 切换视频源}).margin(5)Button('previewUri').onClick(() => {this.previewUri = $r('app.media.poster2') // 切换视频预览海报}).margin(5)Button('controls').onClick(() => {this.showControls = !this.showControls // 切换是否显示视频控制栏}).margin(5)}Row() {Button('start').onClick(() => {this.controller.start() // 开始播放}).margin(5)Button('pause').onClick(() => {this.controller.pause() // 暂停播放}).margin(5)Button('stop').onClick(() => {this.controller.stop() // 结束播放}).margin(5)Button('setTime').onClick(() => {this.controller.setCurrentTime(10, SeekMode.Accurate) // 精准跳转到视频的10s位置}).margin(5)}Row() {Button('rate 0.75').onClick(() => {this.curRate = PlaybackSpeed.Speed_Forward_0_75_X // 0.75倍速播放}).margin(5)Button('rate 1').onClick(() => {this.curRate = PlaybackSpeed.Speed_Forward_1_00_X // 原倍速播放}).margin(5)Button('rate 2').onClick(() => {this.curRate = PlaybackSpeed.Speed_Forward_2_00_X // 2倍速播放}).margin(5)}}}
}
这篇关于鸿蒙开发笔记(二十): 常用组件 TextInput/TextArea, 弹窗,视频播放Video的文章就介绍到这儿,希望我们推荐的文章对编程师们有所帮助!


