本文主要是介绍Netty源码分析系列之三:Netty启动之NioEventLoop创建,希望对大家解决编程问题提供一定的参考价值,需要的开发者们随着小编来一起学习吧!
引言
从本文开始,我们一起来阅读Netty的源码实现,主要针对Netty的核心实现进行进一步的梳理。但是话又说回来,如果我们直接看Netty源码的话,可能不知道该如何下手,大大小小那么多个源码包,就像一团乱麻,千头万绪。所以本文从Netty服务启动开始,根据启动流程来逐渐打开Netty的神秘面纱,理清Netty的技术脉络。
NioEventLoop创建- 总结

今天是周末,但是生物钟还是准时叫醒了疲惫的自己。不上班的日子,那就好好类写博客吧,哈哈。
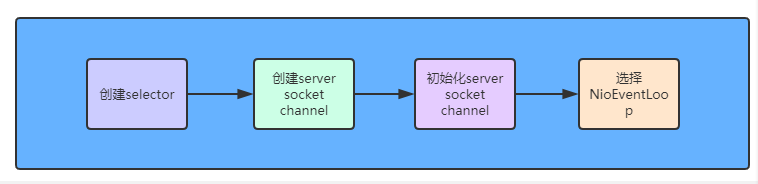
下图是Netty的Reactor线程模型示意图,可以方便大家对于这部分内容的理解,后续的文章中这种图还会持续出现,本文主要涉及的内容包含了其中的几个步骤。

(图片来自于网络)
一、NioEventLoop创建
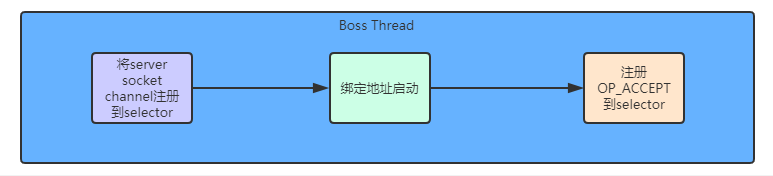
Netty服务启动,最重要的事情就是做好接受客户端连接的准备。我们分别看下自定义线程以及boss线程所要完成的任务以及流程,如下所示:
这里罗列了一些比较重要的类名称及其对应的主要功能说明,以便于大家在阅读源码时可以快速了解对应类的功能:
| 类 | 作用 |
|---|---|
| ServerBootstrap | 服务端启动辅助类 |
| NioEventLoop | Nio事件处理器(Reactor模型) |
| NioEventLoopGroup | 一组Nio事件处理器(Reactor模型) |
在Netty源码包中,我们首先看下 io.netty.example.echo包中的EchoServer 类,该类中包含了Netty服务启动相关代码,具体源码以及源码部分分析注释如下所示:
public final class EchoServer {static final boolean SSL = System.getProperty("ssl") != null;static final int PORT = Integer.parseInt(System.getProperty("port", "8007"));public static void main(String[] args) throws Exception {// Configure SSL.final SslContext sslCtx;if (SSL) {SelfSignedCertificate ssc = new SelfSignedCertificate();sslCtx = SslContextBuilder.forServer(ssc.certificate(), ssc.privateKey()).build();} else {sslCtx = null;}//处理连接事件EventLoopGroup bossGroup = new NioEventLoopGroup(1);//处理读以及写的事件EventLoopGroup workerGroup = new NioEventLoopGroup();final EchoServerHandler serverHandler = new EchoServerHandler();try {//服务引导类ServerBootstrap b = new ServerBootstrap();b.group(bossGroup, workerGroup).channel(NioServerSocketChannel.class).option(ChannelOption.SO_BACKLOG, 100).handler(new LoggingHandler(LogLevel.INFO)).childHandler(new ChannelInitializer<SocketChannel>() {@Overridepublic void initChannel(SocketChannel ch) throws Exception {//初始化channel.pipelineChannelPipeline p = ch.pipeline();if (sslCtx != null) {p.addLast(sslCtx.newHandler(ch.alloc()));}//p.addLast(new LoggingHandler(LogLevel.INFO));p.addLast(serverHandler);}});// 启动服务,绑定端口ChannelFuture f = b.bind(PORT).sync();// Wait until the server socket is closed.f.channel().closeFuture().sync();} finally {// Shut down all event loops to terminate all threads.bossGroup.shutdownGracefully();workerGroup.shutdownGracefully();}}
}
在启动Netty服务过程中,创建了两个EventLoopGroup 对象,这两个对象是Netty的核心对象,其中bossGroup 用于接收请求,workerGroup用于处理请求。如下所示:
EventLoopGroup bossGroup = new NioEventLoopGroup(1);
EventLoopGroup workerGroup = new NioEventLoopGroup();
我们可以看下NioEventLoopGroup的类继承结构情况,如下所示:
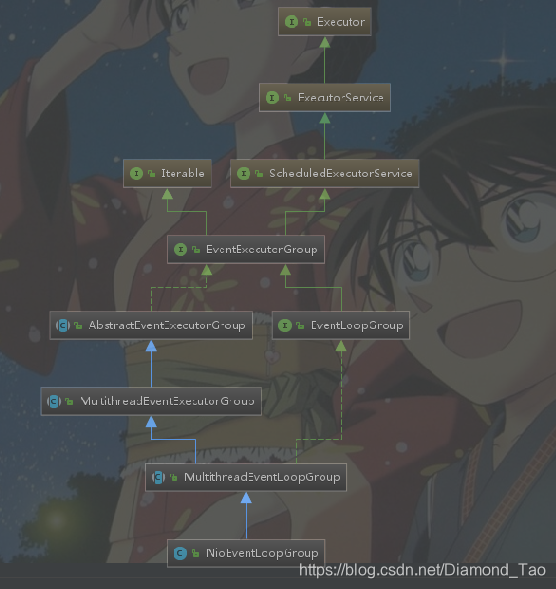
从上图可知,NioEventLoopGroup实现了ScheduledExecutorService接口,因此它可以实现定时任务相关的功能。同时它还继承了SingleThreadEventExecutor类,从类名可以看出,这是一个单线程的线程执行器。在Netty中,通过NioEventLoopGroup的创建来达到创建NioEventLoop的目的。通过有参参数构建NioEventLoopGroup对象,实际调用的是MultithreadEventExecutorGroup的构造方法,如下所示:
protected MultithreadEventExecutorGroup(int nThreads, Executor executor,EventExecutorChooserFactory chooserFactory, Object... args) {if (nThreads <= 0) {throw new IllegalArgumentException(String.format("nThreads: %d (expected: > 0)", nThreads));}if (executor == null) {//ewDefaultThreadFactory()会创建一个线程工厂,该线程工厂的作用就是用来创建线程,同时给线程设置名称:nioEventLoop-1-XXexecutor = new ThreadPerTaskExecutor(newDefaultThreadFactory());}// 根据传进来的线程数,来创建指定大小的数组大小,这个数组就是用来存放NioEventLoop对象实例children = new EventExecutor[nThreads];for (int i = 0; i < nThreads; i ++) {//异常标志boolean success = false;try {创建nThreads个nioEventLoop保存到children数组中children[i] = newChild(executor, args);success = true;} catch (Exception e) {// TODO: Think about if this is a good exception typethrow new IllegalStateException("failed to create a child event loop", e);} finally {//异常处理if (!success) {for (int j = 0; j < i; j ++) {children[j].shutdownGracefully();}for (int j = 0; j < i; j ++) {EventExecutor e = children[j];try {while (!e.isTerminated()) {e.awaitTermination(Integer.MAX_VALUE, TimeUnit.SECONDS);}} catch (InterruptedException interrupted) {// Let the caller handle the interruption.Thread.currentThread().interrupt();break;}}}}}// 通过线程执行器选择工厂来创建一个线程执行器chooser = chooserFactory.newChooser(children);final FutureListener<Object> terminationListener = new FutureListener<Object>() {@Overridepublic void operationComplete(Future<Object> future) throws Exception {if (terminatedChildren.incrementAndGet() == children.length) {terminationFuture.setSuccess(null);}}};for (EventExecutor e: children) {e.terminationFuture().addListener(terminationListener);}Set<EventExecutor> childrenSet = new LinkedHashSet<EventExecutor>(children.length);Collections.addAll(childrenSet, children);readonlyChildren = Collections.unmodifiableSet(childrenSet);}
对应的参数解析,如下表所示:
| 参数 | 说明 |
|---|---|
| nThreads | 创建的线程数量 |
| executor | 线程执行器(用户可自定义,没有则为null,后续进行初始化) |
| chooserFactory | 事件执行选择工厂 |
EventLoopGroup 在创建的时候会调用NioEventLoop 中的openSelector()方法。
EventLoopGroup创建本质就是创建多个NioEventLoop,这里创建NioEventLoop就是初始化一个Reactor,包括selector和taskQueue。
NioEventLoop 源码如下:
public final class NioEventLoop extends SingleThreadEventLoop {
...
private SelectorTuple openSelector() {final Selector unwrappedSelector;try {unwrappedSelector = provider.openSelector();} catch (IOException e) {throw new ChannelException("failed to open a new selector", e);}if (DISABLE_KEY_SET_OPTIMIZATION) {return new SelectorTuple(unwrappedSelector);}Object maybeSelectorImplClass = AccessController.doPrivileged(new PrivilegedAction<Object>() {@Overridepublic Object run() {try {return Class.forName("sun.nio.ch.SelectorImpl",false,PlatformDependent.getSystemClassLoader());} catch (Throwable cause) {return cause;}}});if (!(maybeSelectorImplClass instanceof Class) ||// ensure the current selector implementation is what we can instrument.!((Class<?>) maybeSelectorImplClass).isAssignableFrom(unwrappedSelector.getClass())) {if (maybeSelectorImplClass instanceof Throwable) {Throwable t = (Throwable) maybeSelectorImplClass;logger.trace("failed to instrument a special java.util.Set into: {}", unwrappedSelector, t);}return new SelectorTuple(unwrappedSelector);}final Class<?> selectorImplClass = (Class<?>) maybeSelectorImplClass;final SelectedSelectionKeySet selectedKeySet = new SelectedSelectionKeySet();Object maybeException = AccessController.doPrivileged(new PrivilegedAction<Object>() {@Overridepublic Object run() {try {Field selectedKeysField = selectorImplClass.getDeclaredField("selectedKeys");Field publicSelectedKeysField = selectorImplClass.getDeclaredField("publicSelectedKeys");if (PlatformDependent.javaVersion() >= 9 && PlatformDependent.hasUnsafe()) {// Let us try to use sun.misc.Unsafe to replace the SelectionKeySet.// This allows us to also do this in Java9+ without any extra flags.long selectedKeysFieldOffset = PlatformDependent.objectFieldOffset(selectedKeysField);long publicSelectedKeysFieldOffset =PlatformDependent.objectFieldOffset(publicSelectedKeysField);if (selectedKeysFieldOffset != -1 && publicSelectedKeysFieldOffset != -1) {PlatformDependent.putObject(unwrappedSelector, selectedKeysFieldOffset, selectedKeySet);PlatformDependent.putObject(unwrappedSelector, publicSelectedKeysFieldOffset, selectedKeySet);return null;}// We could not retrieve the offset, lets try reflection as last-resort.}Throwable cause = ReflectionUtil.trySetAccessible(selectedKeysField, true);if (cause != null) {return cause;}cause = ReflectionUtil.trySetAccessible(publicSelectedKeysField, true);if (cause != null) {return cause;}selectedKeysField.set(unwrappedSelector, selectedKeySet);publicSelectedKeysField.set(unwrappedSelector, selectedKeySet);return null;} catch (NoSuchFieldException e) {return e;} catch (IllegalAccessException e) {return e;}}});if (maybeException instanceof Exception) {selectedKeys = null;Exception e = (Exception) maybeException;logger.trace("failed to instrument a special java.util.Set into: {}", unwrappedSelector, e);return new SelectorTuple(unwrappedSelector);}selectedKeys = selectedKeySet;logger.trace("instrumented a special java.util.Set into: {}", unwrappedSelector);return new SelectorTuple(unwrappedSelector,new SelectedSelectionKeySetSelector(unwrappedSelector, selectedKeySet));}
...
}
二、总结
本文主要通过Netty的服务的启动代码,初步了解了Netty在启动过程中做了哪些事情。重点分析了NioEventLoop的创建过程,之后的文章再介绍启动过程中,Netty的其他操作。
这篇关于Netty源码分析系列之三:Netty启动之NioEventLoop创建的文章就介绍到这儿,希望我们推荐的文章对编程师们有所帮助!


