本文主要是介绍Spring Boot - 利用Resilience4j-RateLimiter进行流量控制和服务降级,希望对大家解决编程问题提供一定的参考价值,需要的开发者们随着小编来一起学习吧!
文章目录
- Resilience4j概述
- Resilience4j官方地址
- Resilience4j-RateLimiter
- 微服务演示
- Payment processor
- POM
- 配置文件
- Service
- Controller
- Payment service
- POM
- Model
- Service
- RestConfig
- Controller
- 配置
- 验证
- 探究 Rate Limiting
- 请求三次 ,观察
- 等待15秒
- 连续访问6次
Resilience4j概述
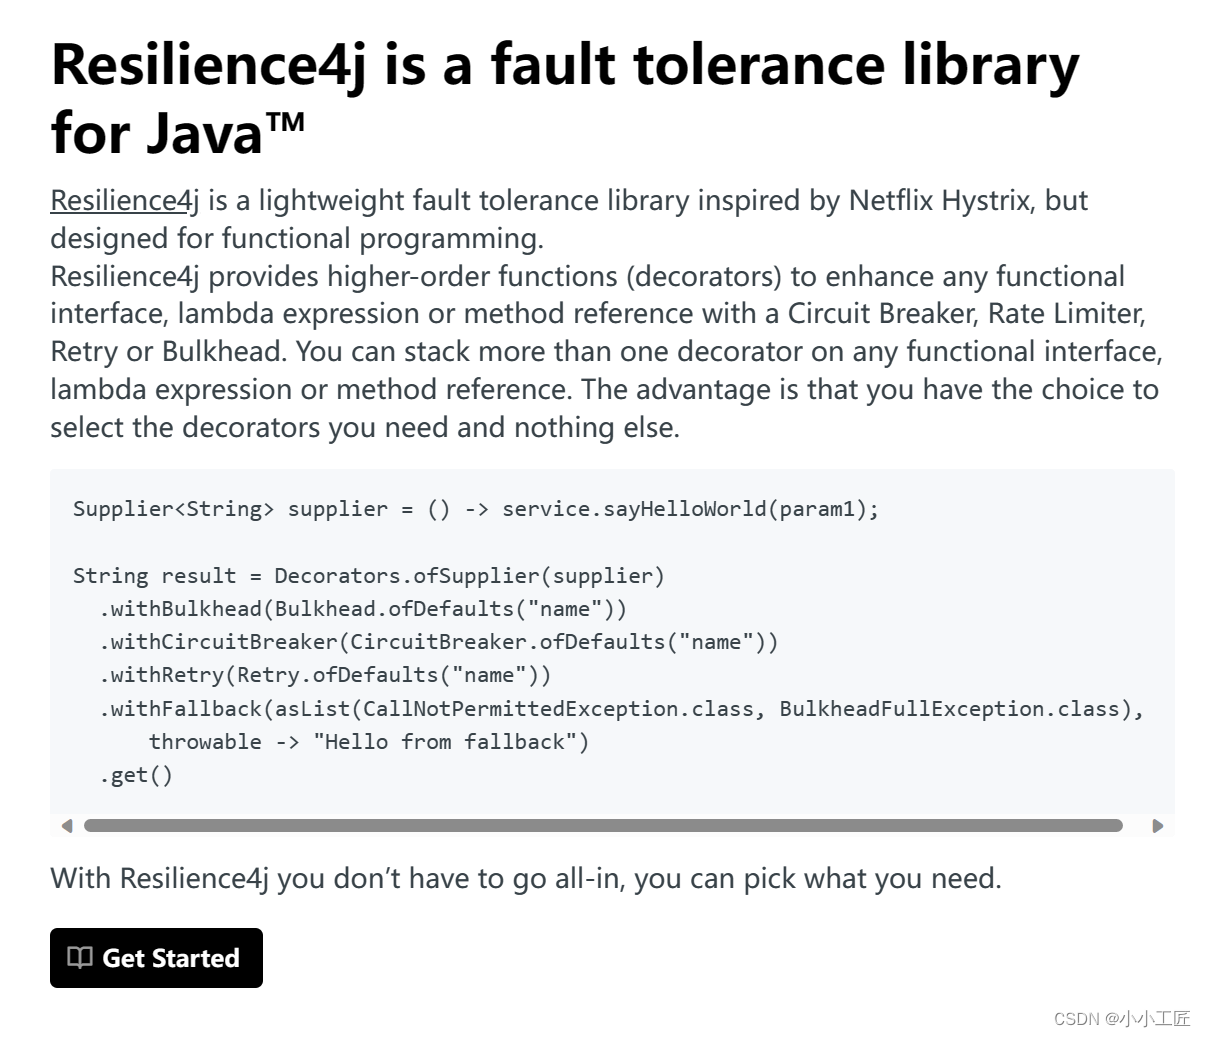
Resilience4J 是一个针对 Java 8 应用程序的轻量级容错和弹性库。它设计用于在分布式系统中的服务之间提供弹性和容错性。Resilience4J 的名字来源于它提供的核心功能,即让系统(服务)能够“弹性”(resilient)地应对各种失败情况,包括网络问题、第三方服务故障等。
Resilience4J 提供了以下功能:
- 断路器(Circuit Breaker):当检测到服务异常或超时,断路器会打开,阻止进一步的请求发送到该服务。一段时间后(通常是秒级),断路器会进入半开状态,允许一个测试请求通过以检查服务是否恢复。如果请求成功,断路器关闭;如果失败,断路器会再次打开。
- 限流(Rate Limiter):限制进入系统的请求速率,防止系统过载。这可以通过令牌桶算法或滑动窗口算法实现。
- 隔离(Isolation):通过信号量或线程池隔离不同的服务调用,防止一个服务的失败影响到其他服务。
- 超时(Timeouts):为服务调用设置超时时间,超过时间后会触发超时异常。
- 重试(Retry):在遇到特定异常时自动重试服务调用,可以配置重试次数和间隔。
- 缓存(Caching):提供缓存机制,以避免重复执行计算密集型或远程调用。
Resilience4J 的一大特点是它的轻量级特性,它只使用了 Vavr 库(一个函数式编程库),没有其他外部库依赖。这使得它在集成到现有系统时非常方便,且性能开销小。
Resilience4J 设计上易于配置,支持通过代码、配置文件或运行时参数进行配置。它也支持通过 actuator 模块与 Spring Boot 的监控和管理特性集成。
由于 Resilience4J 的这些特性和优势,它在现代分布式系统和微服务架构中得到了广泛应用,尤其是在需要高可用性和弹性的环境中。
Resilience4j官方地址
https://resilience4j.readme.io/
https://github.com/resilience4j/resilience4j
Resilience4j-RateLimiter
https://resilience4j.readme.io/docs/ratelimiter
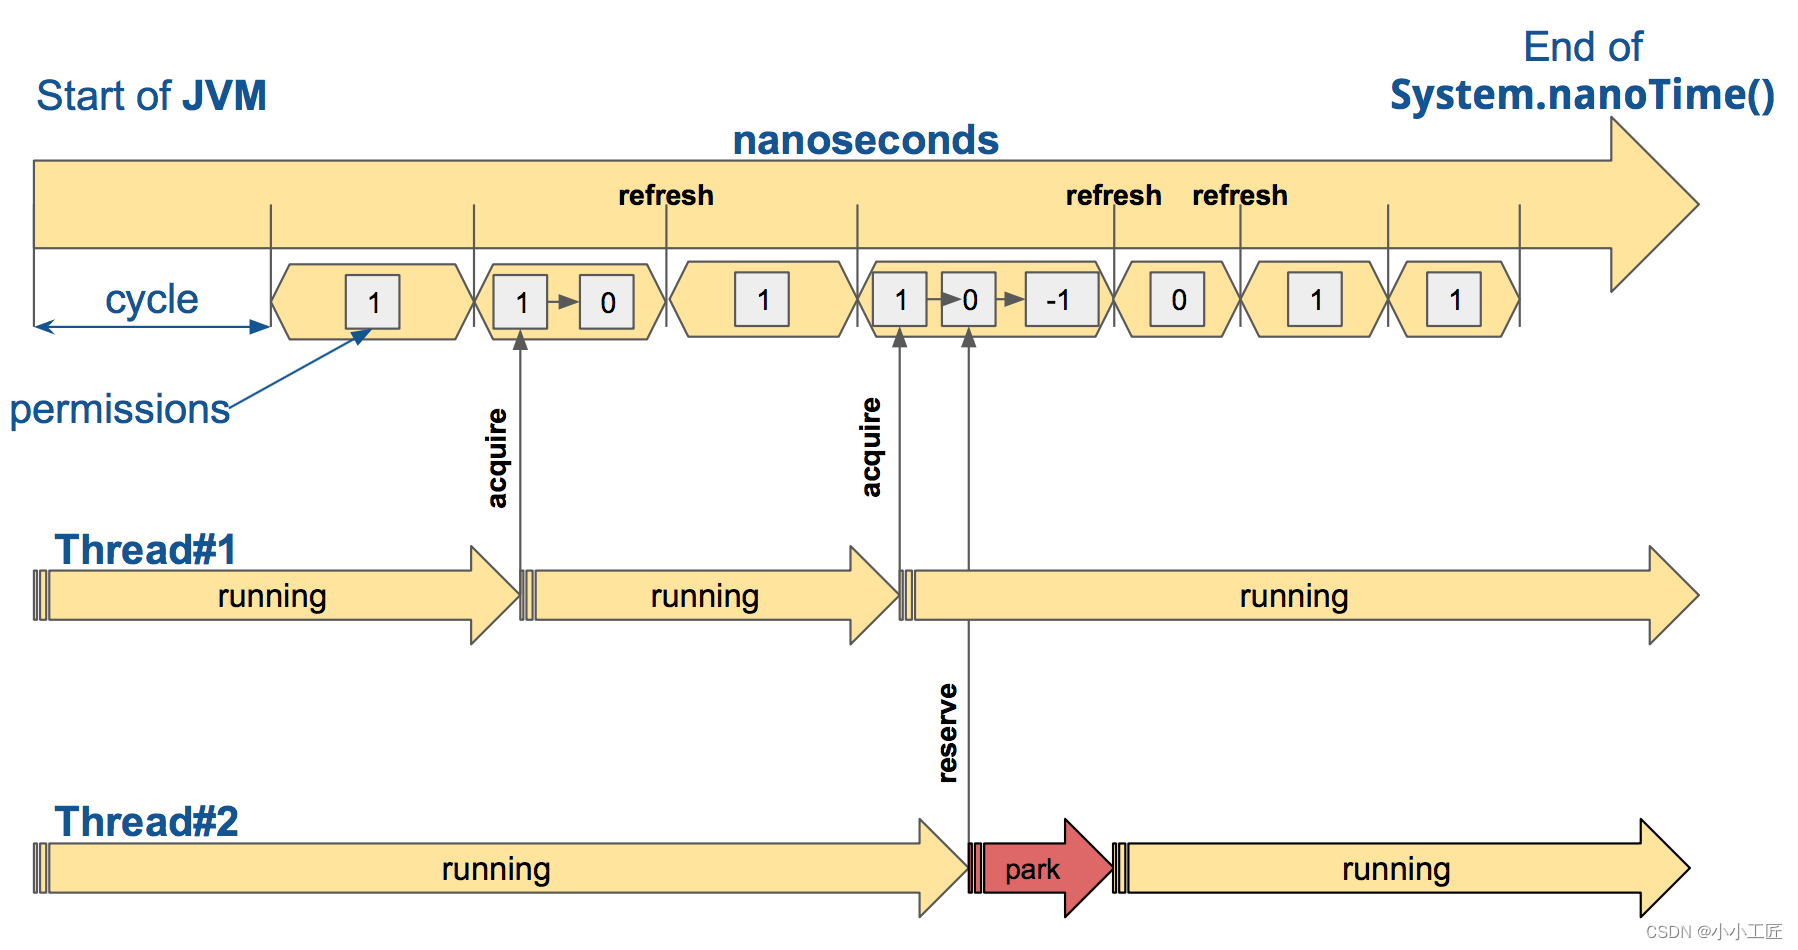
RateLimiter 的默认实现是 AtomicRateLimiter ,它通过 AtomicReference 管理其状态。 AtomicRateLimiter.State 是完全不可变的。
功能点:
-
Warm-Up Period: 当启动应用程序或重置后,可能会有一个预热期,在此期间速率限制器逐渐增加允许的请求速率。这是为了防止启动后流量突然激增,从而可能导致系统过载。
-
Steady State: 预热期结束后,速率限制器进入稳定状态。在此阶段,速率限制器根据配置的速率限制允许请求通过。例如,如果将限制设置为每分钟 100 个请求,则速率限制器将允许大约每 0.6 秒一个请求。
-
Limit Exceeded: 如果传入请求速率超过配置的限制,速率限制器立即开始拒绝超出的请求。
-
Replenishing Tokens: 速率限制器以与配置的限制相对应的速率持续补充“Token”。每个允许的请求消耗一个令牌。如果系统未充分利用允许的速率,则未使用的令牌会累积,从而允许偶尔爆发请求。
-
Cooldown Period: 如果速率限制器因超出速率限制而拒绝请求,则可能存在一个冷却期,在此期间速率限制器会再次逐渐增加允许的请求速率。这是为了防止限制放宽后流量突然激增。
微服务演示
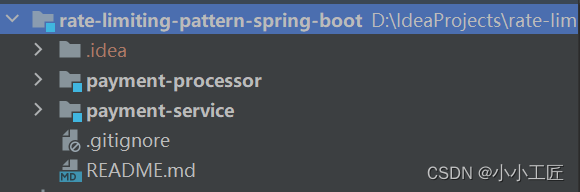
我们的演示有 2 个服务,名为支付服务和支付处理器。

- 付款服务处理来自购物者的传入付款请求,并将其转发到付款处理器进行处理。
- 支付处理器处理并发送结果。
我们将对支付服务实施速率限制,以控制传入付款请求的速率。
Payment processor
首先构建支付处理器,因为它是一个依赖服务.
为了演示的目的,将其简化为显示成功消息
POM
<?xml version="1.0" encoding="UTF-8"?>
<project xmlns="http://maven.apache.org/POM/4.0.0" xmlns:xsi="http://www.w3.org/2001/XMLSchema-instance"xsi:schemaLocation="http://maven.apache.org/POM/4.0.0 https://maven.apache.org/xsd/maven-4.0.0.xsd"><modelVersion>4.0.0</modelVersion><parent><groupId>org.springframework.boot</groupId><artifactId>spring-boot-starter-parent</artifactId><version>3.1.2</version><relativePath/> <!-- lookup parent from repository --></parent><groupId>com.artisan</groupId><artifactId>payment-processor</artifactId><version>0.0.1-SNAPSHOT</version><name>payment-processor</name><properties><java.version>17</java.version></properties><dependencies><dependency><groupId>org.springframework.boot</groupId><artifactId>spring-boot-starter-web</artifactId></dependency><dependency><groupId>org.projectlombok</groupId><artifactId>lombok</artifactId><optional>true</optional></dependency><dependency><groupId>org.springframework.boot</groupId><artifactId>spring-boot-starter-test</artifactId><scope>test</scope></dependency></dependencies><build><plugins><plugin><groupId>org.springframework.boot</groupId><artifactId>spring-boot-maven-plugin</artifactId><configuration><excludes><exclude><groupId>org.projectlombok</groupId><artifactId>lombok</artifactId></exclude></excludes></configuration></plugin></plugins></build></project>
配置文件
server:port: 1010
spring:application:name: payment-processor
Service
package com.artisan.paymentprocessor.service;
/*** @author 小工匠* @version 1.0* @mark: show me the code , change the world*/
public interface PaymentProcessorService {String processPayment(String paymentInfo);
}
package com.artisan.paymentprocessor.service.impl;import org.springframework.stereotype.Service;import com.artisan.paymentprocessor.service.PaymentProcessorService;
/*** @author 小工匠* @version 1.0* @mark: show me the code , change the world*/
@Service
public class PaymentProcessorServiceImpl implements PaymentProcessorService {@Overridepublic String processPayment(String paymentInfo) {// Simulated logic to process paymentreturn "Payment processed: " + paymentInfo;}
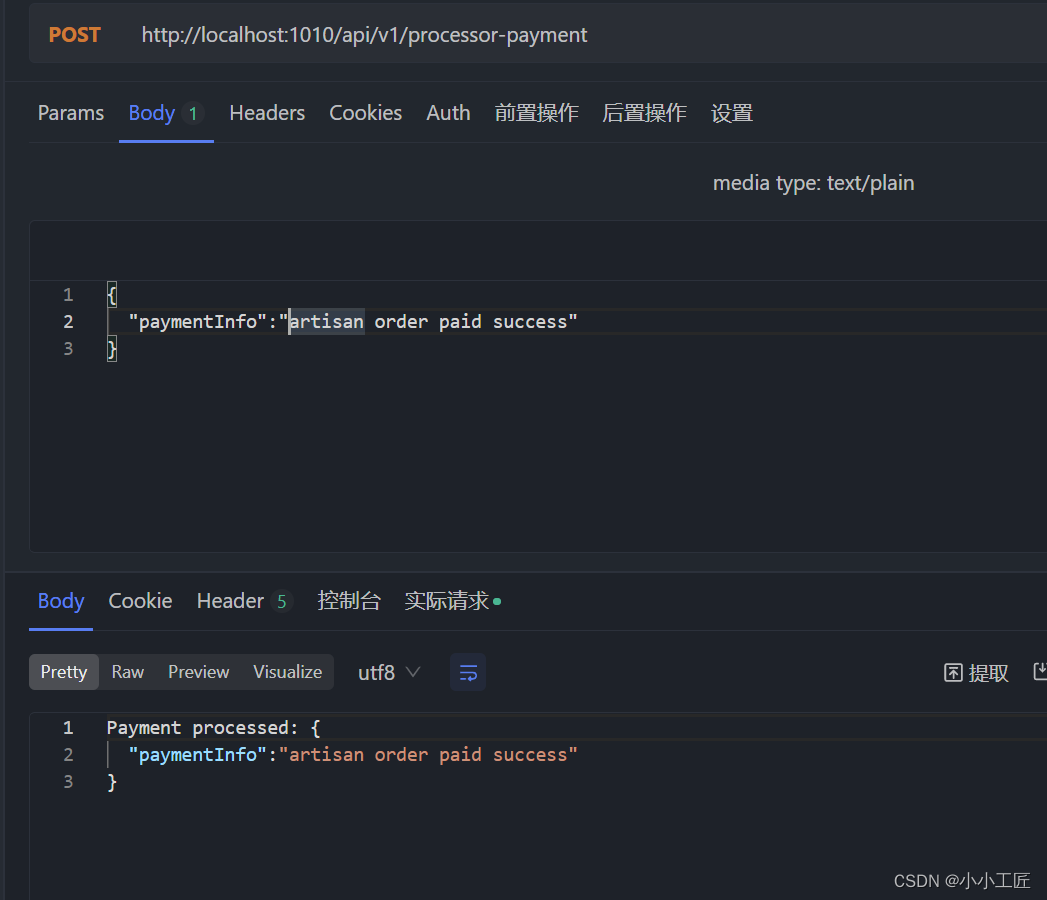
}Controller
package com.artisan.paymentprocessor.controller;import com.artisan.paymentprocessor.service.PaymentProcessorService;
import org.springframework.web.bind.annotation.PostMapping;
import org.springframework.web.bind.annotation.RequestBody;
import org.springframework.web.bind.annotation.RequestMapping;
import org.springframework.web.bind.annotation.RestController;import lombok.RequiredArgsConstructor;/*** @author artisan*/
@RestController
@RequestMapping("/api/v1/processor-payment")
@RequiredArgsConstructor
public class PaymentProcessorController {private final PaymentProcessorService paymentProcessorService;@PostMappingpublic String processPayment(@RequestBody String paymentInfo) {return paymentProcessorService.processPayment(paymentInfo);}
}
测试一下:
Payment service
我们将配置 Rate Limiter,并通过 Actuator 监控其状态 。
POM
<?xml version="1.0" encoding="UTF-8"?>
<project xmlns="http://maven.apache.org/POM/4.0.0" xmlns:xsi="http://www.w3.org/2001/XMLSchema-instance"xsi:schemaLocation="http://maven.apache.org/POM/4.0.0 https://maven.apache.org/xsd/maven-4.0.0.xsd"><modelVersion>4.0.0</modelVersion><parent><groupId>org.springframework.boot</groupId><artifactId>spring-boot-starter-parent</artifactId><version>3.1.2</version><relativePath/> <!-- lookup parent from repository --></parent><groupId>com.artisan</groupId><artifactId>payment-service</artifactId><version>0.0.1-SNAPSHOT</version><name>payment-service</name><properties><java.version>17</java.version><spring-cloud.version>2022.0.4</spring-cloud.version></properties><dependencies><dependency><groupId>org.springframework.boot</groupId><artifactId>spring-boot-starter-actuator</artifactId></dependency><dependency><groupId>org.springframework.boot</groupId><artifactId>spring-boot-starter-aop</artifactId></dependency><dependency><groupId>org.springframework.boot</groupId><artifactId>spring-boot-starter-web</artifactId></dependency><dependency><groupId>org.springframework.cloud</groupId><artifactId>spring-cloud-starter-circuitbreaker-resilience4j</artifactId></dependency><dependency><groupId>org.projectlombok</groupId><artifactId>lombok</artifactId><optional>true</optional></dependency><dependency><groupId>org.springframework.boot</groupId><artifactId>spring-boot-starter-test</artifactId><scope>test</scope></dependency></dependencies><dependencyManagement><dependencies><dependency><groupId>org.springframework.cloud</groupId><artifactId>spring-cloud-dependencies</artifactId><version>${spring-cloud.version}</version><type>pom</type><scope>import</scope></dependency></dependencies></dependencyManagement><build><plugins><plugin><groupId>org.springframework.boot</groupId><artifactId>spring-boot-maven-plugin</artifactId><configuration><excludes><exclude><groupId>org.projectlombok</groupId><artifactId>lombok</artifactId></exclude></excludes></configuration></plugin></plugins></build></project>
Model
public interface Type {
}
@Data
public class Success implements Type {private final String msg;
}
@Data
public class Failure implements Type {private final String msg;
}
Service
如何调用外部API -------------->我们这里使用 Spring的 RestTemplate 。
package com.artisan.paymentservice.service;import com.artisan.paymentservice.model.Type;/*** @author 小工匠* @version 1.0* @mark: show me the code , change the world*/
public interface PaymentService {Type submitPayment(String paymentInfo);
}
package com.artisan.paymentservice.service.impl;import com.artisan.paymentservice.model.Failure;
import com.artisan.paymentservice.model.Success;
import com.artisan.paymentservice.model.Type;
import com.artisan.paymentservice.service.PaymentService;
import org.springframework.http.*;
import org.springframework.stereotype.Service;
import org.springframework.web.client.RestTemplate;import io.github.resilience4j.ratelimiter.RequestNotPermitted;
import io.github.resilience4j.ratelimiter.annotation.RateLimiter;
import lombok.RequiredArgsConstructor;/*** @author 小工匠* @version 1.0* @mark: show me the code , change the world*/
@Service
@RequiredArgsConstructor
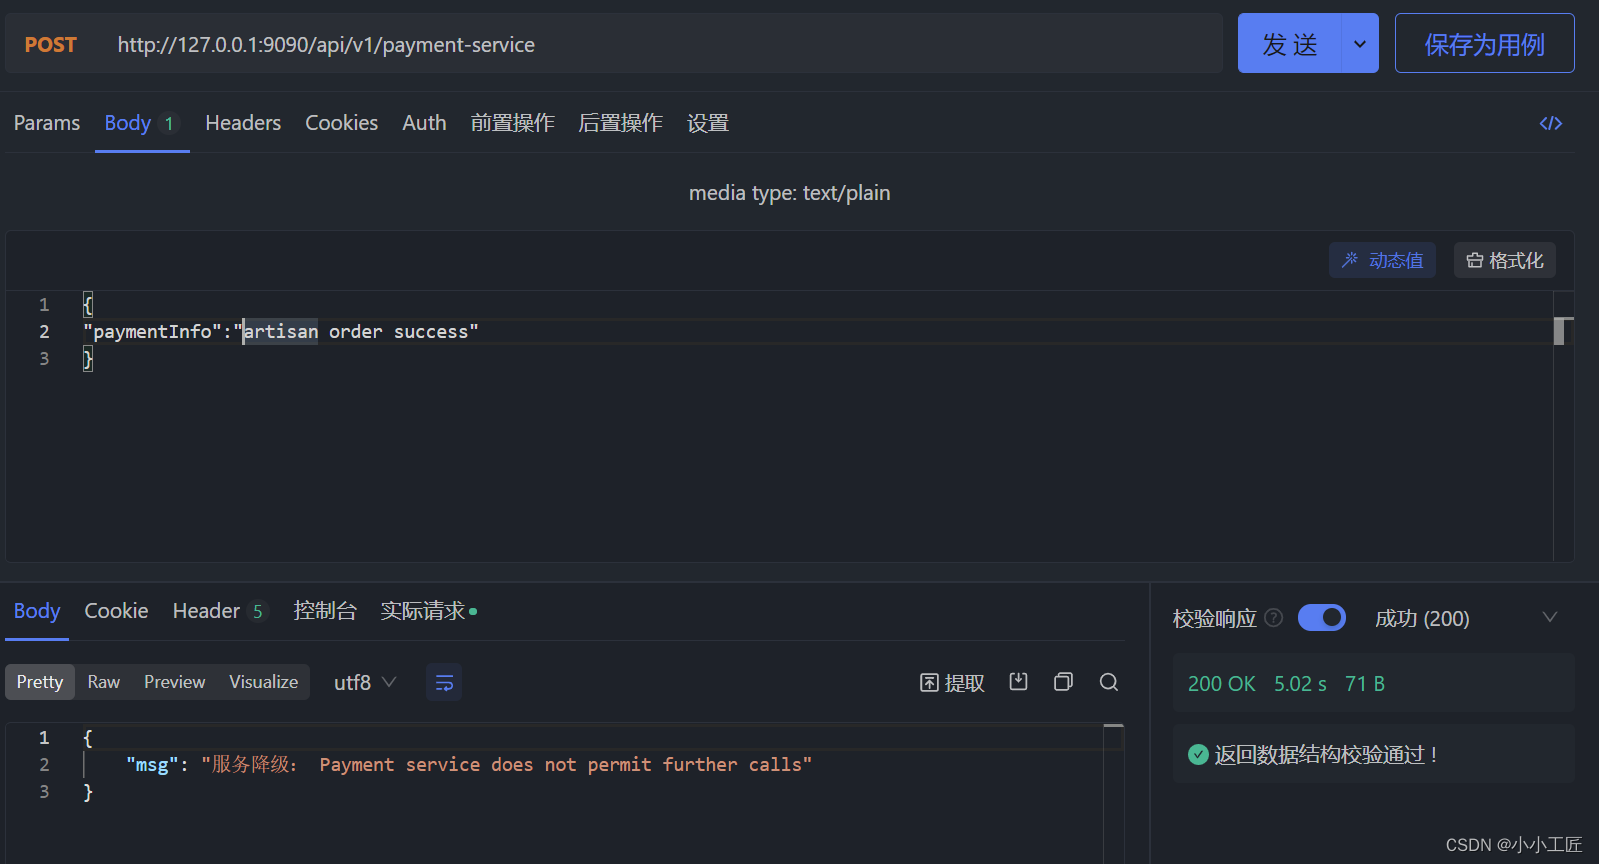
public class PaymentServiceImpl implements PaymentService {private final RestTemplate restTemplate;private static final String SERVICE_NAME = "payment-service";private static final String PAYMENT_PROCESSOR_URL = "http://localhost:1010/api/v1/processor-payment";@Override@RateLimiter(name = SERVICE_NAME, fallbackMethod = "fallbackMethod")public Type submitPayment(String paymentInfo) {HttpHeaders headers = new HttpHeaders();headers.setContentType(MediaType.APPLICATION_JSON);HttpEntity<String> entity = new HttpEntity<>(paymentInfo, headers);ResponseEntity<String> response = restTemplate.exchange(PAYMENT_PROCESSOR_URL,HttpMethod.POST, entity, String.class);Success success = new Success(response.getBody());return success;}private Type fallbackMethod(RequestNotPermitted requestNotPermitted) {return new Failure("服务降级: Payment service does not permit further calls");}
}重点关注: @RateLimiter(name = SERVICE_NAME, fallbackMethod = "fallbackMethod")
需要注意这两种方法应该返回相同的数据类型, 所以对两个模型类都使用“Type”来实现。
RestConfig
package com.artisan.paymentservice.config;import org.springframework.context.annotation.Bean;
import org.springframework.context.annotation.Configuration;
import org.springframework.web.client.RestTemplate;
/*** @author 小工匠* @version 1.0* @mark: show me the code , change the world*/
@Configuration
public class RestConfig {@Beanpublic RestTemplate restTemplate() {return new RestTemplate();}
}
Controller
package com.artisan.paymentservice.controller;import com.artisan.paymentservice.model.Type;
import com.artisan.paymentservice.service.PaymentService;
import org.springframework.web.bind.annotation.PostMapping;
import org.springframework.web.bind.annotation.RequestBody;
import org.springframework.web.bind.annotation.RequestMapping;
import org.springframework.web.bind.annotation.RestController;import lombok.RequiredArgsConstructor;
/*** @author 小工匠* @version 1.0* @mark: show me the code , change the world*/
@RestController
@RequestMapping("/api/v1/payment-service")
@RequiredArgsConstructor
public class PaymentController {private final PaymentService paymentService;@PostMappingpublic Type submitPayment(@RequestBody String paymentInfo) {return paymentService.submitPayment(paymentInfo);}
}
配置
server:port: 9090
spring:application:name: payment-service
management:endpoint:health:show-details: alwaysendpoints:web:exposure:include: healthhealth:ratelimiters:enabled: true
resilience4j:ratelimiter:instances:payment-service:limit-for-period: 5limit-refresh-period: 15stimeout-duration: 5sregister-health-indicator: true
- limit-for-period:一个“limit-refresh-period”期间允许的请求数
- limit-refresh-period:指定“limit-for-period”将被重置的持续时间
- timeout-duration:设置速率限制器允许后续请求的最大等待时间。
这段配置确保了payment-service服务的请求速率不会超过每15秒5次,同时如果请求超过10秒没有响应,则认为请求超时。此外,通过注册健康指标,可以对速率限制器的状态进行监控和管理。
验证

探究 Rate Limiting
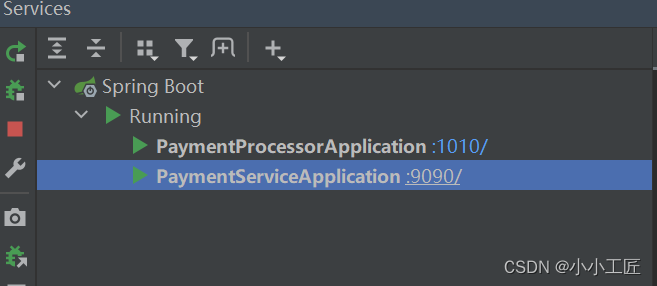
确保两个服务启动成功
访问 http://localhost:9090/actuator/health 查看速率限制器详细信息。
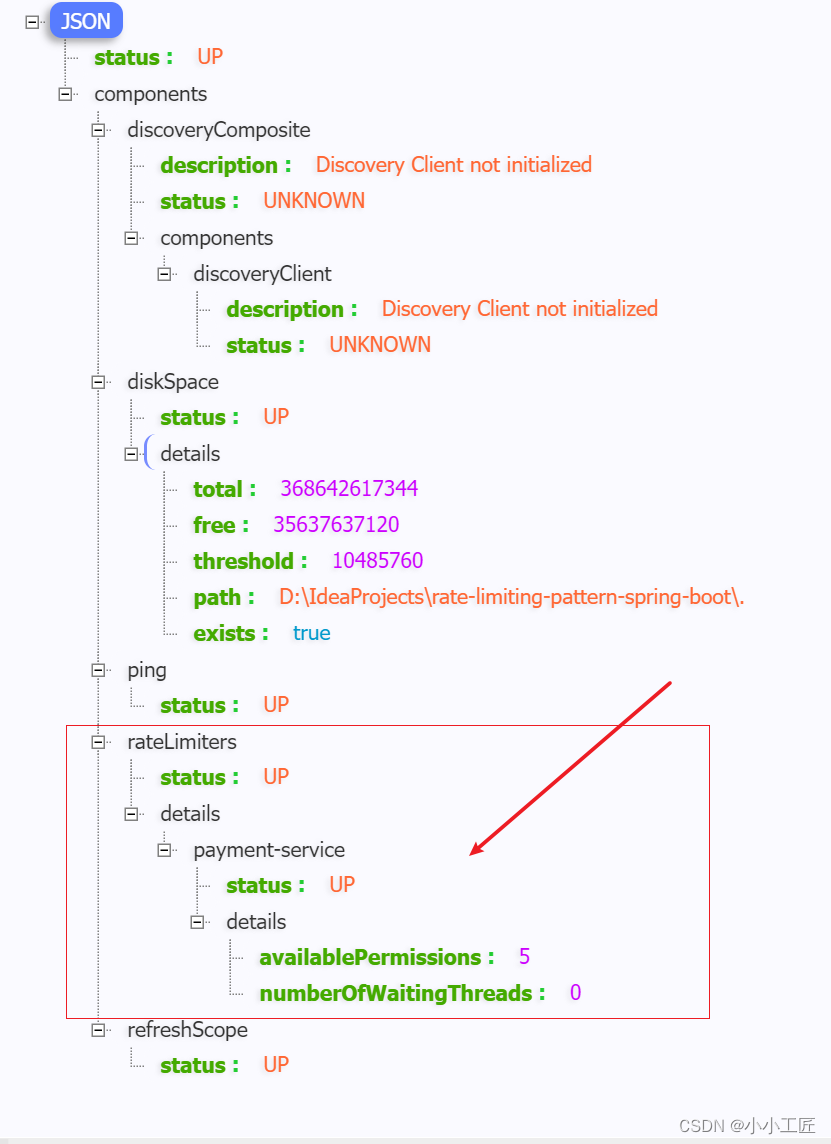
请求三次 ,观察
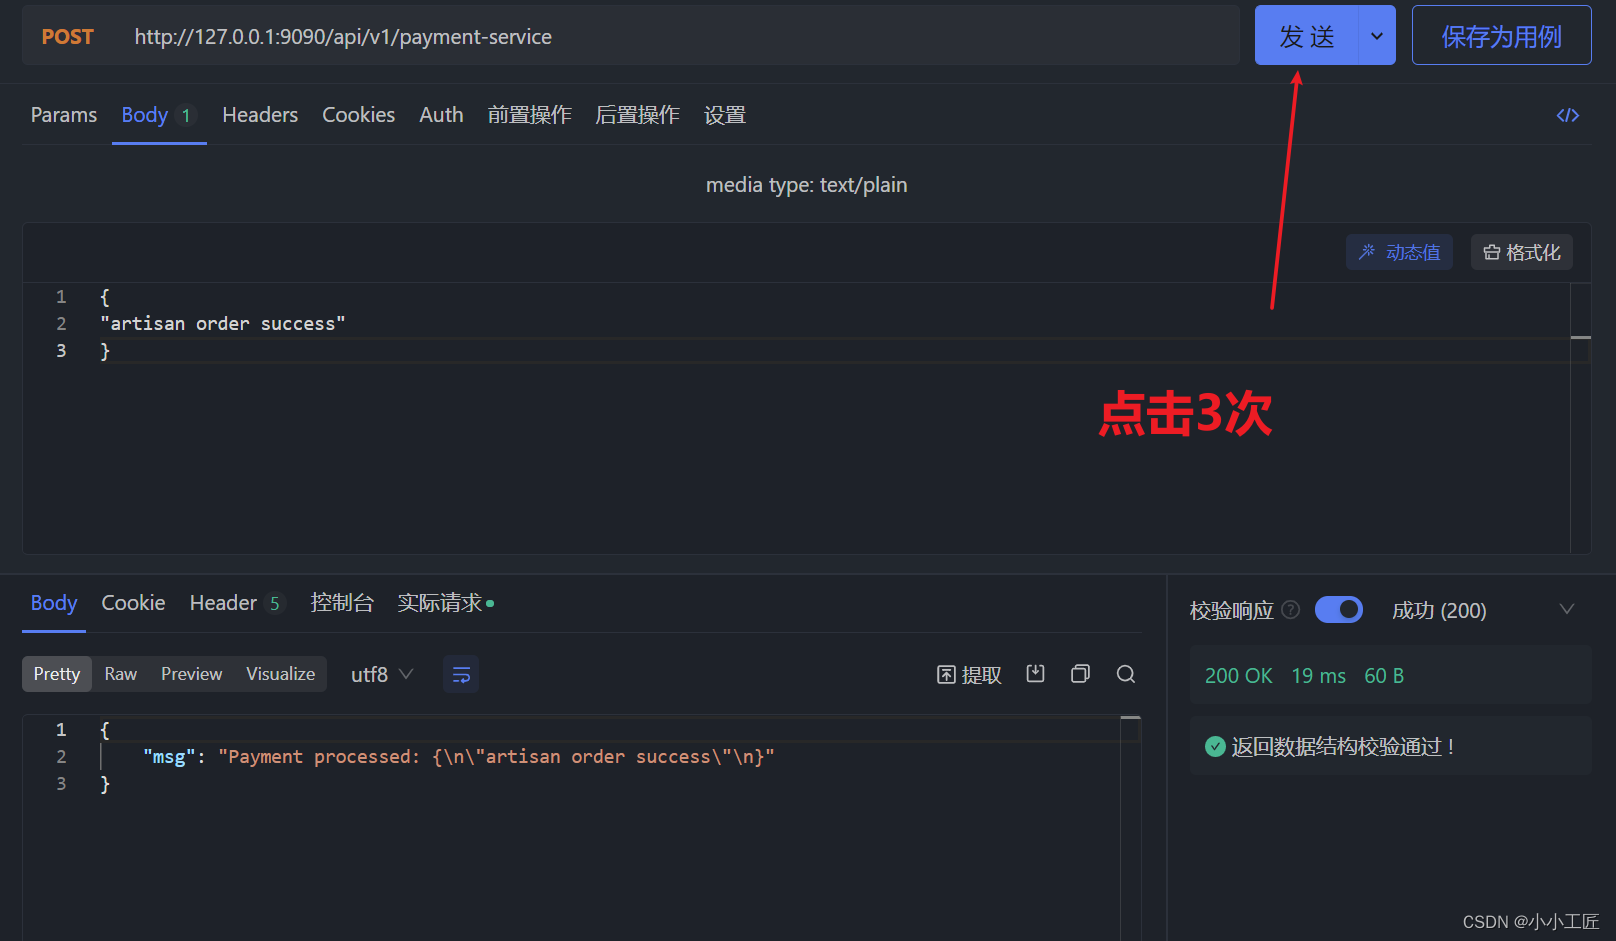
http://localhost:9090/api/v1/ payment-service 请求3次 ,然后刷新执行器链接 http://localhost:9090/actuator/health

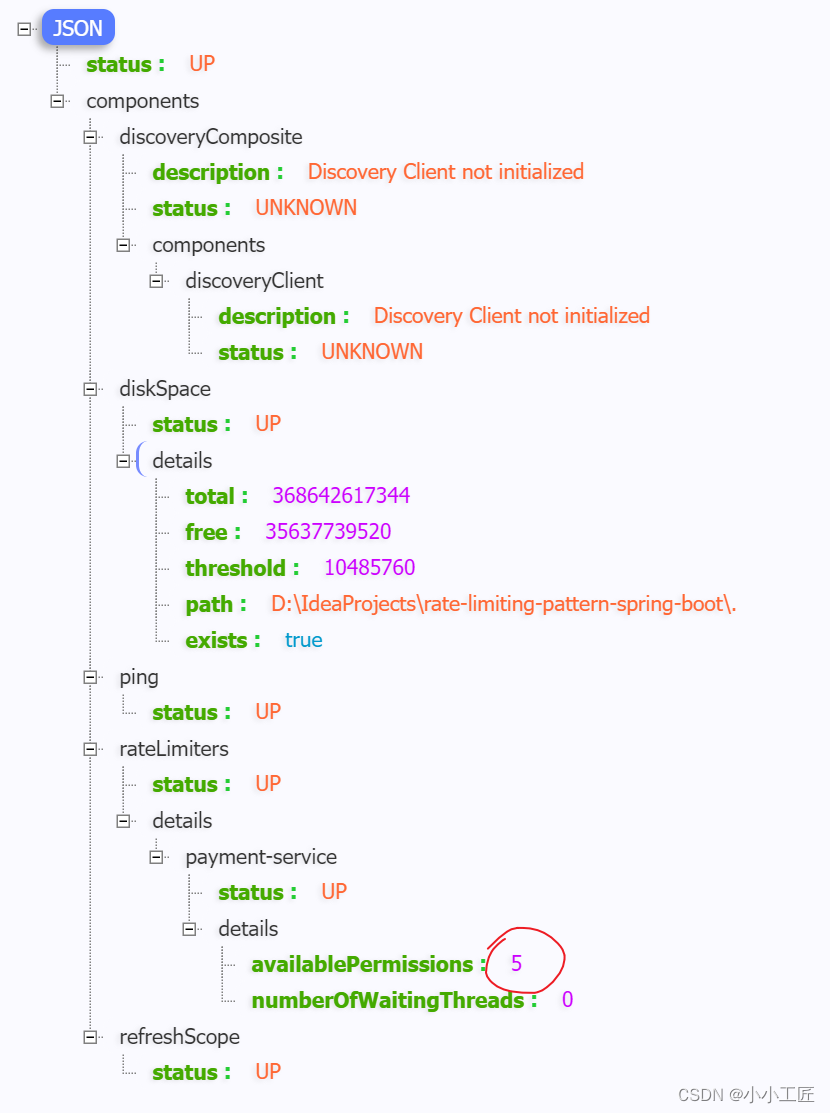
等待15秒
等待 15 秒(如果在 API 访问之前开始,时间可能会更短),然后刷新执行器链接 http://localhost:9090/actuator/health,我们将观察到允许的请求重置为 5。
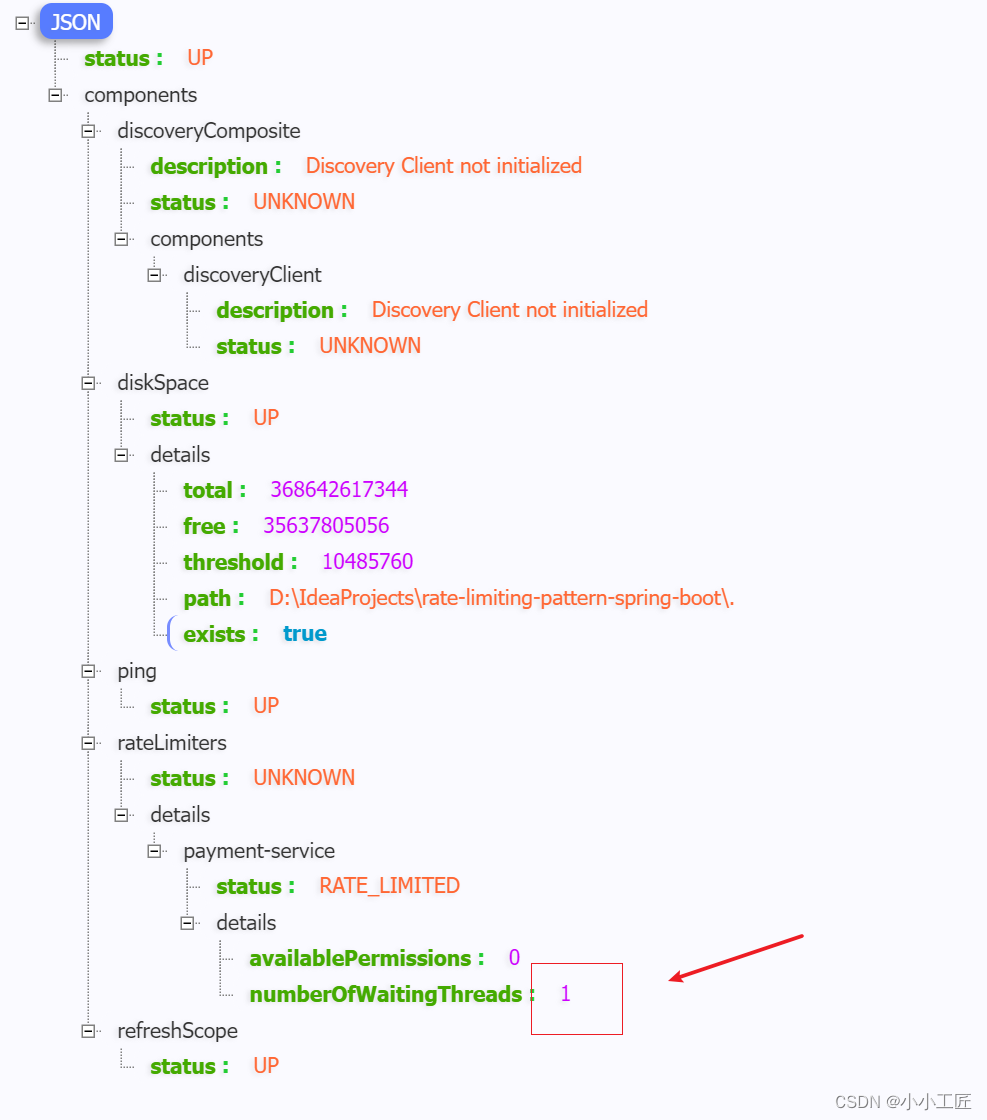
连续访问6次
API 访问 6 次 http://localhost:9090/api/v1/ payment-service。第 6 个请求将因超出限制而延迟 5 秒。等待期间,刷新 http://localhost:9090/actuator/health 以获取以下详细信息
这篇关于Spring Boot - 利用Resilience4j-RateLimiter进行流量控制和服务降级的文章就介绍到这儿,希望我们推荐的文章对编程师们有所帮助!


