本文主要是介绍vue配置qiankun及打包上线,希望对大家解决编程问题提供一定的参考价值,需要的开发者们随着小编来一起学习吧!
项目结构
基座:vue3
子应用A:vue3
子应用B: react
子应用C:vue3+vite
项目目录:

配置基座
首先下载qiankun yarn add qiankun # 或者 npm i qiankun -S 所有子应用也要安装,vue-vite项目安装 cnpm install vite-plugin-qiankun
设置main.js
import { createApp } from 'vue'
import App from './App.vue'
import router from './router'
import store from './store'
import { registerMicroApps, start } from 'qiankun';createApp(App).use(store).use(router).mount('#app')
registerMicroApps([{name: 'vueapp',entry: '//localhost:3001', // 配置子应用的服务container: '#qiankunid',   // 子服务渲染的domactiveRule: '/vue/',       // 路由对应的子服务
}, {name: 'reactapp',entry: '//localhost:3000',container: '#qiankunid',activeRule: '/react/',}, {name: 'vuevite',entry: '//localhost:3002',container: '#qiankunid',activeRule: '/vuevite/',
}], {beforeLoad: [async() => console.log("befor load")],beforeMount: [async() => console.log("beforeMount ")],afterMount: [async() => console.log("afterMount ")],
});// 启动 qiankun
start();
App.vue
<template><div class="main"><div class="mainLeft"><router-link class="meunLi" to="/">首页</router-link><router-link class="meunLi" to="/vue/">vue</router-link><router-link class="meunLi" to="/react/">react</router-link><router-link class="meunLi" to="/vuevite/">vue-vite</router-link></div><div class="mainRight"><router-view /><div id="qiankunid"></div></div></div>
</template><style scoped lang="less">
.main {width: 100vw;height: 100vh;display: flex;.mainLeft {width: 200px;height: 100vh;}.mainRight {flex: 1;height: 100vh;background: #f2f2f2;}.meunLi {width: 100%;height: 40px;line-height: 40px;padding: 0 20px;cursor: pointer;display: block;border-bottom: 1px solid #ddd;}
}
</style>
vue3子应用
配置vue.config.js
const { defineConfig } = require('@vue/cli-service')
const { name } = require('./package');console.log(name)
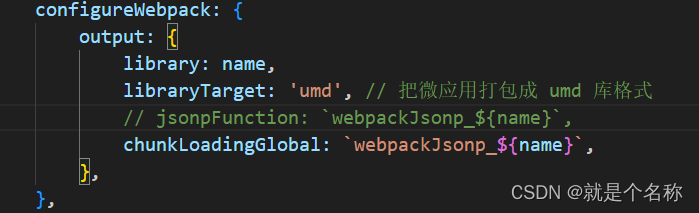
module.exports = defineConfig({transpileDependencies: true,lintOnSave: false,devServer: {headers: {'Access-Control-Allow-Origin': '*',},//设置代理hot: true,port: "3001",open: true,},configureWebpack: {output: {library: name,libraryTarget: 'umd', // 把微应用打包成 umd 库格式chunkLoadingGlobal: `webpackJsonp_${name}`,},},
})配置main.js
import './public-path';
import { createApp } from 'vue'
import App from './App.vue'
import router from './router'
import store from './store'let app// createApp(App).use(store).use(router).mount('#vue-app')
function render(props = {}) {const { container } = props;app = createApp(App)// 这里为了防止冲突 id修改了app.use(store).use(router).mount('#vue-app')}// 独立运行时
if (!window.__POWERED_BY_QIANKUN__) {render();
}export async function bootstrap() {console.log('[vue] vue app bootstraped');
}
export async function mount(props) {console.log('mount', props);render(props);
}
export async function unmount() {app.unmount();
}
src下新增public-path.js
if (window.__POWERED_BY_QIANKUN__) {__webpack_public_path__ = window.__INJECTED_PUBLIC_PATH_BY_QIANKUN__;
}
配置路由
import { createRouter, createWebHistory } from 'vue-router'
import HomeView from '../views/HomeView.vue'const routes = [{path: '/',name: 'home',component: HomeView},{path: '/about',name: 'about',// route level code-splitting// this generates a separate chunk (about.[hash].js) for this route// which is lazy-loaded when the route is visited.component: () =>import ( /* webpackChunkName: "about" */ '../views/AboutView.vue')}
]
console.log(window.__POWERED_BY_QIANKUN__)
const router = createRouter({history: createWebHistory(window.__POWERED_BY_QIANKUN__ ? "/vue/" : "/"),routes
})export default router
vue-vite子应用
vite下载qiankun 用cnpm install vite-plugin-qiankun
配置vite.config.js
import {defineConfig
} from 'vite'
import vue from '@vitejs/plugin-vue'import qiankun from "vite-plugin-qiankun"export default defineConfig({base: "http://localhost:3002/",plugins: [vue(), qiankun("vuevite", { // 配置qiankun插件useDevMode: true})],server: {headers: {'Access-Control-Allow-Origin': '*',},port: '3002',cors: true,origin: "http://localhost:3002"},})
src下新增public-path.js
if (window.__POWERED_BY_QIANKUN__) {__webpack_public_path__ = window.__INJECTED_PUBLIC_PATH_BY_QIANKUN__;
}
配置main.js
import './public-path';
import {createApp
} from 'vue'
import router from "./router/index";import {renderWithQiankun,qiankunWindow
} from 'vite-plugin-qiankun/dist/helper'
import App from './App.vue'let appif (!qiankunWindow.__POWERED_BY_QIANKUN__) {app = createApp(App)app.use(router)app.mount('#vue-vite')
} else {renderWithQiankun({mount(props) {console.log('--mount');const { container } = props;app = createApp(App);app.use(router)app.mount(document.getElementById('vue-vite'));},bootstrap() {console.log('--bootstrap');},update() {console.log('--update');},unmount() {console.log('--unmount');app.unmount();}});
}
配置路由
import {createRouter,createWebHistory
} from 'vue-router'const routes = [{path: '/',name: '3v',component: () =>import ('@/components/3v.vue'),}
]
console.log(window.__POWERED_BY_QIANKUN__)
const router = createRouter({history: createWebHistory("/vuevite/"),routes
})export default router
react子应用
src下新增public-path.js
if (window.__POWERED_BY_QIANKUN__) {__webpack_public_path__ = window.__INJECTED_PUBLIC_PATH_BY_QIANKUN__;
}
配置index.js
import "./public-path.js"
import React from 'react';
import { createRoot } from 'react-dom/client';
import { BrowserRouter, Routes, Route } from "react-router-dom";import App from "./App.js";let root;function render(props) {const { container } = props;const dom = document.getElementById("root")root = createRoot(dom)root.render( <BrowserRouter basename = {window.__POWERED_BY_QIANKUN__ ? '/react' : '/'}> <App/> </BrowserRouter> );}if (!window.__POWERED_BY_QIANKUN__) {render({});}export async function bootstrap() {console.log('[react16] react app bootstraped');}export async function mount(props) {console.log('[react16] props from main framework', props);render(props);}export async function unmount(props) {const { container } = props;root.unmount()}
配置config-overrides.js
为了不暴露所有的webpack配置,我们用 react-app-rewired 来配置webpack,下载 cnpm i react-app-rewired, 然后修改package.json的启动方法

然后根目录新增config-overrides.js文件
const { name } = require('./package');module.exports = {webpack: (config) => {config.output.library = `${name}`;config.output.libraryTarget = 'umd';config.output.chunkLoadingGlobal = `webpackJsonp_${name}`;config.output.globalObject = 'window';return config;},devServer: (_) => {const config = _;config.headers = {'Access-Control-Allow-Origin': '*',};config.historyApiFallback = true;config.hot = false;config.watchContentBase = false;config.liveReload = false;return config;},
};
打包上线
这里用的nginx代理,下面是nginx配置
#user  nobody;
worker_processes  1;#error_log  logs/error.log;
#error_log  logs/error.log  notice;
#error_log  logs/error.log  info;#pid        logs/nginx.pid;events {worker_connections  1024;
}http {include       mime.types;default_type  application/octet-stream;#log_format  main  '$remote_addr - $remote_user [$time_local] "$request" '#                  '$status $body_bytes_sent "$http_referer" '#                  '"$http_user_agent" "$http_x_forwarded_for"';#access_log  logs/access.log  main;sendfile        on;#tcp_nopush     on;#keepalive_timeout  0;keepalive_timeout  65;# 开启gzip 功能#gzip  on;# gzip_static on# 基座server {listen       8084;server_name  localhost;#charset koi8-r;#access_log  logs/host.access.log  main;location / {root   html;index  index.html index.htm;try_files $uri $uri/ /index.html; }#error_page  404              /404.html;# redirect server error pages to the static page /50x.html#error_page   500 502 503 504  /50x.html;location = /50x.html {root   html;}# proxy the PHP scripts to Apache listening on 127.0.0.1:80##location ~ \.php$ {#    proxy_pass   http://127.0.0.1;#}# pass the PHP scripts to FastCGI server listening on 127.0.0.1:9000##location ~ \.php$ {#    root           html;#    fastcgi_pass   127.0.0.1:9000;#    fastcgi_index  index.php;#    fastcgi_param  SCRIPT_FILENAME  /scripts$fastcgi_script_name;#    include        fastcgi_params;#}# deny access to .htaccess files, if Apache's document root# concurs with nginx's one##location ~ /\.ht {#    deny  all;#}}# reactserver {default_type 'text/html';charset utf-8;listen       3000;server_name  localhost;# client_header_buffer_size 128k;# large_client_header_buffers 4 128k;# add_header Set-Cookie loginSessionHttps;port_in_redirect off; #防止跳转的时候带了端口号,会导致404#charset koi8-r;#access_log  logs/host.access.log  main;location / {root   appreact; #指定访问跟路径文件夹为app1index  index.html index.htm;add_header 'Access-Control-Allow-Origin' '*';add_header 'Access-Control-Allow-Credentials' 'true';try_files $uri $uri/ /index.html;}}# vue3server {default_type 'text/html';charset utf-8;listen       3001;server_name  localhost;# client_header_buffer_size 128k;# large_client_header_buffers 4 128k;# add_header Set-Cookie loginSessionHttps;port_in_redirect off; #防止跳转的时候带了端口号,会导致404#charset koi8-r;#access_log  logs/host.access.log  main;location / {root   appvue3;index  index.html index.htm;add_header 'Access-Control-Allow-Origin' '*';add_header 'Access-Control-Allow-Credentials' 'true';try_files $uri $uri/ /index.html;}}# viteserver {default_type 'text/html';charset utf-8;listen       3002;server_name  localhost;# client_header_buffer_size 128k;# large_client_header_buffers 4 128k;# add_header Set-Cookie loginSessionHttps;port_in_redirect off; #防止跳转的时候带了端口号,会导致404#charset koi8-r;#access_log  logs/host.access.log  main;location / {root   appvite; index  index.html index.htm;add_header 'Access-Control-Allow-Origin' '*';add_header 'Access-Control-Allow-Credentials' 'true';try_files $uri $uri/ /index.html;}}# another virtual host using mix of IP-, name-, and port-based configuration##server {#    listen       8000;#    listen       somename:8080;#    server_name  somename  alias  another.alias;#    location / {#        root   html;#        index  index.html index.htm;#    }#}# HTTPS server##server {#    listen       443 ssl;#    server_name  localhost;#    ssl_certificate      cert.pem;#    ssl_certificate_key  cert.key;#    ssl_session_cache    shared:SSL:1m;#    ssl_session_timeout  5m;#    ssl_ciphers  HIGH:!aNULL:!MD5;#    ssl_prefer_server_ciphers  on;#    location / {#        root   html;#        index  index.html index.htm;#    }#}}
遇到的问题
问题一:找到不子应用
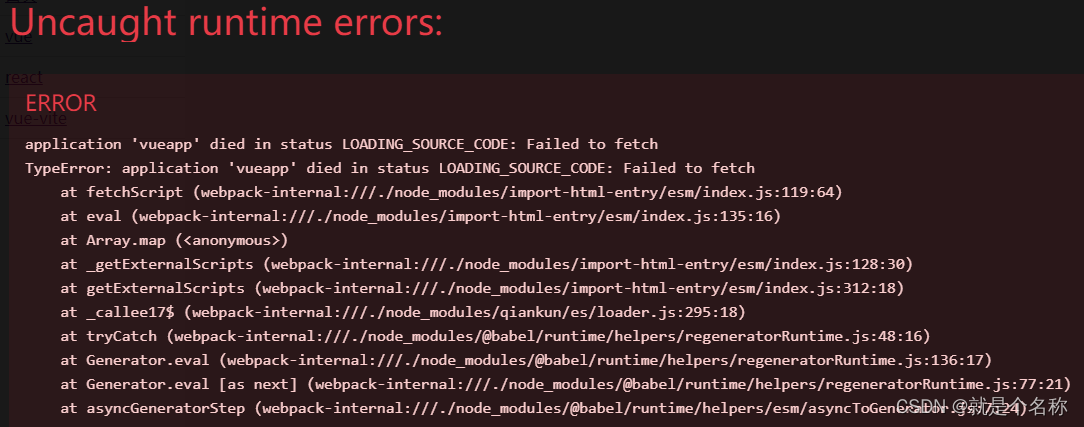
导致这样的问题有很多,我这里只写了我是怎么解决的
原因1:vue.config.js中 devServer需要加headers,这个是主应用获取子应用时候的跨域响应头

原因2: 子项目没有暴露出qiankun的生命周期 bootstrap mount unmount,包括vite的vite.config.js的配置也要暴露出去。


原因3: 在配置vite.config.js时,要配置base和plugins属性,base属性路径配置的不对,可能和版本有关系,有的是可以成功的。

原因4: 子项目没有启动
问题二:configuration has an unknown property ‘jsonpFunction‘
vue2 用jsonpFunction vue3 用chunkLoadingGlobal
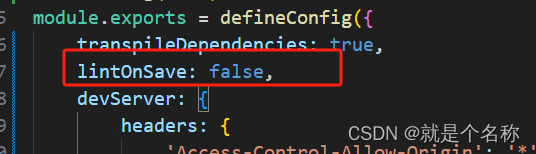
问题三:全局 __webpack_public_path__ 报错

这个是eslint校验 报错,百度给出解决办法是在 package.json里添加全局变量

但是发现没有用,意思我这里直接关闭了 eslint的校验,就没有这个报错了,不建议大家采取我的这个方法,如果大家有更好的方法可以给我留言。
这篇关于vue配置qiankun及打包上线的文章就介绍到这儿,希望我们推荐的文章对编程师们有所帮助!


