本文主要是介绍springboot项目集成activiti-modeler工作流,页面设计器部署到项目中,希望对大家解决编程问题提供一定的参考价值,需要的开发者们随着小编来一起学习吧!
接着上篇文章idea插件画流程图,这种方法在项目中会使用但是用起来感觉不方便,需要将吧bpmn、png文件保存在一个固定的路径下,部署此文件。
而本篇文章不需要,只需要在项目页面中画好流程,直接部署流程。具体操作需要用到
activiti源码,改动部分代码即可。这里是5.22.0版本,下载好的在下方链接直接下载就好。
https://pan.baidu.com/s/1MU_uALvU_nB1piNq3ihrJA?pwd=bovw
1、将Activiti-activiti-5.22.0\modules\activiti-webapp-explorer2\src\main\webapp下的三个文件放到resources的static中
2、将Activiti-activiti-5.22.0\modules\activiti-webapp-explorer2\src\main\resources的json文件放到resources的static中
3、Activiti-activiti-5.22.0\modules\activiti-modeler\src\main\java\org\activiti\rest\editor这两个文件夹下的java文件放到com.atxinxin.activiti下
整体目录结构(包名自己定义就好)

完成以上步骤,需要修改ModelEditorJsoRestResource.java、ModelSaveResource.java、StencilsetRestResource.java
添加@RequestMapping("/activiti-explorer/service")
例:
修改 StencilsetRestResource.java文件
@RestController
@RequestMapping("/activiti-explorer/service")
public class StencilsetRestResource {@RequestMapping(value="/editor/stencilset", method = RequestMethod.GET, produces = "application/json;charset=utf-8")public @ResponseBody String getStencilset() {InputStream stencilsetStream = this.getClass().getClassLoader().getResourceAsStream("static/stencilset.json");try {return IOUtils.toString(stencilsetStream, "utf-8");} catch (Exception e) {throw new ActivitiException("Error while loading stencil set", e);}}
}
在此所有文件修改完成。
接下来配置端口、数据源、等等
--- 先来activiti的数据源配置文件
/*** @author weixinxin* @Description actityti数据源配置* @Date 11:22 2023/07/06*/
@Configuration
public class ActitytiDataSourceConfig extends AbstractProcessEngineAutoConfiguration {@Bean(name = "activitiDataSource")@ConfigurationProperties(prefix = "spring.datasource")public DataSource activitiDataSource(){System.out.println("-------------------------");return new DruidDataSource();}@Beanpublic PlatformTransactionManager transactionManager() {return new DataSourceTransactionManager(activitiDataSource());}@Beanpublic SpringProcessEngineConfiguration springProcessEngineConfiguration() {SpringProcessEngineConfiguration configuration = new SpringProcessEngineConfiguration();configuration.setDataSource(activitiDataSource());configuration.setDatabaseSchemaUpdate(ProcessEngineConfiguration.DB_SCHEMA_UPDATE_TRUE);configuration.setJobExecutorActivate(true);configuration.setTransactionManager(transactionManager());return configuration;}}
--- application-dev.properties配置文件
server.port=9999
spring.datasource.validationQuery=select 1 from dual
spring.datasource.driverClassName = com.mysql.cj.jdbc.Driver
spring.datasource.url = jdbc:mysql://localhost:3306/activiti?useUnicode=true&characterEncoding=utf-8&useSSL=false&&allowPublicKeyRetrieval=true&serverTimezone=Asia/Shanghai
spring.datasource.password = 123456
spring.datasource.username= root# &nullCatalogMeansCurrent=true?????mybatis.mapper-locations=classpath:com/atxinxin/mapper/*.xml  #mybatis??
spring.activiti.check-process-definitions = false
#spring.activiti.database-schema-update=false
logging.file.name=log.log
logging.pattern.level=debugsecurity.basic.enabled=false
--- 启动类
/*** @author weixinxin* @Description 启动类* @Date 11:26 2023/07/06*/
@Slf4j
@SpringBootApplication(exclude = {org.springframework.boot.autoconfigure.security.servlet.SecurityAutoConfiguration.class, org.activiti.spring.boot.SecurityAutoConfiguration.class})
public class ActivitiDemlApplication {public static void main(String[] args) {SpringApplication.run(ActivitiDemlApplication.class, args);log.info("---- 启动成功 !! ----------");}}
以上就是所有的准备工作
接下来需要写测试类进行测试。
1、先创建模型,跳转到流程编辑页面
2、部署流程
3、启动流程
4、提交任务(完成任务)
/*** @author weixinxin_ext 2023-07-06**/
@Controller
@Slf4j
@RequestMapping("/activiti-explorer/service")
public class MyActivitiController {@Resourceprivate RepositoryService repositoryService;/*** @Description 创建模型* @author weixinxin* @Date 18:12 2023/6/30**/@RequestMapping(value = "/create")public void create(HttpServletRequest request, HttpServletResponse response) throws IOException {String id = "";String name = "出差申请-Travel approval process";String description = "出差申请-Travel approval process";String key = "travel_approval_process";ObjectMapper objectMapper = new ObjectMapper();ObjectNode editorNode = objectMapper.createObjectNode();editorNode.put("id", "canvas");editorNode.put("resourceId", "canvas");ObjectNode stencilSetNode = objectMapper.createObjectNode();stencilSetNode.put("namespace", "http://b3mn.org/stencilset/bpmn2.0#");editorNode.put("stencilset", stencilSetNode);Model modelData = this.repositoryService.newModel();ObjectNode modelObjectNode = objectMapper.createObjectNode();modelObjectNode.put("name", name);modelObjectNode.put("revision", 1);description = StringUtils.defaultString(description);modelObjectNode.put("description", description);modelData.setMetaInfo(modelObjectNode.toString());modelData.setName(name);modelData.setKey(StringUtils.defaultString(key));this.repositoryService.saveModel(modelData);this.repositoryService.addModelEditorSource(modelData.getId(), editorNode.toString().getBytes("utf-8"));id = modelData.getId();//一定要输出id,部署需要,刚接触activiti不知道这个id在哪里System.out.println("id ========= " + id);response.sendRedirect("/modeler.html?modelId=" + id);}/*** @param id * @Description 发布模型为流程定义* @Date 14:04 2023/07/06* @author weixinxin*/@RequestMapping("/deploy/{id}")@ResponseBodypublic void deploy(@PathVariable("id") String id) throws Exception {Model modelData = repositoryService.getModel(id);byte[] bytes = repositoryService.getModelEditorSource(modelData.getId());JsonNode modelNode = new ObjectMapper().readTree(bytes);BpmnModel model = new BpmnJsonConverter().convertToBpmnModel(modelNode);if (model.getProcesses().size() == 0) {log.error("数据模型不符要求,请至少设计一条主线流程。");}byte[] bpmnBytes = new BpmnXMLConverter().convertToXML(model);String processName = modelData.getName() + ".bpmn20.xml";repositoryService.createDeployment().name(modelData.getName()).addString(processName, new String(bpmnBytes, "UTF-8")).deploy();}/*** @param keyName * @Description 启动流程* @Date 14:03 2023/07/06* @author weixinxin*/@RequestMapping("/start/{key}")@ResponseBodypublic Object startProcess(@PathVariable("key") String keyName) {ProcessInstance process = processEngine.getRuntimeService().startProcessInstanceByKey(keyName);return process.getId() + " : " + process.getProcessDefinitionId();}/*** @param processInstanceId 流程实例id* @Description 提交任务* @Date 14:03 2023/07/06* @author weixinxin*/@RequestMapping("/run/{processInstanceId}")@ResponseBodypublic Object run(@PathVariable("processInstanceId") String processInstanceId) {Task task = processEngine.getTaskService().createTaskQuery().processInstanceId(processInstanceId).singleResult();System.out.println("task {} find " + task.getId());processEngine.getTaskService().complete(task.getId());return "SUCCESS";}
}
创建模型,流程编辑页面
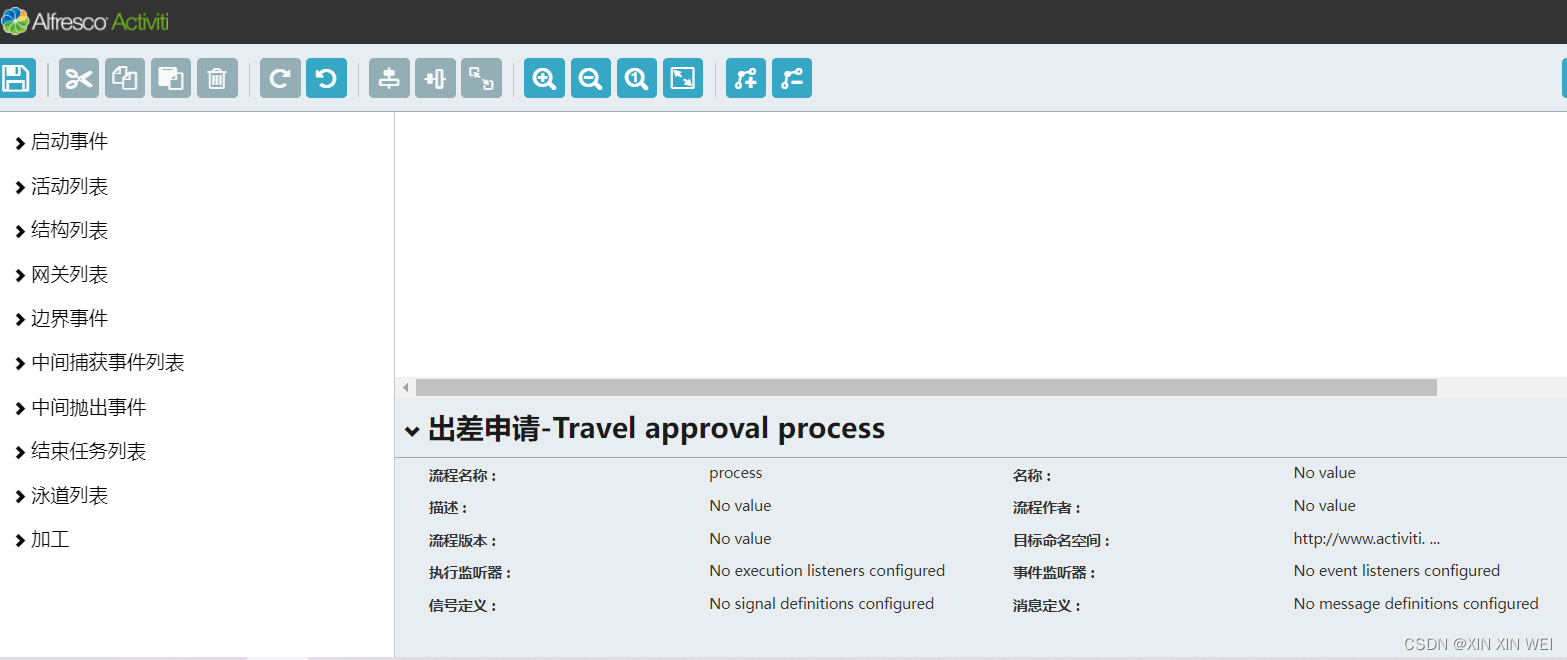
以上完成测试类编写,开始测试
1、创建模型,跳转流程设计页面
http://localhost:9999/activiti-explorer/service/create
2、部署流程(id换成自己的)
http://localhost:9999/activiti-explorer/service/deploy/id
3、启动流程(key换成自己的)
http://localhost:9999/activiti-explorer/service/start/key
4、完成任务(流程实例id换成自己的)
http://localhost:9999/activiti-explorer/service/run/processInstanceId
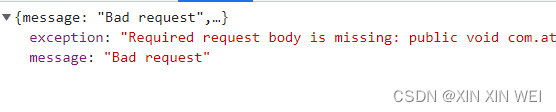
1、当创建模型,跳转流程设计页面时,创建完成流程图点击保存会发现返回的状态码为400
http://localhost:9999/activiti-explorer/service/create
在看一下返回的信息
在ModelSaveResource.java中
后端接受参数,可以看到需要(MultiValueMap<String,String> values)
@RequestMapping(value = "/model/{modelId}/save", method = RequestMethod.PUT)@ResponseStatus(value = HttpStatus.OK)public void saveModel(@PathVariable String modelId, @RequestBody MultiValueMap<String, String> values)前端传参(删除了许多,为了方便看需要哪些参数)可以看到(是 json_xml,svg_xml,name,descriotin)
json_xml: {"resourceId":"5007","properties":{}
svg_xml: <svg xmlns="http://www.w3.org/2000/svg" </svg>
name: 请假申请-Leave approval process
description: 请假申请-Leave approval process
这就需要我们来修改ModelSaveResource.java中的saveModel方法
/*** @Description 保存模型* @Date 15:52 2023/07/07* @author weixinxin*/
@RequestMapping(value = "/model/{modelId}/save", method = RequestMethod.PUT)@ResponseStatus(value = HttpStatus.OK)public void saveModel(@PathVariable String modelId,@RequestParam("json_xml") String json_xml,@RequestParam("svg_xml") String svg_xml,@RequestParam("name") String name,@RequestParam("description") String description) {try {Model model = repositoryService.getModel(modelId);ObjectNode modelJson = (ObjectNode) objectMapper.readTree(model.getMetaInfo());modelJson.put(MODEL_NAME, name);modelJson.put(MODEL_DESCRIPTION, description);model.setMetaInfo(modelJson.toString());model.setName(name);repositoryService.saveModel(model);repositoryService.addModelEditorSource(model.getId(), json_xml.getBytes("utf-8"));InputStream svgStream = new ByteArrayInputStream(svg_xml.getBytes("utf-8"));TranscoderInput input = new TranscoderInput(svgStream);PNGTranscoder transcoder = new PNGTranscoder();// Setup outputByteArrayOutputStream outStream = new ByteArrayOutputStream();TranscoderOutput output = new TranscoderOutput(outStream);// Do the transformationtranscoder.transcode(input, output);final byte[] result = outStream.toByteArray();repositoryService.addModelEditorSourceExtra(model.getId(), result);outStream.close();} catch (Exception e) {LOGGER.error("Error saving model", e);throw new ActivitiException("Error saving model", e);}}
按理说这是activiti的源码,传参和接受参数应该一样,但是为什么不一样需要找到前端的方法看一下,目前因为时间问题,没时间看,到时候有时间,找到原因我在补充吧!


看了一下原因,如果不想修改后端接受收参数,那就修改一下请求方式,
后端 :put 修改为 post
@RequestMapping(value = "/model/{modelId}/save", method = RequestMethod.POST)前端:static/editor-app/configuration/toolbar-default-actions.js文件中
$scope.save = function (successCallback)这个方法的请求方式修改为post
$http({ method: 'POST',data: params,ignoreErrors: true,headers: {'Accept': 'application/json','Content-Type': 'application/x-www-form-urlencoded; charset=UTF-8'},transformRequest: function (obj) {var str = [];for (var p in obj) {str.push(encodeURIComponent(p) + "=" + encodeURIComponent(obj[p]));}return str.join("&");},url: KISBPM.URL.putModel(modelMetaData.modelId)})这样就不需要修改接收参数就可以保存流程模型了
这篇关于springboot项目集成activiti-modeler工作流,页面设计器部署到项目中的文章就介绍到这儿,希望我们推荐的文章对编程师们有所帮助!


