本文主要是介绍简单实现电影院选座效果php,Android实现电影院选座效果,希望对大家解决编程问题提供一定的参考价值,需要的开发者们随着小编来一起学习吧!
本文实例为大家分享了Android实现电影院选座效果展示的具体代码,供大家参考,具体内容如下
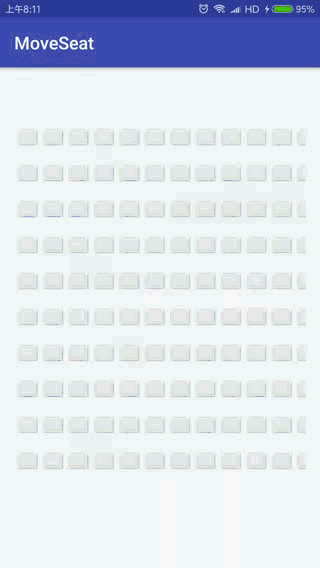
这是一个简单的电影院选座效果,实现该效果大致分为三步:
1.自定义view进行绘制;
2.手势缩放效果的实现;
3.手势触摸被选和未被选效果的实现;
先来看第一步,效果的绘制;
public class MoveSeatView extends View {
private final boolean DBG = false;
private Paint paint = new Paint();
private Matrix matrix = new Matrix();
private Matrix tempMatrix = new Matrix();
//座位水平间距
private int spacing;
//座位垂直间距
private int verSpacing;
//行号宽度
private int numberWidth;
//行数
private int row;
//列数
private int column;
//可选座位的图片
private Bitmap seatBitmap;
//选中时座位的图片
private Bitmap checkedSeatBitmap;
private int lastX;
private int lastY;
//整个座位图的宽度
private int seatBitmapWidth;
private int seatBitmapHeight;
private float screenHeight;
//屏幕的最小宽度
private int defaultScreenWidth;
//标识是否正在缩放
private boolean isScaling;
private float scaleX, scaleY;
//是否是第一次缩放
private boolean firstScale = true;
private boolean isOnClick;
private int downX, downY;
private boolean pointer;
//用于存储已经选在好的座位
public ArrayList list;
/**
* 默认的座位图片的宽度,如果使用的自己的座位的图片比这个尺寸大或者小,会缩放到这个大小
*/
private float defaultImgW = 40;
private float defaultImgH = 34;
/**
* 座位图片的宽度
*/
private int seatWidth = 40;
/**
* 座位图片的高度
*/
private int seatHeight = 34;
private float zoom;
float xScalel = 1;
float yScalel = 1;
public MoveSeatView(Context context) {
this(context, null);
}
public MoveSeatView(Context context, AttributeSet attrs) {
this(context, attrs, 0);
}
public MoveSeatView(Context context, AttributeSet attrs, int defStyleAttr) {
super(context, attrs, defStyleAttr);
}
private void init() {
spacing = (int) dip2px(5);
verSpacing = (int) dip2px(10);
defaultScreenWidth = (int) dip2px(80);
seatBitmap = BitmapFactory.decodeResource(getResources(), R.drawable.seat_default);
xScalel = defaultImgW / seatBitmap.getWidth();
yScalel = defaultImgH / seatBitmap.getHeight();
checkedSeatBitmap = BitmapFactory.decodeResource(getResources(), R.drawable.seat_green);
seatBitmapWidth = (int) (column * seatBitmap.getWidth() * xScalel + (column - 1) * spacing);
seatBitmapHeight = (int) (row * seatBitmap.getHeight() * yScalel + (row - 1) * verSpacing);
paint.setColor(Color.RED);
numberWidth = (int) dip2px(20);
screenHeight = dip2px(20);
list = new ArrayList<>();
matrix.postTranslate(numberWidth + spacing, screenHeight + 1 + verSpacing);
}
}
上面这些都是一些初始化动作,接下来在onDraw方法中进行绘制;
@Override
protected void onDraw(Canvas canvas) {
if (row <= 0 || column <= 0) {
return;
}
drawSeat(canvas);
super.onDraw(canvas);
}
具体的绘制逻辑实在drawSeat(),方法中实现的;
/**
* 绘制
*
* @param canvas
*/
private void drawSeat(Canvas canvas) {
zoom = getMatrixScaleX();
float translateX = getTranslateX();
float translateY = getTranslateY();
float scaleX = zoom;
float scaleY = zoom;
for (int i = 0; i < row; i++) {
float top = i * seatBitmap.getHeight() * yScalel * scaleY + i * verSpacing * scaleY + translateY;
float bottom = top + seatBitmap.getHeight() * yScalel * scaleY;
for (int j = 0; j < column; j++) {
float left = j * seatBitmap.getWidth() * xScalel * scaleX + j * spacing * xScalel * scaleX + translateX;
float right = left + seatBitmap.getWidth() * xScalel * scaleX;
tempMatrix.setTranslate(left, top);
tempMatrix.postScale(xScalel, yScalel, left, top);
tempMatrix.postScale(scaleX, scaleY, left, top);
if (isHave(i, j)) {
//绘制被选
canvas.drawBitmap(checkedSeatBitmap, tempMatrix, paint);
//绘制文字
drawText(canvas, i, j, top, left);
} else {
//绘制普通
canvas.drawBitmap(seatBitmap, tempMatrix, paint);
}
}
}
}
主要是计算绘制的位置,矩阵的缩放,根据是否被选进行绘制不同的效果;
/**
* 绘制文字
*
* @param canvas
* @param row
* @param column
* @param top
* @param left
*/
private void drawText(Canvas canvas, int row, int column, float top, float left) {
String txt = (row + 1) + "排";
String txt1 = (column + 1) + "座";
//实例化文字画笔
TextPaint txtPaint = new TextPaint(Paint.ANTI_ALIAS_FLAG);
txtPaint.setColor(Color.WHITE);
//设置字体样式
txtPaint.setTypeface(Typeface.DEFAULT_BOLD);
float seatHeight = this.seatHeight * getMatrixScaleX();
float seatWidth = this.seatWidth * getMatrixScaleX();
txtPaint.setTextSize(seatHeight / 3);
//获取中间线
float center = seatHeight / 2;
float txtWidth = txtPaint.measureText(txt);
float startX = left + seatWidth / 2 - txtWidth / 2;
//只绘制一行文字
if (txt1 == null) {
canvas.drawText(txt, startX, getBaseLine(txtPaint, top, top + seatHeight), txtPaint);
} else {
canvas.drawText(txt, startX, getBaseLine(txtPaint, top, top + center), txtPaint);
canvas.drawText(txt1, startX, getBaseLine(txtPaint, top + center, top + center + seatHeight / 2), txtPaint);
}
if (DBG) {
Log.d("drawTest", "top" + top);
}
}
这里是使用TextPaint画笔进行文字的绘制,在绘制文字的时候要注意基准线;
/**
* 获取基准线
* @param p
* @param top
* @param bottom
* @return
*/
private float getBaseLine(Paint p, float top, float bottom) {
Paint.FontMetrics fontMetrics = p.getFontMetrics();
int baseLine = (int) ((bottom + top - fontMetrics.bottom - fontMetrics.top) / 2);
return baseLine;
}
这样大致的绘制做完成了,剩下的第二步和第三步都涉及到手势触摸,在onTouchEvent方法中去实现具体的逻辑;
@Override
public boolean onTouchEvent(MotionEvent event) {
int x = (int) event.getX();
int y = (int) event.getY();
//手势缩放
scaleGuestureDetector.onTouchEvent(event);
//手势
gestureDetector.onTouchEvent(event);
//获取当前操作的手指数量
int pointerCount = event.getPointerCount();
if (pointerCount > 1) {
//多手指操作
pointer = true;
}
switch (event.getAction()) {
case MotionEvent.ACTION_DOWN:
pointer = false;
downX = x;
downY = y;
invalidate();
break;
case MotionEvent.ACTION_UP:
autoScale();
break;
case MotionEvent.ACTION_MOVE:
if (!isScaling && !isOnClick) {
int downDX = Math.abs(x - downX);
int downDY = Math.abs(y - downY);
if ((downDX > 10 || downDY > 10) && !pointer) {
int dx = x - lastX;
int dy = y - lastY;
matrix.postTranslate(dx, dy);
invalidate();
}
}
lastX = x;
lastY = y;
isOnClick = false;
break;
}
return true;
}
刚触摸去选择的时候会有个手势缩放的效果,手势缩放系统提供了ScaleGestureDetector类可以很容易的实现,具体的逻辑系统都已经处理好了,在对应的回调方法里面去实现就可以了;
/**
* 手势缩放
*/
ScaleGestureDetector scaleGuestureDetector = new ScaleGestureDetector(getContext(), new ScaleGestureDetector.OnScaleGestureListener() {
@Override
public boolean onScale(ScaleGestureDetector detector) {
//正在缩放的时候回调
isScaling = true;
float scaleFactor = detector.getScaleFactor();
if (getMatrixScaleY() * scaleFactor > 3) {
scaleFactor = 3 / getMatrixScaleY();
}
if (firstScale) {
scaleX = detector.getCurrentSpanX();
scaleY = detector.getCurrentSpanY();
firstScale = false;
}
if (getMatrixScaleY() * scaleFactor < 0.5) {
scaleFactor = 0.5f * getMatrixScaleY();
}
matrix.postScale(scaleFactor, scaleFactor, scaleX, scaleY);
invalidate();
return true;
}
@Override
public boolean onScaleBegin(ScaleGestureDetector detector) {
//开始缩放的时候回调
return false;
}
@Override
public void onScaleEnd(ScaleGestureDetector detector) {
//缩放完成回调
isScaling = false;
firstScale = true;
}
});
其他的手势操作系统还提供了GestureDetector类,可以使用GestureDetector来实现具体的效果;
GestureDetector gestureDetector = new GestureDetector(getContext(), new GestureDetector.SimpleOnGestureListener() {
@Override
public boolean onSingleTapConfirmed(MotionEvent e) {
int x = (int) e.getX();
int y = (int) e.getY();
for (int i = 0; i < row; i++) {
for (int j = 0; j < column; j++) {
int tempX = (int) ((j * seatWidth + j * spacing) * getMatrixScaleX() + getTranslateX());
int maxTempX = (int) (tempX + seatWidth * getMatrixScaleX());
int tempY = (int) ((seatHeight * i + i * verSpacing) * getMatrixScaleY() + getTranslateY());
int maxTempY = (int) (tempY + seatHeight * getMatrixScaleY());
if (x >= tempX && x <= maxTempX && y >= tempY && y <= maxTempY) {
if (isHave(i, j)) {
remove(i, j);
} else {
list.add(new Point(i, j));
}
}
}
}
float currentScaleY = getMatrixScaleY();
if (currentScaleY < 1.7) {
scaleX = x;
scaleY = y;
zoomAnimate(currentScaleY, 1.9f);
}
invalidate();
return true;
}
});
完成上面三步,效果也就大致实现了,提供外部设置的方法供调用就可以了;
/**
* 对外界提供的设置方法
* @param row
* @param column
*/
public void setData(int row, int column) {
this.row = row;
this.column = column;
init();
invalidate();
}
以上就是本文的全部内容,希望对大家的学习有所帮助,也希望大家多多支持脚本之家。
这篇关于简单实现电影院选座效果php,Android实现电影院选座效果的文章就介绍到这儿,希望我们推荐的文章对编程师们有所帮助!


