本文主要是介绍Spring AMQP实现RabbitMQ的5种消息模式,希望对大家解决编程问题提供一定的参考价值,需要的开发者们随着小编来一起学习吧!
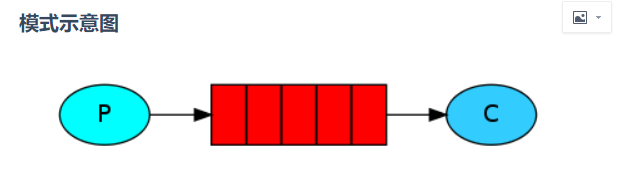
一、简单模式
简单模式是最简单的消息模式,它包含一个生产者、一个消费者和一个队列。生产者向队列里发送消息,消费者从队列中获取消息并消费。
1. 创建队列simple.hello2
import org.springframework.amqp.core.Queue;
import org.springframework.context.annotation.Bean;
import org.springframework.context.annotation.Configuration;@Configuration
public class SimpleRabbitConfig {@Beanpublic Queue simpleHello(){return new Queue("simple.hello");}}
2. 创建生产者
@Component
public class SimpleHelloSender {@Autowiredprivate AmqpTemplate amqpTemplate;public void sendMessage(){//发送消息hello simpleamqpTemplate.convertAndSend("simple.hello", "hello simple");}
}
3. 创建消费者
@Component
@RabbitListener(queues = "simple.hello")
public class SimpleHelloReceiver {@RabbitHandlerpublic void handle(String in){System.out.println("我收到了消息:" + in);}
}
4. 测试类
@RestController
@RequestMapping("/rabbit")
public class RabbitTestController {@Autowiredprivate SimpleHelloSender simpleHelloSender;@RequestMapping("/simple")public String simpleSend(){simpleHelloSender.sendMessage();return "消息发送成功";}}
5. 测试结果

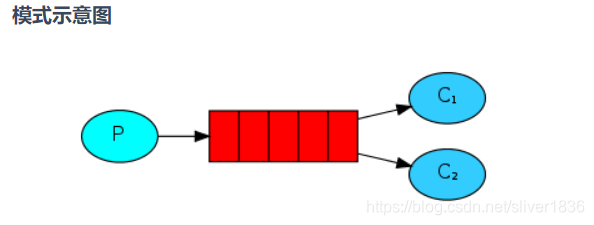
二、工作模式(为了方便,和simple方法写在了一起)
工作模式是指向多个互相竞争的消费者发送消息的模式,它包含一个生产者、两个消费者和一个队列。两个消费者同时绑定到一个队列上去,当消费者获取消息处理耗时任务时,空闲的消费者从队列中获取并消费消息。
1. 创建队列
@Bean
public Queue workQueue(){return new Queue("work.queue");
}
2. 创建生产者
public void sendWorkMessage(){amqpTemplate.convertAndSend("work.queue", "hello work queue");
}
3. 创建消费者
@Component
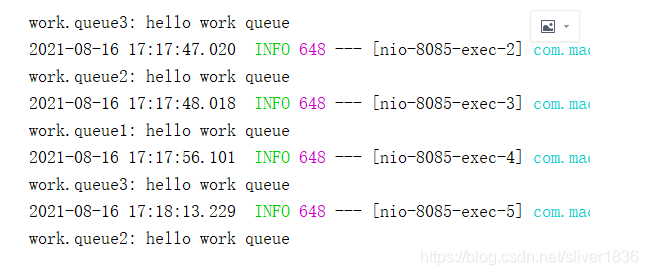
public class RabbitReceiver {// 3个方法同时监听同一个队列@RabbitListener(queues = "work.queue")public void processOne(String in) {System.out.println("work.queue1" + in);}@RabbitListener(queues = "work.queue")public void processTwo(String in) {System.out.println("work.queue2" + in);}@RabbitListener(queues = "work.queue")public void processThree(String in) {System.out.println("work.queue3" + in);}}4. 测试类
@RequestMapping("/work")
public String workSend(){simpleHelloSender.sendWorkMessage();return "消息发送成功";
}
5. 测试结果,发现是轮询消费,空闲的消费者轮询消费信息,也就是谁有空那就是谁去做事。
三、发布/订阅者模式(Publish/Subscribe)
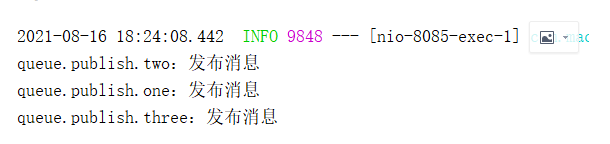
发布/订阅模式是指同时向多个消费者发送消息的模式(类似广播的形式),它包含一个生产者、两个消费者、两个队列和一个交换机。两个消费者同时绑定到不同的队列上去,两个队列绑定到交换机上去,生产者通过发送消息到交换机,所有消费者接收并消费消息。

1. 创建队列
@Configuration
public class FanoutRabbitConfig {// 创建队列@Beanpublic Queue publishOne(){return new Queue("queue.publish.one");}@Beanpublic Queue publishTwo(){return new Queue("queue.publish.two");}@Beanpublic Queue publishThree(){return new Queue("queue.publish.three");}// 创建交换机@Beanpublic FanoutExchange publishExchange(){return new FanoutExchange("publishExchange");}//绑定队列(不用指定routing key),参数名字要和bean名字一致@BeanBinding bingingPublishOne(Queue publishOne, FanoutExchange publishExchange){return BindingBuilder.bind(publishOne).to(publishExchange);}@BeanBinding bindingPublishTwo(Queue publishTwo, FanoutExchange publishExchange){return BindingBuilder.bind(publishTwo).to(publishExchange);}@BeanBinding bindingPublishThree(Queue publishThree, FanoutExchange publishExchange){return BindingBuilder.bind(publishThree).to(publishExchange);}
}
2. 创建生产者
public void sendPublishMessage(){amqpTemplate.convertAndSend("publishExchange","","发布消息");
}
3. 创建消费者
@RabbitListener(queues = "queue.publish.one")
public void publishOne(String in) {System.out.println("queue.publish.one:" + in);
}@RabbitListener(queues = "queue.publish.two")
public void publishTwo(String in) {System.out.println("queue.publish.two:" + in);
}@RabbitListener(queues = "queue.publish.three")
public void publishThree(String in) {System.out.println("queue.publish.three:" + in);
}
4. 测试类
@RequestMapping("/pulish")
public String pulishSend(){simpleHelloSender.sendPublishMessage();return "消息发送成功";
}
5. 测试结果(所有订阅者都能收到消息)
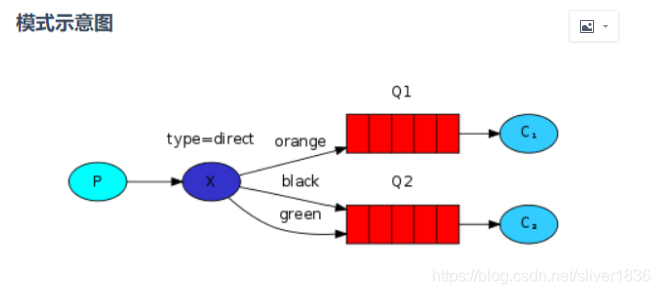
四、路由模式
路由模式是可以根据路由键选择性给多个消费者发送消息的模式,它包含一个生产者、两个消费者、两个队列和一个交换机。两个消费者同时绑定到不同的队列上去,两个队列通过路由键绑定到交换机上去,生产者发送消息到交换机,交换机通过路由键转发到不同队列,队列绑定的消费者接收并消费消息。
1. 创建队列
@Configuration
public class RoutingRabbitConfig {// 创建队列@Beanpublic Queue routingOne(){return new Queue("queue.routing.one");}@Beanpublic Queue routingTwo(){return new Queue("queue.routing.two");}@Beanpublic Queue routingThree(){return new Queue("queue.routing.three");}// 创建交换机@Beanpublic DirectExchange directExchange(){return new DirectExchange("routingExchange");}//绑定队列(@BeanBinding bingingRoutingOne(Queue routingOne, DirectExchange directExchange){return BindingBuilder.bind(routingOne).to(directExchange).with("1");}@BeanBinding bingingRoutingTwo(Queue routingTwo, DirectExchange directExchange){return BindingBuilder.bind(routingTwo).to(directExchange).with("2");}@BeanBinding bingingRoutingThree(Queue routingThree, DirectExchange directExchange){return BindingBuilder.bind(routingThree).to(directExchange).with("3");}
}
2. 创建生产者
public void sendRoutingMessage(String type){amqpTemplate.convertAndSend("routingExchange",type,"发布Routing消息" + type);
}
3. 创建消费者
@RabbitListener(queues = "queue.routing.one")
public void routingOne(String in) {System.out.println("queue.routing.one:" + in);
}@RabbitListener(queues = "queue.routing.two")
public void routingTwo(String in) {System.out.println("queue.routing.two:" + in);
}@RabbitListener(queues = "queue.routing.three")
public void routingThree(String in) {System.out.println("queue.routing.three:" + in);
}
4. 测试类
@RequestMapping("/routing/{type}")
public String routingSend(@PathVariable String type){simpleHelloSender.sendRoutingMessage(type);return "发送成功";
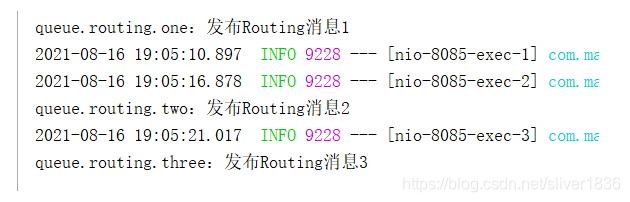
}5. 测试结果(请求参数分别为1,2,3,只有路由键对应上的队列才能消费)
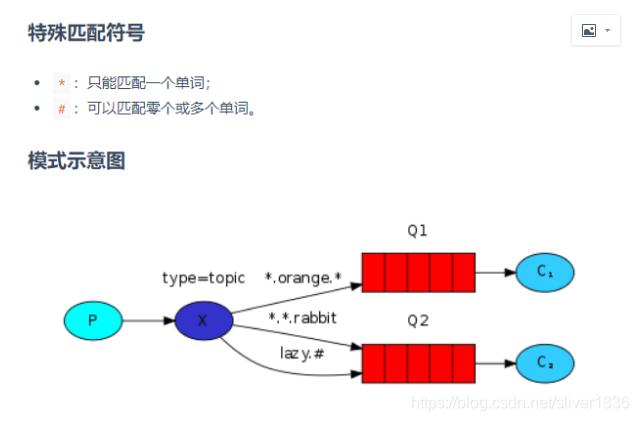
五、主题模式(Topic)
主题模式是可以根据路由键匹配规则选择性给多个消费者发送消息的模式,它包含一个生产者、两个消费者、两个队列和一个交换机。两个消费者同时绑定到不同的队列上去,两个队列通过路由键匹配规则绑定到交换机上去,生产者发送消息到交换机,交换机通过路由键匹配规则转发到不同队列,队列绑定的消费者接收并消费消息。
1. 创建队列
@Configuration
public class TopicRabbitConfig {// 创建队列@Beanpublic Queue topicOne(){return new Queue("queue.topic.one");}@Beanpublic Queue topicTwo(){return new Queue("queue.topic.two");}@Beanpublic Queue topicThree(){return new Queue("queue.topic.three");}// 创建交换机@Beanpublic TopicExchange topicExchange(){return new TopicExchange("topicExchange");}//绑定队列(@BeanBinding bingingTopicOne(Queue topicOne, TopicExchange topicExchange){return BindingBuilder.bind(topicOne).to(topicExchange).with("#.error");}@BeanBinding bingingTopicTwo(Queue topicTwo, TopicExchange topicExchange){return BindingBuilder.bind(topicTwo).to(topicExchange).with("#.log");}@BeanBinding bingingTopicThree(Queue topicThree, TopicExchange topicExchange){return BindingBuilder.bind(topicThree).to(topicExchange).with("test.#.time");}}
2. 创建生产者
public void sendTopicMessage(String topic){amqpTemplate.convertAndSend("topicExchange",topic,"发布Topic消息" + topic);
}
3. 创建消费者
@RabbitListener(queues = "queue.topic.one")
public void topicOne(String in) {System.out.println("queue.topic.one:" + in);
}@RabbitListener(queues = "queue.topic.two")
public void topicTwo(String in) {System.out.println("queue.topic.two:" + in);
}@RabbitListener(queues = "queue.topic.three")
public void topicThree(String in) {System.out.println("queue.topic.three:" + in);
}
4. 测试类
@RequestMapping("/topic/{type}")
public String send(@PathVariable String type){simpleHelloSender.sendTopicMessage(type);return "发送成功";
}
5. 测试结果

这篇关于Spring AMQP实现RabbitMQ的5种消息模式的文章就介绍到这儿,希望我们推荐的文章对编程师们有所帮助!


