本文主要是介绍使用 JMH 做 Kotlin 的基准测试,希望对大家解决编程问题提供一定的参考价值,需要的开发者们随着小编来一起学习吧!

一. 基准测试
基准测试是指通过设计科学的测试方法、测试工具和测试系统,实现对一类测试对象的某项性能指标进行定量的和可对比的测试。
基准测试是一种测量和评估软件性能指标的活动。你可以在某个时候通过基准测试建立一个已知的性能水平(称为基准线),当系统的软硬件环境发生变化之后再进行一次基准测试以确定那些变化对性能的影响。
二. JMH
JMH(Java Microbenchmark Harness) 是专门用于进行代码的微基准测试的一套工具API,也支持基于JVM的语言例如 Scala、Groovy、Kotlin。它是由 OpenJDK/Oracle 里面那群开发了 Java 编译器的大牛们所开发的工具。
三. 举例
首先,在 build.gradle 中添加 JMH 所需的依赖
plugins {id 'java'id 'org.jetbrains.kotlin.jvm' version '1.3.10'id "org.jetbrains.kotlin.kapt" version "1.3.10"}...dependencies {compile "org.jetbrains.kotlin:kotlin-stdlib-jdk8"compile "org.jetbrains.kotlin:kotlin-reflect:1.3.10"testCompile group: 'junit', name: 'junit', version: '4.12'compile "org.openjdk.jmh:jmh-core:1.21"kapt "org.openjdk.jmh:jmh-generator-annprocess:1.21"......}
3.1 对比 Sequence 和 List
在 Kotlin 1.2.70 的 release note 上曾说明:
使用 Sequence 有助于避免不必要的临时分配开销,并且可以显着提高复杂处理 PipeLines 的性能。
所以,有必要下面编写一个例子来证实这个说法:
import org.openjdk.jmh.annotations.*import org.openjdk.jmh.results.format.ResultFormatTypeimport org.openjdk.jmh.runner.Runnerimport org.openjdk.jmh.runner.options.OptionsBuilderimport java.util.concurrent.TimeUnit/*** Created by tony on 2018-12-10.*/@BenchmarkMode(Mode.Throughput) // 基准测试的模式,采用整体吞吐量的模式@Warmup(iterations = 3) // 预热次数@Measurement(iterations = 10, time = 5, timeUnit = TimeUnit.SECONDS) // 测试参数,iterations = 10 表示进行10轮测试@Threads(8) // 每个进程中的测试线程数@Fork(2) // 进行 fork 的次数,表示 JMH 会 fork 出两个进程来进行测试@OutputTimeUnit(TimeUnit.MILLISECONDS) // 基准测试结果的时间类型open class SequenceBenchmark {@Benchmarkfun testSequence():Int {return sequenceOf(1,2,3,4,5,6,7,8,9,10).map{ it * 2 }.filter { it % 3 == 0 }.map{ it+1 }.sum()}@Benchmarkfun testList():Int {return listOf(1,2,3,4,5,6,7,8,9,10).map{ it * 2 }.filter { it % 3 == 0 }.map{ it+1 }.sum()}}fun main() {val options = OptionsBuilder().include(SequenceBenchmark::class.java.simpleName).output("benchmark_sequence.log").build()Runner(options).run()}
在运行上述代码之前,需要先执行 ./gradlew build
然后,再运行main函数,得到如下的结果。
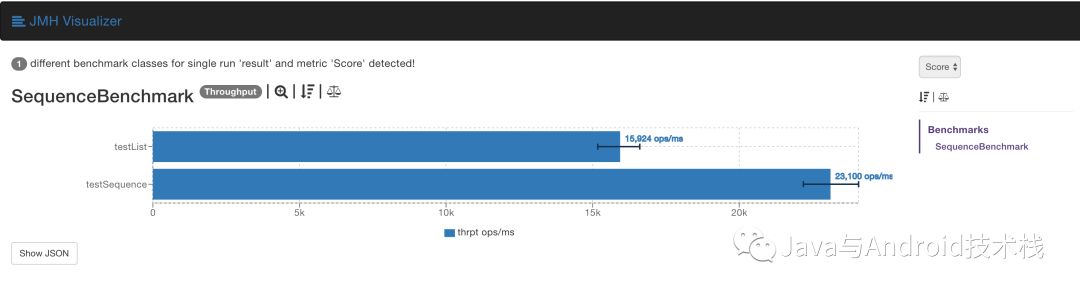
# Run complete. Total time: 00:05:23REMEMBER: The numbers below are just data. To gain reusable insights, you need to follow up onwhy the numbers are the way they are. Use profilers (see -prof, -lprof), design factorialexperiments, perform baseline and negative tests that provide experimental control, make surethe benchmarking environment is safe on JVM/OS/HW level, ask for reviews from the domain experts.Do not assume the numbers tell you what you want them to tell.Benchmark Mode Cnt Score Error UnitsSequenceBenchmark.testList thrpt 20 15924.272 ± 305.825 ops/msSequenceBenchmark.testSequence thrpt 20 23099.938 ± 515.524 ops/ms
果然,经过多次链式调用时 Sequence 比起 List 具有更高的效率。
如果把结果导出成json格式,还可以借助 jmh 相关的 gradle 插件生成可视化的报告。
fun main() {val options = OptionsBuilder().include(SequenceBenchmark::class.java.simpleName).resultFormat(ResultFormatType.JSON).result("benchmark_sequence.json").output("benchmark_sequence.log").build()Runner(options).run()}
需要依赖到这个插件:https://github.com/jzillmann/gradle-jmh-report
借助 gradle-jmh-report 生成如下的报告:
3.2 内联函数和非内联函数
Kotlin 的内联函数从编译器角度将函数的函数体复制到调用处实现内联,减少了使用高阶函数带来的隐性成本。
尝试编写一个例子:
@BenchmarkMode(Mode.Throughput) // 基准测试的模式,采用整体吞吐量的模式@Warmup(iterations = 3) // 预热次数@Measurement(iterations = 10, time = 5, timeUnit = TimeUnit.SECONDS) // 测试参数,iterations = 10 表示进行10轮测试@Threads(8) // 每个进程中的测试线程数@Fork(2) // 进行 fork 的次数,表示 JMH 会 fork 出两个进程来进行测试@OutputTimeUnit(TimeUnit.MILLISECONDS) // 基准测试结果的时间类型open class InlineBenchmark {fun nonInlined(block: () -> Unit) { // 不用内联的函数block()}inline fun inlined(block: () -> Unit) { // 使用内联的函数block()}@Benchmarkfun testNonInlined() {nonInlined {println("")}}@Benchmarkfun testInlined() {inlined {println("")}}}
得到如下的结果。
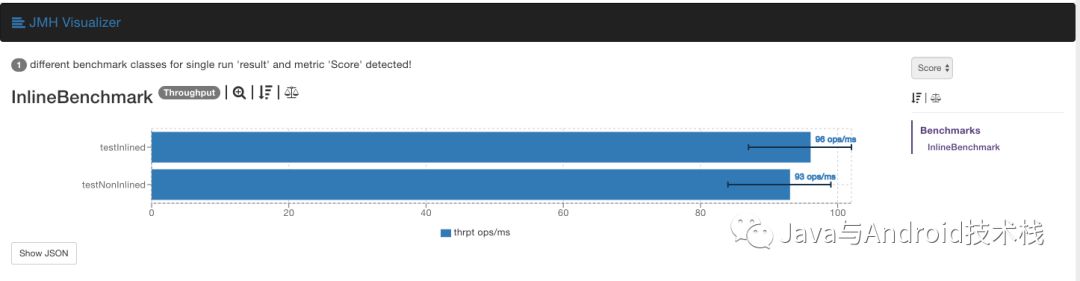
# Run complete. Total time: 00:05:23REMEMBER: The numbers below are just data. To gain reusable insights, you need to follow up onwhy the numbers are the way they are. Use profilers (see -prof, -lprof), design factorialexperiments, perform baseline and negative tests that provide experimental control, make surethe benchmarking environment is safe on JVM/OS/HW level, ask for reviews from the domain experts.Do not assume the numbers tell you what you want them to tell.Benchmark Mode Cnt Score Error UnitsInlineBenchmark.testInlined thrpt 20 95.866 ± 4.085 ops/msInlineBenchmark.testNonInlined thrpt 20 92.736 ± 3.085 ops/ms
果然,内联更高效一些。
3.3 协程和RxJava
自从 Kotlin 有协程这个功能之后,经常会有人提起协程和RxJava的比对。
于是,我也尝试编写一个例子,此例子使用的 Kotlin 1.3.10 ,协程的版本1.0.1,RxJava 2.2.4
@BenchmarkMode(Mode.Throughput) // 基准测试的模式,采用整体吞吐量的模式@Warmup(iterations = 3) // 预热次数@Measurement(iterations = 10, time = 5, timeUnit = TimeUnit.SECONDS) // 测试参数,iterations = 10 表示进行10轮测试@Threads(8) // 每个进程中的测试线程数@Fork(2) // 进行 fork 的次数,表示 JMH 会 fork 出两个进程来进行测试@OutputTimeUnit(TimeUnit.MILLISECONDS) // 基准测试结果的时间类型@State(Scope.Thread) // 为每个线程独享open class CoroutinesBenchmark {var counter1 = AtomicInteger()var counter2 = AtomicInteger()@Setupfun prepare() {counter1.set(0)counter2.set(0)}fun calculate(counter:AtomicInteger): Double {val result = ArrayList<Int>()for (i in 0 until 10_000) {result.add(counter.incrementAndGet())}return result.asSequence().filter { it % 3 ==0 }.map { it *2 + 1 }.average()}@Benchmarkfun testCoroutines() = runBlocking {calculate(counter1)}@Benchmarkfun testRxJava() = Observable.fromCallable { calculate(counter2) }.blockingFirst()}
执行结果如下:
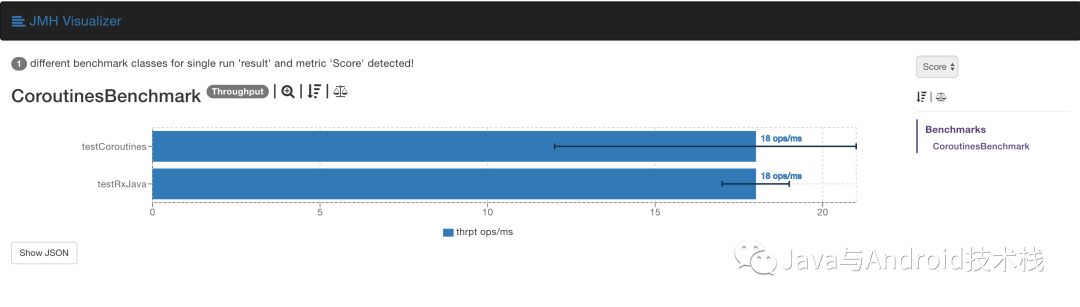
# Run complete. Total time: 00:05:23REMEMBER: The numbers below are just data. To gain reusable insights, you need to follow up onwhy the numbers are the way they are. Use profilers (see -prof, -lprof), design factorialexperiments, perform baseline and negative tests that provide experimental control, make surethe benchmarking environment is safe on JVM/OS/HW level, ask for reviews from the domain experts.Do not assume the numbers tell you what you want them to tell.Benchmark Mode Cnt Score Error UnitsCoroutinesBenchmark.testCoroutines thrpt 20 17.719 ± 2.249 ops/msCoroutinesBenchmark.testRxJava thrpt 20 18.151 ± 0.429 ops/ms
此基准测试采用的是 Throughput 模式,得分越高则性能越好。从得分来看,两者差距不大。(对于两者的比较,我还没有做更多的测试。)
总结
基准测试有很多典型的应用场景,例如想比较某些方法的执行时间,对比接口不同实现在相同条件下的吞吐量等等。在这些场景下,使用 JMH 都是很不错的选择。
关注【Java与Android技术栈】
更多精彩内容请关注扫码:

这篇关于使用 JMH 做 Kotlin 的基准测试的文章就介绍到这儿,希望我们推荐的文章对编程师们有所帮助!


