本文主要是介绍Redisson 源码解析系列一:分布式锁RedissonLock可重入机制+锁续约解析,希望对大家解决编程问题提供一定的参考价值,需要的开发者们随着小编来一起学习吧!
1、redisson概述
Redisson是一个分布式协调Redis客服端,实现了大部分java环境下分布式对象,如锁分布式锁和同步器、对象桶(Object Bucket)、二进制流(Binary Stream)、地理空间对象桶(Geospatial Bucket)、BitSet、原子整长形(AtomicLong)、原子双精度浮点数(AtomicDouble)、话题(订阅分发)、模糊话题、布隆过滤器(Bloom Filter)、基数估计算法(HyperLogLog)等。
2、 redissonLock 比setnx有哪些优势
- 实现可重入锁机制。
- 实现在一定的waittime内等待重试获取锁。
- 实现看门狗定时刷新过期时间——锁续约机制。
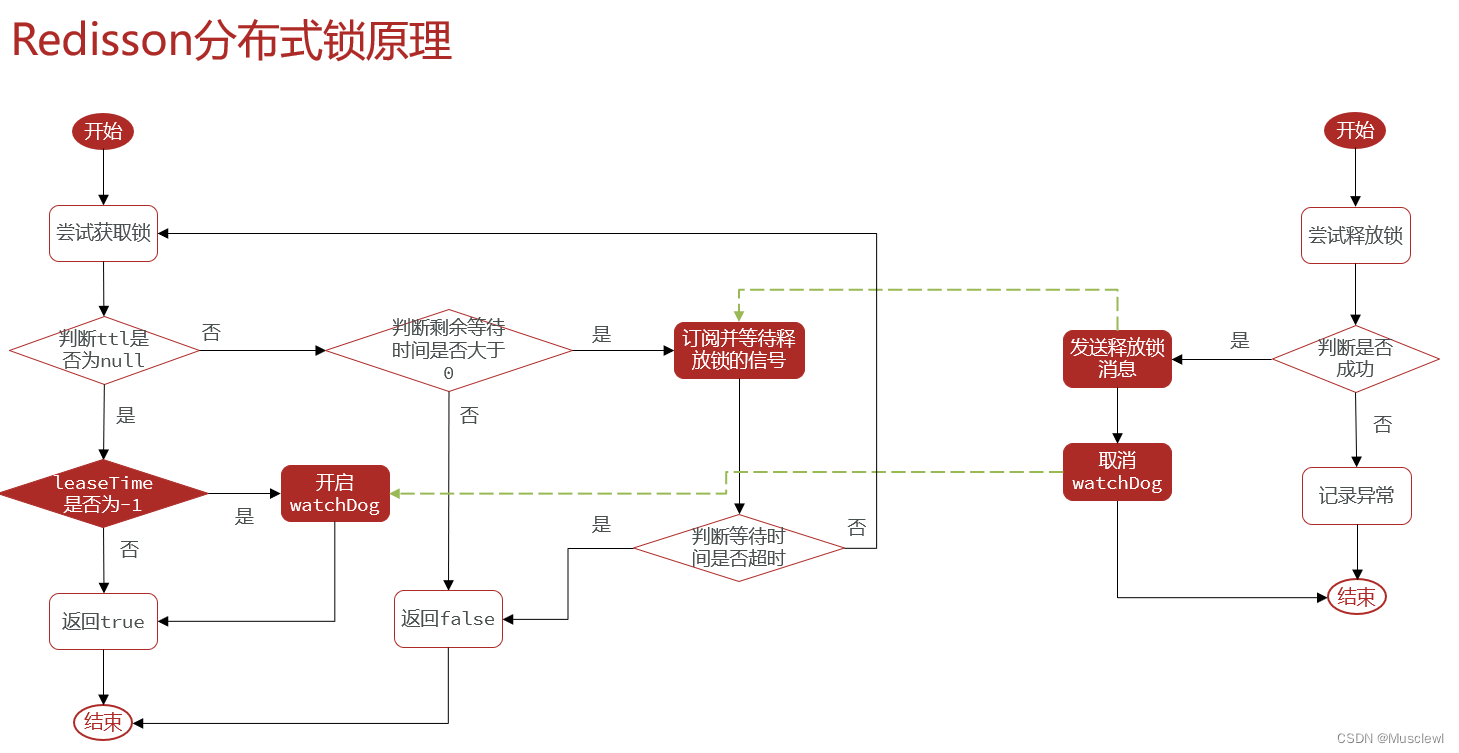
- 只有用户没有设置leaseTime超时时间,那么才会使用默认的超时时间,也就是看门狗时间=30s,定时任务也是1/3 * 看门狗时间(30s)的延时任务刷新超时时间。
- 实现多节点保存同一把锁,防止主从不一致问题。
-
redis主从结构,一般主写从读,获取锁则是写操作,当A获取锁失败,此时主从尚未同步之前,主宕机,从选举为主,此时锁没了,其他用户还能获取锁。
-
3、分布式锁RedissonLock
RedissonLock 使用 Redis Hash 数据结构来承载锁的抢占与释放,锁标识为自定义key, 如lock:order:userID, Hash 中的 filed 由UUID.toString():Thread.currentThread().getId()拼接而成,value 值一般为 1 (重入次数自增)。
本章主要研究可重入式分布式锁RedissonLock,其JAVA 代码创建如下:
Config config = new Config();config.useSingleServer().setAddress("redis://ip:6379").setPassword("123");Redisson redisson = Redisson.create(config);// 使用redisson 自带的分布式锁RLock redisLock = redissonClient.getLock("voucherOrder");if (!redisLock.tryLock()) {return Result.fail("禁止重复参与!");}try {IVoucherOrderService proxy = (IVoucherOrderService) AopContext.currentProxy();return proxy.createVoucherOrder(voucherId); } finally {redisLock.unlock();}
4、RedissonLock代码解析
上述例子中,主要是tryLock和unlock接口,先看tryLock接口。
public boolean tryLock() {return get(tryLockAsync());}/*** 等待异步回调结果,若future执行成功则返回结果。* 在此:返回的是*/public <V> V get(RFuture<V> future) {try {future.await();} catch (InterruptedException e) {Thread.currentThread().interrupt();}if (future.isSuccess()) {return future.getNow();}throw convertException(future);}
4.1 、RedissonLock加锁阶段解析(+锁续约)
主要是tryLockAsync()方法,get方法是等待异步回调成功后,拿到结果。接着看tryLockAsync方法。
private RFuture<Boolean> tryAcquireOnceAsync(long waitTime, long leaseTime, TimeUnit unit, long threadId) {// 当超时释放时间leaseTime!=-1时, 执行tryLockInnerAsyncif (leaseTime != -1) {return tryLockInnerAsync(waitTime, leaseTime, unit, threadId, RedisCommands.EVAL_NULL_BOOLEAN);}RFuture<Boolean> ttlRemainingFuture = tryLockInnerAsync(waitTime,commandExecutor.getConnectionManager().getCfg().getLockWatchdogTimeout(),TimeUnit.MILLISECONDS, threadId, RedisCommands.EVAL_NULL_BOOLEAN);ttlRemainingFuture.onComplete((ttlRemaining, e) -> {if (e != null) {return;}// lock acquiredif (ttlRemaining) {scheduleExpirationRenewal(threadId);}});return ttlRemainingFuture;
}
可以看到,在代码内部,当超时释放时间leaseTime!=-1时, 执行tryLockInnerAsync()方法,且入参是用户设定的超时释放时间leaseTime。而用户没设置时,默认为-1,则执行下方的代码,其中tryLockInnerAsync()方法入参超时释放时间为:commandExecutor.getConnectionManager().getCfg().getLockWatchdogTimeout(),即添加了看门狗超时时间, private long lockWatchdogTimeout = 30 * 1000; 默认是30s。
- 先看用户设定了超时释放时间的代码,跟入tryLockInnerAsync()中:
<T> RFuture<T> tryLockInnerAsync(long waitTime, long leaseTime, TimeUnit unit, long threadId, RedisStrictCommand<T> command) {// 在此将超时时间转为毫秒,赋值给internalLockLeaseTime,后续将用到internalLockLeaseTime = unit.toMillis(leaseTime);return evalWriteAsync(getName(), LongCodec.INSTANCE, command,"if (redis.call('exists', KEYS[1]) == 0) then " +"redis.call('hincrby', KEYS[1], ARGV[2], 1); " +"redis.call('pexpire', KEYS[1], ARGV[1]); " +"return nil; " +"end; " +"if (redis.call('hexists', KEYS[1], ARGV[2]) == 1) then " +"redis.call('hincrby', KEYS[1], ARGV[2], 1); " +"redis.call('pexpire', KEYS[1], ARGV[1]); " +"return nil; " +"end; " +"return redis.call('pttl', KEYS[1]);",Collections.singletonList(getName()),internalLockLeaseTime, getLockName(threadId));}
进入方法后,将超时时间转为毫秒,赋值给internalLockLeaseTime,后续将用到。
- 最终是直接调用lua脚本,进行加锁操作,保证多条命令执行的原子性。
先来解析下lua脚本:
--- 调用脚本命令: eval('lua-script', key, leaseTime, threadId);
--- KEYS[1]: key
--- ARGV[1]: leaseTime
--- ARGV[2]: threadId=UUID+threadIdif (redis.call('exists', KEYS[1]) == 0) then --判断锁的key是否存在,不存在则创建锁redis.call('hincrby', KEYS[1], ARGV[2], 1); -- ==0 是不存在锁,利用hash结构,将key, field=threadId, count(重入次数)数据创建redis.call('pexpire', KEYS[1], ARGV[1]);-- 设置过期时间,时间为leaseTimereturn nil;end;if (redis.call('hexists', KEYS[1], ARGV[2]) == 1) then " -- 若所存在,再判断当前锁标识是否是当前线程,若是,则重入次数count自增redis.call('hincrby', KEYS[1], ARGV[2], 1); -- ==1 代表是当前线程的获取锁,自增重入次数redis.call('pexpire', KEYS[1], ARGV[1]); -- 同时需要设置过期时间,时间为leaseTimereturn nil; end;return redis.call('pttl', KEYS[1]); --在此则表示,获取锁失败,返回当前key单位毫秒的超时释放时间 (ttl 返回单位秒的超时释放时间)。--**最后返回的是pttl ——为重试获取锁准备**
根据lua脚本分析,目前上锁的流程大概是和JUC下ReentrantLock 上锁逻辑类似,都是先尝试获取锁,若是锁存在,在判断锁标识是否是当前线程,若是当前线程,则重入次数自增;否则,获取锁失败。
- 接着看用户未指定超时释放时间逻辑,即下面这段逻辑,与设置超时释放时间相比,主要多了两点。
- 设置了默认超时释放时间——
看门狗超时释放时间 - 添加了Future监听器,执行tryLockInnerAsync()完成后,看是否存在异常,存在则直接返回;若正常,则看pttl时间(
注意:在此返回的ttlRemaining = return redis.call('pttl', KEYS[1]); 执行上述lua脚本获取锁失败返回的值)是否>0,若大于0,则执行scheduleExpirationRenewal() 定时重置超时释放时间。
- 设置了默认超时释放时间——
RFuture<Boolean> ttlRemainingFuture = tryLockInnerAsync(waitTime,commandExecutor.getConnectionManager().getCfg().getLockWatchdogTimeout(),TimeUnit.MILLISECONDS, threadId, RedisCommands.EVAL_NULL_BOOLEAN);ttlRemainingFuture.onComplete((ttlRemaining, e) -> {if (e != null) {return;}// lock acquiredif (ttlRemaining) {scheduleExpirationRenewal(threadId);}});return ttlRemainingFuture;
- 进入scheduleExpirationRenewal()方法,
private static final ConcurrentMap<String, ExpirationEntry> EXPIRATION_RENEWAL_MAP = new ConcurrentHashMap<>();protected String getEntryName() {return id(UUID) + ":" + name;}private void scheduleExpirationRenewal(long threadId) {ExpirationEntry entry = new ExpirationEntry();ExpirationEntry oldEntry = EXPIRATION_RENEWAL_MAP.putIfAbsent(getEntryName(), entry);if (oldEntry != null) {oldEntry.addThreadId(threadId);} else {entry.addThreadId(threadId);renewExpiration();}}
在该方法内,若当前锁已经在MAP重存在,则只添加addThreadId,旨在为了让entry里面的Map<Long, Integer> threadIds属性中保存的threadid++,与重入次数类似,在此自增、自减操作是为了后续执行或清除定时任务——定时重置超时释放时间任务(锁续约);
若当前锁未存在,则新增ExpirationEntry, 并执行**renewExpiration();**方法,该方法则是最终执行定时任务主方法。
private void renewExpiration() {ExpirationEntry ee = EXPIRATION_RENEWAL_MAP.get(getEntryName());Timeout task = commandExecutor.getConnectionManager().newTimeout(new TimerTask() {@Overridepublic void run(Timeout timeout) throws Exception {ExpirationEntry ent = EXPIRATION_RENEWAL_MAP.get(getEntryName());if (ent == null) { return;}Long threadId = ent.getFirstThreadId();if (threadId == null) { return;}RFuture<Boolean> future = renewExpirationAsync(threadId);future.onComplete((res, e) -> {if (e != null) {log.error("Can't update lock " + getName() + " expiration", e);return;}// reschedule itself if (res) { renewExpiration();}});}}, internalLockLeaseTime / 3, TimeUnit.MILLISECONDS);ee.setTimeout(task);}
可以看到,使用newTimeout接口包装定时任务TimerTask,其接口为:
Timeout newTimeout(TimerTask task, long delay, TimeUnit unit); 其中参数:delay: 是指定时任务延迟时间。在此设置为internalLockLeaseTime / 3,在上面文章说到,在tryLockInnerAsync()方法中,将超时释放时间赋值给internalLockLeaseTime,而此时的超时释放时间则是默认,也就是看门狗超时时间=30s,delay= 30/3s。
tryLockInnerAsync() {
// 在此将超时时间转为毫秒,赋值给internalLockLeaseTime,后续将用到internalLockLeaseTime = unit.toMillis(leaseTime);...}
紧接着,在renewExpirationAsync()执行刷新过期时间动作——锁续约。
protected RFuture<Boolean> renewExpirationAsync(long threadId) {return evalWriteAsync(getName(), LongCodec.INSTANCE, RedisCommands.EVAL_BOOLEAN,"if (redis.call('hexists', KEYS[1], ARGV[2]) == 1) then " +"redis.call('pexpire', KEYS[1], ARGV[1]); " +"return 1; " +"end; " +"return 0;",Collections.singletonList(getName()),internalLockLeaseTime, getLockName(threadId));}
还是同理,redisson绝大部分执行redis命令,都是借助于lua脚本的原子性来执行。在该方法中,首先判断当前锁是否存在且是当前线程ID所持有,若是,则重置超时释放时间,单位毫秒,返回1。若不是,返回0。
当然,redisson还监听了设置超时时间的future,当其完成时,若返回1,则再次执行renewExpiration方法:if (res) { renewExpiration();}, 也就是每10s 延迟执行刷新超时时间动作。
在此,RedissonLock加锁阶段已经分析完成。
4.2 、RedissonLock释放锁阶段解析
redissonLock解锁直接调用unlock();方法。
redisLock.unlock();
首先,进入unlock方法内部,
public void unlock() {try {get(unlockAsync(Thread.currentThread().getId()));} catch (RedisException e) {if (e.getCause() instanceof IllegalMonitorStateException) {throw (IllegalMonitorStateException) e.getCause();} else {throw e;}}}
主要是unlockAsync()方法实现解锁逻辑,get是阻塞拿到异步处理结果。在进入unlockAsync()方法,
public RFuture<Void> unlockAsync(long threadId) {RPromise<Void> result = new RedissonPromise<Void>();// 调用lua脚本执行解锁操作RFuture<Boolean> future = unlockInnerAsync(threadId);future.onComplete((opStatus, e) -> {cancelExpirationRenewal(threadId);if (e != null) { result.tryFailure(e); return; }if (opStatus == null) {IllegalMonitorStateException cause = new IllegalMonitorStateException("attempt to unlock lock, not locked by current thread by node id: "+ id + " thread-id: " + threadId);result.tryFailure(cause);return;}result.trySuccess(null);});return result;}
可以看到,最终执行释放锁逻辑在unlockInnerAsync()方法,返回RFuture对象。不出所料,redisson还是使用lua脚本执行解锁操作,如下:
protected RFuture<Boolean> unlockInnerAsync(long threadId) {return evalWriteAsync(getName(), LongCodec.INSTANCE, RedisCommands.EVAL_BOOLEAN,"if (redis.call('hexists', KEYS[1], ARGV[3]) == 0) then " + --判断锁是否存在,且线程ID是当前线程"return nil;" + --不存在则直接返回"end; " +"local counter = redis.call('hincrby', KEYS[1], ARGV[3], -1); " + --先将重入次数-1,"if (counter > 0) then " + --在判断是否>0,若大于0,则重置超时时间"redis.call('pexpire', KEYS[1], ARGV[2]); " + --重置超时时间"return 0; " + --返回0"else " + --若<=0,则代表重入次数为0,将锁删除"redis.call('del', KEYS[1]); " + --删除锁"redis.call('publish', KEYS[2], ARGV[1]); " + --发布消息(后续获取锁重试将会用到)"return 1; " + -- 返回1"end; " +"return nil;",Arrays.asList(getName(), getChannelName()), LockPubSub.UNLOCK_MESSAGE, internalLockLeaseTime, getLockName(threadId));}
执行释放锁脚本后,执行后续监听器,清除之前设置的看门狗定时刷新超时时间任务,若有设置的话。也就是执行
cancelExpirationRenewal(threadId);方法,
void cancelExpirationRenewal(Long threadId) {ExpirationEntry task = EXPIRATION_RENEWAL_MAP.get(getEntryName());if (task == null) { return; } //若为空,则代表没设置看门狗机制if (threadId != null) {task.removeThreadId(threadId);}if (threadId == null || task.hasNoThreads()) {Timeout timeout = task.getTimeout();if (timeout != null) {timeout.cancel();}EXPIRATION_RENEWAL_MAP.remove(getEntryName());}}
EXPIRATION_RENEWAL_MAP变量在尝试获取锁时,会将当前锁生成ExpirationEntry 对象,在此就是根据锁获取出来,若为空,则代表没有设置看门狗机制。
若存在,则依次删除线程ID,取消定时任务,最后移除MAP中的由锁创建的ExpirationEntry 对象。
这篇关于Redisson 源码解析系列一:分布式锁RedissonLock可重入机制+锁续约解析的文章就介绍到这儿,希望我们推荐的文章对编程师们有所帮助!


