本文主要是介绍EDA大作业-----打地鼠,模块记录以及分享,希望对大家解决编程问题提供一定的参考价值,需要的开发者们随着小编来一起学习吧!
EDA大作业-----打地鼠,模块记录以及分享
源码及相关实用工具(这个工具我也没用过,不知道好不好用)
题目要求:
1.选择一个拨码开关作为游戏开始开关;
2.使用一排LED灯(8个,从左至右编号1到8),灯亮表示地鼠出现,要求地鼠随机出现;
3.使用8个脉冲开关,对应位置(从左至右编号1到8)开关可以打击对应地鼠(灯灭);
4.击中一个地鼠得一分,用数码管显示当前分数;
5.一局游戏时间是60秒,时间到游戏结束,选择另外一个led灯亮指示时间到,拨下开始开关指示灯灭,数码管得分显示消失,恢复初始状态。
模块
简述
对于这个作业的话,个人感觉还是比较简单的(实现的过程想打人,特别折磨人),因为它的模块很清晰,下面我就简单的说一下我需要实现的模块有哪些:show(用于数码管上显示),compareadd(按键的信号和随机数进行比较来实现计分),random(随机数模块,其实也是地鼠产生的模块),button(按键,来实现打地鼠),time_down(倒计时),new_clock(实现分频,产生新的时钟信号),嗯,没错,就是这几个模块,下面我简单的描述一下我的每个模块。
show
对于这个模块我就不过多的说明了,不能理解的看我前面的相关博客。这个show也就是简单的数码管的动态扫描,只不过其中加入了一些输入信号而已,读者可以看前面的blog自行理解
“show”的源码
library ieee;
use ieee.std_logic_1164.all;
use ieee.std_logic_unsigned.all;entity show is
port(
time_g:in std_logic_vector(3 downto 0);
time_s:in std_logic_vector(3 downto 0);
grade_s,grade_g:in std_logic_vector(3 downto 0);
clk:in std_logic;
sel:out std_logic_vector(7 downto 0);
smg:out std_logic_vector(6 downto 0)
);
end;
architecture one of show is
begin
process(clk)
variable cnt:integer range 0 to 3:=0;
begin
if clk'event and clk='1' then  if cnt=0 then sel<="10111111";case grade_g iswhen "0000"=>smg<="1111110";when "0001"=>smg<="0110000";when "0010"=>smg<="1101101";when "0011"=>smg<="1111001";when "0100"=>smg<="0110011";when "0101"=>smg<="1011011";when "0110"=>smg<="1011111";when "0111"=>smg<="1110000";when "1000"=>smg<="1111111";when "1001"=>smg<="1111011";when others=>smg<="0000000";end case;cnt:=cnt+1;elsif cnt=1 then sel<="01111111";case grade_s iswhen "0000"=>smg<="1111110";when "0001"=>smg<="0110000";when "0010"=>smg<="1101101";when "0011"=>smg<="1111001";when "0100"=>smg<="0110011";when "0101"=>smg<="1011011";when "0110"=>smg<="1011111";when "0111"=>smg<="1110000";when "1000"=>smg<="1111111";when "1001"=>smg<="1111011";when others=>smg<="0000000";end case;cnt:=cnt+1;elsif cnt=2 then sel<="11111101";case time_s iswhen "0000"=>smg<="1111110";when "0001"=>smg<="0110000";when "0010"=>smg<="1101101";when "0011"=>smg<="1111001";when "0100"=>smg<="0110011";when "0101"=>smg<="1011011";when "0110"=>smg<="1011111";when "0111"=>smg<="1110000";when "1000"=>smg<="1111111";when "1001"=>smg<="1111011";when others=>smg<="0000000";end case;cnt:=cnt+1;elsif cnt=3 then sel<="11111110";case time_g iswhen "0000"=>smg<="1111110";when "0001"=>smg<="0110000";when "0010"=>smg<="1101101";when "0011"=>smg<="1111001";when "0100"=>smg<="0110011";when "0101"=>smg<="1011011";when "0110"=>smg<="1011111";when "0111"=>smg<="1110000";when "1000"=>smg<="1111111";when "1001"=>smg<="1111011";when others=>smg<="0000000";end case;cnt:=0;end if;
end if;
end process;
end;
代码就是这样,读者自行结合前面的内容理解。
button
对于这个东西是我最头疼的部分,为啥呢?这个鬼玩意要实现消抖。因为不消抖的话,就会出现很大的偏差。然后消抖一开始我只会单个按键的消抖,这里我推荐一篇文章是有关于消抖的,但是是单个按键的.(vhdl按键消抖程序)。然后在捣鼓一段时间后我就发现这个多个按键的消抖是和单个按键的没什么区别的(主要是对这些底层的东西不是很理解),也是通过时钟脉冲来实现的,一开始是不知道如何下笔,后来理解了就很好写了。
代码呈上:
library ieee;
use ieee.std_logic_1164.all;
use ieee.std_logic_unsigned.all;entity button is
port(
clk:in std_logic;
reset_in:in std_logic_vector(7 downto 0);
com:out std_logic_vector(7 downto 0):="00000000"--com为按键后输出的值,用来和random产生数进行比较
);
end;
architecture one of button is
begin
process(clk,reset_in(7),reset_in(6),reset_in(5),reset_in(4),reset_in(3),reset_in(2),reset_in(1),reset_in(0))
variable cnt:integer range 0 to 20:=0;--计数器,来实现消抖的关键,因为一般的按键的延时是在20ms左右,这里频率是1000hz
begin--本质上和单个按键消抖没什么区别,读者可以参考那片消抖的文章,自行领悟。当然我也会简单的说一下
if reset_in(7)='0' then if clk='1'and cnt<20 then cnt:=cnt+1;elsif cnt=20 then com<="10000000";cnt:=0;end if;
elsif reset_in(6)='0' then if clk='1'and cnt<20 then cnt:=cnt+1;elsif cnt=20 then com<="01000000";cnt:=0;end if;
elsif reset_in(5)='0' then if clk='1'and cnt<20 then cnt:=cnt+1;elsif cnt=20 then com<="00100000";cnt:=0;end if;
elsif reset_in(4)='0' then if clk='1'and cnt<20 then cnt:=cnt+1;elsif cnt=20 then com<="00010000";cnt:=0;end if;
elsif reset_in(3)='0' then if clk='1'and cnt<20 then cnt:=cnt+1;elsif cnt=20 then com<="00001000";cnt:=0;end if;
elsif reset_in(2)='0' then if clk='1'and cnt<20 then cnt:=cnt+1;elsif cnt=20 then com<="00000100";cnt:=0;end if;
elsif reset_in(1)='0' then if clk='1'and cnt<20 then cnt:=cnt+1;elsif cnt=20 then com<="00000010";cnt:=0;end if;
elsif reset_in(0)='0' then if clk='1'and cnt<20 then cnt:=cnt+1;elsif cnt=20 then com<="00000001";cnt:=0;end if;
else com<="00000000";end if;
end process;
end;
ps:我还是简单的说一下按键消抖,这个其实比较简单,因为按键在按下去的一瞬间,会因为一些其他的原因而产生一些反应,这个好像就被称为抖动,具体的细节还请参考百度(读者自己查证)。而对于一般的抖动而言就只有20ms左右,那么就很好解决了嘛。没错就是通过时钟来实现,然后再设置一个变量来实现等待的时间,至于给多少自己按照选定的频率来看。然后当达到这个variable的时候,就执行相关的操作,这个就是所谓的消抖,知道了这个上面的代码应该很好实现吧。
random
首先对于random,在vhdl上是没有随机数算法,然后就自己实现随机数的。然后对于随机数的实现,我这里采用m序列来实现随机数。
对于这个m序列其实就是首先定义几个变量,然后通过循环进行赋值,譬如说:x1->out,x2->x1…Xn->Xn-1;然后Xn被赋值为之前的Xn和之前的X1的异或。如此循环往复,就可以实现一个伪随机的数字序列。对于这个m序列运用似乎也是挺广的,详细请参考文档m序列。
知道了原理,那么就很好实现了,那么代码呈上:
library ieee;
use ieee.std_logic_1164.all;
use ieee.std_logic_unsigned.all;entity random is
port(
clk :in std_logic;
finish:in std_logic;
random_out:out std_logic_vector(7 downto 0)
);
end;
architecture one of random is
signal rd:std_logic_vector(4 downto 0):="10000";
signal mid:std_logic;
signal put:std_logic_vector(2 downto 0);
begin
process(clk)
begin
if clk'event and clk='1' then
if finish='1' then mid<=rd(0);rd(0)<=rd(1);rd(1)<=rd(2);rd(2)<=rd(3);rd(3)<=rd(4);rd(4)<=rd(4) xor mid;put<=rd(4 downto 2); --因为要产生8只地鼠,那么直接取m序列的高三位即可,然后映射为八位二进制数(只含一个1表示地鼠的位置)if put="000" then random_out<="00000001";elsif put="001" then random_out<="00000010";elsif put="010" then random_out<="00000100";elsif put="011" then random_out<="00001000";elsif put="100" then random_out<="00010000";elsif put="101" then random_out<="00100000";elsif put="110" then random_out<="01000000";else random_out<="10000000";end if;
end if;
end if;
end process;
end;
ps:这里的random_out需要和button的com的位数。在经过老师的验收之后,发现随机数的出现频率太快(地鼠),对用户体验感很差,但是修改很容易,加上一个分频即可,大家可以自行加入,我懒得搞了(即使很简单)。
new_clock
对于这个模块我也感觉没什么好说的,因为要实现1s来实现对计数器的计数,而已有的时钟频率是不能够实现,所以的话,我就创建一个新的时钟信号来实现即可,其实也就是分频。
原理:对于这个其实也很好实现了,也是和消抖的差不多。首先也是定义一个变量来实现什么时候对时钟信号进行改变,但是这个我采用的是翻转来实现的,所以对于分频的话,这个公式就得在原来的基础上除以2(公式可以在以前的文章中找到),至于原因嘛就是两次反转才是一个周期,所以这样就可以实现一个新的时钟信号了。
源码奉上:
library ieee;
use ieee.std_logic_1164.all;
use ieee.std_logic_unsigned.all;entity new_clock is
port(
clk:in std_logic;
n_clk:buffer std_logic:='0'
);
end;architecture one of new_clock is
begin
process(clk)
variable cnt:integer range 0 to 50000:=0;--控制变量来实现分频,就是说当其有50000个时钟上升沿信号到后,新clk才会翻转
begin
if clk'event and clk='1' thenif cnt=50000 then cnt:=0;n_clk<=not n_clk;else cnt:=cnt+1;end if;
end if;
end process;
end;
对,这个模块就是这样。
time_down&compareAdd
对于这两个模块是要放在一起来描述的,为啥?因为这两个模块相互影响,所以我把这两个模块放到一起来进行描述。
首先你需要通过时钟信号来实现打地鼠的时长,然后再通过倒计时输出的信号来作用于compareAdd这个模块,拟实现对计分的控制。
当倒计时结束的时候,compareAdd模块就停止计分。当然可以通过clr信号来实现对倒计时和分数的重置,以及控制开始游戏,当然本质上是一样的。
对于控制停止计分这个我简要的说一下,这个实现其实很容易,就是通过finish这个变量来进行控制。当然这其中还用一丝丝小细节,大家可以参考代码。(就是这个部分实现的我都想吐了,后来在time_down中加入了一个varialbe就很轻松解决了)。
对于数码的计数,计分;这个可以分别利用两个逻辑序列来进行实现,就很容易的在show这个模块来进行相关的操作。(一开始我才用的一个variable来搞的,然后通过取余等一系列操作来搞的,结果导致超出了板载资源,我直接炸裂!!!!!!!!!!!!!)
那么说完了原理,读者看代码自行理解吧:
time_down
library ieee;
use ieee.std_logic_1164.all;
use ieee.std_logic_unsigned.all;entity time_down is
port(
clk:in std_logic;
clr:in std_logic;
finish:out std_logic;
time_s,time_g:out std_logic_vector(3 downto 0)
);
end;architecture one of time_down is
signal g:std_logic_vector(3 downto 0):="0000";
signal s:std_logic_vector(3 downto 0):="0000";
begin
process(clk)
variable cnt:integer range 0 to 60:=0;
begin
if clr='0' then time_s<="0000";time_g<="0000";
s<="0000";g<="0000";finish<='0';cnt:=0;
elsif clk'event and clk='1' thenif cnt<60 or cnt=60 then time_s<=s;time_g<=g;if g="1001" then if s="0101" then s<="0000";else s<=s+1;finish<='1';end if;g<="0000";else g<=g+1;finish<='1';end if;cnt:=cnt+1;else finish<='0';end if;
end if;
end process;
end;
compareAdd
library ieee;
use ieee.std_logic_1164.all;
use ieee.std_logic_unsigned.all;entity CompareAdd is
port(
clk,clr:in std_logic;
com,random_out:in std_logic_vector(7 downto 0);
finish:in std_logic;
grade_s,grade_g:out std_logic_vector(3 downto 0)
);
end;
architecture one of CompareAdd is
signal s,g:std_logic_vector(3 downto 0):="0000";
begin
process(clk)
begin
if clk'event and clk='1' then if clr<='0' then grade_s<="0000";grade_g<="0000";s<="0000";g<="0000";elsif com=random_out and finish='1'  thenif g="1001" then g<="0000";if s="1001" then s<="0000";g<="0000";else s<=s+1;end if;else g<=g+1;end if;grade_s<=s;grade_g<=g;end if;
end if;
end process;
end;
这其中不好理解的,我个人认为就是finish的这个部分,其他的都应该很好实现,我也就懒得写注释了(一个不好的习惯)
顶层文件
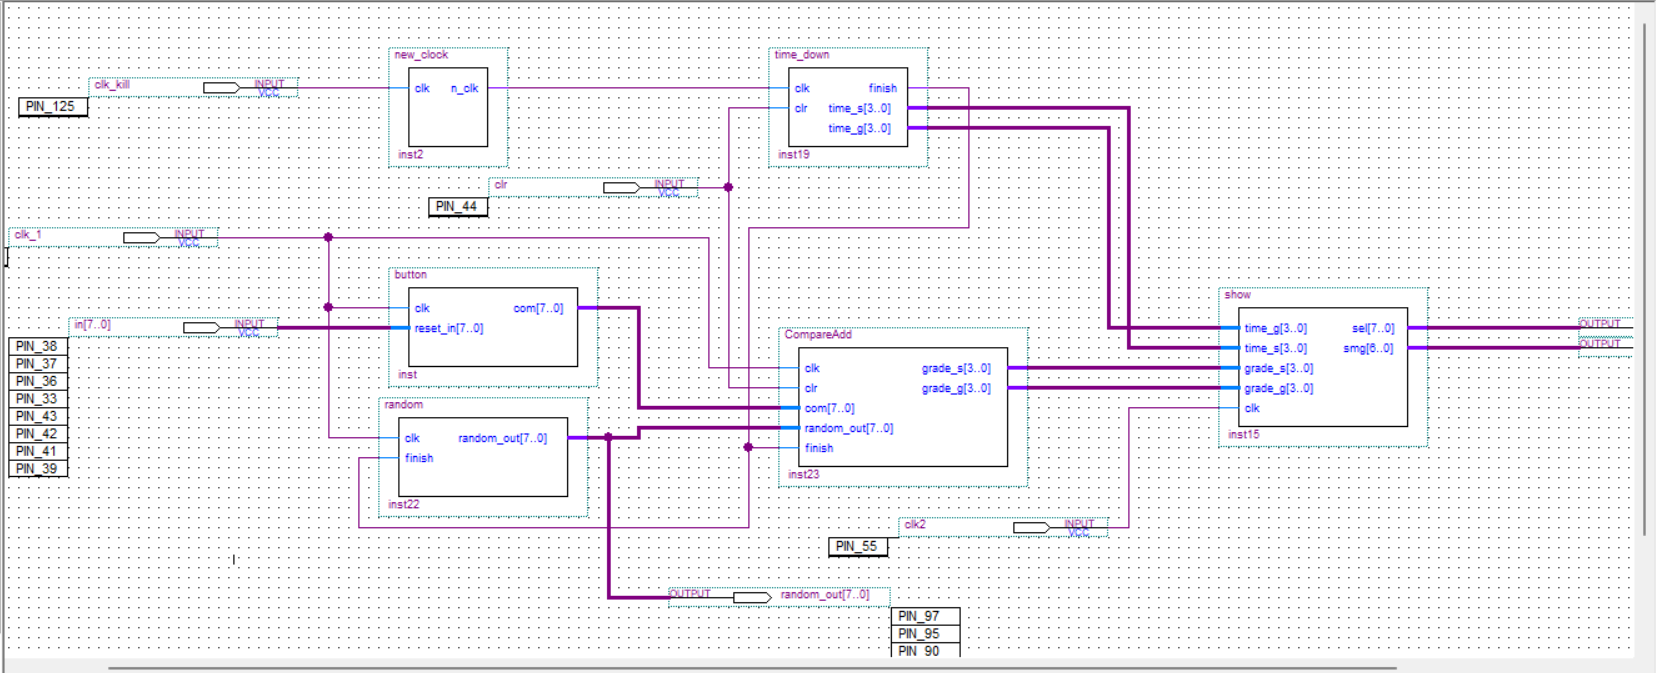
这个部分就是通过编译器的生成元器件来实现。个人认为连线比较容易(至少这个比较简单)
如下图:(连线很好理解,我也就不多说了)

那么,好了这也就是EDA的大作业的全部内容了,真的很累。要是有啥问题私信我。
这篇关于EDA大作业-----打地鼠,模块记录以及分享的文章就介绍到这儿,希望我们推荐的文章对编程师们有所帮助!


