本文主要是介绍OPENCV例子opencv-4.5.5\samples\gpu\generalized_hough.cpp的代码分析,希望对大家解决编程问题提供一定的参考价值,需要的开发者们随着小编来一起学习吧!
该程序演示了使用广义霍夫变换进行任意对象查找,仅检测位置,无需平移和旋转。
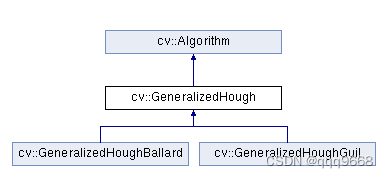
相关类的继承关系如下图:
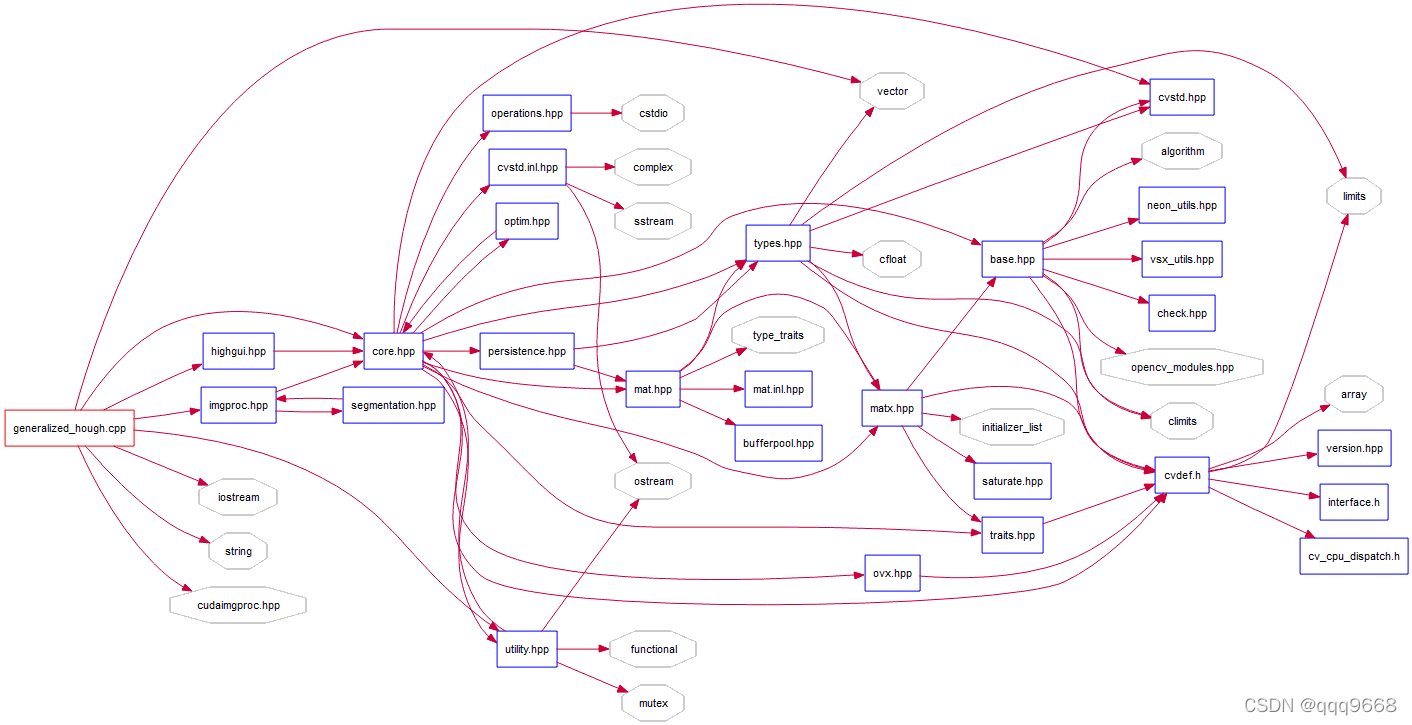
示例的调用关系如下图:
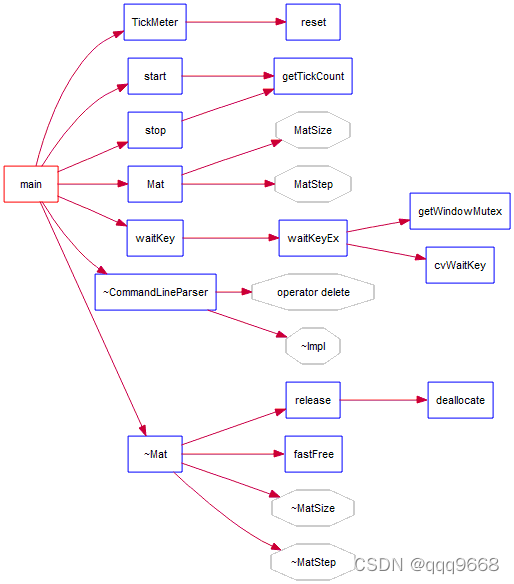
main的调用关系如下图:
main的流程图如下图:

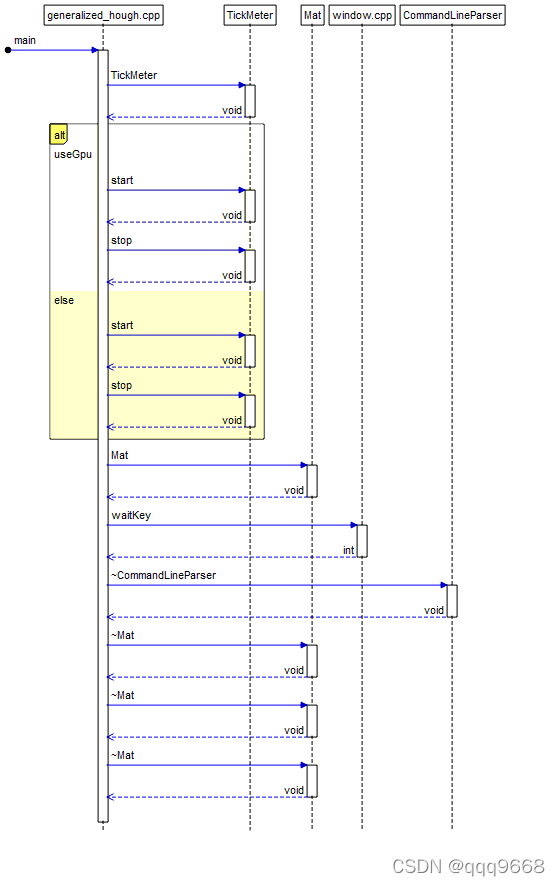
main的UML逻辑图如下图:
示例源代码:
#include <vector>
#include <iostream>
#include <string>
#include "opencv2/core.hpp"
#include "opencv2/core/utility.hpp"
#include "opencv2/imgproc.hpp"
#include "opencv2/cudaimgproc.hpp"
#include "opencv2/highgui.hpp"
using namespace std;
using namespace cv;
static Mat loadImage(const string& name)
{
Mat image = imread(name, IMREAD_GRAYSCALE);
if (image.empty())
{
cerr << "Can't load image - " << name << endl;//无法载入图片
exit(-1);
}
return image;
}
int main(int argc, const char* argv[])
{
CommandLineParser cmd(argc, argv,
"{ image i | ../data/pic1.png | input image }" //图片i
"{ template t | templ.png | template image }" //模板
"{ full | | estimate scale and rotation }" //估计尺度和旋转
"{ gpu | | use gpu version }" //使用GPU
"{ minDist | 100 | minimum distance between the centers of the detected objects }"//最小的距离(被检测物体的中心之间)
"{ levels | 360 | R-Table levels }"//RTable的层级
"{ votesThreshold | 30 | the accumulator threshold for the template centers at the detection stage. The smaller it is, the more false positions may be detected }"//检测阶段模板中心的累加器阈值。它越小,可能检测到的错误位置越多
"{ angleThresh | 10000 | angle votes threshold }"//角度门槛
"{ scaleThresh | 1000 | scale votes threshold }"//尺度门槛
"{ posThresh | 100 | position votes threshold }"//位置门槛
"{ dp | 2 | inverse ratio of the accumulator resolution to the image resolution }"//累加器分辨率与图像分辨率的反比
"{ minScale | 0.5 | minimal scale to detect }"//检测的最小尺度
"{ maxScale | 2 | maximal scale to detect }"//检测的最大尺度
"{ scaleStep | 0.05 | scale step }"//尺度步长
"{ minAngle | 0 | minimal rotation angle to detect in degrees }"//以度为单位检测的最小旋转角度
"{ maxAngle | 360 | maximal rotation angle to detect in degrees }"//以度为单位检测的最大旋转角度
"{ angleStep | 1 | angle step in degrees }"//角度步长
"{ maxBufSize | 1000 | maximal size of inner buffers }"//内部缓冲区的最大大小
"{ help h ? | | print help message }"//打印帮助信息
);
cmd.about("This program demonstrates arbitrary object finding with the Generalized Hough transform.");
if (cmd.has("help"))
{
cmd.printMessage();
return 0;
}
const string templName = cmd.get<string>("template");
const string imageName = cmd.get<string>("image");
const bool full = cmd.has("full");
const bool useGpu = cmd.has("gpu");
const double minDist = cmd.get<double>("minDist");
const int levels = cmd.get<int>("levels");
const int votesThreshold = cmd.get<int>("votesThreshold");
const int angleThresh = cmd.get<int>("angleThresh");
const int scaleThresh = cmd.get<int>("scaleThresh");
const int posThresh = cmd.get<int>("posThresh");
const double dp = cmd.get<double>("dp");
const double minScale = cmd.get<double>("minScale");
const double maxScale = cmd.get<double>("maxScale");
const double scaleStep = cmd.get<double>("scaleStep");
const double minAngle = cmd.get<double>("minAngle");
const double maxAngle = cmd.get<double>("maxAngle");
const double angleStep = cmd.get<double>("angleStep");
const int maxBufSize = cmd.get<int>("maxBufSize");
if (!cmd.check())
{
cmd.printErrors();
return -1;
}
Mat templ = loadImage(templName);
Mat image = loadImage(imageName);
Ptr<GeneralizedHough> alg;
if (!full)
{
Ptr<GeneralizedHoughBallard> ballard = useGpu ? cuda::createGeneralizedHoughBallard() : createGeneralizedHoughBallard();
ballard->setMinDist(minDist);
ballard->setLevels(levels);
ballard->setDp(dp);
ballard->setMaxBufferSize(maxBufSize);
ballard->setVotesThreshold(votesThreshold);
alg = ballard;
}
else
{
Ptr<GeneralizedHoughGuil> guil = useGpu ? cuda::createGeneralizedHoughGuil() : createGeneralizedHoughGuil();
guil->setMinDist(minDist);
guil->setLevels(levels);
guil->setDp(dp);
guil->setMaxBufferSize(maxBufSize);
guil->setMinAngle(minAngle);
guil->setMaxAngle(maxAngle);
guil->setAngleStep(angleStep);
guil->setAngleThresh(angleThresh);
guil->setMinScale(minScale);
guil->setMaxScale(maxScale);
guil->setScaleStep(scaleStep);
guil->setScaleThresh(scaleThresh);
guil->setPosThresh(posThresh);
alg = guil;
}
vector<Vec4f> position;
TickMeter tm;
if (useGpu)
{
cuda::GpuMat d_templ(templ);
cuda::GpuMat d_image(image);
cuda::GpuMat d_position;
alg->setTemplate(d_templ);
tm.start();
alg->detect(d_image, d_position);
d_position.download(position);
tm.stop();
}
else
{
alg->setTemplate(templ);
tm.start();
alg->detect(image, position);
tm.stop();
}
cout << "Found : " << position.size() << " objects" << endl;
cout << "Detection time : " << tm.getTimeMilli() << " ms" << endl;
Mat out;
cv::cvtColor(image, out, COLOR_GRAY2BGR);
for (size_t i = 0; i < position.size(); ++i)
{
Point2f pos(position[i][0], position[i][1]);
float scale = position[i][2];
float angle = position[i][3];
RotatedRect rect;
rect.center = pos;
rect.size = Size2f(templ.cols * scale, templ.rows * scale);
rect.angle = angle;
Point2f pts[4];
rect.points(pts);
line(out, pts[0], pts[1], Scalar(0, 0, 255), 3);
line(out, pts[1], pts[2], Scalar(0, 0, 255), 3);
line(out, pts[2], pts[3], Scalar(0, 0, 255), 3);
line(out, pts[3], pts[0], Scalar(0, 0, 255), 3);
}
imshow("out", out);
waitKey();
return 0;
}
这篇关于OPENCV例子opencv-4.5.5\samples\gpu\generalized_hough.cpp的代码分析的文章就介绍到这儿,希望我们推荐的文章对编程师们有所帮助!


