本文主要是介绍使用 extract + TextMapAdapter 实现了自定义 traceId,希望对大家解决编程问题提供一定的参考价值,需要的开发者们随着小编来一起学习吧!
前言
某些特定的场景,需要我们通过代码的方式实现自定义 traceId。
实现思路:通过 tracer.extract 能够构造出 SpanContext ,将构造出来的 SpanContext 作为上层节点信息,通过 asChildOf(SpanContext) 能够构造出当前的 span。
TraceId 如何参数定义
对于 tracer.extract 构建 SpanContext,内部通过 ContextInterpreter 进行解析并获取对应的 traceId 和 spanId,ContextInterpreter 部分实现代码将在下文做介绍。
传播器
ddtrace 支持几种传播协议,不同的传播协议的 traceId 的参数名不一样。
就 java 而言,ddtrace 支持两种传播协议:
- Datadog :默认传播协议
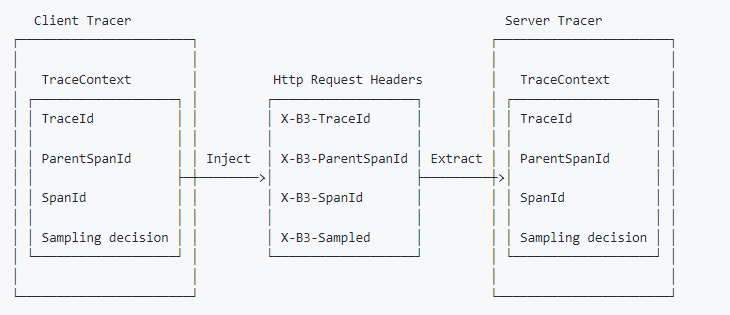
- B3 :B3 传播是标头“b3”和以“x-b3-”开头的标头的规范。这些标头用于跨服务边界的跟踪上下文传播。
使用 Datadog 传播器实现自定义 traceId
开启 Datadog 传播器
-Ddd.propagation.style.extract=Datadog
-Ddd.propagation.style.inject=Datadog
机制源码介绍
ddtrace 默认采用 Datadog 作为默认的传播协议,拦截器为DatadogContextInterpreter,其部分代码如下:
public boolean accept(String key, String value) {case 'x':if ("x-datadog-trace-id".equalsIgnoreCase(key)) {classification = 0;} else if ("x-datadog-parent-id".equalsIgnoreCase(key)) {classification = 1;} else if ("x-datadog-sampling-priority".equalsIgnoreCase(key)) {classification = 3;} else if ("x-datadog-origin".equalsIgnoreCase(key)) {classification = 2;....switch(classification) {case 0:this.traceId = DDId.from(firstValue);break;case 1:this.spanId = DDId.from(firstValue);break;case 2:this.origin = firstValue;break;case 3:this.samplingPriority = Integer.parseInt(firstValue);break;....}
代码实现
/**** 自定义traceId相关信息,实现自定义链路* @param traceId* @param parentId* @param treeLength* @return*/@GetMapping("/customTrace")@ResponseBodypublic String customTrace(String traceId, String parentId, Integer treeLength) {Tracer tracer = GlobalTracer.get();traceId = StringUtils.isEmpty(traceId) ? IdGenerationStrategy.RANDOM.generate().toString() : traceId;parentId = StringUtils.isEmpty(parentId) ? DDId.ZERO.toString() : parentId;treeLength = treeLength == null ? 3 : treeLength;for (int i = 0; i < treeLength; i++) {Map<String, String> data = new HashMap<>();data.put("x-datadog-trace-id", traceId);data.put("x-datadog-parent-id", parentId);SpanContext extractedContext = tracer.extract(Format.Builtin.HTTP_HEADERS, new TextMapAdapter(data));Span serverSpan = tracer.buildSpan("opt" + i).withTag("service_name", "someService" + i).asChildOf(extractedContext).start();tracer.activateSpan(serverSpan).close();serverSpan.finish();parentId = serverSpan.context().toSpanId();}return "build success!";}使用B3传播器实现自定义 traceId
<关于 B3 传播器介绍>
B3 有两种编码:Single Header 和 Multiple Header。
- 多个标头编码 X-B3-在跟踪上下文中使用每个项目的前缀标头
- 单个标头将上下文分隔为一个名为 b3. 提取字段时,单头变体优先于多头变体。
这是一个使用多个标头编码的示例流程,假设 HTTP 请求带有传播的跟踪:
开启 B3 传播器
-Ddd.propagation.style.extract=B3
-Ddd.propagation.style.inject=B3
机制源码介绍
public boolean accept(String key, String value) {...char first = Character.toLowerCase(key.charAt(0));switch (first) {case 'f':if (this.handledForwarding(key, value)) {return true;}break;case 'u':if (this.handledUserAgent(key, value)) {return true;}break;case 'x':if ((this.traceId == null || this.traceId == DDId.ZERO) && "X-B3-TraceId".equalsIgnoreCase(key)) {classification = 0;} else if ((this.spanId == null || this.spanId == DDId.ZERO) && "X-B3-SpanId".equalsIgnoreCase(key)) {classification = 1;} else if (this.samplingPriority == this.defaultSamplingPriority() && "X-B3-Sampled".equalsIgnoreCase(key)) {classification = 3;} else if (this.handledXForwarding(key, value)) {return true;}}...String firstValue = HttpCodec.firstHeaderValue(value);if (null != firstValue) {switch (classification) {case 0:if (this.setTraceId(firstValue)) {return true;}break;case 1:this.setSpanId(firstValue);break;case 2:String mappedKey = (String)this.taggedHeaders.get(lowerCaseKey);if (null != mappedKey) {if (this.tags.isEmpty()) {this.tags = new TreeMap();}this.tags.put(mappedKey, HttpCodec.decode(firstValue));}break;case 3:this.samplingPriority = this.convertSamplingPriority(firstValue);break;case 4:if (this.extractB3(firstValue)) {return true;}}}...以下方法是对 Single Header 方式的处理
private boolean extractB3(String firstValue) {if (firstValue.length() == 1) {this.samplingPriority = this.convertSamplingPriority(firstValue);} else {int firstIndex = firstValue.indexOf("-");int secondIndex = firstValue.indexOf("-", firstIndex + 1);String b3SpanId;if (firstIndex != -1) {b3SpanId = firstValue.substring(0, firstIndex);if (this.setTraceId(b3SpanId)) {return true;}}if (secondIndex == -1) {b3SpanId = firstValue.substring(firstIndex + 1);this.setSpanId(b3SpanId);} else {b3SpanId = firstValue.substring(firstIndex + 1, secondIndex);this.setSpanId(b3SpanId);String b3SamplingId = firstValue.substring(secondIndex + 1);this.samplingPriority = this.convertSamplingPriority(b3SamplingId);}}return false;}
Multiple Header 代码实现
private static void b3TraceByMultiple(){String traceId = DDId.from("6917954032704516265").toHexStringOrOriginal();Tracer tracer = GlobalTracer.get();String parentId = DDId.from("4025816492133344807").toHexStringOrOriginal();for (int i = 0; i < 3; i++) {Map<String, String> data = new HashMap<>();data.put("X-B3-TraceId", traceId);data.put("X-B3-SpanId", parentId);SpanContext extractedContext = tracer.extract(Format.Builtin.HTTP_HEADERS, new TextMapAdapter(data));Span serverSpan = tracer.buildSpan("opt"+i).withTag("service","someService"+i).asChildOf(extractedContext).start();serverSpan.setTag("code","200");tracer.activateSpan(serverSpan).close();serverSpan.finish();parentId = DDId.from(serverSpan.context().toSpanId()).toHexStringOrOriginal();System.out.println( traceId+"\t"+serverSpan.context().toTraceId()+"\t"+parentId);}}**注意:**Multiple Header 必需传入两个 header,分别为:
X-B3-TraceId和X-B3-SpanId,从拦截器上分析,是不区分大小写的。
6001828a33d570a9	6917954032704516265	58c4b35f113ee353
6001828a33d570a9	6917954032704516265	330359b7aaea9d6b
6001828a33d570a9	6917954032704516265	1ac0dcd332f9262f
Single Header 代码实现
private static void b3TraceBySingle(){String traceId = DDId.from("6917954032704516265").toHexStringOrOriginal();Tracer tracer = GlobalTracer.get();String parentId = DDId.from("4025816492133344807").toHexStringOrOriginal();for (int i = 0; i < 3; i++) {String b3 = traceId+ "-"+parentId+"-1";Map<String, String> data = new HashMap<>();data.put("b3",b3);SpanContext extractedContext = tracer.extract(Format.Builtin.HTTP_HEADERS, new TextMapAdapter(data));Span serverSpan = tracer.buildSpan("opt"+i).withTag("service","someService"+i).asChildOf(extractedContext).start();serverSpan.setTag("code","200");tracer.activateSpan(serverSpan).close();serverSpan.finish();parentId = DDId.from(serverSpan.context().toSpanId()).toHexStringOrOriginal();System.out.println( traceId+"\t"+serverSpan.context().toTraceId()+"\t"+parentId);System.out.println("b3="+b3);}}
6001828a33d570a9	6917954032704516265	308287d022272ed9
b3=6001828a33d570a9-37de92c518846627-1
6001828a33d570a9	6917954032704516265	5e6fbaad91daef5c
b3=6001828a33d570a9-308287d022272ed9-1
6001828a33d570a9	6917954032704516265	2cfbc225bddf5e6d
b3=6001828a33d570a9-5e6fbaad91daef5c-1
**注意:**Single Header 只需要 header 传入
b3即可,格式为traceId-parentId-Sampled
开启多种传播器
两种方式任选一种即可:
- System Property :
-Ddd.propagation.style.inject=Datadog,B3
-Ddd.propagation.style.extract=Datadog,B3
- Environment Variable:
DD_PROPAGATION_STYLE_INJECT=Datadog,B3
DD_PROPAGATION_STYLE_EXTRACT=Datadog,B3
这篇关于使用 extract + TextMapAdapter 实现了自定义 traceId的文章就介绍到这儿,希望我们推荐的文章对编程师们有所帮助!


