本文主要是介绍python实现元旦多种炫酷高级倒计时_附源码【第19篇—python过元旦】,希望对大家解决编程问题提供一定的参考价值,需要的开发者们随着小编来一起学习吧!
文章目录
- 🌍python实现元旦倒计时 — 初级(控制台)
- ⛅实现效果
- 🌋实现源码
- 🌜源码讲解
- 🌍python实现元旦倒计时 — 中级(精美动态图)
- ⛅实现效果
- 🌋实现源码
- 🌜源码讲解
- 🌍python实现元旦倒计时 — 高级(烟花+龙宝+声音)
- ⛅实现效果
- 🌋实现源码
- 🌜源码讲解
- 🎥源码下载
- 🎉寄语
🌍python实现元旦倒计时 — 初级(控制台)
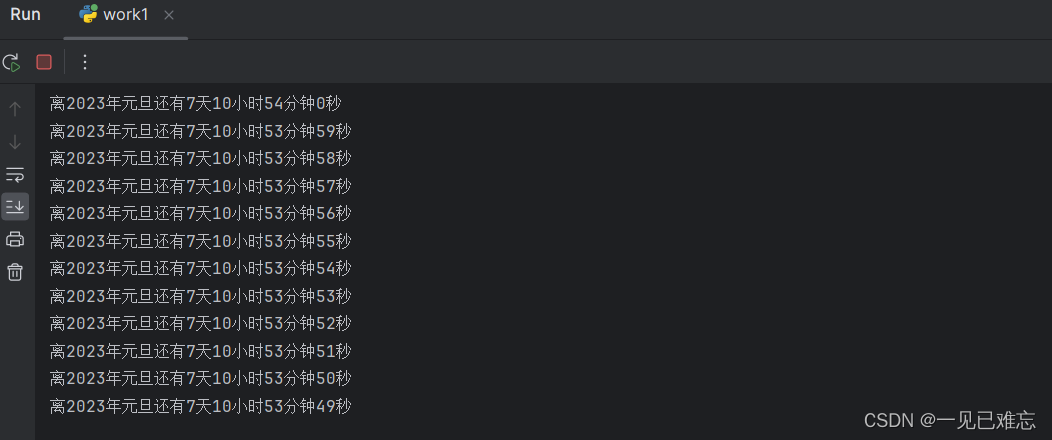
⛅实现效果
🌋实现源码
# 导入所需要的功能模块
import datetime
import sys
import math
import time
# 定义新的一年日期
spring = datetime.datetime(2024, 1, 1, 0, 0, 0)  # 新的一年的日期def caldays():while True:# 获取当前的日期today = datetime.datetime.now()# 新年日期减去当前日期    day = (spring - today).days  # 得到秒数second = (spring - today).seconds # 计算秒sec = second % 60# 计算分minute = second / 60 % 60# 计算小时hour = second / 60 / 60# 计算天数if hour > 24:hour = hour - 24hour = math.floor(hour)  # 去掉小数点,向下取整minute = math.floor(minute)  # 去掉小数点,向下取整# 输出结果sys.stdout.write("离2024年元旦还有" + str(day) + "天" + str(hour) + "小时" + str(minute) + "分钟" + str(sec) + "秒" + '\r')sys.stdout.flush()time.sleep(1)print("离2024年元旦还有" + str(day) + "天" + str(hour) + "小时" + str(minute) + "分钟" + str(sec) + "秒" + '\r')if __name__ == '__main__':caldays()
🌜源码讲解
这是一个简单的Python脚本,用于计算离指定日期(2024年元旦)的倒计时,以天、小时、分钟和秒为单位。
让我逐步解释代码:
- 导入所需的功能模块:
import datetime
import sys
import math
import time
这些模块提供了日期时间处理、系统输入/输出、数学运算和时间操作的功能。
- 定义新的一年日期:
spring = datetime.datetime(2024, 1, 1, 0, 0, 0)
在这里,创建了一个datetime对象,表示2024年元旦的日期和时间。
- 定义一个函数
caldays:
def caldays():while True:# 获取当前的日期today = datetime.datetime.now()# 新年日期减去当前日期 day = (spring - today).days # 得到秒数second = (spring - today).seconds # 计算秒sec = second % 60# 计算分minute = second / 60 % 60# 计算小时hour = second / 60 / 60# 计算天数if hour > 24:hour = hour - 24hour = math.floor(hour) # 去掉小数点,向下取整minute = math.floor(minute) # 去掉小数点,向下取整# 输出结果sys.stdout.write("离2024年元旦还有" + str(day) + "天" + str(hour) + "小时" + str(minute) + "分钟" + str(sec) + "秒" + '\r')sys.stdout.flush()time.sleep(1)print("离2024年元旦还有" + str(day) + "天" + str(hour) + "小时" + str(minute) + "分钟" + str(sec) + "秒" + '\r')
该函数使用一个无限循环,每次迭代都会计算距离指定日期的剩余时间,并输出到控制台。具体步骤如下:
- 获取当前日期时间对象
today。 - 计算距离新年日期的天数
day和剩余秒数second。 - 计算秒、分钟和小时,并进行一些调整,确保小时在24小时以内。
- 使用
sys.stdout.write在同一行输出倒计时信息,并使用\r实现覆盖之前的输出。 - 使用
sys.stdout.flush()强制刷新输出缓冲区,确保信息立即显示。 - 使用
time.sleep(1)暂停1秒,然后进入下一次循环。
- 如果脚本被直接执行(而不是被作为模块导入),则调用
caldays函数:
if __name__ == '__main__':caldays()
这部分代码确保在直接运行脚本时才执行倒计时功能,而在被导入为模块时不执行。
🌍python实现元旦倒计时 — 中级(精美动态图)
⛅实现效果

🌋实现源码
import tkinter as tk     # 引入tkinter标准库 取别名为 tk
import sys
import time
import datetime
import mathroot = tk.Tk()                     # 设置tk 的主窗口
root.geometry("600x400")           # 主窗口 600x400 大小
root.title("salted fish")          # 设置主窗口标题内容 "salted fish"
img = tk.PhotoImage(file = "nanwang.png")     # 用 PHotoimage 函数设置一个图片对象bg_labe =tk.Label(root,                              # 定义一个label组件justify=tk.LEFT,                   # 设置多行文本对其方式compound=tk.CENTER,                 # 设置文本和图像混合模式font=("微软雅黑", 35),               # 设置字体的样式和大小fg="red",                          # 设置文本字体颜色image=img)                        # 设置图片
bg_labe.place(x=0, y=0)                             # 设置label 对象在主窗口中的位置
bg_labe.pack()def cdn():spring = datetime.datetime(2024, 1, 1, 0, 0)today = datetime.datetime.now()day = (spring - today).dayssecond = (spring - today).secondssec = second % 60minute = second / 60 % 60hour = second / 60 / 60if hour > 24:hour = hour - 24hour = math.floor(hour)minute = math.floor(minute)# bg_labe.config(text=str(day) + "天" + str(hour) + "小时" + str(minute) + "分钟" + str(sec) + "秒")bg_labe.config(text=str(day) + "天" + str(hour) + "小时" + str(minute) + "分钟" + str(sec) + "秒")    # 设置 bg_label 对象的文本内容sys.stdout.flush()bg_labe.after(1000, cdn)                            # 设置对象一秒执行一个 cdn 函数
cdn()                                                   # 调用 cdn 函数tk.mainloop()
🌜源码讲解
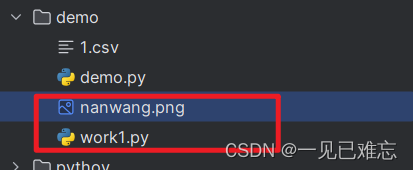
背景图自取。

目录结构:
这段代码使用了tkinter库创建了一个简单的图形用户界面(GUI),其中显示了一个背景图像和一个倒计时。让我逐步解释代码:
- 导入所需的模块:
import tkinter as tk
import sys
import time
import datetime
import math
这里导入了tkinter库以及其他一些标准库,用于创建GUI应用。
- 创建主窗口和设置基本属性:
root = tk.Tk()
root.geometry("600x400")
root.title("salted fish")
创建一个Tk对象作为主窗口,设置窗口大小为600x400像素,设置窗口标题为"salted fish"。
- 使用
PhotoImage加载图片:
img = tk.PhotoImage(file="nanwang.png")
创建一个PhotoImage对象,加载了一个名为"nanwang.png"的图片文件。
- 创建一个
Label组件用于显示背景图片:
bg_label = tk.Label(root,justify=tk.LEFT,compound=tk.CENTER,font=("微软雅黑", 35),fg="red",image=img)
bg_label.place(x=0, y=0)
使用Label组件显示背景图片,设置文本的对齐方式、字体、颜色等属性,并将图片放置在窗口的坐标(0, 0)处。
- 定义倒计时函数
cdn:
def cdn():spring = datetime.datetime(2024, 1, 1, 0, 0)today = datetime.datetime.now()day = (spring - today).dayssecond = (spring - today).secondssec = second % 60minute = second / 60 % 60hour = second / 60 / 60if hour > 24:hour = hour - 24hour = math.floor(hour)minute = math.floor(minute)bg_label.config(text=str(day) + "天" + str(hour) + "小时" + str(minute) + "分钟" + str(sec) + "秒")sys.stdout.flush()bg_label.after(1000, cdn)
这个函数计算并更新距离指定日期(2024年元旦)的倒计时,并通过config方法更新bg_label对象的文本内容。然后,通过after方法设置每隔1秒调用一次cdn函数。
- 调用倒计时函数和启动GUI主循环:
cdn()
tk.mainloop()
调用cdn函数开始倒计时,然后通过tk.mainloop()启动主循环,使图形界面响应用户交互。
🌍python实现元旦倒计时 — 高级(烟花+龙宝+声音)
⛅实现效果

🌋实现源码
# -*- coding: UTF-8 -*-import random
import pygame as py
import tkinter as tk
from time import time, sleep
from tkinter import filedialog
from PIL import Image, ImageTk
from math import sin, cos, radians
from random import choice, uniform, randint# 导入库def randomcolor():# 生成随机颜色colArr = ['1', '2', '3', '4', '5', '6', '7', '8', '9', 'A', 'B', 'C', 'D', 'E', 'F']color = ""for i in range(6):color += colArr[random.randint(0, 14)]return "#" + colorGRAVITY = 0.06
# 重力变量
colors = ['red', 'blue', 'yellow', 'white', 'green', 'orange', 'purple', 'seagreen', 'indigo', 'cornflowerblue', 'pink']
# 颜色列表'''
Generic class for particles
particles are emitted almost randomly on the sky, forming a round of circle (a star) before falling and getting removed
from canvas
Attributes(属性):- id: 粒子的id- x, y: 粒子的坐标- vx, vy: 粒子在对应坐标的变化速度- total:一颗烟花里的粒子总数- age: 粒子在画布上停留的时间- color: 自我移植- cv: 画布- lifespan: 粒子在画布上停留的时间
'''class part:# 为每一个烟花绽放出来的粒子单独构建一个类的对象 ,每个粒子都会有一些重要的属性,决定它的外观(大小、颜色)、移动速度等def __init__(self, cv, idx, total, explosion_speed, x=0., y=0., vx=0., vy=0., size=2., color='red', lifespan=2,**kwargs):self.id = idx# 每个烟花的特定标识符self.x = x# 烟花绽放x轴self.y = y# 烟花绽放y轴self.initial_speed = explosion_speed# 粒子初始速度self.vx = vx# 粒子运动x轴速度self.vy = vy# 粒子运动y轴速度self.total = total# 绽放粒子数self.age = 0# 粒子已停留时间self.color = color# 粒子颜色self.cv = cv# 画布self.cid = self.cv.create_oval(x - size, y - size, x + size, y + size, fill=self.color, outline='white',width=0.01)# 指定一个限定矩形(Tkinter 会自动在这个矩形内绘制一个椭圆)self.lifespan = lifespan# 粒子在画布上停留的时间def update(self, dt):self.age += dt# 更新粒子停留时间if self.alive() and self.expand():# 如果粒子既存活又处于扩张阶段move_x = cos(radians(self.id * 360 / self.total)) * self.initial_speed# 粒子x轴继续膨胀move_y = sin(radians(self.id * 360 / self.total)) * self.initial_speed# 粒子y轴继续膨胀self.cv.move(self.cid, move_x, move_y)# 根据id把画布上的粒子移动x和y个距离self.vx = move_x / (float(dt) * 1000)# 粒子x轴的速度elif self.alive():columnFont = ('华文行楷', 20)# 如果粒子仅存活不扩张(只是停留时间足够,说明膨胀到最大了),则自由坠落self.cv.create_text(250, 100, text='新', tag="write_tag", fill=choice(colors), font=columnFont)  # 字体self.cv.create_text(300, 100, text='年', tag="write_tag", fill=choice(colors), font=columnFont)self.cv.create_text(350, 100, text='快', tag="write_tag", fill=choice(colors), font=columnFont)self.cv.create_text(400, 100, text='乐', tag="write_tag", fill=choice(colors), font=columnFont)# 删除文字标签move_x = cos(radians(self.id * 360 / self.total))# x轴的移动位移# we technically don't need to update x, y because move will do the jobself.cv.move(self.cid, self.vx + move_x, self.vy + GRAVITY * dt)self.vy += GRAVITY * dt# 更新y轴elif self.cid is not None:# 如果粒子生命周期已过,则将其移除cv.delete(self.cid)# 在画布上移除该粒子对象self.cv.delete("write_tag")# 同时移除字体self.cid = Nonedef expand(self):# 定义膨胀效果时间帧return self.age <= 1.2# 判断膨胀时间是否小于1.2秒def alive(self):# 判断粒子是否仍在生命周期内return self.age <= self.lifespan# 判断已停留时间是否小于应该停留时间'''
Firework simulation loop:
Recursively call to repeatedly emit new fireworks on canvas
a list of list (list of stars, each of which is a list of particles)
is created and drawn on canvas at every call,
via update protocol inside each 'part' object
'''def simulate(cv):t = time()# 返回自1970年后经过的浮点秒数,精确到小数点后7位explode_points = []# 爆炸点列表,烟花列表wait_time = randint(10, 100)# 等待时间为10到100之间整数numb_explode = randint(8, 20)# 爆炸烟花个数时6到10之间的随机整数# create list of list of all particles in all simultaneous explosionfor point in range(numb_explode):# 为所有模拟烟花绽放的全部粒子创建一列列表if point <= 4:objects = []# 每个点的爆炸粒子列表粒子列表x_cordi = 250 + point * 50# 每个爆炸点的x轴y_cordi = 100# 每个爆炸点的y轴speed = uniform(0.5, 1.5)# 每个爆炸点的速度size = uniform(0.5, 3)# 每个爆炸点的大小color = choice(colors)# 每个爆炸点的颜色explosion_speed = uniform(0.6, 3)# 爆炸的绽放速度total_particles = randint(10, 60)# 烟花的总粒子数for i in range(1, total_particles):# 同一个烟花爆炸出来的粒子大小、速度、坐标都是相同的r = part(cv, idx=i, total=total_particles, explosion_speed=explosion_speed, x=x_cordi, y=y_cordi,vx=speed, vy=speed, color=color, size=size, lifespan=uniform(0.6, 1.75))# 把上述参数代入part函数,但是每个粒子的生存时间是自己独立的objects.append(r)# 把r添加进粒子列表explode_points.append(objects)# 把粒子列表添加进烟花列表else:objects = []# 每个点的爆炸粒子列表粒子列表x_cordi = randint(50, 550)# 每个爆炸点的x轴y_cordi = randint(50, 150)# 每个爆炸点的y轴speed = uniform(0.5, 1.5)# 每个爆炸点的速度size = uniform(0.5, 3)# 每个爆炸点的大小color = choice(colors)# 每个爆炸点的颜色explosion_speed = uniform(0.3, 2)# 爆炸的绽放速度total_particles = randint(10, 50)# 烟花的总粒子数for i in range(1, total_particles):# 同一个烟花爆炸出来的粒子大小、速度、坐标都是相同的r = part(cv, idx=i, total=total_particles, explosion_speed=explosion_speed, x=x_cordi, y=y_cordi,vx=speed, vy=speed, color=color, size=size, lifespan=uniform(0.6, 1.75))# 把上述参数代入part函数,但是每个粒子的生存时间是自己独立的objects.append(r)# 把r添加进粒子列表explode_points.append(objects)# 把粒子列表添加进烟花列表total_time = .0# 初始化总时间# keeps undate within a timeframe of 1.8 secondwhile total_time < 2:# 当总时间小于1.8秒时运行该循环sleep(0.03)# 让画面暂停0.01秒tnew = time()# 刷新时间t, dt = tnew, tnew - t# 时间等于新时间,和上次时间间隔为tnew-tfor point in explode_points:# 遍历烟花列表for item in point:# 遍历烟花里的粒子列表item.update(dt)# 粒子更新时间cv.update()# 刷新画布total_time += dt# 为while循环增加时间root.after(wait_time, simulate, cv)# 将组件置于其他组件之后,放在最顶层,覆盖下面的,递归调用自己,形成新一轮的爆炸def close(*ignore):# 打开模拟循环并关闭窗口"""Stops simulation loop and closes the window."""global rootroot.quit()if __name__ == '__main__':root = tk.Tk()root.title('祝大家—虎年大吉')  # 设置窗体的标题栏cv = tk.Canvas(root, height=600, width=600)# 绘制一个高600,宽600的画布bgpath = filedialog.askopenfilename(title='请选择背景图片')# 选择背景图片image = Image.open(bgpath)# 打开背景图片image = image.resize((600, 600), Image.ANTIALIAS)# 把背景图片调整成窗口大小photo = ImageTk.PhotoImage(image)cv.create_image(0, 0, image=photo, anchor='nw')# 在画布上绘制加载的背景图片bgmusic = filedialog.askopenfilename(title='请选择背景音乐')py.mixer.init()# 初始化py.mixer.music.load(bgmusic)# 文件加载py.mixer.music.play(-1, 0, fade_ms=50)# 播放  第一个是播放值 -1代表循环播放, 第二个参数代表开始播放的时间py.mixer.music.pause()# 暂停py.mixer.music.unpause()# 取消暂停cv.pack()# 把cv添加进去root.protocol("WM_DELETE_WINDOW", close)root.after(200, simulate, cv)# 在0.1秒后再调用stimulate函数,生成一轮烟花绽放效果root.mainloop()# 执行root,生成窗口
🌜源码讲解
这是一个使用tkinter和pygame库创建的烟花模拟程序,模拟多个烟花在窗口中的绽放效果。让我逐步解释代码:
- 导入所需的库:
import random
import pygame as py
import tkinter as tk
from time import time, sleep
from tkinter import filedialog
from PIL import Image, ImageTk
from math import sin, cos, radians
from random import choice, uniform, randint
导入了random、pygame、tkinter、time、sleep、filedialog、Image、ImageTk等模块。
- 定义一个生成随机颜色的函数
randomcolor:
def randomcolor():colArr = ['1', '2', '3', '4', '5', '6', '7', '8', '9', 'A', 'B', 'C', 'D', 'E', 'F']color = ""for i in range(6):color += colArr[random.randint(0, 14)]return "#" + color
该函数生成一个随机的十六进制颜色值。
- 定义了全局变量和常量:
GRAVITY = 0.06
colors = ['red', 'blue', 'yellow', 'white', 'green', 'orange', 'purple', 'seagreen', 'indigo', 'cornflowerblue', 'pink']
GRAVITY表示重力加速度,colors是一个颜色列表。
- 定义了烟花粒子的类
part:
class part:# ...
这个类表示烟花的粒子,包含了粒子的各种属性和方法,用于模拟粒子的运动和效果。
- 定义了烟花模拟的主循环函数
simulate:
def simulate(cv):# ...
该函数使用递归调用,生成多个烟花的绽放效果。
- 创建了
tkinter窗口,加载背景图片和背景音乐,并初始化pygame:
if __name__ == '__main__':root = tk.Tk()# ...
这部分代码创建了tkinter窗口,选择了背景图片和背景音乐,并初始化了pygame音乐模块。
- 主循环和启动
tkinter的事件循环:
root.after(200, simulate, cv)root.mainloop()
在0.2秒后调用simulate函数,生成一轮烟花绽放效果,并启动tkinter的事件循环。
🎥源码下载
https://download.csdn.net/download/weixin_52908342/88657678
🎉寄语
亲爱的朋友,
在这辞旧迎新的时刻,送上最美好的祝愿:愿你迎接新的一年,心怀希望,面带微笑,步履坚定,携手幸福。
愿你在新的一年里,收获满满的快乐和成就,健康安康,事业有成。愿生活的琐碎都被温馨填满,愿每一个梦想都能如期绽放。
让我们携手迎接新的开始,用心感恩过去,用勇气迎接未来。愿新的一年,你我共同书写属于自己的精彩篇章。
元旦快乐!
祝福朋友。
这篇关于python实现元旦多种炫酷高级倒计时_附源码【第19篇—python过元旦】的文章就介绍到这儿,希望我们推荐的文章对编程师们有所帮助!


