本文主要是介绍应用 Strangler 模式将遗留系统分解为微服务,希望对大家解决编程问题提供一定的参考价值,需要的开发者们随着小编来一起学习吧!
许多来源在一般情况下提供了微服务的解释,但缺乏特定领域的示例。新来者或不确定从哪里开始的人可能会发现掌握如何将遗留系统过渡到微服务架构具有挑战性。本指南主要面向那些正在努力启动迁移工作的个人,它提供了特定于业务的示例来帮助理解该过程。
我想谈谈另一种模式 - Strangler模式 - 这是一种迁移模式,用于逐步从旧系统过渡到新系统,同时最大限度地降低风险。
让我们以传统杂货计费系统为例。现在是时候升级到微服务架构以利用其优势了。
Strangler 是一种逐步退役旧系统,同时逐步开发新系统的模式。这样,用户可以更快地开始使用新系统,而不是等待整个系统迁移完成。
在第一篇文章中,我将重点关注杂货店所需的微服务。例如,考虑这样一个场景:您当前有一个杂货店的遗留系统,并且您有兴趣将其升级到微服务架构并将其迁移到云。
杂货店遗留系统概述
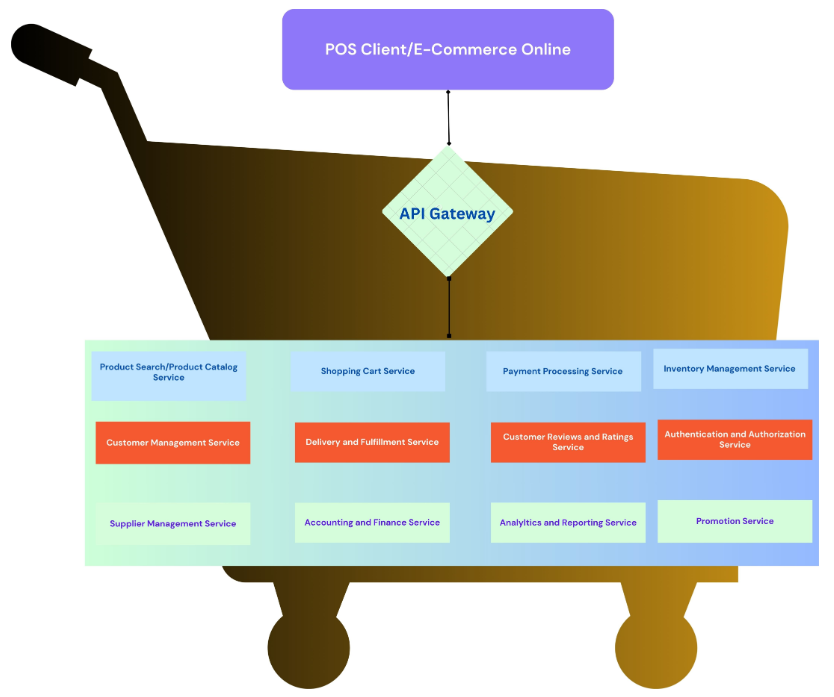
首先,在线杂货店可能具有的模块是:
-
购物车服务
-
退款处理服务
-
库存管理服务:商品销售时减去商品数量,订单退款时加回商品数量。
根据 Strangler 模式,您应该能够用新的微服务替换一个模块,同时继续使用其他模块,直到更新的服务准备就绪。
在这里,您可以先用更新的服务替换购物车。由于购物车服务依赖于支付处理服务,因此您也需要开发该服务。
假设我们将逐步开发这些服务。出于演示目的,我将仅关注上述三个服务。但在现实场景中,您可能需要如下所示的其他服务来完成杂货店的整个电子商务网站:
public class Product
{public Guid Id { get; set; }public string Name { get; set; }public decimal Price { get; set; }public int StockQuantity { get; set; }public Category ProductCategory { get; set; }
}public class Category
{public Guid Id { get; set; }public string Name { get; set; }
}public class ShoppingCartItem
{public Product Product { get; set; }public int Quantity { get; set; }
}public class ShoppingCart
{public Guid Id { get; set; }public List<ShoppingCartItem> Items { get; set; }public Customer Customer { get; set; }public DateTime CreatedAt { get; set; }
}public class Order
{public Guid Id { get; set; }public List<ShoppingCartItem> Items { get; set; }public Customer Customer { get; set; }public decimal TotalAmount { get; set; }public DateTime CreatedAt { get; set; }
}
现在让我们考虑每个服务所需的基本模型类和操作。
对于购物车服务,您需要以下模型类和操作:产品、产品类别、添加到购物车的商品、购物车和订单。它的结构如下:
购物车服务
public class Product
{public Guid Id { get; set; }public string Name { get; set; }public decimal Price { get; set; }public int StockQuantity { get; set; }public Category ProductCategory { get; set; }
}public class Category
{public Guid Id { get; set; }public string Name { get; set; }
}public class ShoppingCartItem
{public Product Product { get; set; }public int Quantity { get; set; }
}public class ShoppingCart
{public Guid Id { get; set; }public List<ShoppingCartItem> Items { get; set; }public Customer Customer { get; set; }public DateTime CreatedAt { get; set; }
}public class Order
{public Guid Id { get; set; }public List<ShoppingCartItem> Items { get; set; }public Customer Customer { get; set; }public decimal TotalAmount { get; set; }public DateTime CreatedAt { get; set; }
}
理想情况下,您应该创建一个共享项目来容纳所有模型和接口。首先必须确定必要的模型和操作。
在考虑客户可以在购物车中执行的操作时,通常只涉及一个主要操作,CreateOrder,即向购物车添加商品。然而,其他操作,例如支付处理、退款和库存调整,应作为单独的微服务来实现。这种模块化方法可以在管理业务流程的不同方面提供更大的灵活性和可扩展性。
public class BillingService : IBillingService
{public Order CreateOrder(Customer customer, List<ShoppingCartItem> items){return new Order{Id = Guid.NewGuid(), //Create a new order idItems = items,Customer = customer,TotalAmount = CalculateTotalAmount(items),CreatedAt = DateTime.Now};}private decimal CalculateTotalAmount(List<ShoppingCartItem> items){decimal totalAmount = 0;foreach (var item in items){totalAmount += item.Product.Price * item.Quantity;}return totalAmount;}
}
理想情况下,在共享项目中,您必须为 IBillingService 创建一个接口。它应该如下所示:
public interface IBillingService{public Order CreateOrder(Customer customer, List<ShoppingCartItem> items);}
现在您可以对CreateOrder操作进行单元测试。
在现实世界中,通常的做法是创建IBillingRepository 将订单保存在数据库中。该存储库应包含在数据库中存储订单的方法,或者您可以选择使用下游服务来处理订单创建过程。
我不会解决用户身份验证、安全、托管、监控、代理以及本讨论中的其他相关主题,因为它们是不同的主题。我的主要关注点仍然是根据您的特定需求量身定制的微服务的设计方面。
创建购物车后,下一步涉及客户付款。让我们继续创建支付服务项目及其关联模型。
付款处理服务
public class Payment
{public Guid Id { get; set; }public decimal Amount { get; set; }public PaymentStatus Status { get; set; }public DateTime PaymentDate { get; set; }public PaymentMethod PaymentMethod { get; set; }
}public enum PaymentStatus
{Pending,Approved,Declined,
}
public enum PaymentMethod
{CreditCard,DebitCard,PayPal,
}public class Receipt
{public Guid Id { get; set; }public Order Order { get; set; }public decimal TotalAmount { get; set; }public DateTime IssuedDate { get; set; }
}public class PaymentService : IPaymentService
{private PaymentGateway paymentGateway;public PaymentService(){this.paymentGateway = new PaymentGateway();}public Payment MakePayment(decimal amount, PaymentMethod paymentMethod, string paymentDetails){// In a real system, you would handle the payment details and validation before calling the payment gateway.return paymentGateway.ProcessPayment(amount, paymentMethod, paymentDetails);}
}public class ReceiptService : IReceiptService
{public Receipt GenerateReceipt(Order order){var receipt = new Receipt{Id = Guid.NewGuid(),Order = order,TotalAmount = order.TotalAmount,IssuedDate = DateTime.Now};return receipt;}
}
在此服务项目中,您必须创建并实现以下接口:
public Interface IPaymentService
{public Payment MakePayment(decimal amount, PaymentMethod paymentMethod, string paymentDetails);
}
public Interface IReceiptService
{public Receipt GenerateReceipt(Order order);
}public Interface IPaymentRepository
{public Payment ProcessPayment(decimal amount, PaymentMethod paymentMethod, string paymentDetails)
} public class PaymentGateway : IPaymentRepository
{public Payment ProcessPayment(decimal amount, PaymentMethod paymentMethod, string paymentDetails){// Simplified payment processing logic for demonstrationvar payment = new Payment{Id = Guid.NewGuid(),Amount = amount,Status = PaymentStatus.Pending,PaymentDate = DateTime.Now,PaymentMethod = paymentMethod};// In a real system, you would connect to a payment gateway and process the payment, updating the payment status accordingly.// For example, you might use an external payment processing library or API to handle the transaction.// Simulating a successful payment here for demonstration purposes.payment.Status = PaymentStatus.Approved;return payment;}
}
创建所有这些服务后,我们可以轻松地使用新系统停用购物车(假设您也有一个并行完成的新用户界面)。
接下来,我们必须解决下订单后的库存管理问题。库存管理服务负责在创建采购订单时补货。该服务项目的结构如下:
库存管理服务
public class Product
{public Guid Id { get; set; }public string Name { get; set; }public decimal Price { get; set; }public int QuantityInStock { get; set; }public Category ProductCategory { get; set; }
}
public class Category
{public Guid Id { get; set; }public string Name { get; set; }
}public class Supplier
{public Guid Id { get; set; }public string Name { get; set; }public string ContactEmail { get; set; }
}
public class PurchaseOrder
{public Guid Id { get; set; }public Supplier Supplier { get; set; }public List<PurchaseOrderItem> Items { get; set; }public DateTime OrderDate { get; set; }public bool IsReceived { get; set; }
}public class PurchaseOrderItem
{public Product Product { get; set; }public int QuantityOrdered { get; set; }public decimal UnitPrice { get; set; }
}public interface IInventoryManagementService
{void ReceivePurchaseOrder(PurchaseOrder purchaseOrder);void SellProduct(Product product, int quantitySold);
}public class InventoryManagementService : IInventoryManagementService
{public void ReceivePurchaseOrder(PurchaseOrder purchaseOrder){if (purchaseOrder.IsReceived){throw new InvalidOperationException("The order is already placed.");}foreach (var item in purchaseOrder.Items){item.Product.QuantityInStock += item.QuantityOrdered;}purchaseOrder.IsReceived = true;}public void SellProduct(Product product, int quantitySold){if (product.QuantityInStock < quantitySold){throw new InvalidOperationException("Item not in stock.");}product.QuantityInStock -= quantitySold;}
}
正如我所提到的,本指南主要面向那些正在努力启动迁移工作的个人,它提供了特定于业务的示例来帮助理解该过程。
我相信本文为如何在微服务架构中启动迁移项目提供了宝贵的见解。如果您正在开发杂货店或任何在线购物车系统,那么此信息对您来说应该特别有用。我希望你能从这里拿走它。在我的下一篇文章中,我将介绍另一个特定于领域的示例,因为您始终可以在其他地方探索有关微服务的更多一般信息。
作者:Somasundaram Kumarasamy
更多技术干货请关注公号【云原生数据库】
squids.cn,云数据库RDS,迁移工具DBMotion,云备份DBTwin等数据库生态工具。
irds.cn,多数据库管理平台(私有云)。
这篇关于应用 Strangler 模式将遗留系统分解为微服务的文章就介绍到这儿,希望我们推荐的文章对编程师们有所帮助!


