本文主要是介绍知乎周源微信_每周源代码25-OpenID版,希望对大家解决编程问题提供一定的参考价值,需要的开发者们随着小编来一起学习吧!

知乎周源微信

We spent a lot of time at Corillian (my last job) thinking about Identity, and a few months before I left I started getting into Cardspace and OpenID. This was a little over a year ago. We did a podcast on OpenID as well.
我们在Corillian (我的上一份工作)上花费了大量时间来思考Identity,而在我离开的几个月前,我开始接触Cardspace和OpenID 。 这是一年多以前的事。 我们也对OpenID进行了播客。
At that time, I tried to take the only .NET implementation at the time of OpenID which was written in in Boo written originally by Grant Monroe and port it to C# causing me to go through the Programmer Phases of Grief. Andrew Arnott and Jason Alexander took the reins and we spend a number of late nights trying to get a good OpenID library working. I gave up, but they soldiered on and created dotnetopenid (downloads), including a client and server as well as Andrew's excellent ASP.NET controls .
当时,我尝试采用OpenID时唯一的.NET实现,该实现是由Grant Monroe最初在Boo中编写的,并将其移植到C#中,这使我经历了“程序员的悲伤期” 。 安德鲁·阿诺特( Andrew Arnott)和杰森·亚历山大( Jason Alexander)接任了职位,我们花了许多深夜试图使良好的OpenID库正常工作。 我放弃了,但是他们坚持不懈地创建了dotnetopenid (下载),包括客户端和服务器以及Andrew出色的ASP.NET控件。
Fast-forward to now. My new friend Aaron Hockley decided to a stands and promote OpenID. He said:
快进到现在。 我的新朋友亚伦·霍克利( Aaron Hockley)决定在摊位上推广OpenID 。 他说:
Effective immediately, I will no longer comment on tech blogs that don’t support OpenID for comment authentication.
立即生效,我将不再对不支持OpenID进行评论身份验证的技术博客发表评论。
He's just one guy, but his heart is in the right place. He points out that:
他只是一个人,但他的心在正确的地方。 他指出:
Google offers it as a Blogger option. It’s available as a super-easy-to-install WordPress plugin. Movable Type has it as a built-in feature.
Google将其作为Blogger选项提供。 它可以作为易于安装的WordPress插件使用。 移动类型将其作为内置功能。
OpenID is a good thing and it's Growing. You may already have an OpenID if, for example, you have a Yahoo! account. More on this soon.
OpenID是一件好事,而且正在不断发展。 例如,如果您拥有Yahoo !,则可能已经具有OpenID。 帐户。 即将推出更多。
如何将您的博客变成OpenID (How to turn your blog into an OpenID)
Simon Willison wrote How to turn your blog into an OpenID and it's very easy.
西蒙·威利森(Simon Willison)撰写了《如何将您的博客变成OpenID》 ,这很容易。
STEP 1: Get an OpenID. There a lots of servers and services out there you can use. I use http://www.myopenid.com for two reasons. One, I know the CEO (they're in Portland), and two, they support optionally using CardSpace to authenticate yourself (as well as the standard way with password).
步骤1:获取OpenID。 您可以使用很多服务器和服务。 我使用http://www.myopenid.com的原因有两个。 一,我认识首席执行官(他们在波特兰),二,他们支持选择使用CardSpace进行身份验证(以及使用密码的标准方式)。
STEP 2: Add these two lines to your blog's main template in-between the <HEAD></HEAD> tags at the top of your template. Most all blog engines support editing your template so this should be an easy and very possible thing to do.
步骤2:在模板顶部的<HEAD> </ HEAD>标记之间,将这两行添加到博客的主模板中。 大多数博客引擎都支持编辑模板,因此这是一件容易且非常可能的事情。
Example:
例:
<link rel="openid.server" href="http://www.myopenid.com/server" />
<link rel="openid.delegate" href=http://YOURUSERNAME.myopenid.com/ />
<link rel =“ openid.server” href =“ http://www.myopenid.com/server” /> <link rel =“ openid.delegate” href = http://YOURUSERNAME.myopenid.com/ />
This will let you use your domain/blog as your OpenID. Now, I can log in with "http://www.hanselman.com" when I see an OpenID Login option - and so can you! Go do it now!
这样您就可以将域/博客用作您的OpenID。 现在,当我看到“ OpenID登录”选项时,可以使用“ http://www.hanselman.com ”登录,您也可以! 现在就去做!
使OpenID登录更容易 (Making OpenID Logins Easier)
If you have a blog or site with OpenID support, you should go get this little snippet of JavaScript and install an OpenID ID Selector on your blog from http://www.idselector.com/.
如果您拥有支持OpenID的博客或网站,则应获取此JavaScript小片段,并从http://www.idselector.com/在博客上安装OpenID ID选择器。
One of the things that is slowing OpenID adoption is that many people don't realize that they may already have one. That's what this little Javascript is trying to do by showing folks sites that they recognize. This way my Dad could login using Yahoo and it would make sense to him. It's a little busy, but it's a start. I've added an http://www.idselector.com/ to my blog for comments.
阻碍OpenID采用的原因之一是,许多人没有意识到他们可能已经拥有OpenID。 这就是这个小Javascript通过向人们展示他们认识的站点所试图做的。 这样,我父亲可以使用Yahoo登录,这对他来说很有意义。 有点忙,但这是一个开始。 我已经在我的博客中添加了http://www.idselector.com/以获得评论。
将OpenID支持添加到DasBlog (Adding OpenID Support to DasBlog)
A year ago, I originally tried to port the Boo code to C# in an attempt to enable OpenID in DasBlog but eventually gave up. However, last night, I re-familiarized myself with the OpenID spec (it's on 2.0 now) and started reading the source for http://code.google.com/p/dotnetopenid/.
一年前,我最初试图将Boo代码移植到C#,以尝试在DasBlog中启用OpenID,但最终放弃了。 但是,昨晚,我重新熟悉了OpenID规范(现在是2.0版),并开始阅读http://code.google.com/p/dotnetopenid/的源代码。
In a word, it's a joy. I was able to get OpenID running OK in two hours and working well and up on my blog in two more. I have to give credit to the fantastic work that Andrew Arnott and Jason Alexander and team are doing. It's come far and you should know about it, Dear Reader.
总之,这是一种喜悦。 我能够在两个小时内使OpenID正常运行,并且又在两个小时内在博客上正常运行。 我必须赞扬安德鲁·阿诺特( Andrew Arnott)和杰森·亚历山大( Jason Alexander)及其团队所做的出色工作。 亲爱的读者,它已经走了,您应该知道这一点。
I had two scenarios in DasBlog (again, in case you didn't know, it's the C# and XML-based blog that runs this site and others) to handle.
我在DasBlog中有两种情况(同样,如果您不知道,它是运行此站点和其他站点的基于C#和XML的博客)。
First, I wanted to support OpenID for Comments which wouldn't actually "log a user in" in the stateful FormsAuthentication sense. I think this isn't a very common scenario, and I'd describe it as One-Time Occasional Authentication. In this case, I used the dotnetopenid classes directly in a moderately complex scenario.
首先,我想为注释支持OpenID,这实际上不会在有状态的FormsAuthentication意义上“使用户登录”。 我认为这不是很常见的情况,我将其描述为一次性偶尔身份验证。 在这种情况下,我在中等复杂的情况下直接使用了dotnetopenid类。
Second, I wanted to support OpenID to login as the Administrator for my site. This would, in fact, log me in via FormsAuthentication. This would be a common scenario that you'd probably care about as it's very typical. In this case, I used the dotnetopenid ASP.NET Controls, which were about as easy as falling off a log. (That's pretty easy.)
其次,我想支持OpenID以我的站点的管理员身份登录。 实际上,这将通过FormsAuthentication登录我。 由于这是非常典型的,因此您可能会在意这是一种常见的情况。 在这种情况下,我使用了dotnetopenid ASP.NET控件,它与创建日志一样容易。 (这很容易。)
Here's the first, harder, scenario.
这是第一个更困难的情况。
If you've entered your OpenID and hit Submit Comment then we'll store the current entry and the comment you're submitting. We'll be redirecting away to get authenticated and we'll need them when we get back. If you're running in a WebFarm, you'll want to store these temporary variables in a database or somewhere that doesn't have node-affinity.
如果您输入了OpenID并点击了Submit Comment,那么我们将存储当前条目和您要提交的评论。 我们将重定向到进行身份验证,回来时将需要它们。 如果您在WebFarm中运行,则需要将这些临时变量存储在数据库中或不具有节点亲和性的位置。
Session["pendingComment"] = comment.Text;
Session["pendingEntryId"] = ViewState["entryId"] as string;
OpenIdRelyingParty openid = new OpenIdRelyingParty();
IAuthenticationRequest req = openid.CreateRequest(openid_identifier.Text);
ClaimsRequest fetch = new ClaimsRequest();
fetch.Email = DemandLevel.Require;
fetch.Nickname = DemandLevel.Require;
req.AddExtension(fetch);
SaveCookies();
req.RedirectToProvider();
return;
What I think of as an "OpenID Client" is called a "Relying Party" or "RP" in the parlance of the OpenID folks. In this code we create an AuthenticationRequest and add some additional claims. There's a nice interface-based extension model in this lower-level library that lets you Request or Require information from the user's profile. For comments on the blog, I just need your email for your Gravatar and your Nickname for Display.
在OpenID人士看来,我所谓的“ OpenID客户”被称为“依赖方”或“ RP”。 在此代码中,我们创建一个AuthenticationRequest并添加一些其他声明。 这个低级库中有一个不错的基于接口的扩展模型,可让您从用户的个人资料中请求或要求信息。 对于博客的评论,我只需要您的Gravatar电子邮件和您的Display昵称即可。
I then call RedirectToProvider, and that's if for the request side. Remember I said this was the hard scenario! Not so hard. ;)
然后,我调用RedirectToProvider,那就是在请求方。 记得我说过这是艰难的情况! 没那么难。 ;)
Next, we're redirected to an OpenIDProvider, we authenticate (or not) and are redirected BACK with additional information encoded on the GET. On the way back in, in our Page_Load (or an HttpHandler if you like) we check the Response status. If we're Authenticated, we grab the info we requested and add the comment. Bam. Sprinkle in a little error handling and we're all set.
接下来,我们被重定向到OpenIDProvider,我们进行身份验证(或不进行身份验证),并使用GET上编码的其他信息重定向回BACK。 在返回的过程中,在我们的Page_Load(或HttpHandler,如果您愿意的话)中,我们检查Response状态。 如果我们已通过身份验证,我们将获取我们要求的信息并添加评论。 am 加上一些错误处理,我们就准备好了。
OpenIdRelyingParty openid = new OpenIdRelyingParty();
if (openid.Response != null)
{
   // Stage 3: OpenID Provider sending assertion response
   switch (openid.Response.Status)
   {
      case AuthenticationStatus.Authenticated:
         ClaimsResponse fetch = openid.Response.GetExtension(typeof(ClaimsResponse)) as ClaimsResponse;
         string nick = fetch.Nickname;
         string homepage = openid.Response.ClaimedIdentifier;
         string email = fetch.Email;
         string comment = Session["pendingComment"] as string;
         string entryId = Session["pendingEntryId"] as string;
         if (String.IsNullOrEmpty(comment) == false && String.IsNullOrEmpty(entryId) == false)
         {
            AddNewComment(nick, email, homepage, comment, entryId, true);
         }
         break;
   }
}
Here's the second scenario where we'll log in as the Administrator of the blog. I just register the DotNetOpenId assembly in my ASPX page and put an <openidlogin> control on the page. Notice that even the claims I created in the manual scenario above are just properties on this control. There's also events like OnLoggedIn to handle the results.
这是我们将以博客管理员身份登录的第二种情况。 我只是在ASPX页面中注册DotNetOpenId程序集,然后在页面上放置一个<openidlogin>控件。 请注意,即使我在上面的手动方案中创建的声明也只是该控件上的属性。 还有像OnLoggedIn这样的事件来处理结果。
<%@ Register Assembly="DotNetOpenId" Namespace="DotNetOpenId.RelyingParty" TagPrefix="cc1" %>
<cc1:openidlogin id="OpenIdLogin1"
RequestEmail="Require" RequestNickname="Request" RegisterVisible="false"
RememberMeVisible="True" PolicyUrl="~/PrivacyPolicy.aspx" TabIndex="1"
OnLoggedIn="OpenIdLogin1_LoggedIn"/></cc1:openidlogin>
This controls renders nicely as seen in the screenshot below.
如下面的屏幕截图所示,此控件可以很好地渲染。

In the OnLoggedIn event, I call my existing security APIs (Thanks to Tony Bunce and Anthony Bouch) and set the AuthCookie from FormsAuthentication.
在OnLoggedIn事件中,我调用了我现有的安全API(感谢Tony Bunce和Anthony Bouch ),并从FormsAuthentication设置AuthCookie。
protected void OpenIdLogin1_LoggedIn(object sender, OpenIdEventArgs e)
{
   UserToken token = SiteSecurity.Login(e.Response);
   if (token != null)
   {
       FormsAuthentication.SetAuthCookie(userName, rememberCheckbox.Checked);
       Response.Redirect(SiteUtilities.GetAdminPageUrl(), true);
   }
}
Poof. I love using well designed libraries and just work. At this point all that was left was adding some CSS and tidying up.
of 我喜欢使用设计良好的库,并且可以正常工作。 此时剩下的就是添加一些CSS并进行整理。
OpenID和ASP.NET WebForms和MVC (OpenID and ASP.NET WebForms and MVC)
The dotnetopenid source includes source for sample sites. It actually includes three samples, two WebForms and one ASP.NET MVC.
dotnetopenid 来源包括样本站点的来源。 它实际上包括三个示例,两个WebForm和一个ASP.NET MVC。
The MVC implementation is very clean, even though (or because?) it doesn't use controls. Here's the Authenticate Controller Action:
MVC实现非常干净,即使(或因为?)它不使用控件也是如此。 这是Authenticate Controller动作:
public void Authenticate() {
	var openid = new OpenIdRelyingParty();
	if (openid.Response == null) {
		// Stage 2: user submitting Identifier
		openid.CreateRequest(Request.Form["openid_identifier"]).RedirectToProvider();
	} else {
		// Stage 3: OpenID Provider sending assertion response
		switch (openid.Response.Status) {
			case AuthenticationStatus.Authenticated:
				FormsAuthentication.RedirectFromLoginPage(openid.Response.ClaimedIdentifier, false);
				break;
			case AuthenticationStatus.Canceled:
				ViewData["Message"] = "Canceled at provider";
				RenderView("Login");
				break;
			case AuthenticationStatus.Failed:
				ViewData["Message"] = openid.Response.Exception.Message;
				RenderView("Login");
				break;
		}
	}
}
那么CardSpace呢? (What about CardSpace?)
for a protocol that "eliminates the need for multiple usernames across different websites, simplifying your online experience." What's cool is that it's open, so you (the consumer) gets to pick your Provider. It's not owned by anyone, so it's ours to screw up (or succeed with).
该协议“消除了跨不同网站使用多个用户名的需求,从而简化了您的在线体验”。 最酷的是它是开放的,因此您(消费者)可以选择您的提供商。 它不归任何人所有,因此要搞砸(或成功)是我们的。
CardSpace is built into Vista and installed on XP when you put .NET 3.0 on your system. There are also Identity Selectors for Safari and Firefox in the works. It's different than OpenID in that it's concerned with strong authentication. Therefore, they are very complimentary.
当将.NET 3.0放入系统时,CardSpace内置在Vista中并安装在XP上。 也有针对Safari和Firefox的身份选择器。 它与OpenID的不同之处在于它涉及强身份验证。 因此,它们是非常互补的。
Here's my CardSpace login as I'm getting ready to log into this blog...
这是我的CardSpace登录名,因为我准备登录此博客...
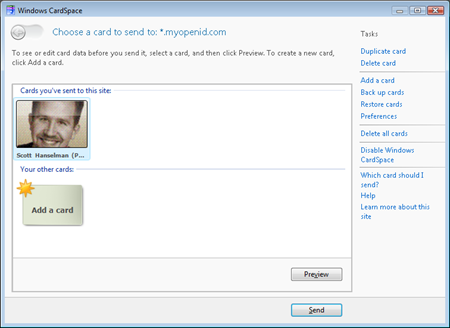
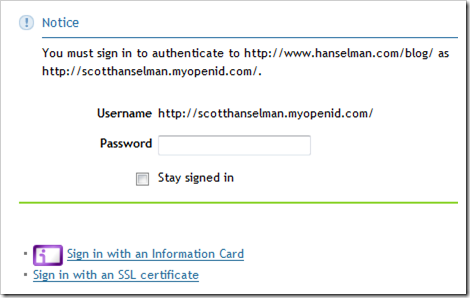
...because my chosen OpenID provider at http://www.myopenid.com (it's free) also supports both InfoCards and SSL Certificates for authentication as well as strong passwords.
...因为我在http://www.myopenid.com (免费)上选择的OpenID提供程序也支持InfoCard和SSL证书进行身份验证以及强密码。
Notice the "Sign into Information Card" icon below next to the IconCard purple icon.
请注意,IconCard紫色图标旁边的“登录信息卡”图标。
An OpenID provider can choose to use anything available with which to authenticate you. Here's a video of a Belgian using an eID to authenticate against an OpenID provider at http://openid.trustbearer.com/ that supports biometric devices, USB keys, and smart cards.
OpenID提供程序可以选择使用任何可用来对您进行身份验证的内容。 这是一个比利时人的视频,它使用eID对http://openid.trustbearer.com/上的OpenID提供程序进行身份验证,该提供程序支持生物识别设备,USB密钥和智能卡。
所以呢? (So What?)
Get involved and give it a try! Here's some things you can do.
参与并尝试一下! 您可以执行以下操作。
Sign up for a Free OpenID at MyOpenID or one of the many public OpenID providers out there.
在MyOpenID或那里的许多公共OpenID提供者中注册一个免费的OpenID。
Then, turn your own domain or your blog into an OpenID.
然后,将您自己的域或博客转换为OpenID 。
Sign up for a Free OpenID at MyOpenID or one of the many public OpenID providers out there.
在MyOpenID或那里的许多公共OpenID提供者中注册一个免费的OpenID。
Go use your new OpenID at one of the many sites that supports OpenID.
在支持OpenID的众多站点之一中使用新的OpenID 。
Come back to this post and leave your first comment using OpenID!
返回本文,并使用OpenID留下您的第一条评论!
Go use your new OpenID at one of the many sites that supports OpenID.
在支持OpenID的众多站点之一中使用新的OpenID 。
Watch Simon Willison talk about the case for OpenID (video)
观看Simon Willison谈论有关OpenID的案例(视频)
And, if you're a developer, get an OpenID library like dotnetopenid and consider enabling your app. Consider using the Javascript ID Selector to make for a nicer User Experience.
而且,如果您是开发人员,请获取像dotnetopenid这样的OpenID库,并考虑启用您的应用程序。 考虑使用Javascript ID选择器来提供更好的用户体验。
翻译自: https://www.hanselman.com/blog/the-weekly-source-code-25-openid-edition
知乎周源微信
这篇关于知乎周源微信_每周源代码25-OpenID版的文章就介绍到这儿,希望我们推荐的文章对编程师们有所帮助!


