本文主要是介绍设置按下电源立刻锁屏失败,希望对大家解决编程问题提供一定的参考价值,需要的开发者们随着小编来一起学习吧!
bug描述
“General description:
It needs about 1s to lock screen when press power key again to awake phone after set “”Immediately”” in screen lock.
Reproducibility:
10/10
Precondition:
None.
Step:
1.Main menu->Settings->Security->Screen lock settings->Turn off Power button instantly locks->Press Automatically lock->Select “”Immediately”“->Press power key twice quickly->Check.
2.Press power key to enter sleep->About 1s->Press power key again->Check.
Actual result:
Step 1:It don’t lock screen when press power key twice quickly to awake phone after set “”Immediately”” in screen lock.
Step 2:It needs about 1s to lock screen when press power key again to awake phone after set “”Immediately”” in screen lock.
Expect result:
Phone should be locked immediately when press power key to enter sleep after set “”Immediately”” in screen lock.
Reference phone result:
Phone is locked immediately when press power key twice after set “”Immediately”” in security.
android可以设置,按下电源键后一段时间不锁屏,这样对于那些手机控来说是一件很好的事,不需要频繁的在keyguard中解锁。这个bug意思是说当设定按下电源后立刻锁屏,结果自己操作时却没有立刻锁屏,而是要等大约一秒钟后在按电源键,才属于锁屏状态。
找源头
通过前面的分析,知道这个bug是keyguard的模块,我们还需要进一步的定位。在android5.0后,将keyguard加入到了SystemUI模块中,关于怎么判断keyguard属于SystemUI可以参考这篇文字Android6.0锁屏简介。
show keyguard有两个触发点。
screen off 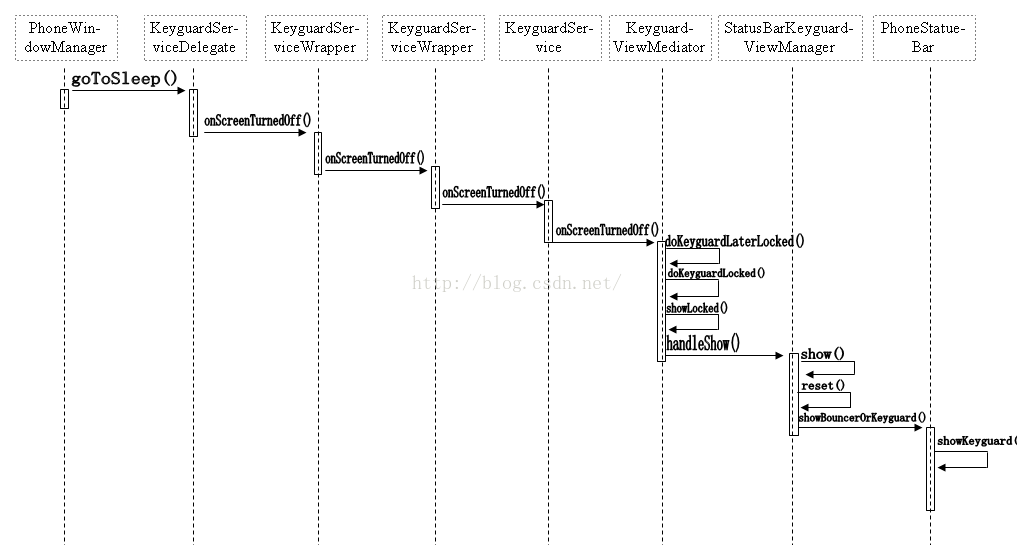
systemReady
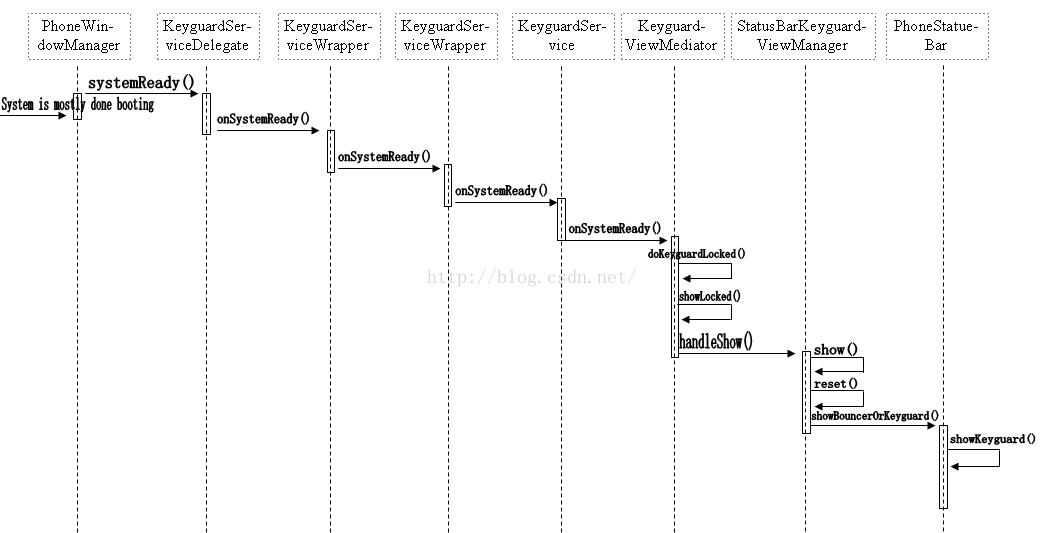
我们发现会通过KeyguardViewMediator.java处理。实际上,详细的流程是这样的
private void doKeyguardLaterLocked(long timeout) {// Lock in the futurelong when = SystemClock.elapsedRealtime() + timeout;Intent intent = new Intent(DELAYED_KEYGUARD_ACTION);intent.putExtra("seq", mDelayedShowingSequence);intent.addFlags(Intent.FLAG_RECEIVER_FOREGROUND);PendingIntent sender = PendingIntent.getBroadcast(mContext,0, intent, PendingIntent.FLAG_CANCEL_CURRENT);mAlarmManager.setExactAndAllowWhileIdle(AlarmManager.ELAPSED_REALTIME_WAKEUP, when, sender);if (DEBUG) Log.d(TAG, "setting alarm to turn off keyguard, seq = "+ mDelayedShowingSequence);doKeyguardLaterForChildProfilesLocked();}在doKeyguardLaterLocked方法中,会发送一个广播DELAYED_KEYGUARD_ACTION,广播的注册是在setupLocked() 中注册的
mContext.registerReceiver(mBroadcastReceiver, new IntentFilter(DELAYED_KEYGUARD_ACTION));在doKeyguardLaterLocked的参数timeout是从settings.app传过来了,也就是我们设定的按键后隔多长时间锁屏的时间。
public void onStartedGoingToSleep(int why) {
.....long timeout = getLockTimeout(KeyguardUpdateMonitor.getCurrentUser());
}
点进去一看,就知道通过在数据库里查询setting设定的时间
private long getLockTimeout(int userId) {// if the screen turned off because of timeout or the user hit the power button// and we don't need to lock immediately, set an alarm// to enable it a little bit later (i.e, give the user a chance// to turn the screen back on within a certain window without// having to unlock the screen)final ContentResolver cr = mContext.getContentResolver();// From SecuritySettingsfinal long lockAfterTimeout = Settings.Secure.getIntForUser(cr,Settings.Secure.LOCK_SCREEN_LOCK_AFTER_TIMEOUT,KEYGUARD_LOCK_AFTER_DELAY_DEFAULT, userId);// From DevicePolicyAdminfinal long policyTimeout = mLockPatternUtils.getDevicePolicyManager().getMaximumTimeToLockForUserAndProfiles(userId);long timeout;if (policyTimeout <= 0) {timeout = lockAfterTimeout;} else {// From DisplaySettingslong displayTimeout = Settings.System.getIntForUser(cr, SCREEN_OFF_TIMEOUT,KEYGUARD_DISPLAY_TIMEOUT_DELAY_DEFAULT, userId);// policy in effect. Make sure we don't go beyond policy limit.displayTimeout = Math.max(displayTimeout, 0); // ignore negative valuestimeout = Math.min(policyTimeout - displayTimeout, lockAfterTimeout);timeout = Math.max(timeout, 0);}return timeout;}接下来看看广播时如何处理的,找到广播接收者
private final BroadcastReceiver mBroadcastReceiver = new BroadcastReceiver() {@Overridepublic void onReceive(Context context, Intent intent) {String action = intent.getAction();if (DELAYED_KEYGUARD_ACTION.equals(action)) {final int sequence = intent.getIntExtra("seq", 0);if (DEBUG) Log.d(TAG, "received DELAYED_KEYGUARD_ACTION with seq = "+ sequence + ", mDelayedShowingSequence = " + mDelayedShowingSequence);synchronized (KeyguardViewMediator.this) {if (mDelayedShowingSequence==sequence) { mSuppressNextLockSound = true;doKeyguardLocked(null);}}} /// @}}};mDelayedShowingSequence==sequence这两个变量相互控制,最后如果相等的话,就开始调用doKeyguardLocked方法,就是说经过timeout时间的等待,就开始锁屏幕了。看看doKeyguardLocked方法
/*** Enable the keyguard if the settings are appropriate.*/private void doKeyguardLocked(Bundle options) {// if another app is disabling us, don't showif (!mExternallyEnabled || PowerOffAlarmManager.isAlarmBoot()) {if (DEBUG) {Log.d(TAG, "doKeyguard: not showing because externally disabled");Log.d(TAG, "doKeyguard : externally disabled reason.." +"mExternallyEnabled = " + mExternallyEnabled) ;Log.d(TAG, "doKeyguard : externally disabled reason.." +"PowerOffAlarmManager.isAlarmBoot() = " +PowerOffAlarmManager.isAlarmBoot()) ;}// note: we *should* set mNeedToReshowWhenReenabled=true here, but that makes// for an occasional ugly flicker in this situation:// 1) receive a call with the screen on (no keyguard) or make a call// 2) screen times out// 3) user hits key to turn screen back on// instead, we reenable the keyguard when we know the screen is off and the call// ends (see the broadcast receiver below)// TODO: clean this up when we have better support at the window manager level// for apps that wish to be on top of the keyguardreturn;}// if the keyguard is already showing, don't botherif (mStatusBarKeyguardViewManager.isShowing()) {if (DEBUG) Log.d(TAG, "doKeyguard: not showing because it is already showing");resetStateLocked();if (DEBUG) {Log.d(TAG, "doKeyguard: not showing because it is already showing");}return;}// In split system user mode, we never unlock system user.if (!UserManager.isSplitSystemUser()|| KeyguardUpdateMonitor.getCurrentUser() != UserHandle.USER_SYSTEM|| !mUpdateMonitor.isDeviceProvisioned()) {// if the setup wizard hasn't run yet, don't showif (DEBUG) {Log.d(TAG, "doKeyguard: get keyguard.no_require_sim property before");}final boolean requireSim = !SystemProperties.getBoolean("keyguard.no_require_sim", true);if (DEBUG) {Log.d(TAG, "doKeyguard: get requireSim=" + requireSim);}final boolean provisioned = mUpdateMonitor.isDeviceProvisioned();boolean lockedOrMissing = false;for (int i = 0; i < KeyguardUtils.getNumOfPhone(); i++) {if (isSimLockedOrMissing(i, requireSim)) {lockedOrMissing = true;break;}}/// M: Add new condition DM lock is not trueboolean antiTheftLocked = AntiTheftManager.isAntiTheftLocked();Log.d(TAG, "lockedOrMissing is " + lockedOrMissing + ", requireSim=" + requireSim+ ", provisioned=" + provisioned +", antiTheftLocked=" + antiTheftLocked);if (!lockedOrMissing && shouldWaitForProvisioning() && !antiTheftLocked) {if (DEBUG) {Log.d(TAG, "doKeyguard: not showing because device isn't provisioned"+ " and the sim is not locked or missing");}return;}if (mLockPatternUtils.isLockScreenDisabled(KeyguardUpdateMonitor.getCurrentUser())&& !lockedOrMissing && !antiTheftLocked) {if (DEBUG) Log.d(TAG, "doKeyguard: not showing because lockscreen is off");return;}final boolean otpLock = mOneTimePassLock.launchIfLockActive();if (mLockPatternUtils.checkVoldPassword(KeyguardUpdateMonitor.getCurrentUser())&& KeyguardUtils.isSystemEncrypted() &&!KeyguardSecurity.bootReasonIsCrash() &&!otpLock) {if (DEBUG) Log.d(TAG, "Not showing lock screen since just decrypted");// Without this, settings is not enabled until the lock screen first appearssetShowingLocked(false);hideLocked();mUpdateMonitor.reportSuccessfulStrongAuthUnlockAttempt();return;}if (otpLock) {boolean relaunchOTP = false;// Wait while property sys.boot_completed is set in order to ensure that// OTPLockscreenActivity will start sucessfullywhile (!SystemProperties.getBoolean("sys.boot_completed", false)) {relaunchOTP = true;try {// Give some time to get property setif (DEBUG) {Log.i(TAG, "Boot not finished, sleeping...");}Thread.sleep(KEYGUARD_WAIT_TIME_MS);} catch (InterruptedException ex) {if (DEBUG) {Log.d(TAG, "doKeyguard: Exception in sleep");}}}// Restart Activity if first attempt failedif (relaunchOTP) {// Disable status bar expandif (mStatusBarManager == null) {mStatusBarManager = (StatusBarManager)mContext.getSystemService(Context.STATUS_BAR_SERVICE);}if (mStatusBarManager != null) {mStatusBarManager.disable(StatusBarManager.DISABLE_EXPAND);}mOneTimePassLock.launchIfLockActive();}}}if (DEBUG) Log.d(TAG, "doKeyguard: showing the lock screen");showLocked(options);}有兴趣可以详细看看,以后的流程没必要追究了,和这个bug的关系不大。
找bug是一件很麻烦的事,如果对流程不清楚的话就更加麻烦,我通过给这个文件调用的doKeyguardLaterLocked方法的地方前打印日志,发现在我触发关掉屏幕动作时会执行 public void onStartedGoingToSleep(int why) {
public void onStartedGoingToSleep(int why) {synchronized (this) {......if ((why == WindowManagerPolicy.OFF_BECAUSE_OF_TIMEOUT && timeout > 0)|| (why == WindowManagerPolicy.OFF_BECAUSE_OF_USER && !lockImmediately)&& !mIsIPOShutDown) {Log日志doKeyguardLaterLocked(timeout);mLockLater = true;} ......}会发现当我的timeout设为0if语句也会成立,也就会执行 doKeyguardLaterLocked(timeout);所以就出现了设置按下按键后立刻锁屏是没有效果的。这就是这个bug的原因。
解决方法
public void onStartedGoingToSleep(int why) {synchronized (this) {......if ((why == WindowManagerPolicy.OFF_BECAUSE_OF_TIMEOUT && timeout > 0)|| (why == WindowManagerPolicy.OFF_BECAUSE_OF_USER && !lockImmediately)&& !mIsIPOShutDown) {Log日志if(timeout>0){doKeyguardLaterLocked(timeout);mLockLater = true;}else{doKeyguardLocked(null);}} ......}
这篇关于设置按下电源立刻锁屏失败的文章就介绍到这儿,希望我们推荐的文章对编程师们有所帮助!


