本文主要是介绍Matlab示例-Examine 16-QAM Using MATLAB学习笔记,希望对大家解决编程问题提供一定的参考价值,需要的开发者们随着小编来一起学习吧!
工作之余学习16-QAM
写在前面
网上看到许多示例,但一般都比较难以跑通。所以,还是老方法,先将matlab自带的例子研究下。
Examine 16-QAM Using MATLAB
Examine 16-QAM Using MATLAB
或者,在matlab中,键入:
openExample(‘comm/Examine16QAMUsingMATLABExample’)
会打开:
~\Document\MATLAB\Examples\R2022b\comm\Examine16QAMUsingMATLABExample
不得不感叹,WathWorks公司,依然在飞速的进步,其文档代码一体化能力,已经非常强了。
要注意有梯子之后,这个例子,可以直接在浏览器中运行和单步Trace.

 不由得有些哀叹。软件这东西怎么说呢,越落后,就越落后。因为人家是在加速,我们则永远在零和搞一年就放弃归零的循环中。
我们能想象,如果MathWorks是中国公司,当你和老板说,我们也开发个网页版的调试器后,老板第一件事就问你这有用吗?这耽误我们挣钱吗?好吧,这玩意真的没什么用处,但真的是太cool了。
而且,下面就是有用的地方:
【注意】Matlab的示例,网页中的一般是最新的,而我们安装好的matlab所带的例子,往往,存在一些小的缺陷,并没有得到修正。
所以,当发生怀疑是不是哪里出错的时候,可以将被怀疑的代码段,与网页版的代码section 进行下比较。
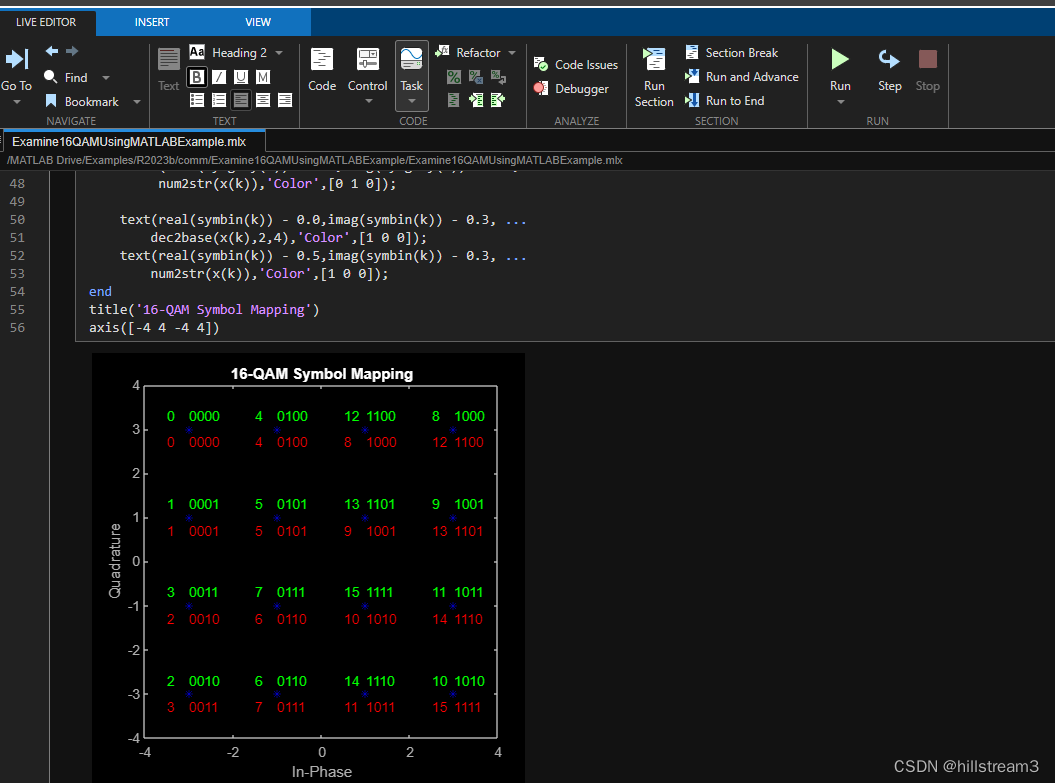
比如当前的这个例子,的最后一段:
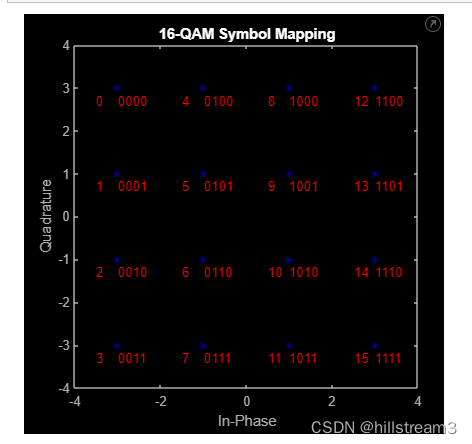
网页版是:
scatterplot(symgray,1,0,'b*');
for k = 1:Mtext(real(symgray(k)) - 0.0,imag(symgray(k)) + 0.3, ...dec2base(x(k),2,4),'Color',[0 1 0]);text(real(symgray(k)) - 0.5,imag(symgray(k)) + 0.3, ...num2str(x(k)),'Color',[0 1 0]);text(real(symbin(k)) - 0.0,imag(symbin(k)) - 0.3, ...dec2base(x(k),2,4),'Color',[1 0 0]);text(real(symbin(k)) - 0.5,imag(symbin(k)) - 0.3, ...num2str(x(k)),'Color',[1 0 0]);
end
title('16-QAM Symbol Mapping')
axis([-4 4 -4 4])
可是matlab中:
scatterplot(symgray,1,0,'b*');
for k = 1:Mtext(real(symgray(k)) - 0.0,imag(symgray(k)) + 0.3, ...dec2base(x(k),2,4));text(real(symgray(k)) - 0.5,imag(symgray(k)) + 0.3, ...num2str(x(k)));text(real(symbin(k)) - 0.0,imag(symbin(k)) - 0.3, ...dec2base(x(k),2,4),'Color',[1 0 0]);text(real(symbin(k)) - 0.5,imag(symbin(k)) - 0.3, ...num2str(x(k)),'Color',[1 0 0]);
end
title('16-QAM Symbol Mapping')
axis([-4 4 -4 4])
要注意,matlab中的代码,for循环中,少了一小段:
dec2base(x(k),2,4),‘Color’,[0 1 0]);
少了的这段Color,对我这样的学习的人,还是造成了一定的困扰。
初学者,在实操时,往往同时面对几个到十几个知识要学习,难以确定自己哪里是可以确认的。
正确的图像是这样的(在Web Cloud版跑出来的):

下面不对的是这样的:
所以,我很久都没有看懂——因为这张图。
看原图,很清楚是想让我们了解自然码与Gray Code的区别。
修改第一部分代码
这个示例的第一段是准备数据。
dataIn = randi([0 1],n,1); % Generate vector of binary data
但这一段,对于我来说,是不太喜欢的。因为作为初学者,要可控。
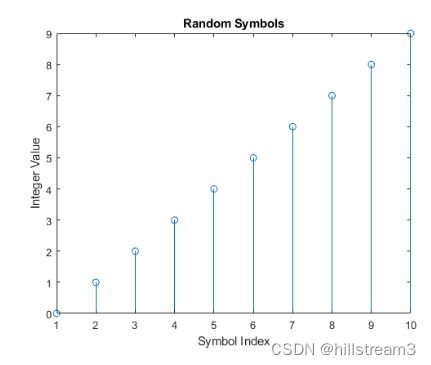
所以,我打算将数据进行变换,变换成为标准的0,1,2,3,…,15的样子。
所以,这是我第一步要做的。
在与ChatGPT进行了一番不对等的沟通之后,大致改好了,事实上,我花了不少时间。。。
clc;
clear all;
close all;M = 16; % Modulation order (alphabet size or number of points in signal constellation)
k = log2(M); % Number of bits per symbol
n = 256; % Number of bits to process
sps = 1; % Number of samples per symbol (oversampling factor)
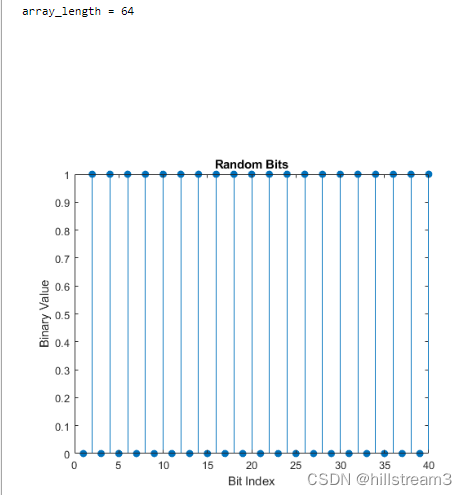
上面的代码是将总binary长度,减为256
array_length=n/4% Create an array named input_data and fill it cyclically with numbers from 0 to 15
decimalArray = mod(0:array_length-1, 16);% Convert decimal array to binary array
binaryArray = dec2bin(decimalArray) - '0';
%swap columns
swappedBinaryArray = binaryArray(:, [4 3 2 1]);% Concatenate each line of binaryArray
%onerow_binaryArray = binaryArray_pose(:);
onerow_binaryArray = swappedBinaryArray(:);% Transpose the binary array to a column vector
%transposedBinaryArray = onerow_binaryArray.';dataIn = onerow_binaryArray;
这段花了不少时间,是因为这里面的矩阵的变换自己不是不熟,是完全不知道如何操作。。。
这一次是学明白了。
这段是为了得到可控的输出
然后我们直接到调制
Modulate Using 16-QAM
Use the qammod function to apply 16-QAM modulation to the dataSymbolsIn column vector for natural-encoded and Gray-encoded binary bit-to-symbol mappings.
dataMod = qammod(dataSymbolsIn,M,'bin'); % Binary coding with phase offset of zero
dataModG = qammod(dataSymbolsIn,M); % Gray coding with phase offset of zero
然后是开始Trace这个函数
在跟踪之前,不得不先学习格雷码。
关于格雷码(Gray Code),最好的文章是wikipedia的内容:https://en.wikipedia.org/wiki/Gray_code
还有一篇也不错:
QAM格雷码映射的规则(Gray Code Mapping in QAM)
自己biying
这句是得到自然码的调制后编码,
dataMod = qammod(dataSymbolsIn,M,‘bin’); % Binary coding with phase offset of zero
然后,下面这句是得到Gray的编码
dataModG = qammod(dataSymbolsIn,M); % Gray coding with phase offset of zero
汇总后见下图:

然后,进入matlab的qammod函数:
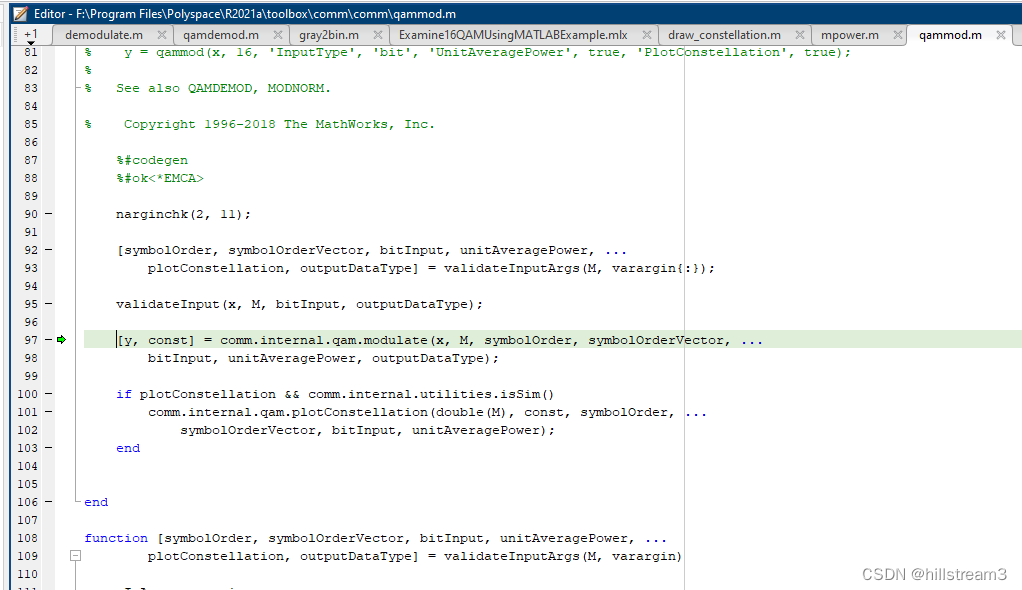 从这里
从这里
    [y, const] = comm.internal.qam.modulate(x, M, symbolOrder, symbolOrderVector, ...bitInput, unitAveragePower, outputDataType);
function y = processIntInput(x, M, symbolOrder, symbolOrderVector, const)msg = processSymbols(x, M, symbolOrder, symbolOrderVector);y = lookupTable(const, msg);
end
function [y, const] = modulate(x, M, symbolOrderStr, ...symbolOrderVector, bitInput, unitAveragePower, outputDataType)y = processIntInput(x, Mnew, symbolOrderStr, symbolOrderVector, newConst);
end
重点是这句:
y = lookupTable(const, msg);
function y = lookupTable(table, x)y = coder.nullcopy(zeros(size(x),'like',table));y(:) = table(x + cast(1,'like',x));
end
重点是这句:
y(:) = table(x + cast(1,'like',x));
-
cast(1,'like',x): This part casts the value1to the same data type as the input variablex. This is necessary to ensure that the indexing operation doesn’t cause any type mismatches. -
x + cast(1,'like',x): This adds 1 to each element of the input vectorx. -
table(x + cast(1,'like',x)): This indexes thetablearray using the modified values ofx + cast(1,'like',x). It effectively looks up values in thetablecorresponding to the modified indices. -
y(:) = table(x + cast(1,'like',x));: This assigns the values obtained from the lookup to the entire vectory. The(:)syntax is used to linearizeyinto a column vector.
Let’s walk through an example:
- Original
xvalues: [0, 1, 2, 3, 4, 5, 6, 7, 8, 9, 10, 11, 12, 13, 14, 15] - Modified indices: [1, 2, 3, 4, 5, 6, 7, 8, 9, 10, 11, 12, 13, 14, 15, 16]
- Values from the
tablecorresponding to the modified indices: [-3 + 1i, -3 - 1i, -3 - 3i, -1 + 3i, -1 + 1i, -1 - 1i, -1 - 3i, 1 + 3i, 1 + 1i, 1 - 1i, 1 - 3i, 3 + 3i, 3 + 1i, 3 - 1i, 3 - 3i]
So, the resulting y would be the values obtained from the table using the modified indices. The purpose seems to be to perform a table lookup operation using the input vector x to generate the output vector y.
解调的部分
注意,条件检查的部分,我省略了,实际我也是详细看了的,写得很精妙!
Demodulate 16-QAM
Use the qamdemod function to demodulate the received data and output integer-valued data symbols.
dataSymbolsOut = qamdemod(receivedSignal,M,'bin');
dataSymbolsOutG = qamdemod(receivedSignalG,M);function x = qamdemod(y, M, varargin)   x = comm.internal.qam.demodulate(y, M, symbolOrderStr, symbolOrderVector, unitAveragePower, ...outputType, noiseVar);
end
function x = demodulate(y, M, symbolOrderStr, symbolOrderVector, ...unitAveragePower, outputType, noiseVar)intX = computeHardInt(y, Mnew);
这里是关键函数
function z = computeHardInt(y, M)if isa(y,'single')z = coder.nullcopy(zeros(size(y), 'single'));elsez = coder.nullcopy(zeros(size(y), 'double'));endif mod(log2(M), 2) % Cross constellation, including M=2const = comm.internal.qam.getSquareConstellation(M);z(:) = genqamdemod(y,const);else % Square constellation, starting with M=4% Precompute for later usesqrtM = sqrt(M);% Inphase/real rail% Move the real part of input signal; scale appropriately and round the% values to get index ideal constellation pointsrIdx = round( ((real(y) + (sqrtM-1)) ./ 2) );% clip values that are outside the valid rangerIdx(rIdx < 0) = 0;rIdx(rIdx > (sqrtM-1)) = sqrtM-1;% Quadrature/imaginary rail% Move the imaginary part of input signal; scale appropriately and round% the values to get index of ideal constellation pointsiIdx = round(((imag(y) + (sqrtM-1)) ./ 2));% clip values that are outside the valid rangeiIdx(iIdx < 0) = 0;iIdx(iIdx > (sqrtM-1)) = sqrtM-1;% compute output from indices of ideal constellation pointsz(:) = sqrtM-iIdx-1 +  sqrtM*rIdx;end
end
computeHardInt中,这两句是重点
% Inphase/real rail% Move the real part of input signal; scale appropriately and round the% values to get index ideal constellation pointsrIdx = round( ((real(y) + (sqrtM-1)) ./ 2) );% Quadrature/imaginary rail% Move the imaginary part of input signal; scale appropriately and round% the values to get index of ideal constellation pointsiIdx = round(((imag(y) + (sqrtM-1)) ./ 2));
格雷码,并没有多大不同,调制是后处理,解调是前处理,将数据重新映射。
以上是所有的内容。
可惜这个例子只有基带的处理,没有信号的调制与解调。
是为遗憾。
希望再找个更全面的例子。
后记
写完才想起来这个例子,很前显有一个向导栏:
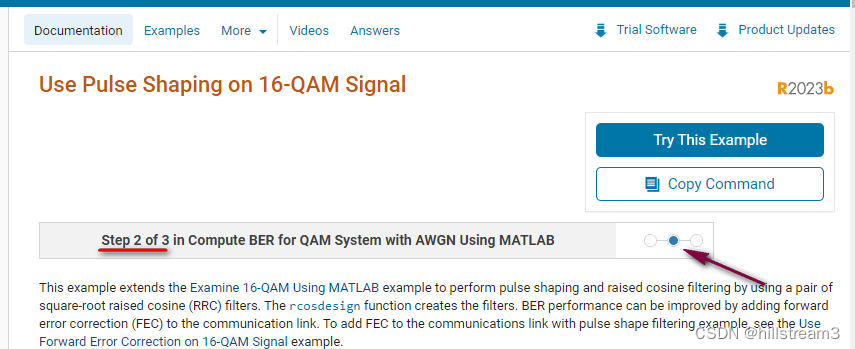
分别为:Use Pulse Shaping on 16-QAM Signal
和 Use Forward Error Correction on 16-QAM Signal(Step 3 of 3 in Compute BER for QAM System with AWGN Using MATLAB )
因为还没有看,所以不做评述。但是看来这个例子,应该是比较全面的。不仅仅是编解码。
这篇关于Matlab示例-Examine 16-QAM Using MATLAB学习笔记的文章就介绍到这儿,希望我们推荐的文章对编程师们有所帮助!


