本文主要是介绍Linux下FFmepg使用,希望对大家解决编程问题提供一定的参考价值,需要的开发者们随着小编来一起学习吧!
1.命令行录一段wav,PCM数据
ffmpeg -f alsa -i hw:0,0 xxx.wav//录制
ffplay out.wav//播放ffmpeg -f alsa -i hw:0,0 -ar 16000 -channels 1 -f s16le 1.pcm
ffplay -ar 16000 -channels 1 -f s16le 1.pcm
-ar freq 设置音频采样率
-ac channels 设置通道 缺省为1
2.将pcm压缩为aac
ffmpeg -f s16le -ar 16000 -ac 1 -i s16_1_16000.pcm output.aac3.将aac转为pcm
ffmpeg -i out.aac -f s16le -ar 16000 -ac 1 -acodec pcm_s16le 16000_1_s16le.pcm4.将aac通过网络传输
5.拉流网络数据
6.录一段原格式视频
7.录一段H264视频
ffmpeg -video_size 1280x720 -f x11grab -i "" -vcodec libx264 -preset ultrafast -f h264 -r 30 test.h264使用RTP发送H264,接收
ffmpeg -re -i d:\videos80P.264 -vcodec copy -f rtp rtp://127.0.0.1:1234
ffplay -protocol_whitelist "file,udp,rtp" -i rtp://127.0.0.1:1234//拉流并播放
注意:ffplay的RTP协议默认是不启用的,需要添加-protocol_whitelist参数把RTP协议加入白名单。但是,执行了上面的命令可能会出错,因为ffplay使用RTP协议接收需要一个SDP文件,该文件定义了输入流的格式信息以及接收端的IP和端口号。
我们可以让FFmpeg在执行推流输出时导出一个SDP,命令行如下:
ffmpeg -re -i d:\videos80P.264 -vcodec copy -f rtp rtp://127.0.0.1:1234>test_rtp_h264.sdp
(SDP文件的信息说明:传输协议:RTP/AVP, 接收端IP:127.0.0.1, 接收端口号:1234 , PayloadType:96 ,视频格式:H264 )
以上面SDP文件为输入让ffplay打开流,命令行是:
ffplay -protocol_whitelist "file,udp,rtp" -i test_rtp_h264.sdp
8.用ffmpeg库录制一段音频数据
语音信号处理-基本概念(二):音频通道数、采样频率、采样位数、采样个数(样本数)、一帧音频的大小、每秒播放的音频字节大小、一帧的播放时长、音频重采样_语音录制采样率和采样率-CSDN博客
在Linux环境下使用ffmpeg将PCM音频数据编码成aac数据_linux ffmpeg pcm转acc-CSDN博客
9.重采样音频
两种重采样方法:
【FFmpeg实战】音频重采样_ffmpeg 音频采样率-CSDN博客
10.编码
11.传输
12 视频的采集编码(代码)
#include <stdio.h>
#include <stdlib.h>
#include <string.h>
#include <unistd.h>
#include <errno.h>
#include <stdio.h>
#include <string.h>
#include <error.h>
#include <iostream>
#define __STDC_CONSTANT_MACROS
extern "C"
{#include "libavutil/avutil.h"#include "libavdevice/avdevice.h"#include "libavformat/avformat.h"#include "libavcodec/avcodec.h"#include "libswresample/swresample.h"
#include <libavutil/time.h>
#include <libswscale/swscale.h>
#include <libavutil/opt.h>
#include <libavutil/imgutils.h>}
#define WIDTH 640
#define HEIGHT 480
#define FPS 30
#define BITRATE 1000000
//g++ video.cpp -I/usr/local/include -L/usr/local/lib -lavutil -lavdevice -lavformat -lavcodec -lavutil -lswresample -lswscale -o video
//yuyv422, 640x480, ffmpeg -h encoder=h264查看编码器支持的格式
int main()
{AVFormatContext *fmt_ctx = NULL;avdevice_register_all();// 根据摄像头能力设置相关参数AVDictionary *options = NULL;av_dict_set(&options, "video_size", "640x480", 0);av_dict_set(&options, "framerate", "30", 0);// 打开视频设备const AVInputFormat *input_fmt = av_find_input_format("video4linux2");if (avformat_open_input(&fmt_ctx, "/dev/video0", input_fmt, &options) != 0) {fprintf(stderr, "Cannot open video device\n");return -1;}// 查找视频流信息if (avformat_find_stream_info(fmt_ctx, NULL) < 0) {fprintf(stderr, "Cannot find stream information\n");return -1;}// 打印视频信息av_dump_format(fmt_ctx, 0, "/dev/video0", 0);// 打开输出文件FILE *output_file = fopen("output.yuyv422", "wb");if (!output_file) {fprintf(stderr, "Error: Cannot open output file\n");return 1;}FILE *output_file2 = fopen("output.h264", "wb");if (!output_file2) {fprintf(stderr, "Error: Cannot open output file\n");return 1;}AVPacket packet;AVFrame* frame;frame = av_frame_alloc();if (!frame) {fprintf(stderr, "Failed to allocate frame\n");return -1;}const AVCodec *codec = avcodec_find_encoder(AV_CODEC_ID_H264);//编码器参数也可以设置,用字典AVDictionary *param = 0;av_dict_set(¶m, "preset", "slow", 0);av_dict_set(¶m, "tune", "zerolatency", 0);if (!codec) {fprintf(stderr, "Codec not found\n");return -1;}AVCodecContext *codecContext = avcodec_alloc_context3(codec);codecContext->width = 640;codecContext->height = 480;//codecContext->pix_fmt = AV_PIX_FMT_YUV422P;codecContext->pix_fmt = AV_PIX_FMT_YUVJ420P;codecContext->time_base = (AVRational){1, 30};//码率:每秒传送的比特(bit)数单位为 bps(Bit Per Second),比特率越高,传送数据速度越快,bps,"b"表示数据量,"ps"表示每秒codecContext->bit_rate = 400000;codecContext->gop_size = 10;codecContext->max_b_frames = 1;//2.9 设置b帧最大值->设置不需要B帧codecContext->max_b_frames = 0;/codecContext->pix_fmt = AV_PIX_FMT_YUV420P; // The only pixel format that H.264 supports 未证实if (avcodec_open2(codecContext, codec, ¶m) < 0) {fprintf(stderr, "Could not open codec\n");return -1;}// 7.为frame分配bufferframe->format = codecContext->pix_fmt;//AV_PIX_FMT_YUYV422frame->width = codecContext->width;frame->height = codecContext->height;int ret = av_frame_get_buffer(frame, 32);//0不需要对齐,32 字节对齐if (ret < 0) {fprintf(stderr, "Could not allocate the video frame data\n");exit(1);}// 计算出每一帧的数据 像素格式 * 宽 * 高// 1382400int frame_bytes = av_image_get_buffer_size((AVPixelFormat)frame->format, frame->width,frame->height, 1);//循环拷贝数据至frameprintf("frame_bytes %d\n", frame_bytes);//将 YUYV422 数据填充到帧的 data[0] 中//memcpy(frame->data[0], yuyv422Data, frame->width * frame->height * 2);//frame_bytesstruct SwsContext *sws_ctx = sws_getContext(WIDTH, HEIGHT, AV_PIX_FMT_YUYV422, WIDTH, HEIGHT, AV_PIX_FMT_YUV420P, 0, NULL, NULL, NULL);AVFormatContext *fmt_ctx_in = avformat_alloc_context();while (1){if (av_read_frame(fmt_ctx, &packet) < 0) {break;}fwrite(packet.data, 1, packet.size, output_file);AVFrame *temp_frame = av_frame_alloc();av_image_fill_arrays(temp_frame->data, temp_frame->linesize, packet.data, AV_PIX_FMT_YUYV422, WIDTH, HEIGHT, 1);sws_scale(sws_ctx, (const uint8_t *const *)temp_frame->data, temp_frame->linesize, 0, HEIGHT, frame->data, frame->linesize);av_frame_free(&temp_frame);avcodec_send_frame(codecContext, frame);avcodec_receive_packet(codecContext, &packet);//av_write_frame(fmt_ctx, &packet); //写文件的packet//printf("Init success\n");// 写入输出文件fwrite(packet.data, 1, packet.size, output_file2);av_packet_unref(&packet);}return 0;
}
相关结构体:
AVFormatContext:FFMPEG结构体 - 简书 (jianshu.com) 主要和流的一些信息相关,混合流和文件流
AVDictionary:设置流的参数信息,主要是采集时候
问题:视频常见问题(四):视频花屏和绿屏 - 知乎 (zhihu.com)
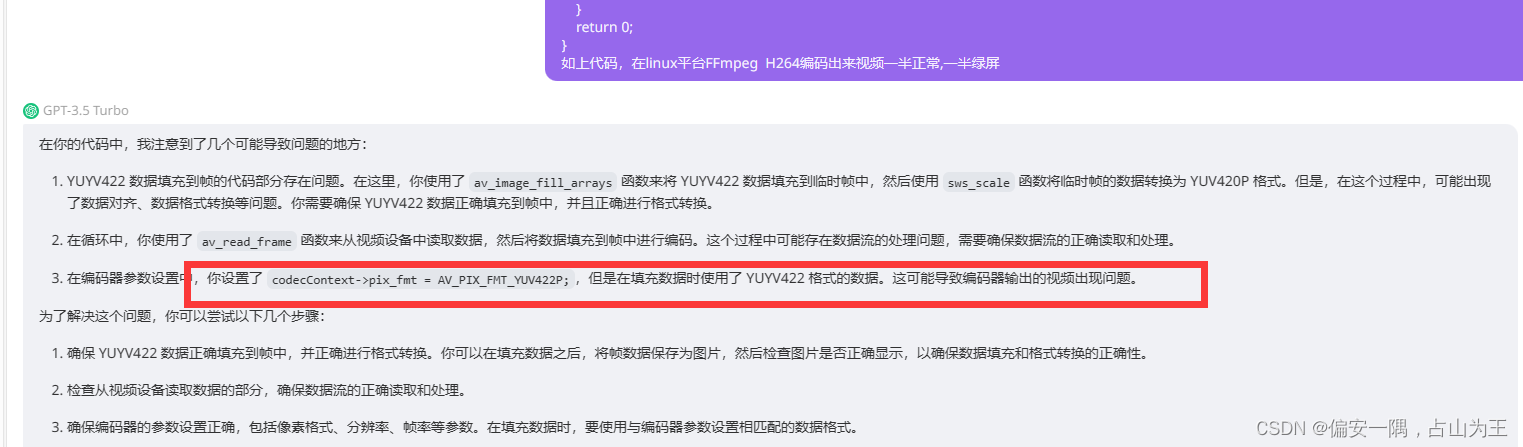
视频编码出来一半正常,一半绿屏
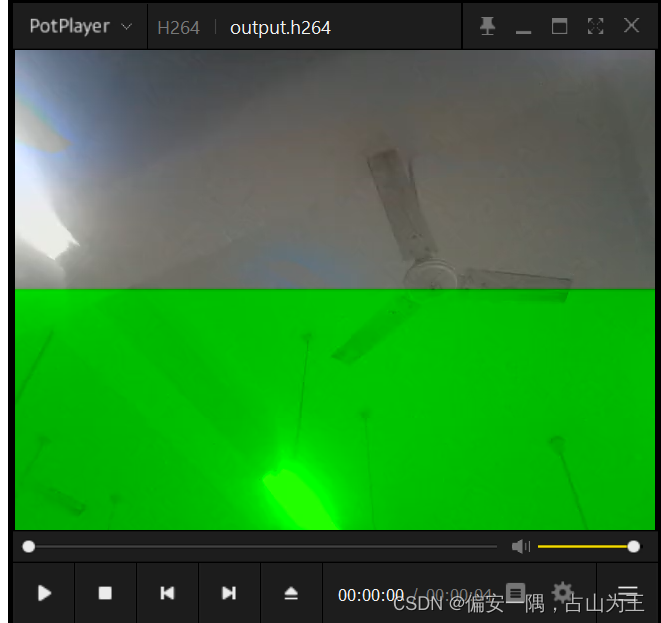
我的问题GPT给我解决了,产生问题到解决问题用来不到三分钟,GPT真香
这篇关于Linux下FFmepg使用的文章就介绍到这儿,希望我们推荐的文章对编程师们有所帮助!


