本文主要是介绍angular状态管理方案(ngrx),希望对大家解决编程问题提供一定的参考价值,需要的开发者们随着小编来一起学习吧!
完全基于redux的ngrx方案,我们看看在angular中如何实现。通过一个简单的计数器例子梳理下整个流程
一 安装 :npm i ngrx/store
这里特别要注意一点:安装 @ngrx/store的时候会出现和angular版本不一致的问题
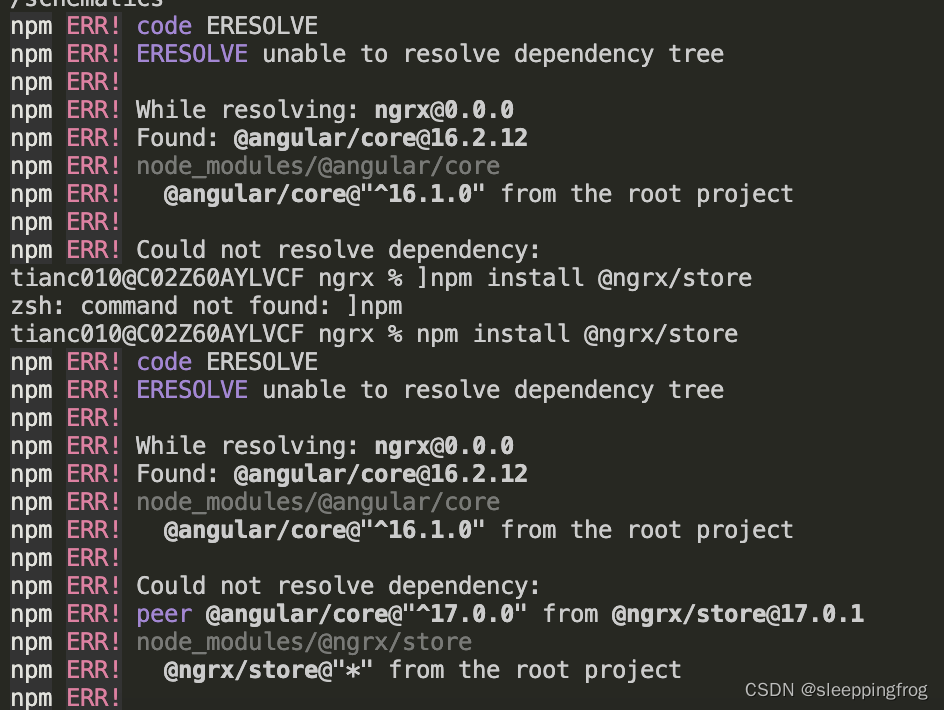
所以检查一下@angular/core的版本和ngrx/store的版本是否一致,如果不一致升级angular,
ng update @angular/core@17.0.0 --force。最好是删除node_modules目录重新下载。保证安装正常,版本一致
二 创建store目录,并且创建如下几个文件:
(1)actions.ts
(2) reducers.ts
(3) state.ts
//state.tsexport interface AppState{count:number;
}   //actions.ts
export const INSCRES="INSCRES"
export const DESCRES="DESCRES"
export const RESET="RESET"//reduces:import {Action} from "@ngrx/store"
import {INSCRES,DESCRES,RESET} from "./actions"const initalState=0;
export function counterReducer(state:number=initalState,action:Action){switch(action.type){case INSCRES:return state+1;case DESCRES:return state-1case RESET:return 0default:return state}}
(4) 页面中注入:注意angular中使用store和react稍有不同。没有createStore(reducer)然后根组件注入的过程,而是在具体页面里直接注入到constructor中,我们以news页面为例,
import { Component, ElementRef, ViewChild } from '@angular/core';
import {INSCRES,DESCRES,RESET} from "../../store/reducer"
import {Store,select} from "@ngrx/store"
import { Observable } from 'rxjs';interface AppState{count:number
}@Component({selector: 'app-news',templateUrl: './news.component.html',styleUrls: ['./news.component.less']
})export class NewsComponent {count:Observable<number>constructor(public http:HttpClient,private store:Store<AppState>){let stream=store.pipe(select('count'))stream.subscribe(res=>{console.log("res:",res)})this.count=store.pipe(select('count'))}increasement(){this.store.dispatch({type:INSCRES})}decreasement(){this.store.dispatch({type:DESCRES})}reset(){this.store.dispatch({type:RESET})}}
然后在具体的页面中使用count:
<button (click)="increasement()">增加increase</button><div>counter :{{count | async }}</div><button (click)="decreasement()">减少increase</button><button (click)="reset()">reset counter</button>整体来看和react中使用redux并没有太大的差异。唯一的差异就是在react中需要定义store(let store=createStore(state,)),angular中直接通过在页面中注入的方式完成。
二:actions也可以是函数,我们可以改造下actions
//actions :注意这里需要用Injectable
import {Injectable} from "@angular/core"export const INSCRES="INSCRES"
export const DESCRES="DESCRES"
export const RESET="RESET"@Injectable()
export  class CountAction{add(){return {type:INSCRES}}}
此时我们需要向app.moudule.ts中作相应修改:
import { NgModule } from '@angular/core';
import { BrowserModule } from '@angular/platform-browser';import {CountAction} from "./store/actions"import { AppComponent } from './app.component';
import { NZ_I18N } from 'ng-zorro-antd/i18n';
import { zh_CN } from 'ng-zorro-antd/i18n';import { HomeComponent } from './pages/home/home.component';
import { AppRouteModule } from './app-route.module';import { StoreModule } from '@ngrx/store';registerLocaleData(zh);@NgModule({declarations: [AppComponent,LayoutComponent,HomeComponent,],providers: [{provide:CountAction},{ provide: [NZ_I18N, UrlSerializer], useValue: zh_CN },{ provide: HTTP_INTERCEPTORS, useClass: AuthInterceptorInterceptor, multi: true },],bootstrap: [AppComponent],imports: [BrowserModule,FormsModule,AppRouteModule,StoreModule.forRoot({count:counterReducer}, {}),]
})
export class AppModule { }
注意这里我们给providers添加了counterAction,以便在所有页面都可以注入countActions
回到页面本身:
import { Component, OnInit } from '@angular/core';
import { Observable, Observer } from 'rxjs';
import{CountAction} from "../../store/actions"
import {Store,select} from "@ngrx/store"interface AppState{count:number
}@Component({selector: 'app-home',templateUrl: './home.component.html',styleUrls: ['./home.component.less']
})
export class HomeComponent {count:Observable<number>constructor(private store:Store<AppState>,private action:CountAction){this.count=this.store.pipe(select('count'))increasement(){this.store.dispatch(this.action.add())}}
这里逻辑的实现和之前一致,唯一的区别就是我们countAction直接注到了counstor里,然后在具体的执行函数中直接actiions的方法。
这篇关于angular状态管理方案(ngrx)的文章就介绍到这儿,希望我们推荐的文章对编程师们有所帮助!


