本文主要是介绍【AntV-G6】决策树简单实例,希望对大家解决编程问题提供一定的参考价值,需要的开发者们随着小编来一起学习吧!
使用步骤
- 复制treeMind.vue文件到前端页面目录,
- 在需要展示的页面引入treeMind
- npm install错误解决方法
树组件 treeMind.vue
<template><div id="container"></div>
</template><script>
import insertCss from "insert-css";
import G6 from "@antv/g6";export default {name: "treeMind",props: {// 数据data: {type: Object,default() {return {};}},//高height: {type: Number,default() {return 500;}}},data() {return {}},mounted() {},methods: {init(mockData) {insertCss(`.g6-component-tooltip {background-color: rgba(0,0,0, 0.65);padding: 10px;box-shadow: rgb(174, 174, 174) 0px 0px 10px;width: fit-content;color: #fff;border-radius = 4px;}`);const colors = {BLUE: '#5B8FF9',RED: '#F46649',YELLOW: '#EEBC20',GREEN: '#5BD8A6',DARKGREY: '#A7A7A7',BROWN: '#A98847',};//  组件propsconst props = {data: mockData ? mockData : this.data,config: {padding: [20, 50],defaultLevel: 3,defaultZoom: 0.8,modes: {default: ['zoom-canvas', 'drag-canvas']},},};const container = document.getElementById('container');const width = container.scrollWidth;const height = container.scrollHeight || 600;// 默认配置const defaultConfig = {width,height,modes: {default: ['zoom-canvas', 'drag-canvas'],},fitView: true,animate: true,defaultNode: {type: 'flow-rect',},defaultEdge: {type: 'cubic-horizontal',style: {stroke: '#CED4D9',},},layout: {type: 'indented',direction: 'LR',dropCap: false,indent: 300,getHeight: () => {return 60;},},};// 自定义节点、边const registerFn = () => {/*** 自定义节点*/G6.registerNode('flow-rect',{shapeType: 'flow-rect',draw(cfg, group) {const {name = '',qty,collapsed,unit,color,rate} = cfg;const grey = '#CED4D9';const rectConfig = {width: 140,height: 50,lineWidth: 1,fontSize: 12,fill: '#fff',radius: 4,stroke: grey,opacity: 1,};const nodeOrigin = {x: -rectConfig.width / 2,y: -rectConfig.height / 2,};const textConfig = {//center / end / left / right / starttextAlign: 'center',//top / middle / bottom / alphabetic / hangingtextBaseline: 'bottom',};const rect = group.addShape('rect', {attrs: {x: nodeOrigin.x,y: nodeOrigin.y,...rectConfig,},});const rectBBox = rect.getBBox();// namegroup.addShape('text', {attrs: {...textConfig,x: 0 ,y: 20 + nodeOrigin.y,text: name.length > 28 ? name.substr(0, 28) + '...' : name,fontSize: 12,opacity: 0.85,fill: '#000',cursor: 'pointer',},name: 'name-shape',});// qtyconst qtyLabel = group.addShape('text', {attrs: {...textConfig,//调整数量的宽x: -4,y: rectBBox.maxY - 12,text: qty,fontSize: 12,fill: '#000',opacity: 0.85,},});//  unitgroup.addShape('text', {attrs: {...textConfig,//调整单位的宽x: qtyLabel.getBBox().maxX +20,y: rectBBox.maxY - 12,text: unit,fontSize: 12,fill: '#000',opacity: 0.75,},});// bottom line backgroundconst bottomBackRect = group.addShape('rect', {attrs: {x: nodeOrigin.x,y: rectBBox.maxY - 4,width: rectConfig.width,height: 4,radius: [0, 0, rectConfig.radius, rectConfig.radius],fill: '#E0DFE3',},});// bottom percentconst bottomRect = group.addShape('rect', {attrs: {x: nodeOrigin.x,y: rectBBox.maxY - 4,width: rate * rectBBox.width,height: 4,radius: [0, 0, rectConfig.radius, rectConfig.radius],fill: colors[color],},});// collapse rectif (cfg.children && cfg.children.length) {group.addShape('rect', {attrs: {x: rectConfig.width / 2 - 8,y: -8,width: 16,height: 16,stroke: 'rgba(0, 0, 0, 0.25)',cursor: 'pointer',fill: '#fff',},name: 'collapse-back',modelId: cfg.id,});// collpase textgroup.addShape('text', {attrs: {x: rectConfig.width / 2,y: 0,textAlign: 'center',textBaseline: 'middle',text: collapsed ? '+' : '-',fontSize: 16,cursor: 'pointer',fill: 'rgba(0, 0, 0, 0.25)',},name: 'collapse-text',modelId: cfg.id,});}this.drawLinkPoints(cfg, group);return rect;},update(cfg, item) {const {level, color, name} = cfg;const group = item.getContainer();let mask = group.find(ele => ele.get('name') === 'mask-shape');let maskLabel = group.find(ele => ele.get('name') === 'mask-qty-shape');if (level === 0) {group.get('children').forEach(child => {if (child.get('name')?.includes('collapse')) return;child.hide();})if (!mask) {mask = group.addShape('rect', {attrs: {x: -101,y: -30,width: 202,height: 60,opacity: 0,fill: colors[color]},name: 'mask-shape',});maskLabel = group.addShape('text', {attrs: {fill: '#fff',fontSize: 20,x: 0,y: 10,text: name.length > 28 ? name.substr(0, 16) + '...' : name,textAlign: 'center',opacity: 0,},name: 'mask-qty-shape',});const collapseRect = group.find(ele => ele.get('name') === 'collapse-back');const collapseText = group.find(ele => ele.get('name') === 'collapse-text');collapseRect?.toFront();collapseText?.toFront();} else {mask.show();maskLabel.show();}mask.animate({opacity: 1}, 200);maskLabel.animate({opacity: 1}, 200);return mask;} else {group.get('children').forEach(child => {if (child.get('name')?.includes('collapse')) return;child.show();})mask?.animate({opacity: 0}, {duration: 200,callback: () => mask.hide()});maskLabel?.animate({opacity: 0}, {duration: 200,callback: () => maskLabel.hide()});}this.updateLinkPoints(cfg, group);},setState(name, value, item) {if (name === 'collapse') {const group = item.getContainer();const collapseText = group.find((e) => e.get('name') === 'collapse-text');if (collapseText) {if (!value) {collapseText.attr({text: '-',});} else {collapseText.attr({text: '+',});}}}},getAnchorPoints() {return [[0, 0.5],[1, 0.5],];},},'rect',);G6.registerEdge('flow-cubic',{getControlPoints(cfg) {let controlPoints = cfg.controlPoints; // 指定controlPointsif (!controlPoints || !controlPoints.length) {const {startPoint, endPoint, sourceNode, targetNode} = cfg;const {x: startX, y: startY, coefficientX, coefficientY} = sourceNode? sourceNode.getModel(): startPoint;const {x: endX, y: endY} = targetNode ? targetNode.getModel() : endPoint;let curveStart = (endX - startX) * coefficientX;let curveEnd = (endY - startY) * coefficientY;curveStart = curveStart > 40 ? 40 : curveStart;curveEnd = curveEnd < -30 ? curveEnd : -30;controlPoints = [{x: startPoint.x + curveStart, y: startPoint.y},{x: endPoint.x + curveEnd, y: endPoint.y},];}return controlPoints;},getPath(points) {const path = [];path.push(['M', points[0].x, points[0].y]);path.push(['C',points[1].x,points[1].y,points[2].x,points[2].y,points[3].x,points[3].y,]);return path;},},'single-line',);};registerFn();const {data} = props;let graph = null;const initGraph = (data) => {if (!data) {return;}const {onInit, config} = props;const tooltip = new G6.Tooltip({// offsetX and offsetY include the padding of the parent containeroffsetX: 20,offsetY: 30,// the types of items that allow the tooltip show up// 允许出现 tooltip 的 item 类型itemTypes: ['node'],// custom the tooltip's content// 自定义 tooltip 内容getContent: (e) => {const outDiv = document.createElement('div');//outDiv.style.padding = '0px 0px 20px 0px';const nodeName = e.item.getModel().name;let formatedNodeName = '';for (let i = 0; i < nodeName.length; i++) {formatedNodeName = `${formatedNodeName}${nodeName[i]}`;if (i !== 0 && i % 20 === 0) formatedNodeName = `${formatedNodeName}<br/>`;}outDiv.innerHTML = `${formatedNodeName}`;return outDiv;},shouldBegin: (e) => {if (e.target.get('name') === 'name-shape' || e.target.get('name') === 'mask-qty-shape') return true;return false;},});graph = new G6.TreeGraph({container: 'container',...defaultConfig,...config,plugins: [tooltip],});if (typeof onInit === 'function') {onInit(graph);}graph.data(data);graph.render();const handleCollapse = (e) => {const target = e.target;const id = target.get('modelId');const item = graph.findById(id);const nodeModel = item.getModel();nodeModel.collapsed = !nodeModel.collapsed;graph.layout();graph.setItemState(item, 'collapse', nodeModel.collapsed);};graph.on('collapse-text:click', (e) => {handleCollapse(e);});graph.on('collapse-back:click', (e) => {handleCollapse(e);});// 监听画布缩放,缩小到一定程度,节点显示缩略样式let currentLevel = 1;const briefZoomThreshold = Math.max(graph.getZoom(), 0.5);graph.on('viewportchange', e => {if (e.action !== 'zoom') return;const currentZoom = graph.getZoom();let toLevel = currentLevel;if (currentZoom < briefZoomThreshold) {toLevel = 0;} else {toLevel = 1;}if (toLevel !== currentLevel) {currentLevel = toLevel;graph.getNodes().forEach(node => {graph.updateItem(node, {level: toLevel})})}});};initGraph(data);if (typeof window !== 'undefined')window.onresize = () => {if (!graph || graph.get('destroyed')) return;if (!container || !container.scrollWidth || !container.scrollHeight) return;graph.changeSize(container.scrollWidth, container.scrollHeight);};},}
}
</script><style scoped>
#container {width: 100%;height: 100%;
}
</style>
引入treeMind.vue (复制到页面)
<template><treeMind ref="treeMind"></treeMind>
</template><script>
export default {name: "tree",components: {TreeMind,},data() {return {//树的数据格式(可自定义字段,需更改treeMind.vue中的参数)treeData: {}};},methods: {// 获取后端传的树格式数据,如 treeDataqueryTreeData(data).then((res) => {if (res.status == 0) {// 初始化树组件,并传入树格式的数据res.data[0]this.$nextTick(() => {this.$refs.treeMind.init(res.data[0]);});} else {this.$message.error(res.msg);}});}
}
</script>
树的数据格式如下(可自定义字段)
treeData: {id: 'g1',name: 'Name1',qty: '538.90',unit: 'Yuan',rate: 1.0,color: 'BULE',children: [{id: 'g12',name: 'Deal with LONG qty',qty: '338.00',unit: 'Yuan',rate: 1,color: 'RED',children: [{id: 'g121',name: 'Name3',collapsed: true,qty: '138.00',rate: 1,color: 'BULE',unit: 'Yuan',children: [],},{id: 'g122',name: 'Name5',collapsed: true,qty: '100.00',rate: 1,color: 'GREEN',unit: 'Yuan',children: [],},],},{id: 'g13',name: 'Name9',qty: '100.90',rate: 1,color: 'BULE',unit: 'Yuan',children: [{id: 'g131',name: 'Name10',qty: '33.90',rate: 1,color: 'RED',unit: 'Yuan',children: [],},{id: 'g132',name: 'Name11',qty: '67.00',rate: 1,color: 'GREEN',unit: 'Yuan',children: [],},],},{id: 'g14',name: 'Name12',qty: '100.00',rate: 1,color: 'GREEN',unit: 'Yuan',children: [],},],}
npm install报错
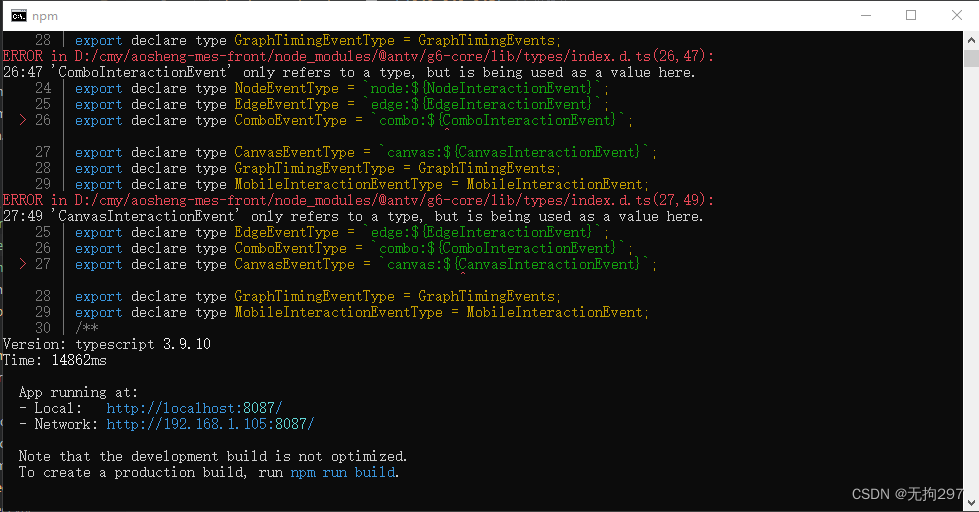
typescript版本问题,图片上是3.9.10,在package.json文件里更改为
"typescript": "^4.2.4",再重新npm install即可
这篇关于【AntV-G6】决策树简单实例的文章就介绍到这儿,希望我们推荐的文章对编程师们有所帮助!


