本文主要是介绍Vue 实现滚动楼层导航定位(可实现监听页面滚动和监听某元素滚动),希望对大家解决编程问题提供一定的参考价值,需要的开发者们随着小编来一起学习吧!
实现思路:
在vue中使用v-for动态渲染楼层和楼层导航,然后使用原生JavaScript实现楼层导航动态更新与楼层滚动定位
1、页面初始化时定位首个楼层
2、页面滚动楼层自动定位到相应的楼层导航并高亮显示
3、鼠标点击楼层导航时,当前楼层导航高亮显示,并且页面自动滚动到相应的楼层
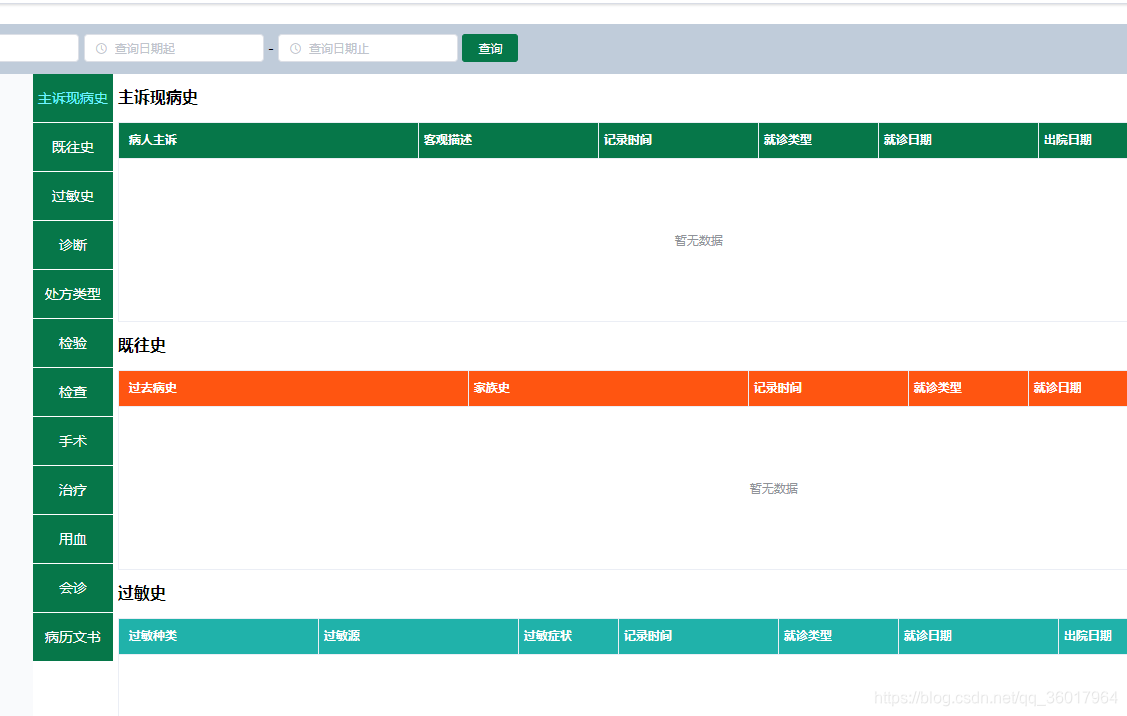
效果
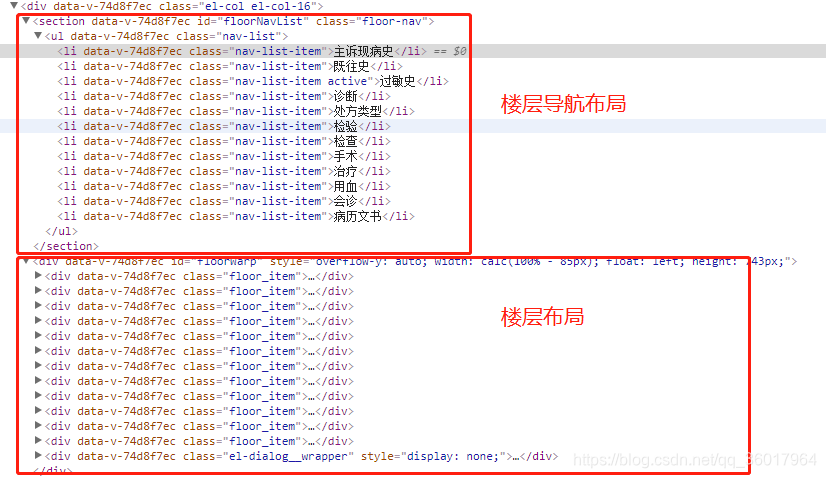
页面布局 和 style
.floor-nav {// position: fixed;// top: 180px;// left: 350px;// z-index: 10;float: left}.nav-list {width: 80px;padding: 0;display: inline-block;text-align: center;background-color: #f8f8f8;margin-top: 0;margin-right: 5px}.nav-list-item {display: inline-block;width: 100%;height: 100%;line-height: 48px;vertical-align: middle;align-self: center;border-bottom: 1px solid #fff;cursor: pointer;background: #067749 !important;color: #FFF;font-size: 14px;}.nav-list-item.active,.nav-list-item:hover {color: rgb(112, 243, 255);}.floor-item {width: 100%;margin: 60px auto;min-height: 300px;text-align: center;color: #FFF;background-color: #404040;}
数据 放在data中
element: {nav_item: null,floor_item: null},timer: null,floorNavList: [{id: 1,name: '主诉现病史'}, {id: 2,name: '既往史'}, {id: 3,name: '过敏史'}, {id: 4,name: '诊断'}, {id: 5,name: '处方类型'}, {id: 6,name: '检验'}, {id: 7,name: '检查'}, {id: 8,name: '手术'}, {id: 9,name: '治疗'}, {id: 10,name: '用血'}, {id: 11,name: '会诊'}, {id: 12,name: '病历文书'}],滚动事件监听
(1)监听页面滚动
mounted () {
this.element = {
nav_item: document.getElementsByClassName('nav-list-item'),
floor_item: document.getElementsByClassName('floor-item')
}
this.element.nav_item[0].classList.add('active')
window.addEventListener('scroll', this.floorSrcollEventListener)
},
beforeDestroy () {
window.removeEventListener('scroll', this.floorSrcollEventListener)
},
(2)监听元素滚动
tips:需要监听的这个元素需要拥有固定的高度
<div style="overflow-y:auto;width: calc(100% - 85px);float: left;" :style="{'height': height + 'px'}" id="floorWarp" @scroll="floorSrcollEventListener"> mounted () {
this.element = {
nav_item: document.getElementsByClassName('nav-list-item'),
floor_item: document.getElementsByClassName('floor-item')
}
this.element.nav_item[0].classList.add('active')
},
beforeDestroy () {
window.removeEventListener('scroll', this.floorSrcollEventListener)
},
tips:如果页面进行了keep-alive beforeDestroy 就要换成 deactivated
原生js部分
export default {methods: {/*** 监听窗口滚动楼层导航动态定位*/floorSrcollEventListener() {const { nav_item, floor_item } = this.elementconst window_scrollTop = this.$el.querySelector('#floorWarp').scrollTopfor (let i = 0, len = floor_item.length; i < len; i++) {const floor_offsetTop = floor_item[i].offsetTop - floor_item[0].offsetTopif (window_scrollTop >= floor_offsetTop) {for (let n = 0, len = nav_item.length; n < len; n++) {const current_classList = nav_item[n].classListi === n? current_classList.add('active'): current_classList.remove('active')}}}},/*** 设置楼层导航事件驱动方法* @param {Number} index  楼层下标*/setFloorNavMountClick(index) {const { floor_item } = this.elementconst floor_offsetTop = floor_item[index].offsetTopconst window_scrollTop = this.$el.querySelector('#floorWarp').scrollTopconst timer = {step: 60,times: 16,FLOOR_OFFSETTOP: floor_offsetTop}if (window_scrollTop > floor_offsetTop) {this.setFloorScrollArrowUp(timer)} else if (window_scrollTop === floor_offsetTop) {return false} else {this.setFloorScrollArrowDown(timer)}},/*** 设置楼层向上滚动* @param {Object} timer 定时器配置*/setFloorScrollArrowUp(timer) {clearInterval(this.timer)this.timer = setInterval(() => {const window_scrollTop = this.$el.querySelector('#floorWarp').scrollTopif (window_scrollTop <= timer.FLOOR_OFFSETTOP) {this.$el.querySelector('#floorWarp').scrollTop = timer.FLOOR_OFFSETTOPclearInterval(this.timer)} else {this.$el.querySelector('#floorWarp').scrollTop = window_scrollTop - timer.step}}, timer.times)},/*** 设置楼层向下滚动* @param {Object} timer 定时器配置*/setFloorScrollArrowDown(timer) {clearInterval(this.timer)this.timer = setInterval(() => {const window_scrollTop = this.$el.querySelector('#floorWarp').scrollTopif (window_scrollTop >= timer.FLOOR_OFFSETTOP) {this.$el.querySelector('#floorWarp').scrollTop = timer.FLOOR_OFFSETTOPclearInterval(this.timer)} else {if (window_scrollTop === 2095) {clearInterval(this.timer)return false}this.$el.querySelector('#floorWarp').scrollTop = window_scrollTop + timer.step}}, timer.times)},}
}
这篇关于Vue 实现滚动楼层导航定位(可实现监听页面滚动和监听某元素滚动)的文章就介绍到这儿,希望我们推荐的文章对编程师们有所帮助!


