本文主要是介绍stm32mp157和imx6ull在设备树节点上设置ap3216c的主要区别,希望对大家解决编程问题提供一定的参考价值,需要的开发者们随着小编来一起学习吧!
stm32mp157和imx6ull在设备树节点上设置ap3216c的主要区别是,它们使用的不同的硬件架构和不同的设备树格式。以下是两者之间的差异:
硬件架构:stm32mp157是基于ARM Cortex-M4内核的微控制器,而imx6ull则是基于ARM Cortex-A7内核的嵌入式处理器。
设备树格式:stm32mp157使用的设备树格式是Device Tree Compiler(DTC)格式,而imx6ull使用的是Flattened Device Tree(FDT)格式。
基于这些差异,设置ap3216c的设备树节点在两者之间有一些细微的差异。以下是一个示例:
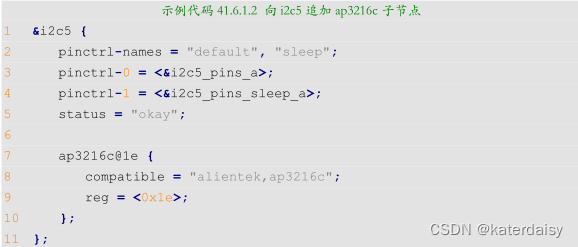
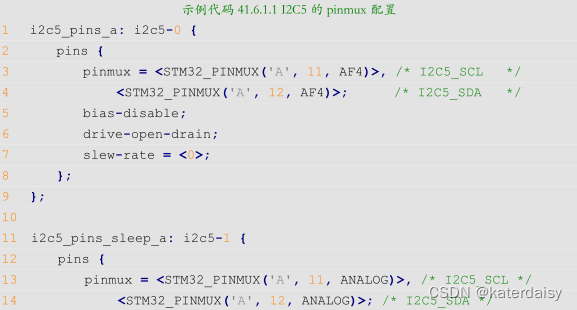
stm32mp157设备树节点示例:

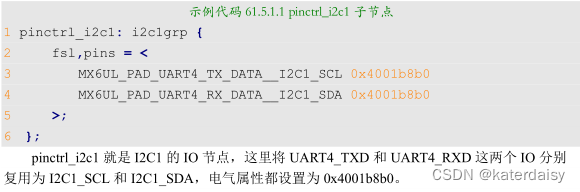
imx6ull设备树节点示例:
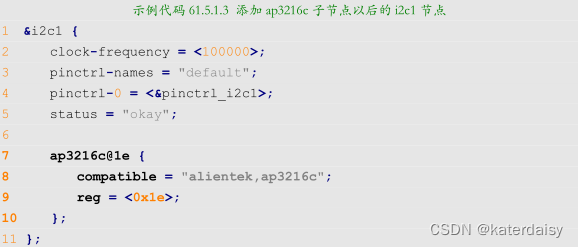
注意,在这两个示例中,ap3216c节点的名称和compatible属性都相同。
总体上来说,stm32mp157和imx6ull之间的差异在于它们所用的硬件架构和设备树格式,但在设置ap3216c设备树节点时,它们的区别不大。
备注:stm32mp157和imx6ull的ap3216c驱动是完全一样的,驱动代码如下:
ap3216creg.h:
#ifndef AP3216C_H
#define AP3216C_H
#define AP3216C_ADDR 0X1E /* AP3216C器件地址 */
/* AP3316C寄存器 /
#define AP3216C_SYSTEMCONG 0x00 / 配置寄存器 /
#define AP3216C_INTSTATUS 0X01 / 中断状态寄存器 /
#define AP3216C_INTCLEAR 0X02 / 中断清除寄存器 /
#define AP3216C_IRDATALOW 0x0A / IR数据低字节 /
#define AP3216C_IRDATAHIGH 0x0B / IR数据高字节 /
#define AP3216C_ALSDATALOW 0x0C / ALS数据低字节 /
#define AP3216C_ALSDATAHIGH 0X0D / ALS数据高字节 /
#define AP3216C_PSDATALOW 0X0E / PS数据低字节 /
#define AP3216C_PSDATAHIGH 0X0F / PS数据高字节 */
#endif
ap3216c.c:
#include <linux/types.h>
#include <linux/kernel.h>
#include <linux/delay.h>
#include <linux/ide.h>
#include <linux/init.h>
#include <linux/module.h>
#include <linux/errno.h>
#include <linux/gpio.h>
#include <linux/cdev.h>
#include <linux/device.h>
#include <linux/of_gpio.h>
#include <linux/semaphore.h>
#include <linux/timer.h>
#include <linux/i2c.h>
#include <asm/mach/map.h>
#include <asm/uaccess.h>
#include <asm/io.h>
#include “ap3216creg.h”
#define AP3216C_CNT 1
#define AP3216C_NAME “ap3216c”
struct ap3216c_dev {
struct i2c_client client; / i2c 设备 /
dev_t devid; / 设备号 /
struct cdev cdev; / cdev */
struct class class; / 类 */
struct device device; / 设备 */
struct device_node nd; / 设备节点 /
unsigned short ir, als, ps; / 三个光传感器数据 */
};
/*
-
@description : 从ap3216c读取多个寄存器数据
-
@param - dev: ap3216c设备
-
@param - reg: 要读取的寄存器首地址
-
@param - val: 读取到的数据
-
@param - len: 要读取的数据长度
-
@return : 操作结果
*/
static int ap3216c_read_regs(struct ap3216c_dev *dev, u8 reg, void *val, int len)
{
int ret;
struct i2c_msg msg[2];
struct i2c_client *client = (struct i2c_client *)dev->client;/* msg[0]为发送要读取的首地址 /
msg[0].addr = client->addr; / ap3216c地址 /
msg[0].flags = 0; / 标记为发送数据 /
msg[0].buf = ® / 读取的首地址 /
msg[0].len = 1; / reg长度*//* msg[1]读取数据 /
msg[1].addr = client->addr; / ap3216c地址 /
msg[1].flags = I2C_M_RD; / 标记为读取数据*/
msg[1].buf = val; /* 读取数据缓冲区 /
msg[1].len = len; / 要读取的数据长度*/ret = i2c_transfer(client->adapter, msg, 2);
if(ret == 2) {
ret = 0;
} else {
printk(“i2c rd failed=%d reg=%06x len=%d\n”,ret, reg, len);
ret = -EREMOTEIO;
}
return ret;
}
/*
-
@description : 向ap3216c多个寄存器写入数据
-
@param - dev: ap3216c设备
-
@param - reg: 要写入的寄存器首地址
-
@param - val: 要写入的数据缓冲区
-
@param - len: 要写入的数据长度
-
@return : 操作结果
*/
static s32 ap3216c_write_regs(struct ap3216c_dev *dev, u8 reg, u8 *buf, u8 len)
{
u8 b[256];
struct i2c_msg msg;
struct i2c_client *client = (struct i2c_client *)dev->client;b[0] = reg; /* 寄存器首地址 /
memcpy(&b[1],buf,len); / 将要写入的数据拷贝到数组b里面 */msg.addr = client->addr; /* ap3216c地址 /
msg.flags = 0; / 标记为写数据 */msg.buf = b; /* 要写入的数据缓冲区 /
msg.len = len + 1; / 要写入的数据长度 */return i2c_transfer(client->adapter, &msg, 1);
}
/*
-
@description : 读取ap3216c指定寄存器值,读取一个寄存器
-
@param - dev: ap3216c设备
-
@param - reg: 要读取的寄存器
-
@return : 读取到的寄存器值
*/
static unsigned char ap3216c_read_reg(struct ap3216c_dev *dev, u8 reg)
{
u8 data = 0;ap3216c_read_regs(dev, reg, &data, 1);
return data;
}
/*
- @description : 向ap3216c指定寄存器写入指定的值,写一个寄存器
- @param - dev: ap3216c设备
- @param - reg: 要写的寄存器
- @param - data: 要写入的值
- @return : 无
*/
static void ap3216c_write_reg(struct ap3216c_dev *dev, u8 reg, u8 data)
{
u8 buf = 0;
buf = data;
ap3216c_write_regs(dev, reg, &buf, 1);
}
/*
-
@description : 读取AP3216C的数据,读取原始数据,包括ALS,PS和IR, 注意!
-
: 如果同时打开ALS,IR+PS的话两次数据读取的时间间隔要大于112.5ms -
@param - ir : ir数据
-
@param - ps : ps数据
-
@param - ps : als数据
-
@return : 无。
*/
void ap3216c_readdata(struct ap3216c_dev *dev)
{
unsigned char i =0;
unsigned char buf[6];/* 循环读取所有传感器数据 */
for(i = 0; i < 6; i++) {
buf[i] = ap3216c_read_reg(dev, AP3216C_IRDATALOW + i);
}if(buf[0] & 0X80) /* IR_OF位为1,则数据无效 /
dev->ir = 0;
else / 读取IR传感器的数据 */
dev->ir = ((unsigned short)buf[1] << 2) | (buf[0] & 0X03);dev->als = ((unsigned short)buf[3] << 8) | buf[2]; /* 读取ALS传感器的数据 */
if(buf[4] & 0x40) /* IR_OF位为1,则数据无效 /
dev->ps = 0;
else / 读取PS传感器的数据 */
dev->ps = ((unsigned short)(buf[5] & 0X3F) << 4) | (buf[4] & 0X0F);
}
/*
-
@description : 打开设备
-
@param - inode : 传递给驱动的inode
-
@param - filp : 设备文件,file结构体有个叫做private_data的成员变量
-
一般在open的时候将private_data指向设备结构体。 -
@return : 0 成功;其他 失败
*/
static int ap3216c_open(struct inode *inode, struct file filp)
{
/ 从file结构体获取cdev的指针,在根据cdev获取ap3216c_dev结构体的首地址 */
struct cdev *cdev = filp->f_path.dentry->d_inode->i_cdev;
struct ap3216c_dev *ap3216cdev = container_of(cdev, struct ap3216c_dev, cdev);/* 初始化AP3216C /
ap3216c_write_reg(ap3216cdev, AP3216C_SYSTEMCONG, 0x04); / 复位AP3216C /
mdelay(50); / AP3216C复位最少10ms /
ap3216c_write_reg(ap3216cdev, AP3216C_SYSTEMCONG, 0X03); / 开启ALS、PS+IR */
return 0;
}
/*
-
@description : 从设备读取数据
-
@param - filp : 要打开的设备文件(文件描述符)
-
@param - buf : 返回给用户空间的数据缓冲区
-
@param - cnt : 要读取的数据长度
-
@param - offt : 相对于文件首地址的偏移
-
@return : 读取的字节数,如果为负值,表示读取失败
*/
static ssize_t ap3216c_read(struct file *filp, char __user *buf, size_t cnt, loff_t *off)
{
short data[3];
long err = 0;struct cdev *cdev = filp->f_path.dentry->d_inode->i_cdev;
struct ap3216c_dev *dev = container_of(cdev, struct ap3216c_dev, cdev);ap3216c_readdata(dev);
data[0] = dev->ir;
data[1] = dev->als;
data[2] = dev->ps;
err = copy_to_user(buf, data, sizeof(data));
return 0;
}
/*
- @description : 关闭/释放设备
- @param - filp : 要关闭的设备文件(文件描述符)
- @return : 0 成功;其他 失败
*/
static int ap3216c_release(struct inode *inode, struct file *filp)
{
return 0;
}
/* AP3216C操作函数 */
static const struct file_operations ap3216c_ops = {
.owner = THIS_MODULE,
.open = ap3216c_open,
.read = ap3216c_read,
.release = ap3216c_release,
};
/*
-
@description : i2c驱动的probe函数,当驱动与
-
设备匹配以后此函数就会执行 -
@param - client : i2c设备
-
@param - id : i2c设备ID
-
@return : 0,成功;其他负值,失败
*/
static int ap3216c_probe(struct i2c_client *client, const struct i2c_device_id *id)
{
int ret;
struct ap3216c_dev *ap3216cdev;/* */
ap3216cdev = devm_kzalloc(&client->dev, sizeof(*ap3216cdev), GFP_KERNEL);
if(!ap3216cdev)
return -ENOMEM;/* 注册字符设备驱动 /
/ 1、创建设备号 */
ret = alloc_chrdev_region(&ap3216cdev->devid, 0, AP3216C_CNT, AP3216C_NAME);
if(ret < 0) {
pr_err(“%s Couldn’t alloc_chrdev_region, ret=%d\r\n”, AP3216C_NAME, ret);
return -ENOMEM;
}/* 2、初始化cdev */
ap3216cdev->cdev.owner = THIS_MODULE;
cdev_init(&ap3216cdev->cdev, &ap3216c_ops);/* 3、添加一个cdev */
ret = cdev_add(&ap3216cdev->cdev, ap3216cdev->devid, AP3216C_CNT);
if(ret < 0) {
goto del_unregister;
}/* 4、创建类 */
ap3216cdev->class = class_create(THIS_MODULE, AP3216C_NAME);
if (IS_ERR(ap3216cdev->class)) {
goto del_cdev;
}/* 5、创建设备 /
ap3216cdev->device = device_create(ap3216cdev->class, NULL, ap3216cdev->devid, NULL, AP3216C_NAME);
if (IS_ERR(ap3216cdev->device)) {
goto destroy_class;
}
ap3216cdev->client = client;
/ 保存ap3216cdev结构体 */
i2c_set_clientdata(client,ap3216cdev);return 0;
destroy_class:
device_destroy(ap3216cdev->class, ap3216cdev->devid);
del_cdev:
cdev_del(&ap3216cdev->cdev);
del_unregister:
unregister_chrdev_region(ap3216cdev->devid, AP3216C_CNT);
return -EIO;
}
/*
- @description : i2c驱动的remove函数,移除i2c驱动的时候此函数会执行
- @param - client : i2c设备
- @return : 0,成功;其他负值,失败
*/
static int ap3216c_remove(struct i2c_client *client)
{
struct ap3216c_dev ap3216cdev = i2c_get_clientdata(client);
/ 注销字符设备驱动 /
/ 1、删除cdev /
cdev_del(&ap3216cdev->cdev);
/ 2、注销设备号 /
unregister_chrdev_region(ap3216cdev->devid, AP3216C_CNT);
/ 3、注销设备 /
device_destroy(ap3216cdev->class, ap3216cdev->devid);
/ 4、注销类 */
class_destroy(ap3216cdev->class);
return 0;
}
/* 传统匹配方式ID列表 */
static const struct i2c_device_id ap3216c_id[] = {
{“ap3216c”, 0},
{}
};
/* 设备树匹配列表 /
static const struct of_device_id ap3216c_of_match[] = {
{ .compatible = “alientek,ap3216c” },
{ / Sentinel */ }
};
/* i2c驱动结构体 */
static struct i2c_driver ap3216c_driver = {
.probe = ap3216c_probe,
.remove = ap3216c_remove,
.driver = {
.owner = THIS_MODULE,
.name = “ap3216c”,
.of_match_table = ap3216c_of_match,
},
.id_table = ap3216c_id,
};
/*
-
@description : 驱动入口函数
-
@param : 无
-
@return : 无
*/
static int __init ap3216c_init(void)
{
int ret = 0;ret = i2c_add_driver(&ap3216c_driver);
return ret;
}
/*
- @description : 驱动出口函数
- @param : 无
- @return : 无
*/
static void __exit ap3216c_exit(void)
{
i2c_del_driver(&ap3216c_driver);
}
/* module_i2c_driver(ap3216c_driver) */
module_init(ap3216c_init);
module_exit(ap3216c_exit);
MODULE_LICENSE(“GPL”);
MODULE_AUTHOR(“ALIENTEK”);
MODULE_INFO(intree, “Y”);
这篇关于stm32mp157和imx6ull在设备树节点上设置ap3216c的主要区别的文章就介绍到这儿,希望我们推荐的文章对编程师们有所帮助!


