本文主要是介绍NSQ详细教程4 证书及TLS功能测试,希望对大家解决编程问题提供一定的参考价值,需要的开发者们随着小编来一起学习吧!
文章目录
- 生成证书
- 测试tls-cert 和tls-key 参数
- 测试tls-required参数
- tls-client-auth-policy 参数验证
- 客户端不合法证书测试
- nsqadmin证书测试
- 总结
可以为nsqd服务配置证书增加安全性,这里我们对该功能进行测试
生成证书
通过openssl 如下命令可以生成证书私钥对
 [root@localhost ~]# openssl req -x509 -newkey rsa:2048 -keyout key.pem -out cert.pem -days 365 -nodes
Generating a 2048 bit RSA private key
.............+++
............................+++
writing new private key to 'key.pem'
测试tls-cert 和tls-key 参数
如果不配置者两个参数,那么,只能通过http 和 tcp 来访问服务,https服务和端口为开启。
只配置者两个参数 http https tcp tls 都可以访问。
key.pem 和 cert.pem 放到指定目录/root/certs,
如下:
 [root@localhost ~]# mkdir certs
[root@localhost ~]# mv cert.pem  certs/
[root@localhost ~]# mv key.pem  certs/
[root@localhost ~]# ll certs
total 8
-rw-r--r--. 1 root root 1261 Apr 17 21:03 cert.pem
-rw-r--r--. 1 root root 1704 Apr 17 21:03 key.pem
重新启动 三个nsq服务 nsqd 要增加证书参数
[root@localhost nsq]# bin/nsqd  -lookupd-tcp-address "192.168.195.10:4160"  -tls-cert "/root/certs/cert.pem"  -tls-key "/root/certs/key.pem"
[nsqd] 2022/04/17 21:14:23.772212 INFO: nsqd v1.2.1 (built w/go1.16.6)
[nsqd] 2022/04/17 21:14:23.772256 INFO: ID: 856
[nsqd] 2022/04/17 21:14:23.773121 INFO: TOPIC(t1): created
[nsqd] 2022/04/17 21:14:23.773246 INFO: TOPIC(t1): new channel(c1)
[nsqd] 2022/04/17 21:14:23.773374 INFO: TOPIC(t1): new channel(c2)
[nsqd] 2022/04/17 21:14:23.773421 INFO: TOPIC(testtopic): created
[nsqd] 2022/04/17 21:14:23.773427 INFO: NSQ: persisting topic/channel metadata to nsqd.dat
[nsqd] 2022/04/17 21:14:23.775041 INFO: LOOKUP(192.168.195.10:4160): adding peer
[nsqd] 2022/04/17 21:14:23.775062 INFO: LOOKUP connecting to 192.168.195.10:4160
[nsqd] 2022/04/17 21:14:23.775274 INFO: TCP: listening on [::]:4150
[nsqd] 2022/04/17 21:14:23.775391 INFO: HTTP: listening on [::]:4151
[nsqd] 2022/04/17 21:14:23.775414 INFO: HTTPS: listening on [::]:4152
[nsqd] 2022/04/17 21:14:23.776061 INFO: LOOKUPD(192.168.195.10:4160): peer info {TCPPort:4160 HTTPPort:4161 Version:1.2.1 BroadcastAddress:localhost.localdomain}
[nsqd] 2022/04/17 21:14:23.776080 INFO: LOOKUPD(192.168.195.10:4160): REGISTER testtopic
[nsqd] 2022/04/17 21:14:23.776350 INFO: LOOKUPD(192.168.195.10:4160): REGISTER t1 c1
[nsqd] 2022/04/17 21:14:23.776525 INFO: LOOKUPD(192.168.195.10:4160): REGISTER t1 c2
[nsqd] 2022/04/17 21:14:23.776672 INFO: LOOKUPD(192.168.195.10:4160): channel REGISTER t1 c1
[nsqd] 2022/04/17 21:14:23.777508 INFO: LOOKUPD(192.168.195.10:4160): topic REGISTER t1
[nsqd] 2022/04/17 21:14:23.777795 INFO: LOOKUPD(192.168.195.10:4160): channel REGISTER t1 c2
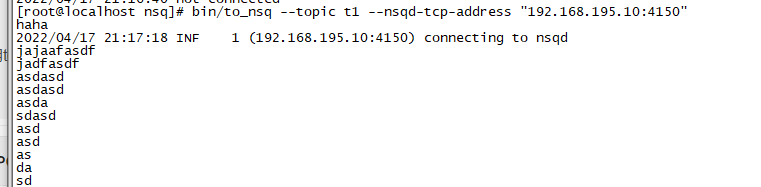
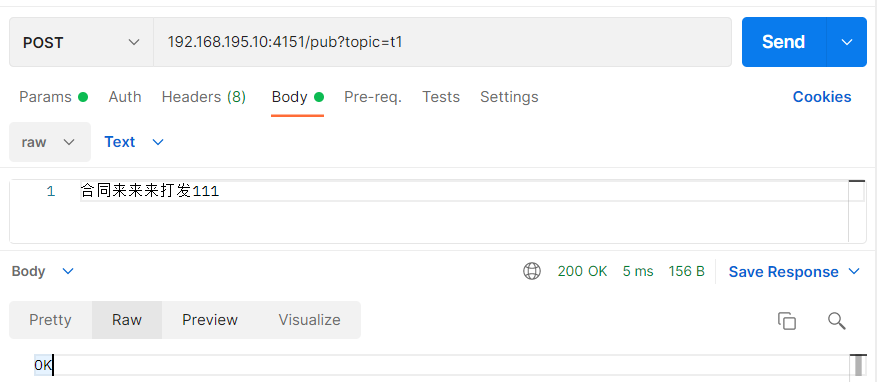
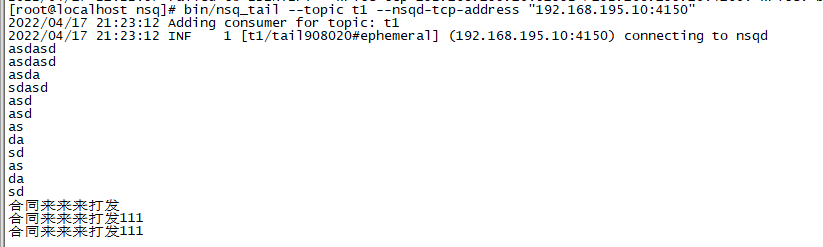
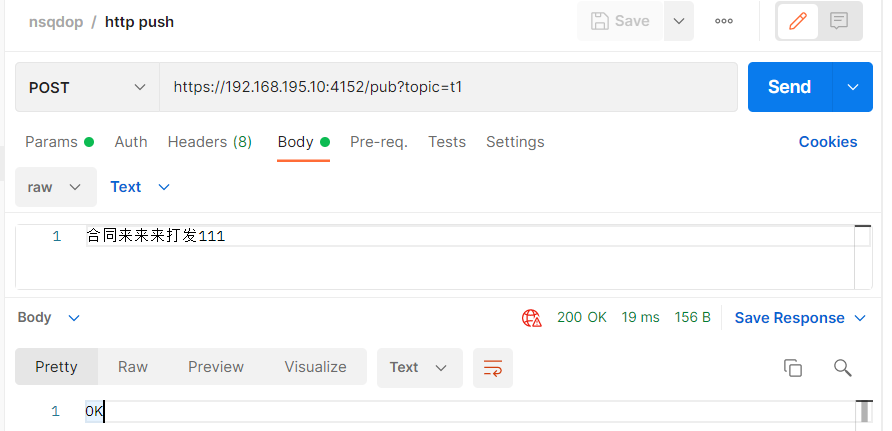
使用to_nsq 和 postman 工具通过http接口向nsqd发送消息,测试结果 二者都可以成功发送,
测试tls-required参数
重启 nsqd服务增加 tls-required 参数配置,这个时候要求客户端链接必须通过tls,http接口不提供服务,https接口默认端口为4152
这个时候必须通过https和tls来访问nsqd服务
bin/nsqd -lookupd-tcp-address "192.168.195.10:4160" -tls-cert "/root/certs/cert.pem" -tls-key "/root/certs/key.pem" -tls-required true
再次通过 工具发送和接收消息,发现 to_nsq、nsq_tail go测试程序均 提示 失败 需要tls
[root@localhost nsq]# bin/to_nsq --topic t1 --nsqd-tcp-address "192.168.195.10:4150"
123
2022/04/17 21:27:46 INF    1 (192.168.195.10:4150) connecting to nsqd
2022/04/17 21:27:46 ERR    1 (192.168.195.10:4150) protocol error - E_INVALID cannot PUB in current state (TLS required)
nsqadmin 也无法获取nsqd信息了
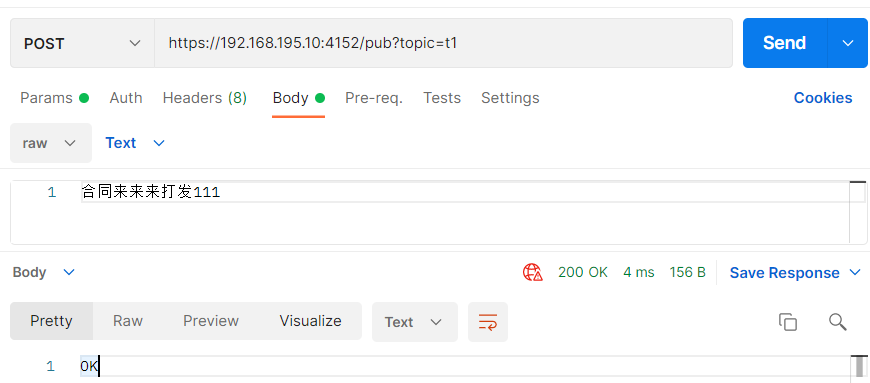
http接口也是同样的提示,但是提示了 https的端口
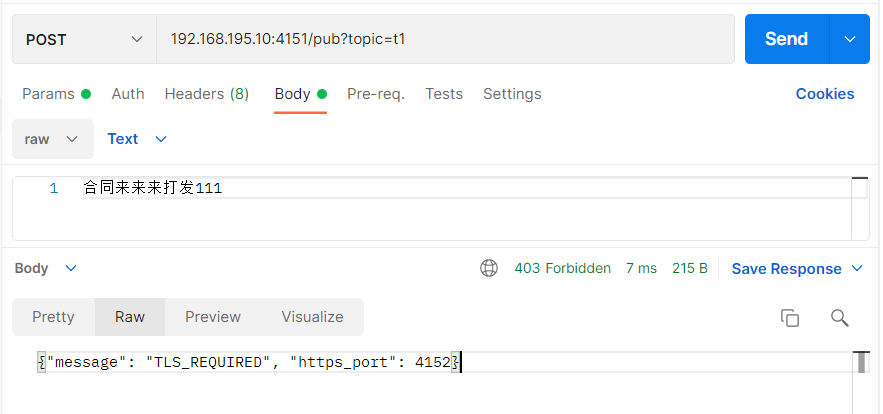
将http接口地址更改为:https://192.168.195.10:4152/pub?topic=t1 消息发送成功
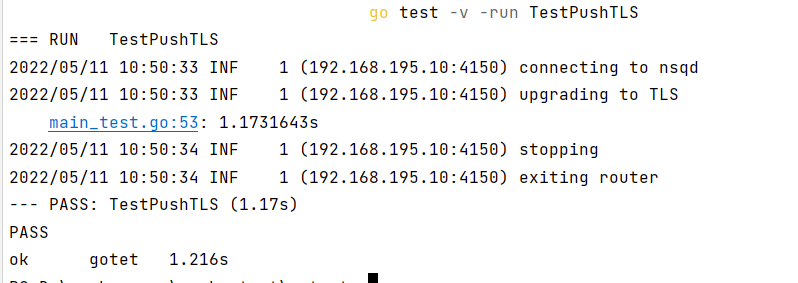
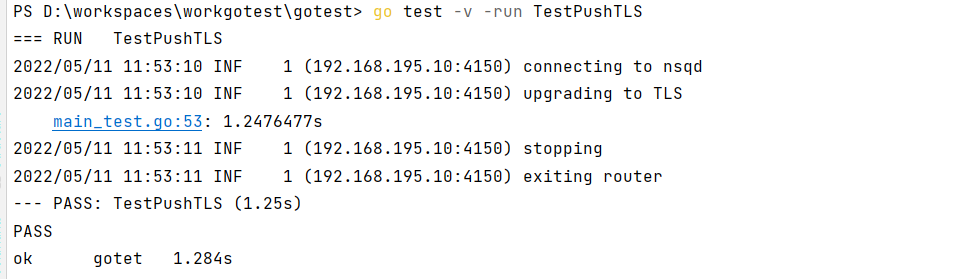
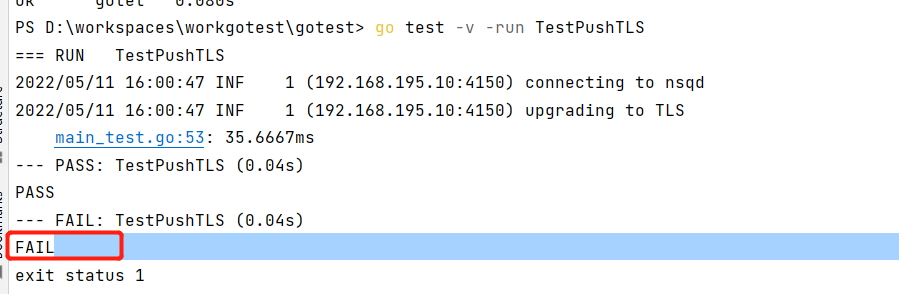
go测试代码中加入 tls支持后也可以正常发送消息
func TestPushTLS(t *testing.T) {config := nsq.NewConfig()//config.AuthSecret = secretconfig.TlsV1 = truetlsConfig := &tls.Config{InsecureSkipVerify: true}//tlsConfig.config.TlsConfig = tlsConfigproducer, err := nsq.NewProducer(address, config)if err != nil {t.Fatal(err)}now := time.Now()for i := 0; i < 2000; i++ {messageBody := []byte(fmt.Sprintf("hello %d", i))err = producer.Publish(topicName, messageBody)if err != nil {t.Fatal(err)}// time.Sleep(3 * time.Second)}t.Log(time.Now().Sub(now))producer.Stop()
}
发送成功
支持tls的 go 测试代码也可以正常消费
func TestSub2TLS(t *testing.T) {config := nsq.NewConfig()//config.AuthSecret = secretconfig.TlsV1 = truetlsConfig := &tls.Config{InsecureSkipVerify: true}config.TlsConfig = tlsConfigconsumer, err := nsq.NewConsumer(topicName, channel2, config)if err != nil {t.Fatal(err)}consumer.AddHandler(&myMessageHandler{})err = consumer.ConnectToNSQD(address)if err != nil {t.Fatal(err)}sigChan := make(chan os.Signal, 1)signal.Notify(sigChan, syscall.SIGINT, syscall.SIGTERM)<-sigChanconsumer.Stop()
}
tls-client-auth-policy 参数验证
该参数可以配置客户端证书验证策略,就是双向验证
require:比较宽松,客户端必须也提供一个证书,否则拒绝
require-verify:客户端必须 提供一个 服务端配置的根证书签发的证书,否则拒绝
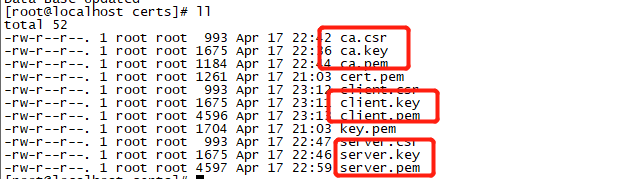
由此我们需要重新生成一组根据根证书的
生成证书
生成过程见openssl签发证书
如下分别生成 服务端证书、根证书、客户端证书
重启nsqd服务
重启nsqd服务,增加 tls-client-auth-policy 和 tls-root-ca-file 配置
[root@localhost nsq]# bin/nsqd  -lookupd-tcp-address "192.168.195.10:4160"  -tls-cert "/root/certs/server.pem"  -tls-key "/root/certs/server.key"  -tls-required true  -tls-client-auth-policy require -tls-root-ca-file "/root/certs/ca.pem"
[nsqd] 2022/04/17 23:18:08.310057 INFO: nsqd v1.2.1 (built w/go1.16.6)
[nsqd] 2022/04/17 23:18:08.310101 INFO: ID: 856
[nsqd] 2022/04/17 23:18:08.313399 INFO: TOPIC(t1): created
[nsqd] 2022/04/17 23:18:08.314127 INFO: TOPIC(t1): new channel(c1)
[nsqd] 2022/04/17 23:18:08.314203 INFO: DISKQUEUE(t1:c1): readOne() opened t1:c1.diskqueue.000000.dat
[nsqd] 2022/04/17 23:18:08.314683 INFO: TOPIC(t1): new channel(c2)
[nsqd] 2022/04/17 23:18:08.314744 INFO: TOPIC(testtopic): created
[nsqd] 2022/04/17 23:18:08.314753 INFO: NSQ: persisting topic/channel metadata to nsqd.dat
[nsqd] 2022/04/17 23:18:08.315459 INFO: DISKQUEUE(t1:c2): readOne() opened t1:c2.diskqueue.000000.dat
[nsqd] 2022/04/17 23:18:08.316918 INFO: LOOKUP(192.168.195.10:4160): adding peer
[nsqd] 2022/04/17 23:18:08.316930 INFO: LOOKUP connecting to 192.168.195.10:4160
[nsqd] 2022/04/17 23:18:08.317160 INFO: TCP: listening on [::]:4150
访问测试
https接口测试仍然可以正常访问
go测试代码测试也正常
重启nsqd修改tls-client-auth-policy值为 require-verify
[root@localhost nsq]# bin/nsqd  -lookupd-tcp-address "192.168.195.10:4160"  -tls-cert "/root/certs/server.pem"  -tls-key "/root/certs/server.key"  -tls-required true  -tls-client-auth-policy require-verify  -tls-root-ca-file "/root/certs/ca.pem"
[nsqd] 2022/04/17 23:23:49.458810 INFO: nsqd v1.2.1 (built w/go1.16.6)
[nsqd] 2022/04/17 23:23:49.458855 INFO: ID: 856
[nsqd] 2022/04/17 23:23:49.459713 INFO: TOPIC(t1): created
[nsqd] 2022/04/17 23:23:49.459874 INFO: TOPIC(t1): new channel(c2)
[nsqd] 2022/04/17 23:23:49.459922 INFO: TOPIC(t1): new channel(c1)
[nsqd] 2022/04/17 23:23:49.459954 INFO: DISKQUEUE(t1:c2): readOne() opened t1:c2.diskqueue.000000.dat
[nsqd] 2022/04/17 23:23:49.460272 INFO: TOPIC(testtopic): created
[nsqd] 2022/04/17 23:23:49.460283 INFO: NSQ: persisting topic/channel metadata to nsqd.dat
[nsqd] 2022/04/17 23:23:49.460356 INFO: DISKQUEUE(t1:c1): readOne() opened t1:c1.diskqueue.000000.dat
[nsqd] 2022/04/17 23:23:49.462165 INFO: LOOKUP(192.168.195.10:4160): adding peer
[nsqd] 2022/04/17 23:23:49.462291 INFO: LOOKUP connecting to 192.168.195.10:4160
[nsqd] 2022/04/17 23:23:49.462631 INFO: HTTP: listening on [::]:4151
[nsqd] 2022/04/17 23:23:49.462677 INFO: TCP: listening on [::]:4150
[nsqd] 2022/04/17 23:23:49.462681 INFO: HTTPS: listening on [::]:4152
[nsqd] 2022/04/17 23:23:49.463280 INFO: LOOKUPD(192.168.195.10:4160): peer info {TCPPort:4160 HTTPPort:4161 Version:1.2.1 BroadcastAddress:localhost.localdomain}
且支持tls 的go测试代码可以 正常消费
https接口和go测试代码都访问正常? 那这个配置参数有什么用?
猜测是参数没起作用,下载nsq源码在本地编译运行 通过配置文件配置 发现 开启这个选项后https无法访问。与预期相符 。为什么这里的参数没生效后续再排查。
后续经过测试 通过如下命令启动nsqd时 参数生效情况如下,生效不生效命令的区别在于 --tls-required=“true” 参数的方式难道必须 --tls-required=“true” 这样传,tls-client-auth-policy 和 tls-root-ca-file 参数才能生效?
bin/nsqd  -lookupd-tcp-address "192.168.195.10:4160"  -tls-cert "/root/certs/server.pem"  -tls-key "/root/certs/server.key"  --tls-required="true"  --tls-client-auth-policy= "require" --tls-root-ca-file= "/root/certs/ca.pem"  --生效
bin/nsqd  -lookupd-tcp-address "192.168.195.10:4160"  -tls-cert "/root/certs/server.pem"  -tls-key "/root/certs/server.key"  --tls-required="true"  -tls-client-auth-policy "require" -tls-root-ca-file "/root/certs/ca.pem" --生效
bin/nsqd  -lookupd-tcp-address "192.168.195.10:4160"  -tls-cert "/root/certs/server.pem"  -tls-key "/root/certs/server.key"  -tls-required "true"  --tls-client-auth-policy= "require" --tls-root-ca-file= "/root/certs/ca.pem"  ----不生效
bin/nsqd  -lookupd-tcp-address "192.168.195.10:4160"  -tls-cert "/root/certs/server.pem"  -tls-key "/root/certs/server.key"  -tls-required true  --tls-client-auth-policy= "require" --tls-root-ca-file= "/root/certs/ca.pem"  ----不生效
这里我们在虚拟机中也采用配置文件来进行配置,配置文件内容如下:
[root@localhost bin]# cat nsqd.conf##log verbosity level: debug, info, warn, error, or fatal
log_level = "debug"## unique identifier (int) for this worker (will default to a hash of hostname)
# id = 5150## <addr>:<port> to listen on for TCP clients
tcp_address = "0.0.0.0:4150"## <addr>:<port> to listen on for HTTP clients
http_address = "0.0.0.0:4151"## <addr>:<port> to listen on for HTTPS clients
# https_address = "0.0.0.0:4152"## address that will be registered with lookupd (defaults to the OS hostname)
# broadcast_address = ""## cluster of nsqlookupd TCP addressesnsqlookupd_tcp_addresses = ["127.0.0.1:4160"]## duration to wait before HTTP client connection timeout
http_client_connect_timeout = "2s"## duration to wait before HTTP client request timeout
http_client_request_timeout = "5s"## path to store disk-backed messages
# data_path = "/var/lib/nsq"## number of messages to keep in memory (per topic/channel)
mem_queue_size = 10000## number of bytes per diskqueue file before rolling
max_bytes_per_file = 104857600## number of messages per diskqueue fsync
sync_every = 2500## duration of time per diskqueue fsync (time.Duration)
sync_timeout = "2s"## duration to wait before auto-requeing a message
msg_timeout = "60s"## maximum duration before a message will timeout
max_msg_timeout = "15m"## maximum size of a single message in bytes
max_msg_size = 1024768## maximum requeuing timeout for a message
max_req_timeout = "1h"## maximum size of a single command body
max_body_size = 5123840## maximum client configurable duration of time between client heartbeats
max_heartbeat_interval = "60s"## maximum RDY count for a client
max_rdy_count = 2500## maximum client configurable size (in bytes) for a client output buffer
max_output_buffer_size = 65536## maximum client configurable duration of time between flushing to a client (time.Duration)
max_output_buffer_timeout = "1s"## UDP <addr>:<port> of a statsd daemon for pushing stats
# statsd_address = "127.0.0.1:8125"## prefix used for keys sent to statsd (%s for host replacement)
statsd_prefix = "nsq.%s"## duration between pushing to statsd (time.Duration)
statsd_interval = "60s"## toggle sending memory and GC stats to statsd
statsd_mem_stats = true## the size in bytes of statsd UDP packets
# statsd_udp_packet_size = 508## message processing time percentiles to keep track of (float)
e2e_processing_latency_percentiles = [1.0,0.99,0.95
]## calculate end to end latency quantiles for this duration of time (time.Duration)
e2e_processing_latency_window_time = "10m"## path to certificate file
tls_cert = "/root/certs/server.pem"## path to private key file
tls_key = "/root/certs/server.key"## set policy on client certificate (require - client must provide certificate,
##  require-verify - client must provide verifiable signed certificate)
tls_client_auth_policy = "require-verify"## set custom root Certificate Authority
tls_root_ca_file = "/root/certs/ca.pem"## require client TLS upgrades
tls_required = true## minimum TLS version ("ssl3.0", "tls1.0," "tls1.1", "tls1.2")
tls_min_version = ""## enable deflate feature negotiation (client compression)
deflate = true## max deflate compression level a client can negotiate (> values == > nsqd CPU usage)
max_deflate_level = 6## enable snappy feature negotiation (client compression)
snappy = true
使用配置文件重启nsqd服务
[root@localhost bin]# ./nsqd --config nsqd.conf
[nsqd] 2022/04/18 11:21:27.860418 INFO: nsqd v1.2.1 (built w/go1.16.6)
[nsqd] 2022/04/18 11:21:27.860785 INFO: ID: 856
[nsqd] 2022/04/18 11:21:27.861701 INFO: NSQ: persisting topic/channel metadata to nsqd.dat
[nsqd] 2022/04/18 11:21:27.920159 INFO: HTTP: listening on [::]:4151
[nsqd] 2022/04/18 11:21:27.920418 INFO: TCP: listening on [::]:4150
[nsqd] 2022/04/18 11:21:27.920505 INFO: HTTPS: listening on [::]:4152
[nsqd] 2022/04/18 11:21:44.776715 WARNING: http: TLS handshake error from 192.168.195.1:53326: tls: client didn't provide a certificate
[nsqd] 2022/04/18 11:22:18.442487 WARNING: http: TLS handshake error from 192.168.195.1:54206: tls: client didn't provide a certificate
再次 http https 及go TLS代码进行访问测试
http 服务提示通过https 及 4152 端口访问
https 4152端口 提示错误,错误的证书,可见配置生效
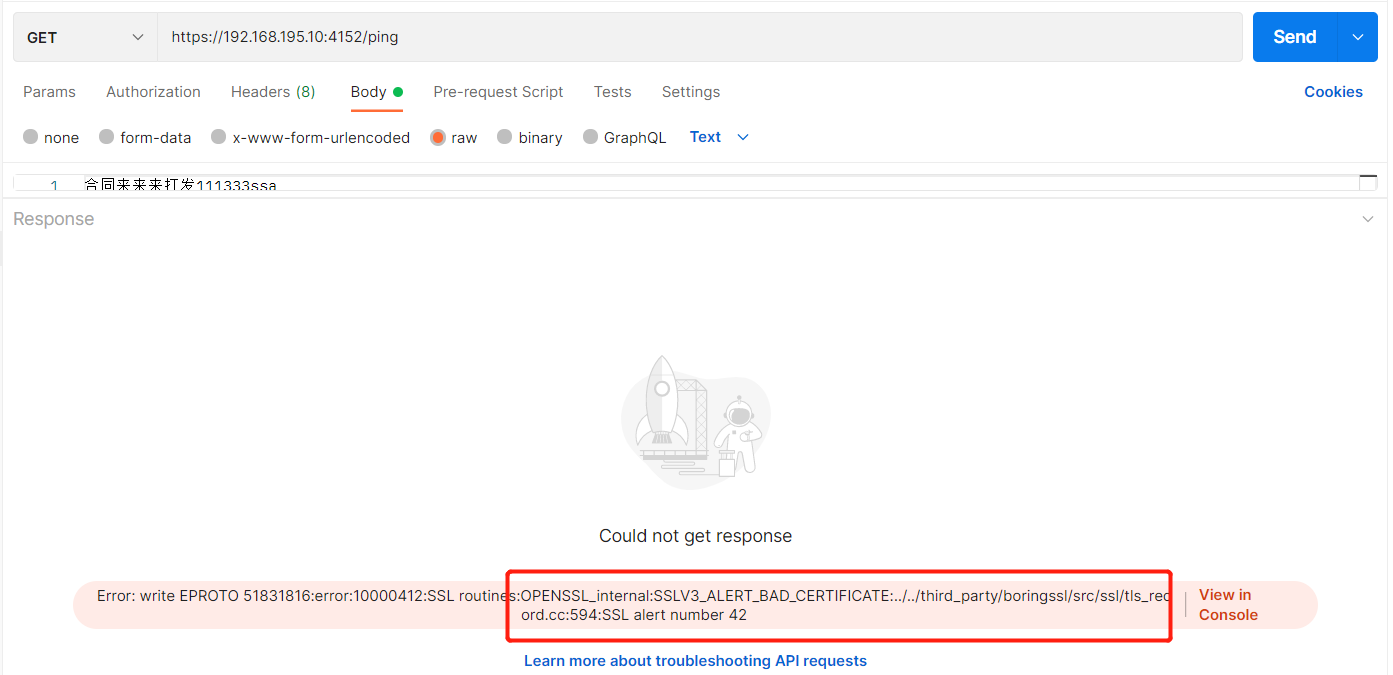
go tls 链接代码测试也失败
nsqd服务打印除了 链接错误信息 提示客户端没有提供合法的证书
[nsqd] 2022/04/18 11:27:06.593307 DEBUG: PROTOCOL(V2): [192.168.195.1:52228] [IDENTIFY]
[nsqd] 2022/04/18 11:27:06.593452 DEBUG: PROTOCOL(V2): [192.168.195.1:52228] {ClientID:DESKTOP-OGF3M8K Hostname:DESKTOP-OGF3M8K HeartbeatInterval:30000 OutputBufferSize:16384 OutputBufferTimeout:250 FeatureNegotiation:true TLSv1:true Deflate:false DeflateLevel:6 Snappy:false SampleRate:0 UserAgent:go-nsq/1.1.0 MsgTimeout:0}
[nsqd] 2022/04/18 11:27:06.593468 INFO: [192.168.195.1:52228] IDENTIFY: {ClientID:DESKTOP-OGF3M8K Hostname:DESKTOP-OGF3M8K HeartbeatInterval:30000 OutputBufferSize:16384 OutputBufferTimeout:250 FeatureNegotiation:true TLSv1:true Deflate:false DeflateLevel:6 Snappy:false SampleRate:0 UserAgent:go-nsq/1.1.0 MsgTimeout:0}
[nsqd] 2022/04/18 11:27:06.593699 INFO: PROTOCOL(V2): [192.168.195.1:52228] upgrading connection to TLS
[nsqd] 2022/04/18 11:27:06.598603 ERROR: [192.168.195.1:52228] - E_IDENTIFY_FAILED IDENTIFY failed tls: client didn't provide a certificate - tls: client didn't provide a certificate
[nsqd] 2022/04/18 11:27:06.598767 INFO: PROTOCOL(V2): [192.168.195.1:52228] exiting ioloop
[nsqd] 2022/04/18 11:27:06.598833 ERROR: client(192.168.195.1:52228) - E_IDENTIFY_FAILED IDENTIFY failed tls: client didn't provide a certificate
[nsqd] 2022/04/18 11:27:06.598945 INFO: PROTOCOL(V2): [192.168.195.1:52228] exiting messagePump
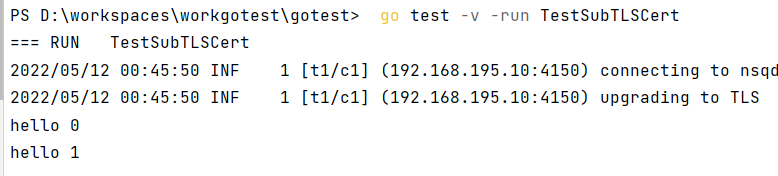
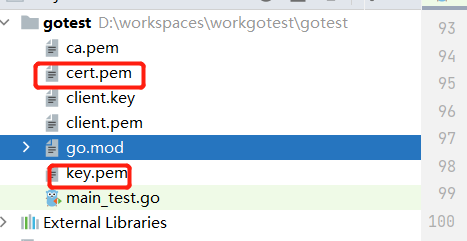
go测试也引入证书,发布和订阅消息方法如下;
func TestPushCert(t *testing.T) {config := nsq.NewConfig()//config.AuthSecret = secretconfig.TlsV1 = truecert, err := tls.LoadX509KeyPair("client.pem", "client.key")if err != nil {log.Println(err)return}certBytes, err := ioutil.ReadFile("ca.pem")if err != nil {panic("Unable to read ca.pem")}clientCertPool := x509.NewCertPool()ok := clientCertPool.AppendCertsFromPEM(certBytes)if !ok {panic("failed to parse root certificate")}tlsConfig := &tls.Config{RootCAs:            clientCertPool,Certificates:       []tls.Certificate{cert},InsecureSkipVerify: true,}config.TlsConfig = tlsConfigproducer, err := nsq.NewProducer(address, config)if err != nil {t.Fatal(err)}now := time.Now()for i := 0; i < 2; i++ {messageBody := []byte(fmt.Sprintf("hello %d", i))err = producer.Publish(topicName, messageBody)if err != nil {t.Fatal(err)}// time.Sleep(3 * time.Second)}t.Log(time.Now().Sub(now))producer.Stop()
}func TestSubTLSCert(t *testing.T) {config := nsq.NewConfig()//config.AuthSecret = secretconfig.TlsV1 = truecert, err := tls.LoadX509KeyPair("client.pem", "client.key")if err != nil {log.Println(err)return}certBytes, err := ioutil.ReadFile("ca.pem")if err != nil {panic("Unable to read ca.pem")}clientCertPool := x509.NewCertPool()ok := clientCertPool.AppendCertsFromPEM(certBytes)if !ok {panic("failed to parse root certificate")}tlsConfig := &tls.Config{RootCAs:            clientCertPool,Certificates:       []tls.Certificate{cert},InsecureSkipVerify: true,}config.TlsConfig = tlsConfigconsumer, err := nsq.NewConsumer(topicName, channel1, config)if err != nil {t.Fatal(err)}consumer.AddHandler(&myMessageHandler{})err = consumer.ConnectToNSQD(address)if err != nil {t.Fatal(err)}sigChan := make(chan os.Signal, 1)signal.Notify(sigChan, syscall.SIGINT, syscall.SIGTERM)<-sigChanconsumer.Stop()
}
执行该两个方法 可以正常的发布和消费
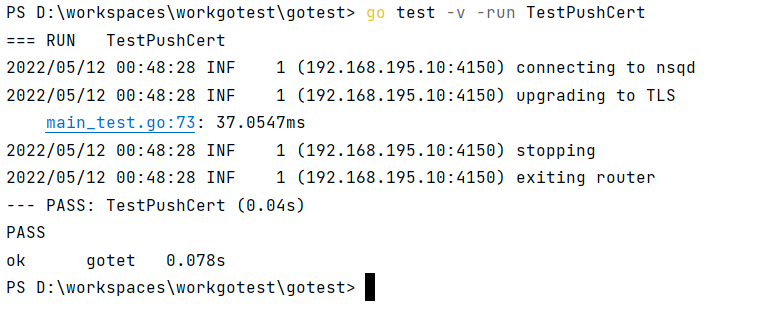
注意方法命名 ,执行 go test -v -run 的时候如果两个方法名类似可能会都执行 从而对测试产生干扰。
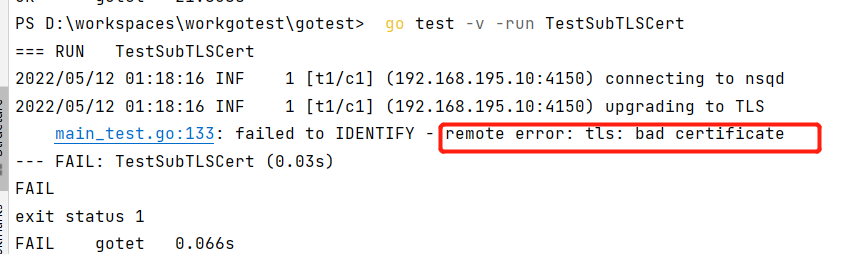
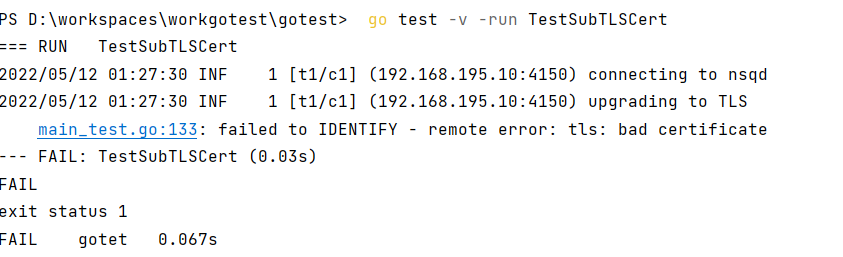
客户端不合法证书测试
tls_client_auth_policy = require-verify 时 客户端必须 提供一个 服务端配置的根证书签发的证书,否则会被拒绝,这里我们客户端证书修改为非ca 签发的证书。如下
用go代码进行链接测试仍然提示,证书不合法
我们修改tls_client_auth_policy = require 重启nsqd服务
订阅程序仍然报错,该参数的意义是什么呢? 谁知道欢迎留言
nsqadmin证书测试
nsqadmin 也提供了配置证书的参数,不知道是用来干嘛的,这里做个测试。
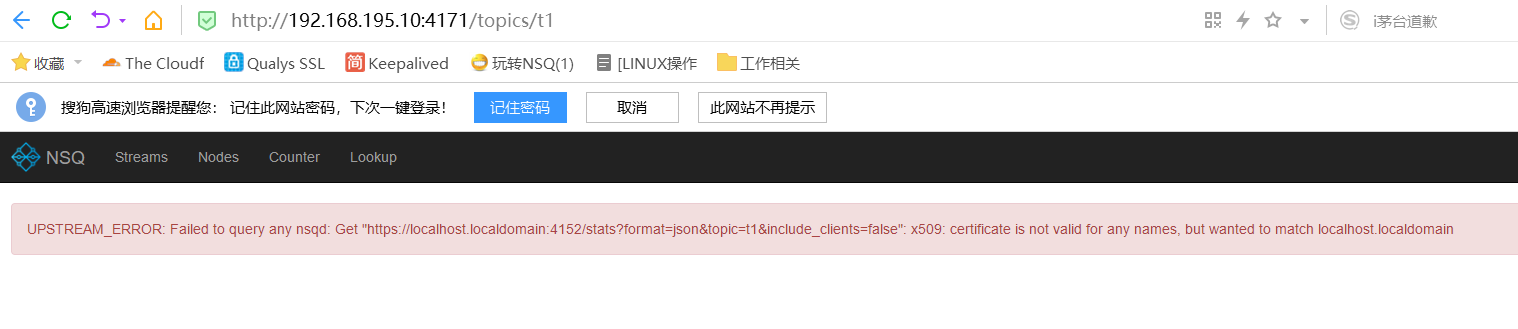
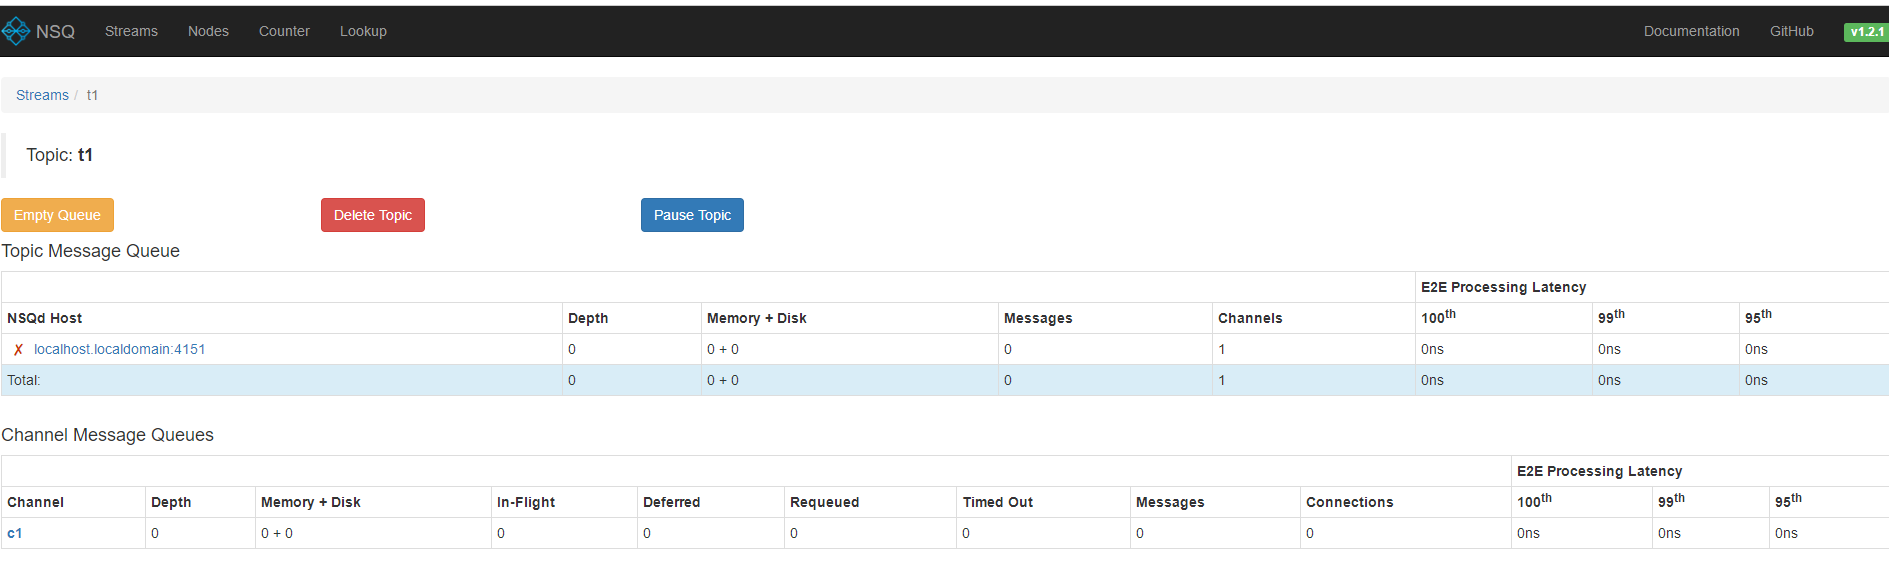
首先如果nsqd配置了双向证书,那么通过nsqdadmin 就无法查看到 topic 的详情了,提示badcertificate,有错误信息可以看到 nsqadmin 访问nsqd是通过https 的方式。

我们将 客户端证书配置上启动nsqdadmin
[root@localhost nsq]# bin/nsqadmin -lookupd-http-address 192.168.195.10:4161 -http-client-tls-cert "/root/certs/client.pem"  -http-client-tls-key "/root/certs/client.key"    -http-client-tls-insecure-skip-verify true -http-client-tls-root-ca-file "/root/certs/ca.pem"
[nsqadmin] 2022/04/18 21:31:26.459717 INFO: nsqadmin v1.2.1 (built w/go1.16.6)
[nsqadmin] 2022/04/18 21:31:26.461381 INFO: HTTP: listening on [::]:4171
[nsqadmin] 2022/04/18 21:31:35.163107 INFO: 200 GET /nodes (192.168.195.111:62594) 1.208135ms
[nsqadmin] 2022/04/18 21:31:35.311040 INFO: 200 GET /static/base.css (192.168.195.111:62595) 88.178µs
[nsqadmin] 2022/04/18 21:31:35.312602 INFO: 200 GET /static/bootstrap.min.css (192.168.195.111:62594) 864.948µs
[nsqadmin] 2022/04/18 21:31:35.316623 INFO: 200 GET /static/main.js (192.168.195.111:62597) 244.716µs
[nsqadmin] 2022/04/18 21:31:35.318465 INFO: 200 GET /static/vendor.js (192.168.195.111:62596) 1.736194ms
[nsqadmin] 2022/04/18 21:31:35.335134 INFO: 200 GET /static/favicon.png (192.168.195.111:62599) 17.424µs
[nsqadmin] 2022/04/18 21:31:35.388056 INFO: CI: querying nsqlookupd http://192.168.195.10:4161/nodes
[nsqadmin] 2022/04/18 21:31:35.388474 INFO: 200 GET /static/nsq_blue.png (192.168.195.111:62596) 22.041µs
[nsqadmin] 2022/04/18 21:31:35.393234 INFO: 200 GET /api/nodes (192.168.195.111:62597) 5.303567ms
[nsqadmin] 2022/04/18 21:31:35.486099 INFO: 200 GET /static/favicon.png (192.168.195.111:62599) 12.06µs
[nsqadmin] 2022/04/18 21:31:38.314833 INFO: CI: querying nsqlookupd http://192.168.195.10:4161/lookup?topic=t1
[nsqadmin] 2022/04/18 21:31:38.316364 INFO: CI: querying nsqd http://localhost.localdomain:4151/stats?format=json&topic=t1&include_clients=false
[nsqadmin] 2022/04/18 21:31:38.321008 INFO: 200 GET /static/favicon.png (192.168.195.111:62599) 8.752µs
[nsqadmin] 2022/04/18 21:31:38.341699 INFO: 200 GET /api/topics/t1 (192.168.195.111:62597) 27.069914ms
再次访问nsq admin服务,可以正常访问,证明作者为nsqdadmin 也考虑了身份验证。
总结
1、这种方法不需要单独部署认证服务,但是需要签发证书
2、这种方式开启后http 接口形式就无法使用,https如果可以支持双向认证应该也可以正常使用,https 接口如何进行双向测试有待进一步验证
3、这种方式nsqadmin服务提供了证书配置参数,配置了合法证书的nsqadmin可以正常访问、管理nsqd。
4、测试过程中证书中设置的ip并未影响证书的验证。
和 auth 方式对比
1、比auth方式,多了http接口方式认证的支持。auth 无法保护http接口,只能隐藏该服务 ,nsqadmin 如果想要访问nsqd 只能部署在特定范围服务器上。
2、不需要另外部署其他认证服务,自签证书就可以,部署相对简单
综上所述 感觉 证书方式更好一些。
这篇关于NSQ详细教程4 证书及TLS功能测试的文章就介绍到这儿,希望我们推荐的文章对编程师们有所帮助!


