本文主要是介绍【深度学习】Python爬取豆瓣实现影评分析,希望对大家解决编程问题提供一定的参考价值,需要的开发者们随着小编来一起学习吧!
提示:文章写完后,目录可以自动生成,如何生成可参考右边的帮助文档
文章目录
- 前言
- 一、任务描述
- 二、使用步骤
- 1.数据爬取
- 1.2.对爬取的页面数据进行解析,并保存为JSON文件
- 2、数据分析
- 2.1数据分析之评论时间分布图
- 2.2角色评分
前言
爬虫的过程,就是模仿浏览器的行为,往目标站点发送请求,接收服务器的响应数据,提取需要的信息,并进行保存的过程。
Python为爬虫的实现提供了工具:requests模块、BeautifulSoup库
提示:以下是本篇文章正文内容,下面案例可供参考
一、任务描述
本次实践使用Python来爬取豆瓣网中《安家》下所有的评论,进行了一波分析,从观众的角度来了解这部电视剧。
数据获取:https://movie.douban.com/subject/30482003/reviews?sort=time&start=0
普通用户:打开浏览器 --> 往目标站点发送请求 --> 接收响应数据 --> 渲染到页面上。爬虫程序:模拟浏览器 --> 往目标站点发送请求 --> 接收响应数据 --> 提取有用的数据 --> 保存到本地/数据库。
爬虫的过程:1.发送请求(requests模块)2.获取响应数据(服务器返回)3.解析并提取数据(BeautifulSoup查找或者re正则)4.保存数据
request模块:requests是python实现的简单易用的HTTP库,官网地址:http://cn.python-requests.org/zh_CN/latest/requests.get(url)可以发送一个http get请求,返回服务器响应内容。BeautifulSoup库:BeautifulSoup 是一个可以从HTML或XML文件中提取数据的Python库。网址:https://beautifulsoup.readthedocs.io/zh_CN/v4.4.0/BeautifulSoup支持Python标准库中的HTML解析器,还支持一些第三方的解析器,其中一个是 lxml。BeautifulSoup(markup, "html.parser")或者BeautifulSoup(markup, "lxml"),推荐使用lxml作为解析器,因为效率更高。
二、使用步骤
# 如果需要进行持久化安装, 需要使用持久化路径, 如下方代码示例:
!mkdir /home/aistudio/external-libraries
!pip install beautifulsoup4 -t /home/aistudio/external-libraries
!pip install lxml -t /home/aistudio/external-libraries
!pip install xgboost==1.1.0 -t /home/aistudio/external-libraries
!pip install wordcloud -t /home/aistudio/external-libraries
# 同时添加如下代码, 这样每次环境(kernel)启动的时候只要运行下方代码即可:
import sys
sys.path.append('/home/aistudio/external-libraries')
1.数据爬取
代码如下(示例):
import json
import re
import requests
from bs4 import BeautifulSoupdef crawl_data(crawl_url):'''爬取豆瓣《安家》影评信息,返回response,并进行解析'''headers = {'User-Agent': 'Mozilla/5.0 (Windows NT 10.0; Win64; x64) AppleWebKit/537.36 (KHTML, like Gecko) Chrome/80.0.3987.132 Safari/537.36'}url = 'https://movie.douban.com/subject/30482003/reviews'+crawl_urltry:response = requests.get(url, headers=headers)print(response.status_code)     parse(response)except Exception as e:print(e)
1.2.对爬取的页面数据进行解析,并保存为JSON文件
代码如下(示例):
item_list = []
def parse(response):'''解析爬取的网页内容'''soup = BeautifulSoup(response.text, 'html.parser')review_list = soup.find_all('div', class_='main review-item')for review_div in review_list:author = review_div.find('a', class_='name').text.strip()author = str_format(author)pub_time = review_div.find('span', class_='main-meta').text.strip()rating = review_div.find('span', class_='main-title-rating')if rating:rating = rating.get('title')else:rating = ""title = review_div.find('div', class_='main-bd').find('a').text.strip()is_unfold = review_div.find('a', class_='unfold')if is_unfold:review_id = review_div.find('div', class_='review-short').get('data-rid')content = get_fold_content(review_id)else:content = review_div.find('div', class_='short-content').text.strip()if content:content = re.sub(r"\s", '', content)item = {"author": author,"pub_time": pub_time,"rating": rating,"title": title,"content": content}print(item["title"])item_list.append(item)next_url = soup.find('span', class_='next').find('a')if next_url:crawl_data(next_url.get('href'))else:save_json()def get_fold_content(review_id):'''根据评论id,获取被折叠的评论内容'''headers = {'User-Agent': 'Mozilla/5.0 (Windows NT 10.0; Win64; x64) AppleWebKit/537.36 (KHTML, like Gecko) Chrome/80.0.3987.132 Safari/537.36'}url = "https://movie.douban.com/j/review/{}/full".format(review_id)resp = requests.get(url, headers=headers)data = resp.json()content = data['html']content = re.sub(r"(<.+?>)", "", content)content = str_format(content)return contentdef str_format(line):'''去除content中特殊字符,单引号、双引号、反斜杠'''error_list = ['\'', '\"', '\\', ',']for c in line:if c in error_list:line = line.replace(c, '')return linedef save_json():'''将爬取的数据保存为JSON文件'''with open('work/review.json', 'w', encoding='UTF-8') as f:json.dump(item_list, f, ensure_ascii=False)print("爬取完成,共爬取%d条数据" % len(item_list))if __name__ == '__main__':start_url = '?sort=time&start=0'crawl_data(start_url)#将所爬取的数据,保存为JSON文件json_data = json.loads(str(item_list).replace("'",'"').replace("\\",""))with open('work/reviews.json', 'a', encoding='UTF-8') as f:        json.dump(item_list, f, ensure_ascii=False)print("爬取完成,共爬取%d条数据"% len(item_list))

2、数据分析
代码如下(示例):
# 下载中文字体
!wget http://d.xiazaiziti.com/en_fonts/fonts/s/SimHei.ttf# 将字体文件复制到matplotlib字体路径
!cp SimHei.ttf /opt/conda/envs/python35-paddle120-env/lib/python3.7/site-packages/matplotlib/mpl-data/fonts/ttf/
# 创建系统字体文件路径
!mkdir .fonts
# 复制文件到该路径
!cp SimHei.ttf .fonts/
!rm -rf .cache/matplotlib
!pip install wordcloud
import json
import pandas as pd
import numpy as np
import matplotlib.pyplot as plt
from matplotlib.font_manager import FontProperties
from matplotlib import cm
import seaborn as sns
import jieba
import collections
import wordcloud
with open('work/review.json', 'r', encoding='UTF-8') as file:item_list = json.loads(file.read().replace("}][{","},{"))review_df = pd.DataFrame(item_list,columns=['author','pub_time','rating','title','content'])
print(review_df)# # 删除缺失数值
review_df.dropna(inplace=True)# 将缺失的评论情况设置为"放弃"
review_df.loc[review_df['rating']=='','rating'] = '放弃' # # 将字符串格式的时间转换为datatime类型
review_df['pub_time'] = pd.to_datetime(review_df['pub_time'])
print(review_df)

#按照评分进行聚合
grouped=review_df['author'].groupby(review_df['rating'])
grouped_count = grouped.count()
print(grouped_count)plt.figure(figsize=(10,5))
plt.bar(range(len(grouped_count.index)), grouped_count.values,color=['b','r','g','y','c','m',])
plt.xticks(range(len(grouped_count.index)),grouped_count.index,fontsize=15)
plt.yticks(fontsize=15)
plt.savefig('/home/aistudio/work/05.jpg')
plt.show()
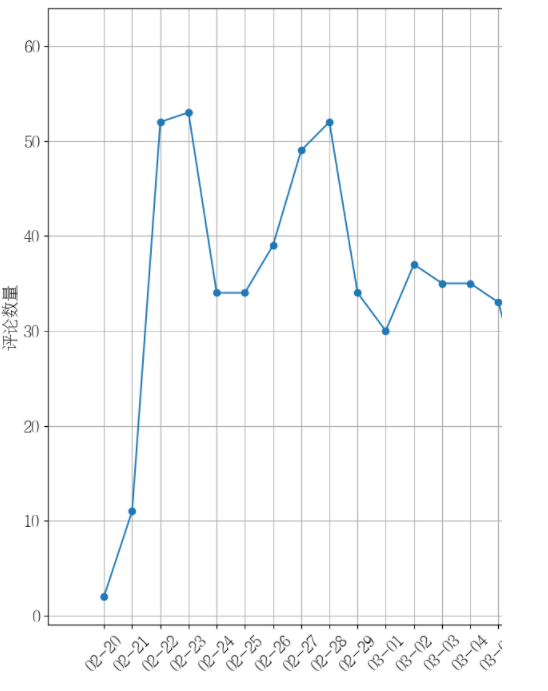
# 分析评论日期
import re
from matplotlib import dates
#显示matplotlib生成的图形
%matplotlib inline#添加一个索引“pub_date”,存储评论日期(2020年2月到3月期间)
review_df['pub_date'] = review_df['pub_time'].dt.datereview_df = review_df[pd.to_datetime(review_df['pub_date']).dt.year==2020]
review_df = review_df[pd.to_datetime(review_df['pub_date']).dt.month>1]
review_df = review_df[pd.to_datetime(review_df['pub_date']).dt.month<4]# 根据评论日期进行聚合
review_date_df = review_df['author'].groupby(review_df['pub_date'])
review_date_df = review_date_df.count()
# print(review_date_df.index)
# print(review_date_df.values)#创建一个画布,指定宽、高
plt.figure(figsize=(20,10))#设置显示中文
plt.rcParams['font.sans-serif'] = ['FZSongYi-Z13S'] # 指定默认字体#绘制折线图
plt.plot(review_date_df.index.to_numpy(), review_date_df.values, marker='o')#配置横坐标
plt.gca().xaxis.set_major_formatter(dates.DateFormatter("%m-%d"))#这里是调节坐标的倾斜度,rotation是度数,以及设置刻度字体大小
plt.xticks(review_date_df.index.to_numpy(),rotation=45,fontsize=15)
plt.yticks(fontsize=15)#配置坐标标题
plt.xlabel("发布日期",fontsize=15)
plt.ylabel("评论数量",fontsize=15)
#网格化
plt.grid()
#保存图形
plt.savefig('/home/aistudio/work/01.jpg')
#显示图形
plt.show()
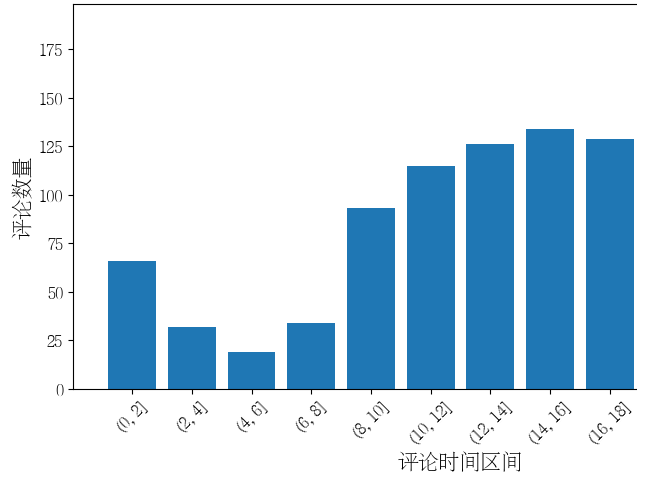
2.1数据分析之评论时间分布图
import datetime
# 指定多个时间区间
time_range = [0, 2, 4, 6, 8, 10, 12, 14, 16, 18, 20, 22, 24]
# 提取评论的小时信息
review_df['pub_hour'] = review_df['pub_time'].dt.hour
# 根据时间区间进行分组并统计数量
review_hour_range_df = review_df.groupby(pd.cut(review_df['pub_hour'], time_range)).size()
# 创建一个画布,指定宽、高
plt.figure(figsize=(10, 5))
# 绘制柱状图
plt.bar(range(len(review_hour_range_df)), review_hour_range_df.values)
# 配置横坐标刻度
plt.xticks(range(len(review_hour_range_df)), review_hour_range_df.index, fontsize=12, rotation=45)
# 配置坐标标题和刻度
plt.xlabel("评论时间区间", fontsize=15)
plt.ylabel("评论数量", fontsize=15)
plt.yticks(fontsize=12)
# 网格化
# plt.grid()
# 保存图形
plt.savefig('work/03.jpg')
# 显示图形
plt.show()
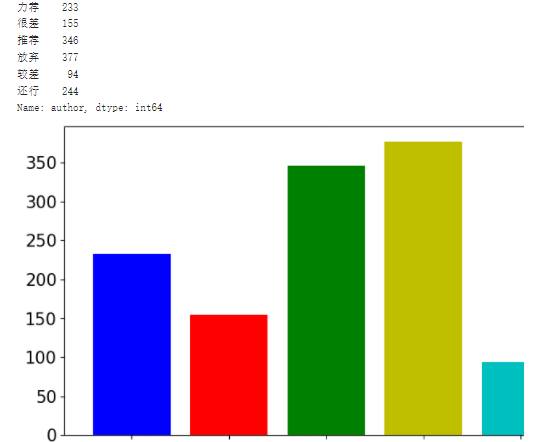
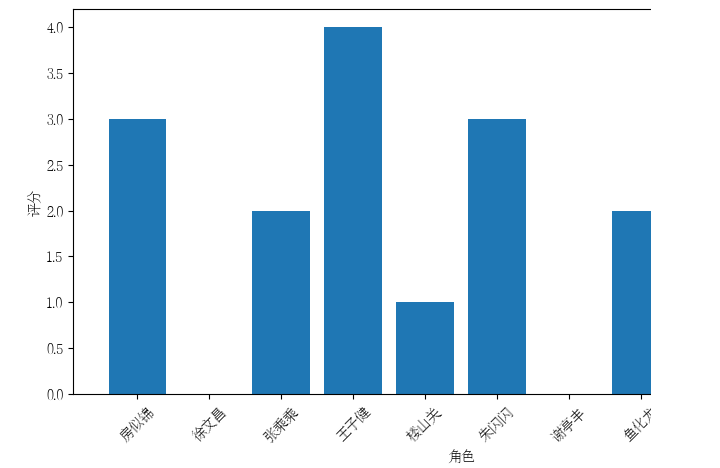
2.2角色评分
# # 电视剧人物的评分
# # 力荐:+5,推荐:+4,还行:3,较差:2,很差:1
# roles = {'房似锦':0,'徐文昌':0,'张乘乘':0,'王子健':0,'楼山关':0,'朱闪闪':0,
# '谢亭丰':0,'鱼化龙':0,'宫蓓蓓':0,'阚文涛':0}
# 定义角色评分字典
roles = {'房似锦': 3, '徐文昌': 0, '张乘乘': 2, '王子健': 4, '楼山关': 1, '朱闪闪': 3,'谢亭丰': 0, '鱼化龙': 2, '宫蓓蓓': 0, '阚文涛': 1}
# 遍历每条评论
for index, row in review_df.iterrows():rating = int(row['rating']) if row['rating'].isdigit() else 0 # 将评分转换为整型,非数字的评分设为0content = row['content']# 统计每个角色在评论中出现的次数for role in roles.keys():count = content.count(role)roles[role] += count * rating
# 打印角色评分结果
for role, score in roles.items():print(f"{role}的评分:{score}")
# 绘制角色评分柱状图
plt.figure(figsize=(10, 5))
plt.bar(roles.keys(), roles.values())
plt.xlabel("角色")
plt.ylabel("评分")
plt.xticks(rotation=45)
plt.savefig('work/04.jpg')
plt.show()
这篇关于【深度学习】Python爬取豆瓣实现影评分析的文章就介绍到这儿,希望我们推荐的文章对编程师们有所帮助!


