本文主要是介绍【CMU15445】Fall 2019, Project 3: Query Execution 实验记录,希望对大家解决编程问题提供一定的参考价值,需要的开发者们随着小编来一起学习吧!
目录
- 实验准备
- 实验测试
- Task 1: CREATING A CATALOG TABLE
- 1.1 Create Table
- 1.2 Get Table
- Task 2: EXECUTORS
- 2.1 什么是 executor
- 2.2 什么是 Tuple
- 2.3 实现 SeqScanExecutor
- 2.4 实现 InsertExecutor
- 2.5 实现 HashJoinExecutor
- 2.6 实现 AggregationExecutor
- Task 3: LINEAR PROBE HASH TABLE RETURNS
- 3.1 实现 TmpTuple 和 TmpTuplePage
- 3.2 实现 HashJoinExecutor
- 实验运行结果
SQL 执行是由数据库解析器转化为一个由多个 executor 组成的 Query Plan 来完成的,本实验选择了火山模型来完成 query execution,这一次的 project 就是实现各种 exeutor,从而可以通过组装这些 executor 来完成数据库的查询、插入等操作。
火山模型如下图所示:
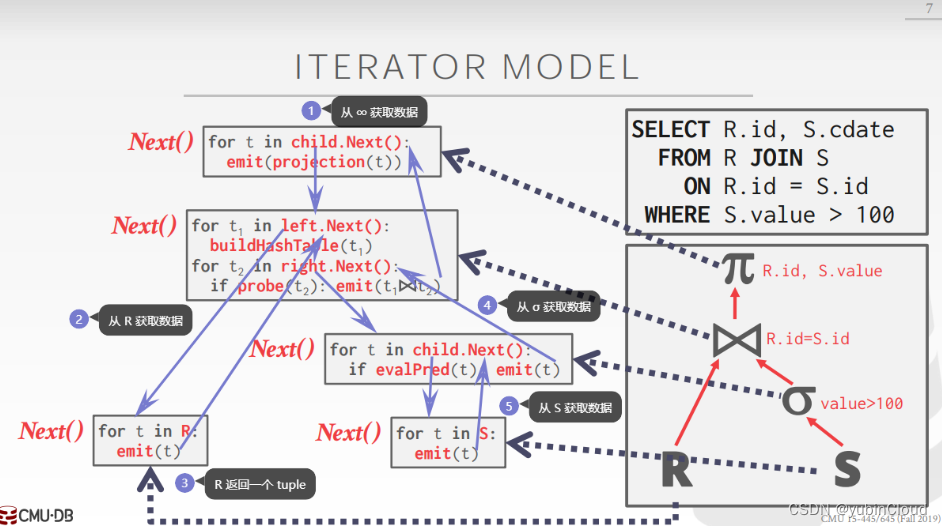
SQL 被转换为一系列 executor 的执行,首先会对每个 executor 调用 Init() 方法来进行初始化,之后上层的 executor 通过调用下层的 executor 的 Next() 方法来获取一个 tuple,每一个 executor 都是如此,就类似一个火山一样,数据从底部逐渐向上喷发。
实验准备
- 官方说明:https://15445.courses.cs.cmu.edu/fall2019/project3/
实验测试
Task 1:
cd build
make catalog_test
./test/catalog_test
Task 2~3:
cd build
make executor_test
./test/executor_test
Task 1: CREATING A CATALOG TABLE
这是一个热身任务,较为简单。
DB 内部通过维护 catalog 来维护数据库的元数据(比如 table 的创建与获取等),这个 task 需要实现 SimpleCatalog 的 CreateTable() 和 GetTable() 方法。
数据库的 table 主要包含 name 和 oid 两个属性,catalog 通过 table_ 属性维护 table 的 name 与 oid 的映射关系,其 GetTable() 方法需要同时支持对这两个的查询:
GetTable(const std::string &table_name):通过 name 来获取 tableGetTable(table_oid_t table_oid):通过 oid 来获取 table
一个 table 的元数据如下:
using table_oid_t = uint32_t;
using column_oid_t = uint32_t;struct TableMetadata {TableMetadata(Schema schema, std::string name, std::unique_ptr<TableHeap> &&table, table_oid_t oid): schema_(std::move(schema)), name_(std::move(name)), table_(std::move(table)), oid_(oid) {}Schema schema_;std::string name_;std::unique_ptr<TableHeap> table_;table_oid_t oid_;
};
Catalog 的关键属性字段有如下:
tables_:记录 table oid -> table metadata 的映射names_:记录 table name -> table oid 的映射next_table_oid:记录创建下一个 table 时可以分配的 oid
1.1 Create Table
catalog 创建 table 的实现:
/*** Create a new table and return its metadata.* @param txn the transaction in which the table is being created* @param table_name the name of the new table* @param schema the schema of the new table* @return a pointer to the metadata of the new table*/auto CreateTable(Transaction *txn, const std::string &table_name, const Schema &schema) -> TableMetadata * {BUSTUB_ASSERT(names_.count(table_name) == 0, "Table names should be unique!");table_oid_t table_oid = next_table_oid_++; // 这行代码很妙,在自增了 atomic 变量的同时将旧值返回给了 oidauto *tableHeap = new TableHeap(bpm_, lock_manager_, log_manager_, txn);auto *tableMetadata = new TableMetadata(schema, table_name, std::unique_ptr<TableHeap>(tableHeap), table_oid);tables_.insert({table_oid, std::unique_ptr<TableMetadata>(tableMetadata)});names_.insert({table_name, table_oid});return tableMetadata;}
1.2 Get Table
catalog 查询 table 的实现:
/** @return table metadata by name */auto GetTable(const std::string &table_name) -> TableMetadata * {const table_oid_t table_oid = names_.at(table_name);const auto& table = tables_.at(table_oid);return table.get();}/** @return table metadata by oid */auto GetTable(table_oid_t table_oid) -> TableMetadata * {const auto &table = tables_.at(table_oid);return table.get();}
Task 2: EXECUTORS
2.1 什么是 executor
这个 task 就是要实现各个 executor:
seq_scan_executor:顺序扫描一个 table,每次Next()生成一个 tuple。insert_executor:在一个 table 中插入 tuples。所要插入的 tuple 可能来源于指定的 tuple(称为 raw insert),也可能来源于调用 child executor 的Next()所得到的 tuple(称为 not-raw insert)。hash_join_executor:使用 hash join 的算法将两个 table 进行 join,每次Next()生成一个 join 后的 tuple。aggregation_executor:使用 aggregation 的相关计算,在本 task 中具体指的是带有 having 子句的 COUNT, SUM, MIN, MAX 这四个计算。
这些 executor 在每次生成一个 SQL 对应的 query plan 时被实例化,并在构造函数中传入上下文信息,在执行时保证在第一次调用 Next() 前会先被调用 Init() 来初始化。
构造函数中主要传入如下几个上下文信息:
ExecutorContext *exec_ctx:包含 buffer pool manager、transaction、catalog 等关于本次执行的全局上下文信息。plan:一个 AbstractPlanNode 的子类的对象,它指示了这个 executor 本次所需要执行的任务的相关信息,比如这个 executor 需要输出 tuple 的 schema、用于过滤的判断谓词 predicate、aggregation 计算的具体类型(比如是 SUM 还是 MIN)等等。每种 executor 传入的 plan 也不同。child executor:一个 executor 可能需要调用 child executor 的Next()方法来获得 tuple,从而完成自己的Next()。比如 insert executor 需要从 child executor 来获取需要插入的 tuple,hash join executor 需要从 left child executor 和 right child executor 来获取需要进行 join 的左右两张表的 tuple。
executor 每次调用 Next() 后需要将相关状态记录到 executor 对象的属性中,这样下次 Next() 知道要继续做什么。
2.2 什么是 Tuple
一个 Tuple 类的实例就是一个 tuple,它包含两个关键属性:
char *data_:字节数组,表示这个 tuple 所拥有的数据uint32_t size_:表示data_的长度
它有一个关键的构造函数:
// constructor for creating a new tuple based on input valueTuple(std::vector<Value> values, const Schema *schema);
values 是这个 tuple 的各个 column 的值,schema 表示如何解读这个 values,构造函数会将其序列化为字节数组。
2.3 实现 SeqScanExecutor
该 executor 顺序扫描一个 table,将满足 predicate 条件的所有 tuple 返回出去。
内部维护一个用于遍历 table 的 iterator,每次调用 Next() 时便会将 iterator 指向第一个满足 predicate 的 tuple 返回回去。
SeqScanExecutor::SeqScanExecutor(ExecutorContext *exec_ctx, const SeqScanPlanNode *plan): AbstractExecutor(exec_ctx),plan_(plan),table_metadata_(exec_ctx->GetCatalog()->GetTable(plan->GetTableOid())),table_iterator_(table_metadata_->table_->Begin(exec_ctx->GetTransaction())) {}void SeqScanExecutor::Init() {}auto SeqScanExecutor::Next(Tuple *tuple) -> bool {const auto *const predicate = plan_->GetPredicate();while (table_iterator_ != table_metadata_->table_->End()) {*tuple = *table_iterator_;++table_iterator_;if (predicate == nullptr || predicate->Evaluate(tuple, &table_metadata_->schema_).GetAs<bool>()) {return true;}}return false;
}
2.4 实现 InsertExecutor
用于向 table 中插入 tuples,调用 Next() 时插入所有的 tuples。根据所要插入的 tuple 的来源不同,分为两种情况:
- raw insert:插入
plan_中指定的 tuple - not-raw insert:所要插入的 tuple 通过调用 child executor 的
Next()来获得
InsertExecutor::InsertExecutor(ExecutorContext *exec_ctx, const InsertPlanNode *plan,std::unique_ptr<AbstractExecutor> &&child_executor): AbstractExecutor(exec_ctx),plan_(plan),child_executor_(std::move(child_executor)),table_metadata_(exec_ctx->GetCatalog()->GetTable(plan->TableOid())) {}auto InsertExecutor::GetOutputSchema() -> const Schema * { return plan_->OutputSchema(); }void InsertExecutor::Init() {}auto InsertExecutor::Next([[maybe_unused]] Tuple *tuple) -> bool {return plan_->IsRawInsert()? RawInsert(): NotRawInsert();
}auto InsertExecutor::RawInsert() -> bool {RID rid;const auto& rows = plan_->RawValues();for (const auto& rowValues : rows) {Tuple tuple(rowValues, &table_metadata_->schema_);if (!table_metadata_->table_->InsertTuple(tuple, &rid, exec_ctx_->GetTransaction())) {return false;}}return true;
}auto InsertExecutor::NotRawInsert() -> bool {Tuple tuple;RID rid;child_executor_->Init();while (child_executor_->Next(&tuple)) {if (!table_metadata_->table_->InsertTuple(tuple, &rid, exec_ctx_->GetTransaction())) {return false;}}return true;
}
2.5 实现 HashJoinExecutor
这个 executor 使用 hash join 算法将两个 table 进行 join,这个算法可以分为两步:
- build 阶段:顺序扫描 left table 每一个 tuple,将每个 tuple 中需要 join 的 column value 计算 hash 放入 hash table 中;
- probe 阶段:顺序扫描 right table 每一个 tuple,对每个 tuple 中需要 join 的 column value 计算 hash,从 hash table 中查出所有哈希碰撞的 left tuples,然后逐一检查每个 left tuple 能否与 right tuple 进行 join,如果可以,则进行 join 并生成一个 tuple 返回。
在这个 task 中,hash table 使用了一个构建于内存中的 SimpleHashTable,build 阶段在 Init() 中完成,每次 Next() 返回一个 probe 阶段生成的 tuple。
HashJoinExecutor::HashJoinExecutor(ExecutorContext *exec_ctx, const HashJoinPlanNode *plan,std::unique_ptr<AbstractExecutor> &&left, std::unique_ptr<AbstractExecutor> &&right): AbstractExecutor(exec_ctx),plan_(plan),jht_("simple-ht", exec_ctx->GetBufferPoolManager(), jht_comp_, jht_num_buckets_, jht_hash_fn_),left_(std::move(left)),right_(std::move(right)),collisions_(nullptr),collision_index_(0) {}void HashJoinExecutor::Init() {left_->Init();right_->Init();// HashJoin build 阶段Tuple tuple;auto * const txn = exec_ctx_->GetTransaction();while (left_->Next(&tuple)) {const auto hash_value = HashValues(&tuple, left_->GetOutputSchema(), plan_->GetLeftKeys());jht_.Insert(txn, hash_value, tuple);}
}auto HashJoinExecutor::Next(Tuple *tuple) -> bool {// HashJoin probe 的阶段while (NextCursor()) {// 初始化相关数据const auto *const predicate = plan_->Predicate();  // 用于判断是否能够 join 的 predicateauto *left_tuple = &collisions_->at(collision_index_);  // left tupleauto *right_tuple = &right_tuple_;  // right tupleconst auto *const output_schema = this->GetOutputSchema();  // join 之后的 output schemaconst auto col_count = output_schema->GetColumnCount();  // output 的 column 个数// 判断 left-tuple 和 right-tuple 是否能够 joinbool jointable = true;if (predicate != nullptr) {jointable = predicate->EvaluateJoin(left_tuple, left_->GetOutputSchema(), right_tuple, right_->GetOutputSchema()).GetAs<bool>();}if (jointable) {// 将两个 tuple 进行 joinstd::vector<Value> values;for (size_t col_index = 0; col_index < col_count; col_index++) {const auto& expr = output_schema->GetColumn(col_index).GetExpr();const auto& value = expr->EvaluateJoin(left_tuple, left_->GetOutputSchema(), right_tuple, right_->GetOutputSchema());values.push_back(value);}*tuple = Tuple(values, output_schema);return true;}}return false;
}/** 指向下一个待匹配的 left tuple 和 right tuple */
auto HashJoinExecutor::NextCursor() -> bool {collision_index_++;while (collisions_ == nullptr || collision_index_ >= collisions_->size()) {bool has_more = right_->Next(&right_tuple_);if (!has_more) {return false;}auto r_hash_value = HashValues(&right_tuple_, right_->GetOutputSchema(), plan_->GetRightKeys());collisions_ = std::make_unique<std::vector<Tuple>>();jht_.GetValue(exec_ctx_->GetTransaction(), r_hash_value, collisions_.get());collision_index_ = 0;}return true;
}
2.6 实现 AggregationExecutor
这个 executor 实现带有 having 条件的 COUNT, SUM, MIN, MAX 这四种聚合计算。
实现 aggregation 也分成两步:
- Partition 阶段:这一阶段完成 group by 操作,将所有 tuples 根据 GroupBy 的 keys 分成一个个 partition;
- ReHash 阶段:将每一个 partition 内的 tuples 根据聚合计算的类型计算出一个 aggregation value。
本 project 已经帮我们实现了一个 SimpleAggregationHashTable,它有一个已实现好的 InsertCombine() 方法,我们只需要遍历所有 tuples,然后分别调用 InsertCombine,就会帮我们完成分区和每个分区的 aggregation value 的计算。
所以我们可以在 executor 的 Init() 阶段遍历所有 tuples,并调用 InsertCombine() 计算出所有分区的 aggregation value,在 Next() 遍历每一个分区的聚合结果,判断一下是否满足 having 条件,将每个满足条件的分区构造为一个 tuple 返回出去。
AggregationExecutor::AggregationExecutor(ExecutorContext *exec_ctx, const AggregationPlanNode *plan,std::unique_ptr<AbstractExecutor> &&child): AbstractExecutor(exec_ctx),plan_(plan),child_(std::move(child)),aht_(plan_->GetAggregates(), plan_->GetAggregateTypes()),aht_iterator_(aht_.End()) {}auto AggregationExecutor::GetChildExecutor() const -> const AbstractExecutor * { return child_.get(); }auto AggregationExecutor::GetOutputSchema() -> const Schema * { return plan_->OutputSchema(); }void AggregationExecutor::Init() {child_->Init();// 构建 hash tableTuple tuple;while (child_->Next(&tuple)) {const auto agg_key = MakeKey(&tuple);const auto agg_value = MakeVal(&tuple);aht_.InsertCombine(agg_key, agg_value);  // 相当于 ReHash 阶段的存储 (GroupKey -> RunningVal)}aht_iterator_ = aht_.Begin();
}auto AggregationExecutor::Next(Tuple *tuple) -> bool {const auto *const having_predicate = plan_->GetHaving();while (aht_iterator_ != aht_.End()) {const auto &agg_key = aht_iterator_.Key();const auto &agg_value = aht_iterator_.Val();++aht_iterator_;// 判断是否满足 having 条件bool isSatified = true;if (having_predicate != nullptr) {isSatified = having_predicate->EvaluateAggregate(agg_key.group_bys_, agg_value.aggregates_).GetAs<bool>();}// 如果满足 having 条件,则将 agg_key 和 agg_value 构建为 output_schema 的形式,并返回if (isSatified) {std::vector<Value> values;const auto *const output_schema = GetOutputSchema();for (size_t i = 0; i < output_schema->GetColumnCount(); i++) {const auto * const expr = output_schema->GetColumn(i).GetExpr();values.push_back(expr->EvaluateAggregate(agg_key.group_bys_, agg_value.aggregates_));}*tuple = Tuple(values, GetOutputSchema());return true;}}return false;
}
Task 3: LINEAR PROBE HASH TABLE RETURNS
之前我们实现 hash join executor 时,使用的 hash table 是一个构建于内存的 SimpleHashTable,当内存无法存放一个 left table 的所有 tuples 时,这种 hash table 便会无法完成运算。本 task 目标就是实现将 hash join executor 中的 SimpleHashTable 更换为我们在 project-2 中实现的构建于磁盘的 LinearProbeHashTable。
3.1 实现 TmpTuple 和 TmpTuplePage
由于 Tuple 类中的 data_ 是一个字节数组,存储有这个 tuple 的实际数据,占用空间较大,将它作为 hash table 的 value 时会惹上很多麻烦,所有本 project 提出可以先实现一个 TmpTuple 和 TmpTuplePage:
TmpTuplePage:它是Page类的子类,由 buffer pool manager 管理,这种 page 专门用于存储Tuple对象,其中包含这个 tuple 的实际数据。TmpTuple:每个它的实例对应一个真正的 tuple,但它不存储 tuple 的实际数据,而是存储了这个 tuple 在哪个 TmpTuplePage 和它在这个 page 上的 offset,这样在构建 hash table 时,可以使用TmpTuple对象来作为 value。
本 project 帮我们设计了 TmpTuplePage 的空间布局:
/*** TmpTuplePage format:** Sizes are in bytes.* | PageId (4) | LSN (4) | FreeSpace (4) | (free space) | TupleSize2 (4) | TupleData2 | TupleSize1 (4) | TupleData1 |** We choose this format because DeserializeExpression expects to read Size followed by Data.*/
- 最开始是 4 个 byte 来存储 page id
- 之后 4 个 byte 存储 LSN
- 之后 4 个 byte 存储 FreeSpacePointer,它是一个指向可用空间的相对位移,它的初始值就是 page 的末尾
- 剩下的所有空间用于存储 tuples,自末尾向前存储,即先在末尾存一个 tuple 1,再向前移动 FreeSpacePointer 存储下一个 tuple 2
TmpTuple 如下:
class TmpTuple {public:TmpTuple() = default;TmpTuple(page_id_t page_id, size_t offset) : page_id_(page_id), offset_(offset) {}inline bool operator==(const TmpTuple &rhs) const { return page_id_ == rhs.page_id_ && offset_ == rhs.offset_; }page_id_t GetPageId() const { return page_id_; }size_t GetOffset() const { return offset_; }void SetPageId(page_id_t page_id) { page_id_ = page_id; }void SetOffset(size_t offset) { offset_ = offset; }private:page_id_t page_id_;size_t offset_;
};
TmpTuplePage 如下:
class TmpTuplePage : public Page {public:void Init(page_id_t page_id, uint32_t page_size) {// Set the page ID.memcpy(GetData(), &page_id, sizeof(page_id_t));// Set FreeSpace// 因为 free-space-pointer 一开始应该是指向 page 的最末尾处,所以 free-space-pointer 的值应当就是 PAGE_SIZESetFreeSpacePointer(page_size);}auto GetTablePageId() -> page_id_t { return *reinterpret_cast<page_id_t *>(GetData()); }auto Insert(const Tuple &tuple, TmpTuple *out) -> bool {const auto tuple_size = tuple.GetLength();// determine whether there is enough space to insert tupleif (GetFreeSpaceRemaining() < tuple_size + SIZE_TUPLE_SIZE) {return false;}// insert tuple and its sizeSetFreeSpacePointer(GetFreeSpacePointer() - tuple_size);memcpy(GetData() + GetFreeSpacePointer(), tuple.GetData(), tuple_size);SetFreeSpacePointer(GetFreeSpacePointer() - SIZE_TUPLE_SIZE);memcpy(GetData() + GetFreeSpacePointer(), &tuple_size, SIZE_TUPLE_SIZE);out->SetPageId(GetPageId());out->SetOffset(GetFreeSpacePointer());return true;}auto Get(uint32_t offset) -> char * {return GetData() + offset;}private:static_assert(sizeof(page_id_t) == 4);static constexpr size_t SIZE_TABLE_PAGE_HEADER = 12;static constexpr size_t SIZE_TUPLE_SIZE = 4;  // TupleSize 字段的 sizestatic constexpr size_t OFFSET_FREE_SPACE = 8;void SetFreeSpacePointer(uint32_t free_space_pointer) {memcpy(GetData() + OFFSET_FREE_SPACE, &free_space_pointer, sizeof(free_space_pointer));}auto GetFreeSpacePointer() -> uint32_t { return *reinterpret_cast<uint32_t *>(GetData() + OFFSET_FREE_SPACE); }auto GetFreeSpaceRemaining() -> uint32_t { return GetFreeSpacePointer() - SIZE_TABLE_PAGE_HEADER; }
};
3.2 实现 HashJoinExecutor
完成了 TmpTuplePage 和 TmpTuple,我们就可以利用它们和 LinearProbeHashTable 共同实现 hash join executor。
我们将 tuple 在 key columns 上的 values 计算的哈希值作为 key,将这个 tuple 对应的 tmp_tuple 作为 value,来构建 hash table。
由于 LinearProbeHashTable 是一个 C++ template,因此我们需要先在 hash_table_block_page.cpp 和 linear_probe_hash_table.cpp 文件中添加如下代码做模板特例化:
// 在 hash_table_block_page.cpp 末尾
template class HashTableBlockPage<hash_t, TmpTuple, HashComparator>;// 在 linear_probe_hash_table.cpp 末尾
template class LinearProbeHashTable<hash_t, TmpTuple, HashComparator>;
在 hash_join_executor.cpp 加上:
// 在 hash_join_executor.cpp 中
template class LinearProbeHashTable<hash_t, TmpTuple, HashComparator>;
template class HashTableBlockPage<hash_t, TmpTuple, HashComparator>;
在 HashJoinExecutor 中声明的 hash table 的类型是 HT,之前 using HT = SimpleHashTable,现在需要将其更换为:
using HashJoinKeyType = hash_t;
using HashJoinValType = TmpTuple;
using HT = LinearProbeHashTable<HashJoinKeyType, HashJoinValType, HashComparator>;
最后是 HashJoinExecutor 的实现代码:
template class LinearProbeHashTable<hash_t, TmpTuple, HashComparator>;
template class HashTableBlockPage<hash_t, TmpTuple, HashComparator>;HashJoinExecutor::HashJoinExecutor(ExecutorContext *exec_ctx, const HashJoinPlanNode *plan,std::unique_ptr<AbstractExecutor> &&left, std::unique_ptr<AbstractExecutor> &&right): AbstractExecutor(exec_ctx),plan_(plan),jht_("linear-probe-ht", exec_ctx->GetBufferPoolManager(), jht_comp_, jht_num_buckets_, jht_hash_fn_),left_(std::move(left)),right_(std::move(right)),collisions_(nullptr),collision_index_(0) {}void HashJoinExecutor::Init() {left_->Init();right_->Init();// HashJoin build 阶段Tuple tuple;auto *const txn = exec_ctx_->GetTransaction();auto *const bpm = exec_ctx_->GetBufferPoolManager();page_id_t tmp_page_id;TmpTuple tmp_tuple;auto *tmp_tuple_page = reinterpret_cast<TmpTuplePage *>(bpm->NewPage(&tmp_page_id));tmp_tuple_page->Init(tmp_page_id, PAGE_SIZE);while (left_->Next(&tuple)) {const auto hash_value = HashValues(&tuple, left_->GetOutputSchema(), plan_->GetLeftKeys());// 如果 tmp_page 满了的话,新建一个 page 再 insertif (!tmp_tuple_page->Insert(tuple, &tmp_tuple)) {bpm->UnpinPage(tmp_page_id, true);tmp_tuple_page = reinterpret_cast<TmpTuplePage *>(bpm->NewPage(&tmp_page_id));tmp_tuple_page->Init(tmp_page_id, PAGE_SIZE);tmp_tuple_page->Insert(tuple, &tmp_tuple);}// 将 tmp_tuple 插入到 hash table 中// - tmp_tuple 中存的是实际 tuple 的位置// - 实际的 tuple 放在了 tmp_tuple_page 中jht_.Insert(txn, hash_value, tmp_tuple);}bpm->UnpinPage(tmp_page_id, true);
}auto HashJoinExecutor::Next(Tuple *tuple) -> bool {auto* const bpm = exec_ctx_->GetBufferPoolManager();// HashJoin probe 的阶段while (NextCursor()) {// 初始化相关数据const auto *const predicate = plan_->Predicate();  // 用于判断是否能够 join 的 predicate// left tupleconst auto *const left_tmp_tuple = &collisions_->at(collision_index_);auto *const left_tuple_page = reinterpret_cast<TmpTuplePage *>(bpm->FetchPage(left_tmp_tuple->GetPageId()));Tuple left_tuple;left_tuple.DeserializeFrom(left_tuple_page->Get(left_tmp_tuple->GetOffset()));bpm->UnpinPage(left_tmp_tuple->GetPageId(), false);const auto *const right_tuple = &right_tuple_;  // right tupleconst auto *const output_schema = this->GetOutputSchema();  // join 之后的 output schemaconst auto col_count = output_schema->GetColumnCount();  // output 的 column 个数// 判断 left-tuple 和 right-tuple 是否能够 joinbool jointable = true;if (predicate != nullptr) {jointable = predicate->EvaluateJoin(&left_tuple, left_->GetOutputSchema(), right_tuple, right_->GetOutputSchema()).GetAs<bool>();}if (jointable) {// 将两个 tuple 进行 joinstd::vector<Value> values;for (size_t col_index = 0; col_index < col_count; col_index++) {const auto* expr = output_schema->GetColumn(col_index).GetExpr();const auto value = expr->EvaluateJoin(&left_tuple, left_->GetOutputSchema(), right_tuple, right_->GetOutputSchema());values.push_back(value);}*tuple = Tuple(values, output_schema);return true;}}return false;
}/** 指向下一个待匹配的 left tuple 和 right tuple */
auto HashJoinExecutor::NextCursor() -> bool {collision_index_++;while (collisions_ == nullptr || collision_index_ >= collisions_->size()) {const bool has_more = right_->Next(&right_tuple_);if (!has_more) {return false;}const auto r_hash_value = HashValues(&right_tuple_, right_->GetOutputSchema(), plan_->GetRightKeys());collisions_ = std::make_unique<std::vector<TmpTuple>>();jht_.GetValue(exec_ctx_->GetTransaction(), r_hash_value, collisions_.get());collision_index_ = 0;}return true;
}
实验运行结果

这篇关于【CMU15445】Fall 2019, Project 3: Query Execution 实验记录的文章就介绍到这儿,希望我们推荐的文章对编程师们有所帮助!


