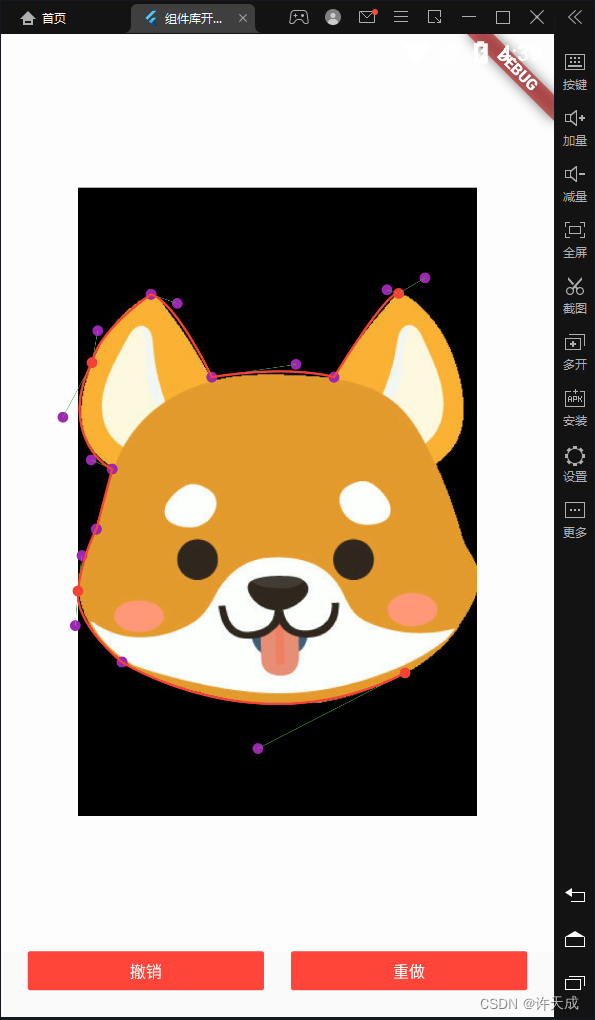
本文主要是介绍Flutter实现PS钢笔工具,实现高精度抠图的效果。,希望对大家解决编程问题提供一定的参考价值,需要的开发者们随着小编来一起学习吧!
演示:
代码:
import 'dart:ui';import 'package:flutter/material.dart' hide Image;
import 'package:flutter/services.dart';
import 'package:flutter_screenutil/flutter_screenutil.dart';
import 'package:kq_flutter_widgets/widgets/animate/stack.dart';
import 'package:kq_flutter_widgets/widgets/button/kq_small_button.dart';
import 'package:kq_flutter_widgets/widgets/update/update_view.dart';///抠图软件原型
class DrawPathTest extends StatefulWidget {const DrawPathTest({super.key});@overrideState<StatefulWidget> createState() => DrawPathTestState();
}class DrawPathTestState extends State<DrawPathTest> {///是否绑定左右操作点,即操作一个点,另一个点自动计算static bool isBind = true;///击中范围半径static double hitRadius = 5;///绘制区域state持有UpdateViewState? state;///背景图Image? _image;///历史步骤存储KqStack stackHistory = KqStack();///回收站步骤存储KqStack stackRecycleBin = KqStack();///绘制步骤集合List<Step> drawList = [];///手指按下时点击的控制点的位置缓存Step? hitControlStep;///手指按下时点击的画线点的位置缓存Step? hitDrawStep;///闭合绘制完成状态,不再添加点bool drawFinish = false;@overridevoid initState() {super.initState();_load("https://c-ssl.duitang.com/uploads/item/201903/19/20190319001325_bjvzi.jpg").then((value) {_image = value;update();});}@overrideWidget build(BuildContext context) {return Column(children: [Expanded(child: LayoutBuilder(builder: (c, lc) {return Container(color: Colors.white60,child: Listener(onPointerDown: (v) {Offset src = v.localPosition;///判断是否hithitDrawStep = _isHitDrawPoint(src);if (!drawFinish) {if (hitDrawStep != null && hitDrawStep!.isFirst) {_add(src, isLast: true);drawFinish = true;} else {hitControlStep = _isHitControlPoint(src);hitControlStep ??= _add(src);}update();} else {hitControlStep = _isHitControlPoint(src);}},onPointerMove: (v) {if (hitDrawStep != null) {_update(hitDrawStep!, v.localPosition);update();} else if (hitControlStep != null) {_update(hitControlStep!, v.localPosition);update();}},child: UpdateView(build: (UpdateViewState state) {this.state = state;return CustomPaint(size: Size(lc.maxWidth, lc.maxHeight),painter: TestDraw(_image, drawList),);},),),);}),),Row(children: [SizedBox(width: 20.r),Expanded(child: KqSmallButton(title: "撤销",onTap: (disabled) {_undo();update();},),),SizedBox(width: 20.r),Expanded(child: KqSmallButton(title: "重做",onTap: (disabled) {_redo();update();},),),SizedBox(width: 20.r),Expanded(child: KqSmallButton(title: "选择",onTap: (disabled) {_select();update();},),),SizedBox(width: 20.r),Expanded(child: KqSmallButton(title: "反选",onTap: (disabled) {_invert();update();},),),SizedBox(width: 20.r),Expanded(child: KqSmallButton(title: "删除",onTap: (disabled) {_delete();update();},),),SizedBox(width: 20.r),],),SizedBox(height: 20.r),],);}///更新绘制区域update() {state?.update();}///添加点Step _add(Offset offset, {bool isLast = false}) {Step step = Step(offset, offset, offset);step.isLast = isLast;if (drawList.isEmpty) {step.isFirst = true;}//添加到历史stackHistory.push(step);//添加到绘制列表drawList.add(step);//清除垃圾箱stackRecycleBin.clear();return step;}///判断是否点击在控制点上Step? _isHitControlPoint(Offset src) {for (Step step in drawList) {if (_distance(step.pointRight, src) < hitRadius) {step.hitPointType = PointType.pointRight;return step;} else if (_distance(step.pointLeft, src) < hitRadius) {step.hitPointType = PointType.pointLeft;return step;}}return null;}///判断是否点击在连接点上Step? _isHitDrawPoint(Offset src) {for (Step step in drawList) {if (_distance(step.point, src) < hitRadius) {step.hitPointType = PointType.point;return step;}}return null;}///更新点信息_update(Step hitStep, Offset target) {if (hitStep.hitPointType == PointType.pointRight) {hitStep.pointRight = target;if (isBind) {hitStep.pointLeft = hitStep.point.scale(2, 2) - target;}} else if (hitStep.hitPointType == PointType.pointLeft) {hitStep.pointLeft = target;if (isBind) {hitStep.pointRight = hitStep.point.scale(2, 2) - target;}} else if (hitStep.hitPointType == PointType.point) {hitStep.pointLeft = hitStep.pointLeft - hitStep.point + target;hitStep.pointRight = hitStep.pointRight - hitStep.point + target;hitStep.point = target;}}///两点距离double _distance(Offset one, Offset two) {return (one - two).distance;}///撤销、后退_undo() {Step? step = stackHistory.pop();if (step != null) {drawList.remove(step);stackRecycleBin.push(step);}}///重做、前进_redo() {Step? step = stackRecycleBin.pop();if (step != null) {drawList.add(step);stackHistory.push(step);}}///选择、完成_select() {}///反选、完成_invert() {}///删除_delete() {}///加载图片Future<Image> _load(String url) async {ByteData data = await NetworkAssetBundle(Uri.parse(url)).load(url);Codec codec = await instantiateImageCodec(data.buffer.asUint8List());FrameInfo fi = await codec.getNextFrame();return fi.image;}
}class TestDraw extends CustomPainter {static double width = 260;static double width1 = 50;static double height1 = 100;///绘制集合final List<Step> draw;///背景图片final Image? image;Step? tempStep;Step? tempFirstStep;TestDraw(this.image, this.draw);@overridevoid paint(Canvas canvas, Size size) {///绘制背景if (image != null) {canvas.drawImageRect(image!,Rect.fromLTRB(0,0,image!.width.toDouble(),image!.height.toDouble(),),Rect.fromLTRB(width1,height1,width + width1,width * image!.height / image!.width + height1,),Paint(),);}if (draw.isNotEmpty) {///构建画点与点之间的连线的pathPath path = Path();///绘制点和线for (int i = 0; i < draw.length; i++) {Step step = draw[i];if (!step.isLast) {canvas.drawCircle(step.point, 4.r, Paint()..color = Colors.red);canvas.drawCircle(step.pointLeft, 4.r, Paint()..color = Colors.purple);canvas.drawCircle(step.pointRight, 4.r, Paint()..color = Colors.purple);///画控制点和连线点之间的线段canvas.drawLine(step.point,step.pointLeft,Paint()..color = Colors.green..style = PaintingStyle.stroke);canvas.drawLine(step.point,step.pointRight,Paint()..color = Colors.green..style = PaintingStyle.stroke);}///构建画点与点之间的连线的pathif (step.isLast) {if (tempFirstStep != null && tempStep != null) {path.cubicTo(tempStep!.pointRight.dx,tempStep!.pointRight.dy,tempFirstStep!.pointLeft.dx,tempFirstStep!.pointLeft.dy,tempFirstStep!.point.dx,tempFirstStep!.point.dy,);}} else {//处理初始点if (step.isFirst) {tempFirstStep = step;path.moveTo(step.point.dx, step.point.dy);}if (tempStep != null) {path.cubicTo(tempStep!.pointRight.dx,tempStep!.pointRight.dy,step.pointLeft.dx,step.pointLeft.dy,step.point.dx,step.point.dy,);}}tempStep = step;}if (draw.length >= 2) {canvas.drawPath(path,Paint()..color = Colors.red..style = PaintingStyle.stroke..strokeWidth = 1.5,);}}}@overridebool shouldRepaint(covariant CustomPainter oldDelegate) {return true;}
}class Step {///线条连接点Offset point;///右控制点Offset pointRight;///左控制点(起始点没有左控制点的)Offset pointLeft;///是否选中了点的类型PointType hitPointType = PointType.pointRight;///是否是第一个控制点bool isFirst = false;///是否是最后一个控制点bool isLast = false;Step(this.point,this.pointRight,this.pointLeft,);
}///点类型
enum PointType {///线条连接点point,///右控制点pointRight,///左控制点pointLeft
}
stack代码:
///栈,先进后出
class KqStack<T> {final List<T> _stack = [];///入栈push(T obj) {_stack.add(obj);}///出栈T? pop() {if (_stack.isEmpty) {return null;} else {return _stack.removeLast();}}///栈长度length() {return _stack.length;}///清除栈clear() {_stack.clear();}
}
主要思路:
更具手指点击屏幕的位置,记录点击的位置,并生成绘制点和两个控制点,手指拖动控制点时,动态刷新控制点位置,然后利用flutter绘制机制,在canvas上根据点的位置和控制点的位置绘制三阶贝塞尔曲线,实现钢笔工具效果。具体实现可以看代码,有注释,逻辑应该还算清晰。
这篇关于Flutter实现PS钢笔工具,实现高精度抠图的效果。的文章就介绍到这儿,希望我们推荐的文章对编程师们有所帮助!


