本文主要是介绍testng框架优化+centos服务器下搭建java自动化环境(centos8.5),希望对大家解决编程问题提供一定的参考价值,需要的开发者们随着小编来一起学习吧!
前2篇见
httpclient+testng接口自动化整体框架设计
httpclient+testng接口自动化框架二次封装Java
总站在黑盒的角度提需求提问题谁都会,要能写出代码解决才是真正的会。高T不会写代码???
推荐巨好的网址:maven中央仓库
https://mvnrepository.com/
服务器自动化结果地址
http://10.xx.xx.xx/testresultHtml/tcicommon430_autoRun.html
2022.8.3 每次存储自动化测试报告的运行结果 最新的报告单独存储 发邮箱
修改CaseUtil类
      // 20220703存入case运行的html结果String writetoHtml = pathAll + "testresultHtml/" + genedReportName + ".html";//20220802 把测试报告放到每次运行的jobid文件夹下String writetoHtmlnew = pathAll + "testresultHtml/every/" + DictGene.dictGene(job_id) + "/" + genedReportName + ".html";// 4月8开会讨论保留历史报告,加时间戳
//        String writetoHtml = "testresultHtml/" + TimeTransfer.TimeStamp2Date(System.currentTimeMillis(), "yyyy-MM-dd HH:mm:ss") + "_" + genedReportName + ".html";ReportUtil report = new ReportUtil(writetoHtml);ReportUtil reportnew = new ReportUtil(writetoHtmlnew);// 20220802新增 保留2份测试报告reportnew.head(genedReportName, usedTime, caseArray.length, pass, ignore);reportnew.sb.append(caselog.toString());reportnew.end();
新增类:每次运行自动化,在测试报告html文件夹下生成唯一的jobid文件夹,在自动化报告历史记录展示时,根据数据库的jobid创建时间去拼url路径 获取报告
package com.httpclient.fileOperate;import com.interfaceframe.util.RandomJobid;import java.io.File;public class DictGene {public static String dictGene(String jobid) {// 本地路径String pathAll = "/Users/qa/Desktop/2021/code/cloudtestng/src/main/java/";// 远程服务器路径
//    String pathAll = "/www/data/cloudtestng/src/main/java/";String jobidHtml = pathAll + "testresultHtml/every/";try {File file = new File(jobidHtml, jobid);if (!file.exists()) {file.mkdir();System.out.println("创建jobid文件夹成功");}} catch (RuntimeException e) {throw new RuntimeException(e);}return jobid;}public static void dictGene() {// 本地路径String pathAll = "/Users/qa/Desktop/2021/code/cloudtestng/src/main/java/";// 远程服务器路径
//    String pathAll = "/www/data/cloudtestng/src/main/java/";String jobidHtml = pathAll + "testresultHtml/";try {File file = new File(jobidHtml, RandomJobid.getId());if (!file.exists()) {file.mkdir();System.out.println("创建jobid文件夹成功");}} catch (RuntimeException e) {throw new RuntimeException(e);}}public static void main(String[] args) {dictGene();}
}
2022.8.1 java使用javax.mail向公司内部outlook发送邮箱完整代码
package com.interfaceframe.mail;import com.interfaceframe.util.TimeTransfer;import javax.activation.DataHandler;
import javax.mail.*;
import javax.mail.internet.InternetAddress;
import javax.mail.internet.MimeBodyPart;
import javax.mail.internet.MimeMessage;
import javax.mail.internet.MimeMultipart;
import javax.mail.util.ByteArrayDataSource;
import java.io.*;
import java.util.Properties;public class SendSMTPMail {/*** 读取本地html文件里的html代码* 20220719** @return*/public static String toHtmlString(File file) {// 获取HTML文件流StringBuffer htmlSb = new StringBuffer();try {BufferedReader br = new BufferedReader(new InputStreamReader(new FileInputStream(file), "utf-8"));while (br.ready()) {htmlSb.append(br.readLine());}br.close();// 删除临时文件//file.delete();} catch (FileNotFoundException e) {e.printStackTrace();} catch (IOException e) {e.printStackTrace();}// HTML文件字符串String htmlStr = htmlSb.toString();// 返回经过清洁的html文本return htmlStr;}//    public static void main(String[] args) {public static void sendMail() {String to = "xx@xx.com";// 发件人邮箱,不需要改动String from = "cloudtest@xx.com";final String username = "xx";//change accordinglyfinal String password = "xx";//change accordingly// 注册好的公司的邮件服务,不需要改动String host = "smtpinternal.xx.com";Properties props = new Properties();props.put("mail.smtp.auth", "true");props.put("mail.smtp.starttls.enable", "true");props.put("mail.smtp.host", host);props.put("mail.smtp.port", "25");// ehlo被设置为false的时候连接邮件服务器不需要验证props.setProperty("mail.smtp.ehlo", "false");Session session = Session.getInstance(props,new javax.mail.Authenticator() {protected PasswordAuthentication getPasswordAuthentication() {return new PasswordAuthentication(username, password);}});try {// 创建一个默认的message对象Message message = new MimeMessage(session);// 设置头部信息message.setFrom(new InternetAddress(from));// 设置发件人信息message.setFrom(new InternetAddress(from));// 发送给message.setRecipients(Message.RecipientType.TO,InternetAddress.parse(to));// 抄送给
//            String[] cclist = {"xx@xx.com","xx@xx.com", "xx@xx.com"};String[] cclist = {"xx@xx.com", "xx@xx.com"};if (cclist.length > 0) {// 遍历抄送人Address[] addressCC = new InternetAddress[cclist.length];for (int j = 0; j < cclist.length; j++) {addressCC[j] = new InternetAddress(cclist[j]);}message.setRecipients(Message.RecipientType.CC, addressCC);}// 设置邮件主题String title = "[hce430 API Report] Build Version: hce430_" + TimeTransfer.TimeStamp2Date();message.setSubject(title);// 本地服务器html路径
//            String reportPath = "/Users/qa/Desktop/2021/code/cloudtestng/src/main/java/testresultHtml/tcicommon430_autoRun.html";// 远程服务器html路径String reportPath = "/www/data/cloudtestng/src/main/java/testresultHtml/hcecommon430_autoRun.html";//读取.html文件为字符串String htmlStr = toHtmlString(new File(reportPath));String url = "http://10.121.216.37/testresultHtml/hcecommon430_autoRun.html";String mailContent = "Dear ALL," +"\n" +"\n" +"\tPlease find hce430 automation test report for this build : hce430_" + TimeTransfer.TimeStamp2Date() + " below.\n" +"\n" +"\tURL:" + url +"\n" +"\n" +"\thce430 Automation Test Summary";//            String mailContent="<html>\n" +
//                    "<head>\n" +
//                    "<meta charset=\"utf-8\">\n" +
//                    "<title>JOB REPORT</title>\n" +
//                    "</head>\n" +
//                    "<body>\n" +
//                    "\n" +
//                    "<h3>Please find hce650 Automation API Test Result</h3>\n" +
//                    " <h4 >Summary</h4>\n" +
//                    "             <table border=\"1\">\n" +
//                    "                 % for product_version, casename, result, passed, failed, errors, test_total_time, time_start, time_end, logdir in items:\n" +
//                    "                <tr>\n" +
//                    "                    <td>Product Version</td><td><tt>{{product_version}}</tt></td>\n" +
//                    "                </tr>\n" +
//                    "                 <tr>\n" +
//                    "                     <td>Test Plan Name</td><td><tt>{{casename}}</tt></td>\n" +
//                    "                 </tr>\n" +
//                    "                 <tr>\n" +
//                    "                     <td>Result</td><td><tt>{{result}} (Passed: {{passed}}; Failed: {{failed}}; Errors: {{errors}})</tt></td>\n" +
//                    "                 </tr>\n" +
//                    "                 <tr>\n" +
//                    "                     <td>Start Time</td><td><tt>{{time_start}}</tt></td>\n" +
//                    "                 </tr>\n" +
//                    "                 <tr>\n" +
//                    "                     <td>End Time</td><td><tt>{{time_end}}</tt></td>\n" +
//                    "                 </tr>\n" +
//                    "                <tr>\n" +
//                    "                     <td>Cumulative Time</td><td><tt>{{test_total_time}}</tt></td>\n" +
//                    "                </tr>\n" +
//                    "                 <tr>\n" +
//                    "                     <td>Result Link</td><td><tt>{{url}}</tt></td>\n" +
//                    "                 </tr>\n" +
//                    "                 %end\n" +
//                    "             </table>\n" +
//                    " </html>";// alternativeMimeMultipart content = new MimeMultipart("multipart_subtype_alternative");MimeBodyPart text = new MimeBodyPart();MimeBodyPart html = new MimeBodyPart();html.setHeader("MIME-Version", "1.0");html.setHeader("Content-Type", html.getContentType());html.setDataHandler(new DataHandler(new ByteArrayDataSource(htmlStr, "text/html; charset=utf-8")));text.setText(mailContent);text.setHeader("MIME-Version", "1.0");text.setHeader("Content-Type", text.getContentType());content.addBodyPart(text, 0);content.addBodyPart(html, 1);message.setContent(content);// 发送邮件Transport.send(message);System.err.println("---------------发送邮件成功 successfully---------------");} catch (MessagingException e) {throw new RuntimeException(e);} catch (IOException e) {throw new RuntimeException(e);}}
}
2022.7.11-7.12 java使用javax.mail向公司内部outlook发送邮箱
第一步,申请邮箱smtp服务,走工单申请--SMTP Service 需要把开发服务器ip添加上
本地无法像outlook发邮件
第二步,审批通过,在开发服务器执行安装telnet
telnet smtpinternal.xx.com 25
执行 cd /www/data
python3 mail_utils.py 查看outlook收到邮件
邮箱错误状态码
SMTP 发送邮件错误码和解决方法
如遇
DEBUG: JavaMail version 1.6.2
DEBUG: successfully loaded resource: /META-INF/javamail.default.address.map
DEBUG: getProvider() returning javax.mail.Provider[TRANSPORT,smtp,com.sun.mail.smtp.SMTPTransport,Oracle]
DEBUG SMTP: useEhlo false, useAuth true
DEBUG SMTP: trying to connect to host "smtpinternal.xx.com", port 25, isSSL false
com.sun.mail.util.MailConnectException: Couldn't connect to host, port: smtpinternal.xx.com, 25; timeout -1;
nested exception is:
解决办法:在开发服务器运行成功,在本地运行失败
如遇
DEBUG SMTP: IOException while sending, closing, THROW:
java.io.IOException: No MimeBodyPart content
at javax.mail.internet.MimePartDataSource.getInputStream(MimePartDataSource.java:116)
at javax.activation.DataHandler.writeTo(DataHandler.java:305)
javax.mail.MessagingException: IOException while sending message;
nested exception is:
java.io.IOException: No MimeBodyPart content
发送失败
解决办法:换个代码写法 参考
发送简单邮件(Send simple email)_学习JavaMail API|WIKI教程
如遇
DEBUG: JavaMail version 1.6.2
DEBUG: successfully loaded resource: /META-INF/javamail.default.address.map
DEBUG: getProvider() returning javax.mail.Provider[TRANSPORT,smtp,com.sun.mail.smtp.SMTPTransport,Oracle]
DEBUG SMTP: useEhlo false, useAuth true
DEBUG SMTP: trying to connect to host "smtpinternal.xx.com", port 25, isSSL false
220 peklppfpool2.xx.com ESMTP xx
, For Authorized Business Use Only
DEBUG SMTP: connected to host "smtpinternal.xx.com", port: 25
HELO localhost
250 peklppfpool2.xx.com
DEBUG SMTP: use8bit false
MAIL FROM:<cloudtest@xx.com>
250 2.1.0 Ok
RCPT TO:<receiver@xx.com>
554 5.7.1 <unknown[10.xx.xx.xx]>: Client host rejected: Access denied
DEBUG SMTP: Invalid Addresses
DEBUG SMTP: receiver@xx.com
DEBUG SMTP: Sending failed because of invalid destination addresses
RSET
250 2.0.0 Ok
DEBUG SMTP: MessagingException while sending, THROW:
javax.mail.SendFailedException: Invalid Addresses;
nested exception is:
com.sun.mail.smtp.SMTPAddressFailedException: 554 5.7.1 <unknown[10.112.60.120]>: Client host rejected: Access denied
at com.sun.mail.smtp.SMTPTransport.rcptTo(SMTPTransport.java:2079)
at com.sun.mail.smtp.SMTPTransport.sendMessage(SMTPTransport.java:1301)
at com.interfaceframe.mail.sendSMTPMail.SendEmail(sendSMTPMail.java:78)
at com.interfaceframe.mail.sendSMTPMail.main(sendSMTPMail.java:115)
Caused by: com.sun.mail.smtp.SMTPAddressFailedException: 554 5.7.1 <unknown[10.112.60.120]>: Client host rejected: Access denied
at com.sun.mail.smtp.SMTPTransport.rcptTo(SMTPTransport.java:1979)
... 3 more
发送失败
javax.mail.SendFailedException: Invalid Addresses;
nested exception is:
com.sun.mail.smtp.SMTPAddressFailedException: 554 5.7.1 <unknown[10.112.60.120]>: Client host rejected: Access denied
at com.sun.mail.smtp.SMTPTransport.rcptTo(SMTPTransport.java:2079)
at com.sun.mail.smtp.SMTPTransport.sendMessage(SMTPTransport.java:1301)
at com.interfaceframe.mail.sendSMTPMail.SendEmail(sendSMTPMail.java:78)
at com.interfaceframe.mail.sendSMTPMail.main(sendSMTPMail.java:115)
Caused by: com.sun.mail.smtp.SMTPAddressFailedException: 554 5.7.1 <unknown[10.112.60.120]>: Client host rejected: Access denied
at com.sun.mail.smtp.SMTPTransport.rcptTo(SMTPTransport.java:1979)
... 3 more
Process finished with exit code 0
如遇
javax.mail.AuthenticationFailedException: 535 5.7.139 Authentication unsuccessful, the user credentials were incorrect. [SGBP274CA0017.SGPP274.PROD.OUTLOOK.COM]
at com.sun.mail.smtp.SMTPTransport$Authenticator.authenticate(SMTPTransport.java:965)
at com.sun.mail.smtp.SMTPTransport.authenticate(SMTPTransport.java:876)
at com.sun.mail.smtp.SMTPTransport.protocolConnect(SMTPTransport.java:780)
at javax.mail.Service.connect(Service.java:366)
at javax.mail.Service.connect(Service.java:246)
at javax.mail.Service.connect(Service.java:267)
at com.interfaceframe.mail.sentmail.SendEmail(sentmail.java:76)
at com.interfaceframe.mail.sentmail.main(sentmail.java:113)

解决办法:
// ehlo被设置为false的时候连接邮件服务器不需要验证
props.setProperty("mail.smtp.ehlo", "false");
2022.7.4-7.5 自动化case运行结果入库以及解决奇奇怪怪的问题。。。。醉了
IDEA文件列表无法显示.log文件
idea运行完程序,在ide项目目录下不展示txt日志文件 log日志文件,在访达查看本地的文件发现确实存在txt文件,但却在idea列表中看不见,要首先考虑是否被隐藏、此格式是否允许显示
如图所示,无论怎么生成log txt文件,idea文件列表始终不展示

IDEA文件列表无法显示.log 部分.txt文件。。。idea版本问题
打开Preference - Editor - File Types 在Recognized File Types 选择文本文档Text,添加后缀*.log 保存即可看到效果


➜ .ssh git:(master) ✗ ssh -v root@xx.xx.xx.xx
OpenSSH_8.1p1, LibreSSL 2.7.3
debug1: Reading configuration data /Users/qa/.ssh/config
debug1: /Users/qa/.ssh/config line 32: Applying options for *
debug1: Reading configuration data /etc/ssh/ssh_config
debug1: /etc/ssh/ssh_config line 47: Applying options for *
debug1: auto-mux: Trying existing master
ssh 远程服务器无反应
个人开发某服务器主机出现如下问题:今天上午开始ssh连接不上了,可以ping通
解决方法:进入cd ~/.ssh 删除有问题的 master-root@10.121.xx.xx:22 ip即可

再次尝试:
➜ .ssh git:(master) ✗ ssh -v root@10.121.xx.xx
OpenSSH_8.1p1, LibreSSL 2.7.3
debug1: Reading configuration data /Users/qa/.ssh/config
debug1: /Users/qa/.ssh/config line 32: Applying options for *
debug1: Reading configuration data /etc/ssh/ssh_config
debug1: /etc/ssh/ssh_config line 47: Applying options for *
debug1: auto-mux: Trying existing master
debug1: Control socket "/Users/qa/.ssh/master-root@10.121.xx.xx:22" does not exist
debug1: Connecting to 10.121.xx.xx [10.121.xx.xx] port 22.
debug1: Connection established.
debug1: identity file /Users/qa/.ssh/id_rsa type 0
debug1: identity file /Users/qa/.ssh/id_rsa-cert type -1
debug1: identity file /Users/qa/.ssh/id_dsa type -1
debug1: identity file /Users/qa/.ssh/id_dsa-cert type -1
debug1: identity file /Users/qa/.ssh/id_ecdsa type -1
debug1: identity file /Users/qa/.ssh/id_ecdsa-cert type -1
debug1: identity file /Users/qa/.ssh/id_ed25519 type -1
debug1: identity file /Users/qa/.ssh/id_ed25519-cert type -1
debug1: identity file /Users/qa/.ssh/id_xmss type -1
debug1: identity file /Users/qa/.ssh/id_xmss-cert type -1
debug1: Local version string SSH-2.0-OpenSSH_8.1
debug1: Remote protocol version 2.0, remote software version OpenSSH_8.0
debug1: match: OpenSSH_8.0 pat OpenSSH* compat 0x04000000
debug1: Authenticating to 10.121.xx.xx:22 as 'root'
debug1: SSH2_MSG_KEXINIT sent
debug1: SSH2_MSG_KEXINIT received
debug1: kex: algorithm: curve25519-sha256
debug1: kex: host key algorithm: ecdsa-sha2-nistp256
debug1: kex: server->client cipher: chacha20-poly1305@openssh.com MAC: <implicit> compression: none
debug1: kex: client->server cipher: chacha20-poly1305@openssh.com MAC: <implicit> compression: none
debug1: expecting SSH2_MSG_KEX_ECDH_REPLY
debug1: Server host key: ecdsa-sha2-nistp256 SHA256:bKzcAVLHBakgx6Z/aRlmqD/onljlxwk8UviUA/6kXqo
debug1: Host '10.121.xx.xx' is known and matches the ECDSA host key.
debug1: Found key in /Users/qa/.ssh/known_hosts:1
debug1: rekey out after 134217728 blocks
debug1: SSH2_MSG_NEWKEYS sent
debug1: expecting SSH2_MSG_NEWKEYS
debug1: SSH2_MSG_NEWKEYS received
debug1: rekey in after 134217728 blocks
debug1: Will attempt key: /Users/qa/.ssh/id_rsa RSA SHA256:6d80+XpqX0pzCpVY/mO2TnEdYIsfU03osVDyQrlKQD8
debug1: Will attempt key: /Users/qa/.ssh/id_dsa
debug1: Will attempt key: /Users/qa/.ssh/id_ecdsa
debug1: Will attempt key: /Users/qa/.ssh/id_ed25519
debug1: Will attempt key: /Users/qa/.ssh/id_xmss
debug1: SSH2_MSG_EXT_INFO received
debug1: kex_input_ext_info: server-sig-algs=<ssh-ed25519,ssh-rsa,rsa-sha2-256,rsa-sha2-512,ssh-dss,ecdsa-sha2-nistp256,ecdsa-sha2-nistp384,ecdsa-sha2-nistp521>
debug1: SSH2_MSG_SERVICE_ACCEPT received
debug1: Authentications that can continue: publickey,gssapi-keyex,gssapi-with-mic,password
debug1: Next authentication method: publickey
debug1: Offering public key: /Users/qa/.ssh/id_rsa RSA SHA256:6d80+XpqX0pzCpVY/mO2TnEdYIsfU03osVDyQrlKQD8
debug1: Authentications that can continue: publickey,gssapi-keyex,gssapi-with-mic,password
debug1: Trying private key: /Users/qa/.ssh/id_dsa
debug1: Trying private key: /Users/qa/.ssh/id_ecdsa
debug1: Trying private key: /Users/qa/.ssh/id_ed25519
debug1: Trying private key: /Users/qa/.ssh/id_xmss
debug1: Next authentication method: password
root@10.121.xx.xx's password:
如上ssh -v 说明正常了
问题2:
如遇git@gitlab.xx.com: Permission denied
私钥验证错误
永久解决:在~/.ssh/config文件中(没有则新建),指定对应git服务使用的认证秘钥文件即可
vim ~/.ssh/config
添加
Host gitlab.xx.com
Preferredauthentications publickey
IdentityFile ~/.ssh/id_rsa
//                    System.out.println("$$$$$$$$$$$$$: " + errorResult_KEYVALUE);// 实际结果和期望结果的key value不相等 ,共有 1 处!具体差异请看下面:*********请注意\n\nkey: xx value: {id:,name:admin,real:管理员,xx@xx.com,role:管理员},不在实际结果\n\n// 20220703入库的fail_reason做解析,去掉*********,把\n换成空if (errorResult_KEYVALUE.contains("*********")) {fail_reason_db = errorResult_KEYVALUE.replace("*********", "").replace("\\n\\n", "").replace("\n\n", "");
//                        System.out.println("fail_reason_db" + fail_reason_db);}
/*** 20220704新增所有case运行总结果入库api_job,插入数据库--开始* 在for循环外面,对总的case运行结果汇总成一条summary入库*/String start_time_all = TimeTransfer.TimeStamp2Date(start_time);long end_time = System.currentTimeMillis();float duration_time = (end_time - start_time) / 1000;ReportToDBApiJob.reportToApiJob(build_number, job_id, pass, fail,0, ignore, total, start_time_all, duration_time);/*** 20220704新增所有case运行总结果入库api_job,插入数据库--结束**/执行结果

2022.7.1-7.3 CentOS 7 环境下安装Maven、设计java运行的shell脚本、配置定时任务
前提:centos安装好了java环境 见 2022.6.24 Linux(centos8)搭建java环境详细步骤
1.下载JDK
JDK官网下载链接
http://www.oracle.com/technetwork/java/javase/downloads/jdk8-downloads-2133151.html
选中Java SE Development Kit 8u144中的Accept License Agreement
选择适合自己操作系统的版本点击链接下载
选择x64 Compressed Archive 下载版本jdk-8u333-linux-x64.tar.gz
配置jdk环境变量 vim /etc/profile
#20220701 new
export JAVA_HOME=/www/data/soft/jdk1.8.0_333
export CLASS_PATH=.:$JAVA_HOME/lib/dt.jar:$JAVA_HOME/lib/tools.jar
export PATH=$PATH:$JAVA_HOME/bin
使用yum查找jdk
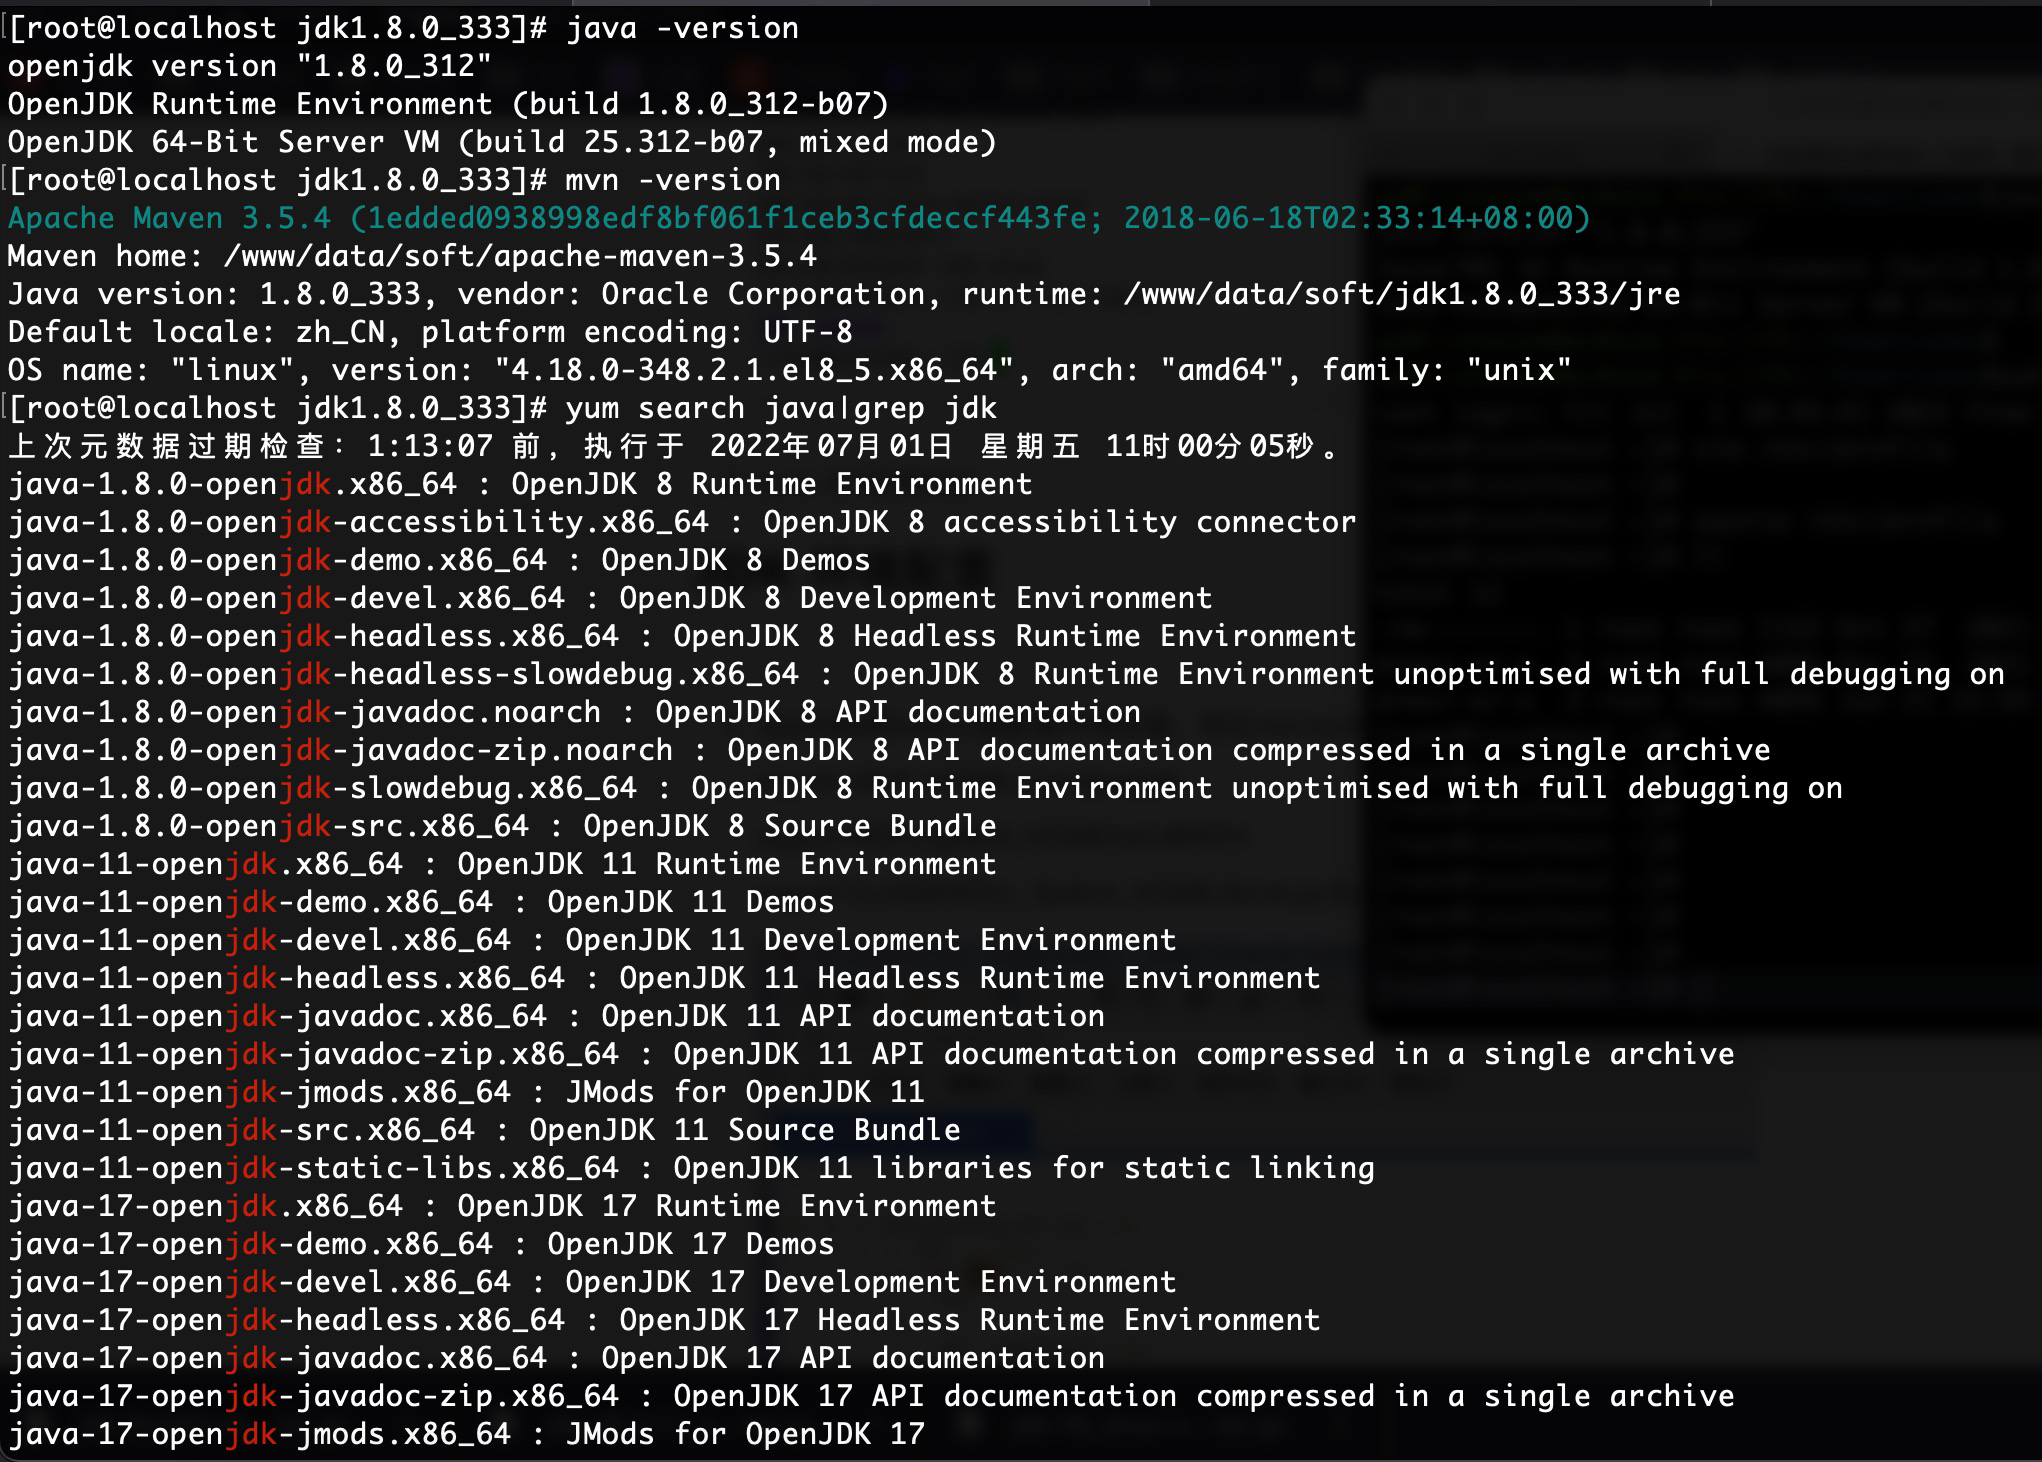
yum search java|grep jdk
2. 下载安装maven文件
wget http://mirrors.tuna.tsinghua.edu.cn/apache/maven/maven-3/3.5.4/binaries/apache-maven-3.5.4-bin.tar.gz
如果下载不下来,则在浏览器下载下来tar包再scp到服务器
scp ./apache-maven-3.5.4-bin.tar.gz root@remoteip:/www/data/soft
3. 解压安装
tar -zxvf apache-maven-3.5.4-bin.tar.gz
参考CentOS 7 环境下安装Maven
4. 配置环境变量
使用vim编辑/etc/profile文件 vim /etc/profile
在/etc/profile文件末尾增加以下3行配置:
#20220701新增maven环境变量 M2_HOME为maven的安装路径
M2_HOME=/www/data/soft/apache-maven-3.5.4
export PATH=${M2_HOME}/bin:${PATH}
重载/etc/profile这个文件 source /etc/profile
5. 检验maven是否安装成功
[root@localhost jdk1.8.0_333]# mvn -version
Apache Maven 3.5.4 (1edded0938998edf8bf061f1ceb3cfdeccf443fe; 2018-06-18T02:33:14+08:00)
Maven home: /www/data/soft/apache-maven-3.5.4
Java version: 1.8.0_333, vendor: Oracle Corporation, runtime: /www/data/soft/jdk1.8.0_333/jre
Default locale: zh_CN, platform encoding: UTF-8
OS name: "linux", version: "4.18.0-348.2.1.el8_5.x86_64", arch: "amd64", family: "unix"
6. 由于代码目录变了,修改nginx配置文件
查看防火墙是否开启了80端口
firewall-cmd --zone=public --list-port
要先确保需要关闭的端口已经关闭。如果已开放则关闭端口。public区域开放的端口,是所有IP都可以进行访问的
firewall-cmd --zone=public --list-ports #查询开放的端口有那些
firewall-cmd --zone=public --list-port
netstat -antlp | grep 80 查看端口号占用情况
ps -ef|grep nginx

[root@localhost ~]# vim /etc/nginx/nginx.conf
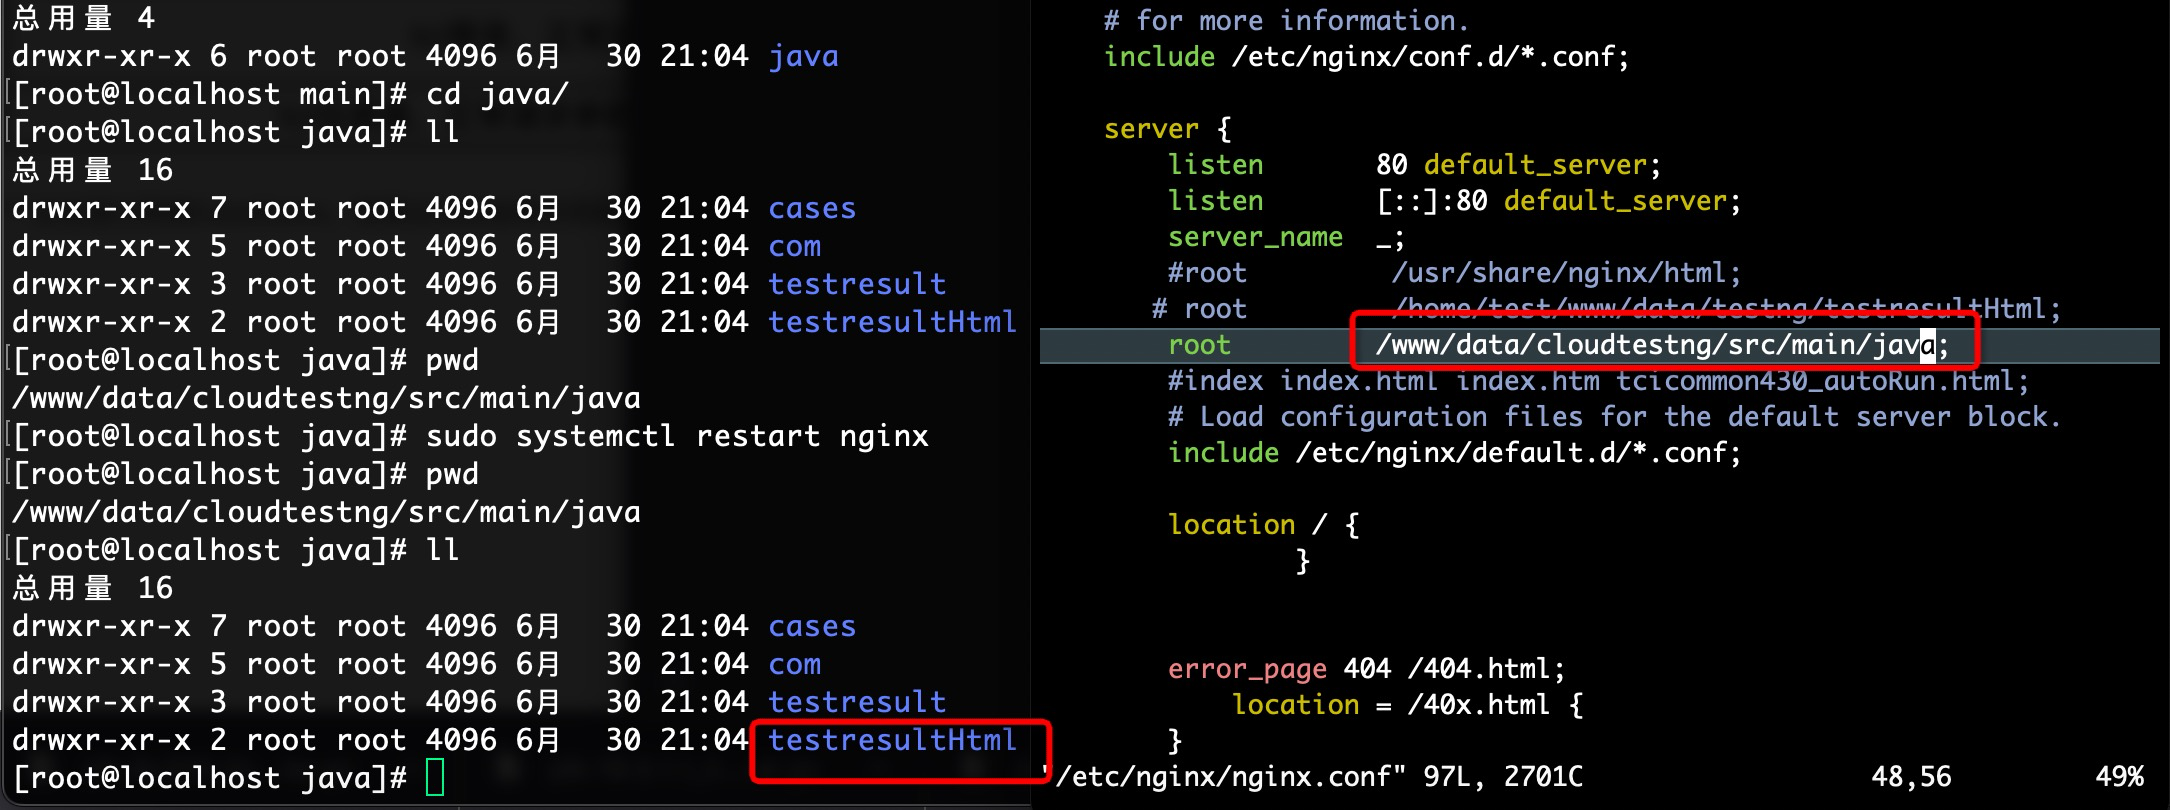
server {
listen 80 default_server;
#listen 8081 default_server;
listen [::]:80 default_server;
#listen [::]:8081 default_server;
server_name _;
#root /usr/share/nginx/html;
# root /home/test/www/data/testng/testresultHtml;
root /www/data/cloudtestng/src/main/java;
#index index.html index.htm tcicommon430_autoRun.html;
# Load configuration files for the default server block.
include /etc/nginx/default.d/*.conf;

修改/etc/nginx/nginx.conf 配置文件后,需要重启nginx
sudo systemctl restart nginx
服务器自动化结果地址
http://10.xx.xx.xx/testresultHtml/tcicommon430_autoRun.html
7. 在centos服务器下git clone最新自动化代码
在pom.xml文件目录下执行
[root@localhost ~]# cd /www/data/cloudtestng/
[root@localhost cloudtestng]# ll
总用量 32
-rw-r--r-- 1 root root 20069 7月 1 15:48 pom.xml
-rw-r--r-- 1 root root 186 6月 30 21:04 remote.sh
drwxr-xr-x 3 root root 4096 6月 30 21:04 src
drwxr-xr-x 6 root root 4096 6月 30 21:04 target
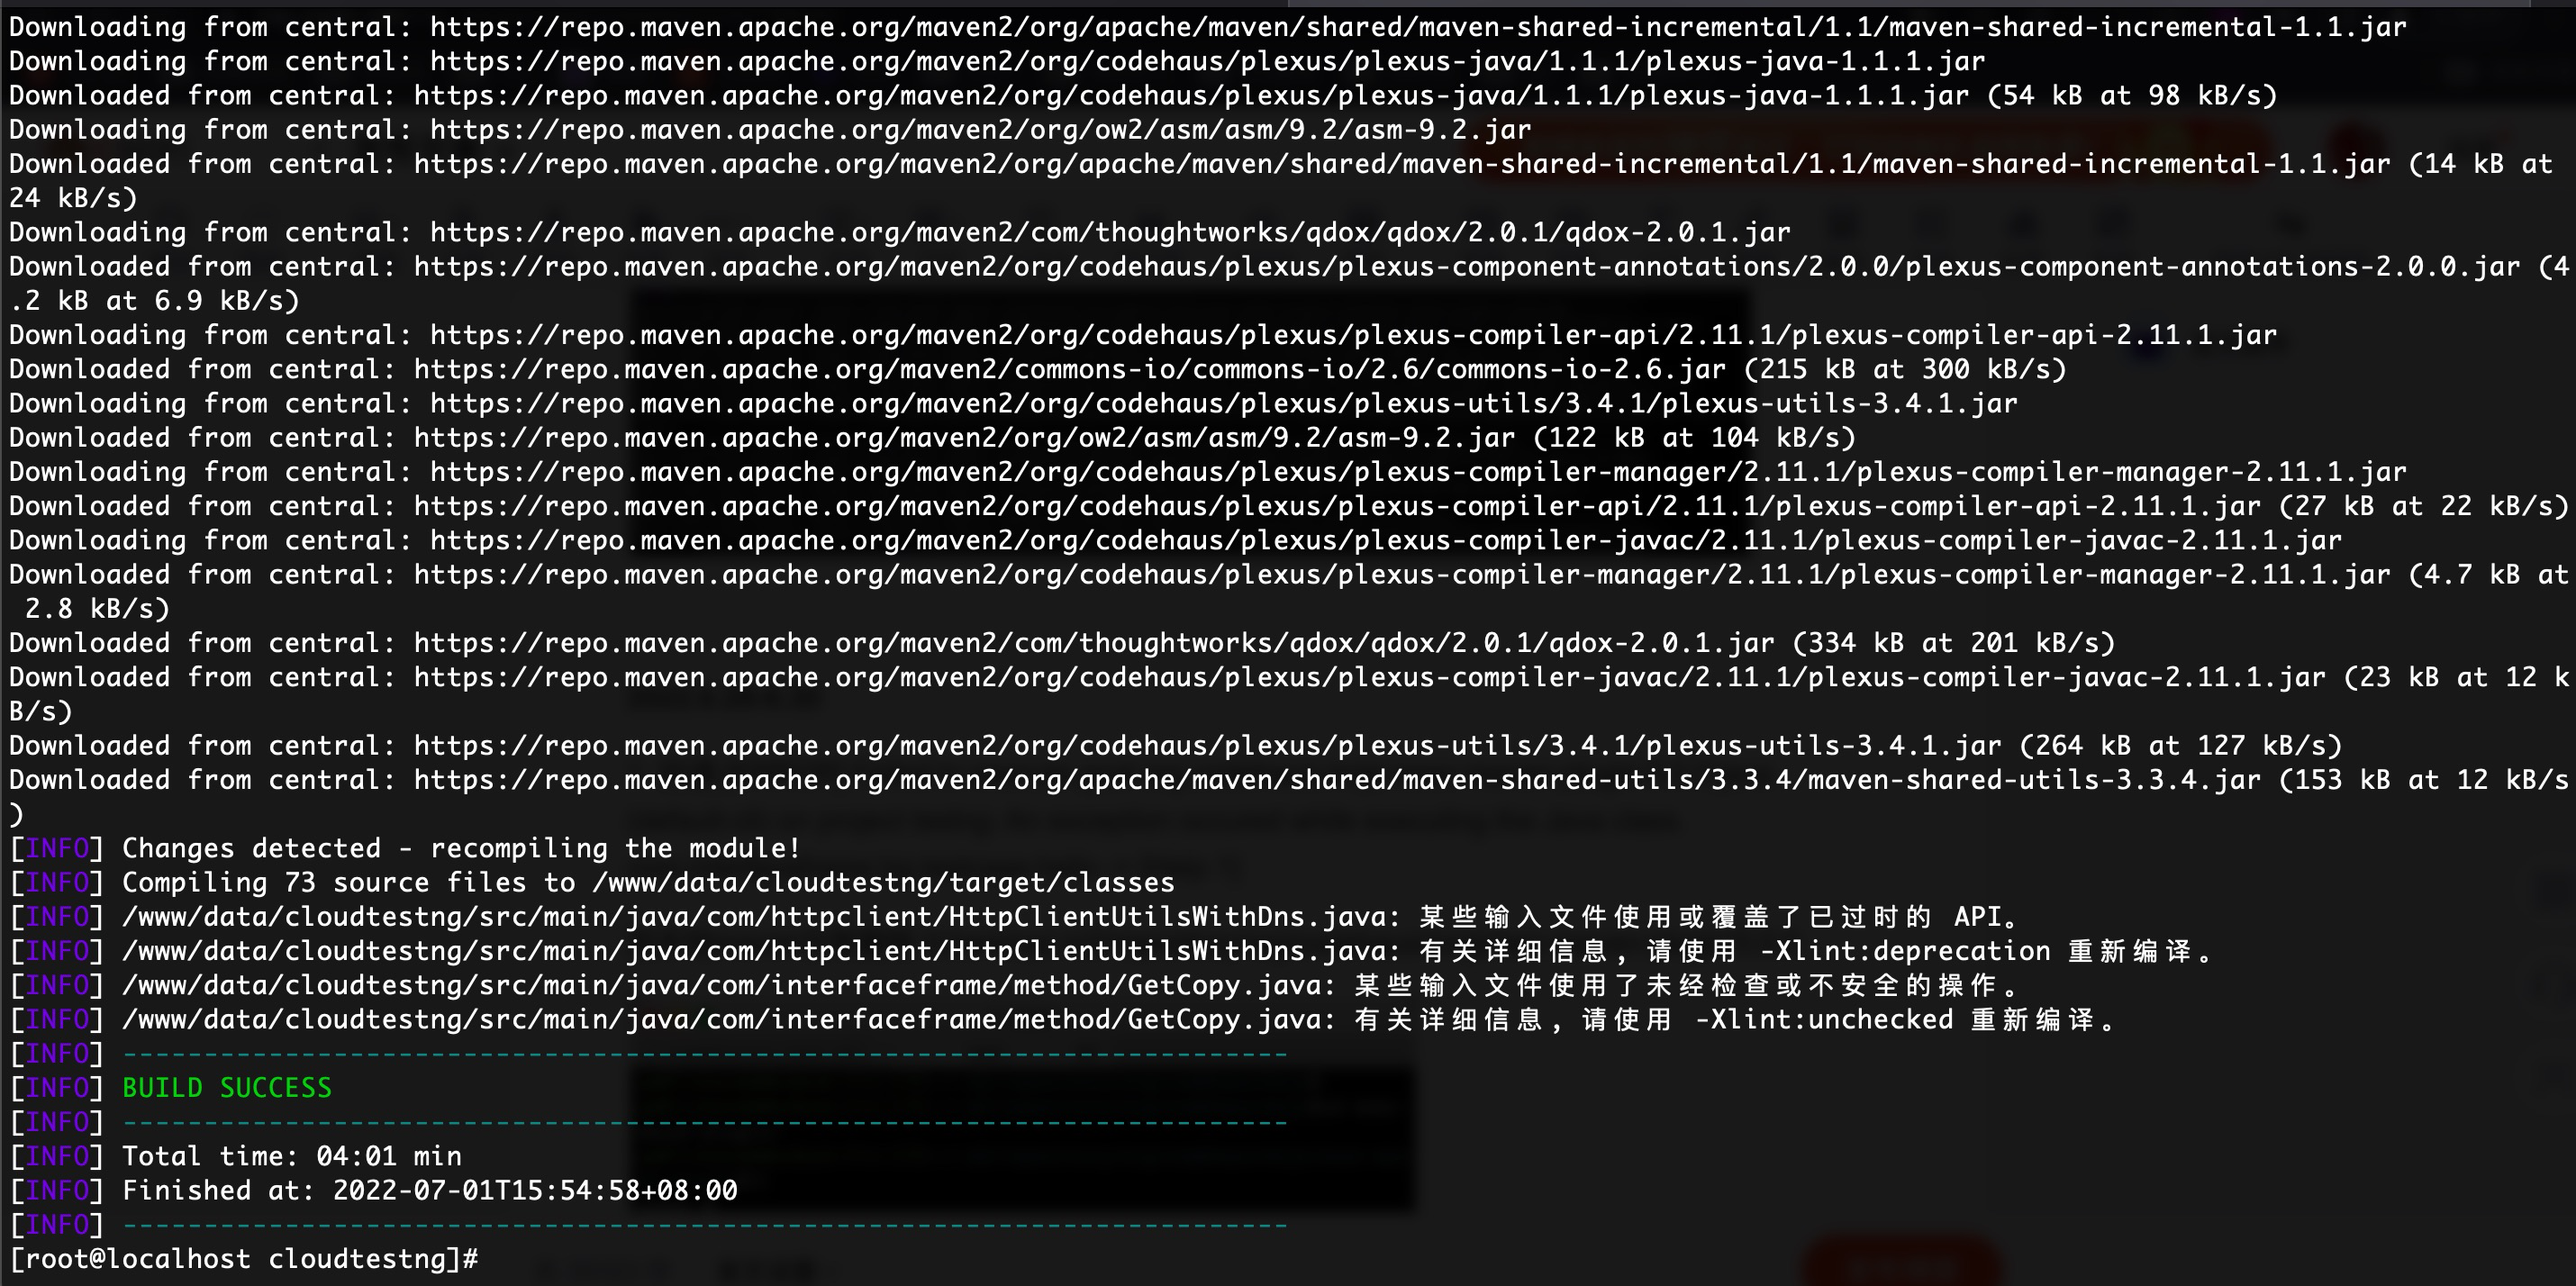
[root@localhost cloudtestng]# mvn clean 清理缓存
[root@localhost cloudtestng]# mvn compile 输入mvn compile后,maven会自动下载依赖jar,为代码生成字节码文件等,即编译,一定要在 /www/data/cloudtestng/ 目录下执行,pom.xml在此目录下
[root@localhost cloudtestng]# mvn test 一次性执行所有的用例
[root@localhost cloudtestng]# mvn package 打包

编译通过
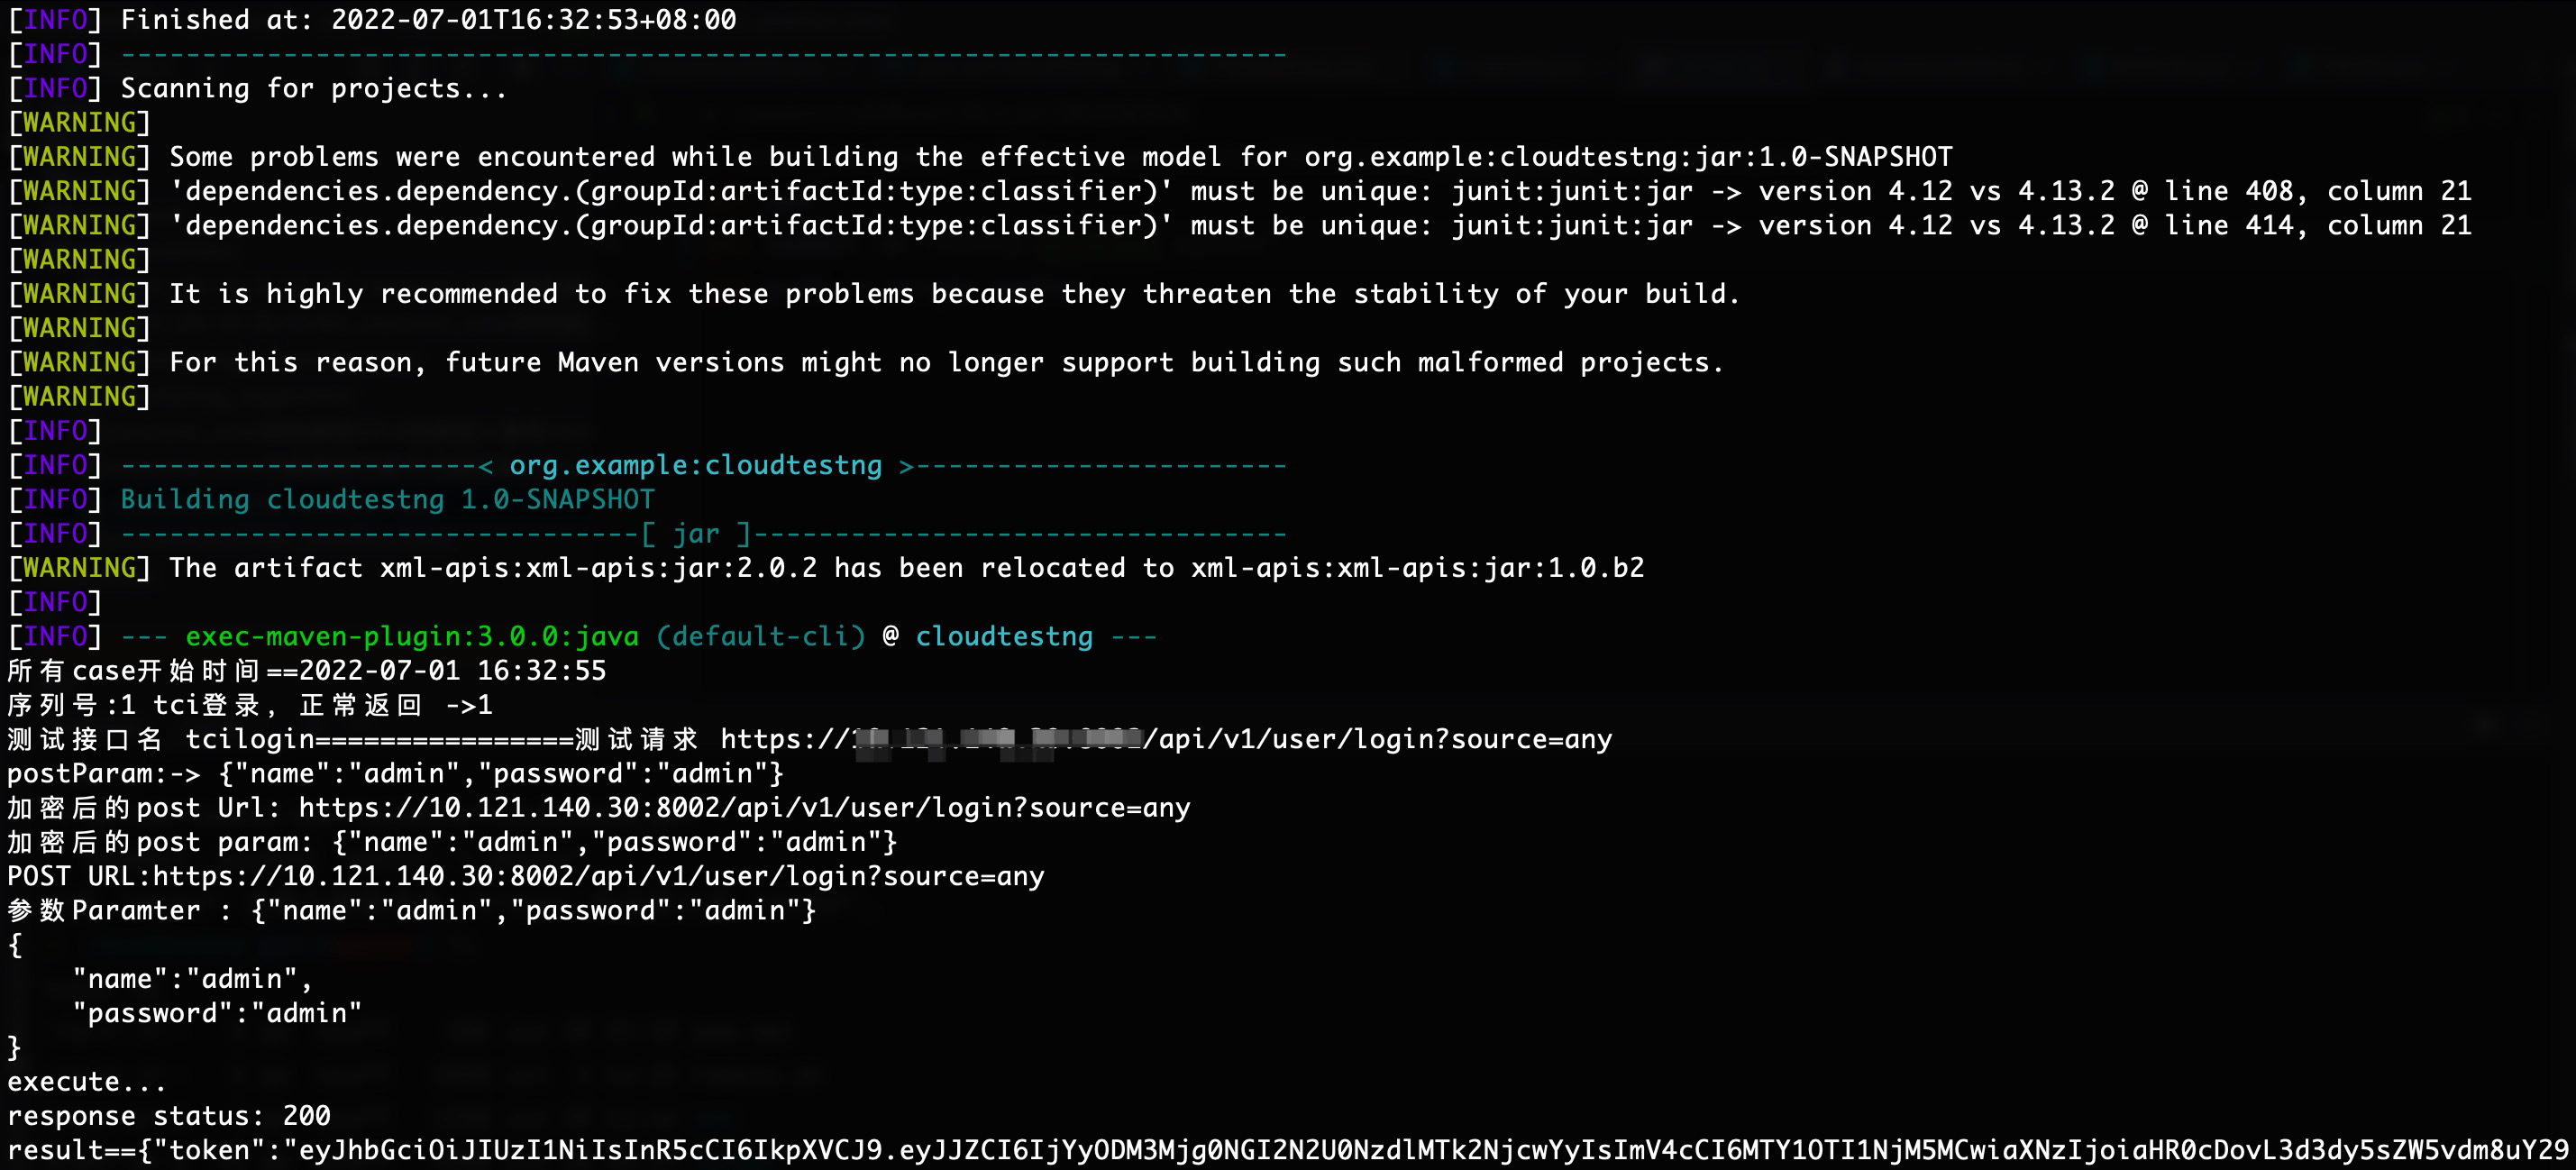
mvn exec:java -Dexec.mainClass="com.interfaceframe.testcase.tcirun"
8. 配置shell脚本(后续慢慢完善)
[root@localhost script]# cat run.sh
cd /www/data/cloudtestng
git pull origin master
mvn compile
mvn exec:java -Dexec.mainClass="com.interfaceframe.testcase.tcirun"
9. crontab配置定时任务
如果提示未安装,就需要自行安装(crontabs)
[root@localhost data]# yum install crontabs
[root@localhost data]# yum list crontabs
定时任务规则
时间格式参数有5位,分表表示:
分钟0-59,小时0-23,日1-31,月1-12,星期0-6
*/2 * * * * /www/data/script/run.sh & >> /www/data/logs/auto.log
每2分钟执行一次shell脚本
[root@localhost data]# service crond status
[root@localhost data]# service crond start
Redirecting to /bin/systemctl start crond.service

服务启动/关闭和查看,使用crond关键词
systemctl status crond
systemctl start crond
systemctl stop crond
systemctl reload crond
systemctl restart crond
crontab常用命令:
crontab -l
查看当前任务列表
crontab -e
编辑任务列表,添加删除新任务。执行命令后会打开文件,vim操作编辑保存文件,文件中每一行代表一条任务
9. 8写的crontab未生效
[root@localhost script]# crontab -l
*/10 * * * * cd /www/data/script && ./run.sh >> /www/data/logs/auto.log
*/1 * * * * echo 123 >> /www/data/logs/echo.log
查看cron的日志
[root@localhost script]# cat /var/log/cron
Jul 1 17:45:02 localhost CROND[133915]: (root) CMDOUT (./run.sh: line 3: mvn: command not found)
Jul 1 17:45:02 localhost CROND[133915]: (root) CMDOUT (./run.sh: line 4: mvn: command not found)

原因找到了:crontab执行shell脚本时,不执行mvn命令,需要在shell脚本添加java_home 和mvn_home。重新执行定时任务,ok了
解决方法:修改run.sh运行脚本
[root@localhost script]# cat run.sh
[root@localhost script]# cat run.sh
git_dir=/www/data/cloudtestng
cd $git_dir
#if [ -f "pom.xml" ];
#then
#	git pull origin master
#else
#	git init
#        git clone git@gitlab.xx.com:username/cloudtestng.git
#figit pull origin master# java env 20220701
export JAVA_HOME=/www/data/soft/jdk1.8.0_333
export CLASS_PATH=.:$JAVA_HOME/lib/dt.jar:$JAVA_HOME/lib/tools.jar
export PATH=$PATH:$JAVA_HOME/bin# maven env 20220701
M2_HOME=/www/data/soft/apache-maven-3.5.4
export PATH=${M2_HOME}/bin:${PATH}mvn compile
mvn exec:java -Dexec.mainClass="com.interfaceframe.testcase.tcirun"
重启crontab :systemctl restart crond
查看crontab的运行日志
[root@localhost logs]# tail -f /www/data/logs/auto.log


[root@localhost script]# crontab -l
* */12 * * * cd /www/data/script && ./run.sh >> /www/data/logs/auto.log
#* * * */1 * echo "123: >> /www/data/logs/echo.log
[root@localhost script]# tail -f /www/data/logs/auto.log

2022.6.28-6.30
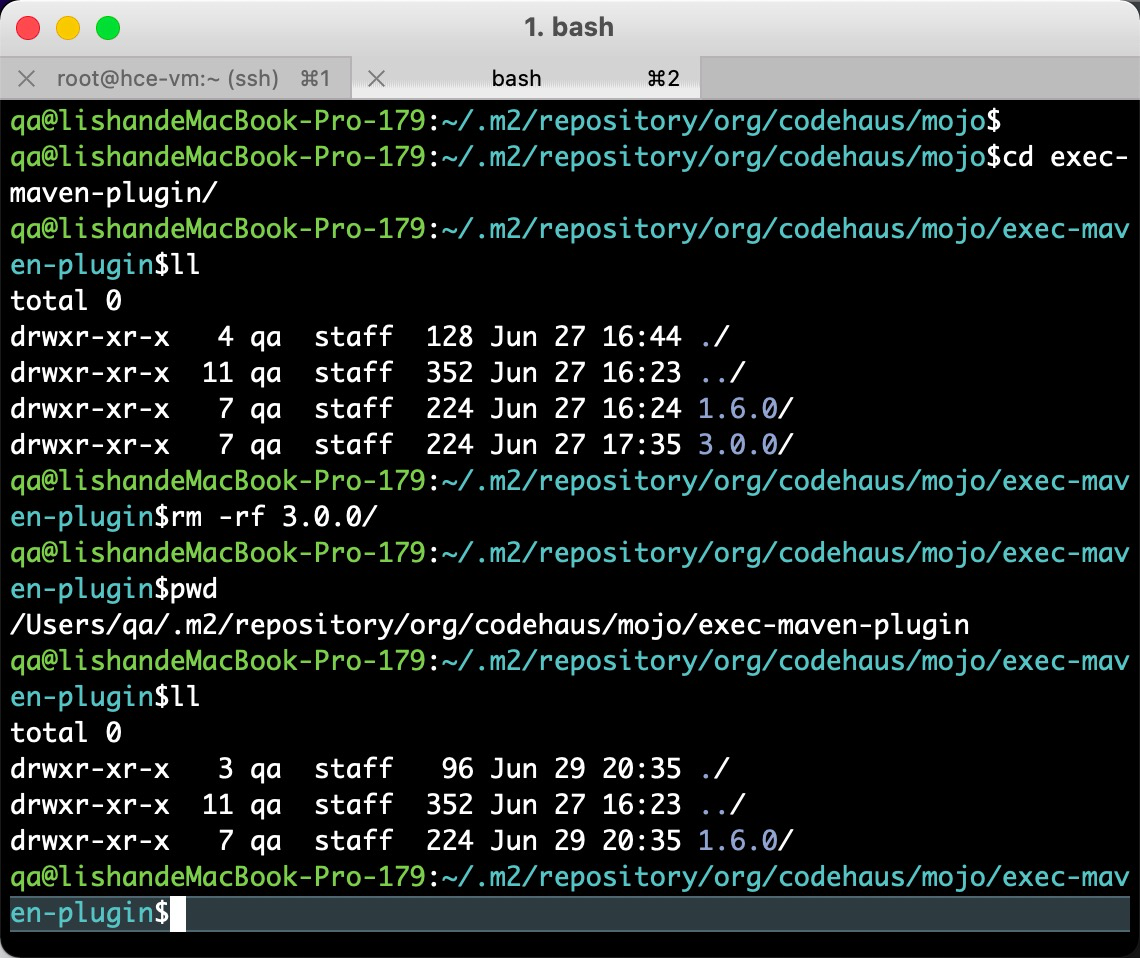
1. 如遇 [ERROR] Failed to execute goal org.codehaus.mojo:exec-maven-plugin:3.0.0:java (default-cli) on project testng: An exception occured while executing the Java class. com.interfaceframe.bg.testcase.hello -> [Help 1]
到本地maven仓库删除 /Users/qa/.m2/repository/org/codehaus/mojo/eec-maven-plugin/3.0.0

pom文件改为1.6.0 ,3.0.0版本可能太高了。。。然后重新加载maven真的就好了。。。。。
<plugin><groupId>org.codehaus.mojo</groupId><artifactId>exec-maven-plugin</artifactId><version>1.6.0</version><executions><execution><goals><goal>java</goal></goals></execution></executions><configuration><classpathScope>test</classpathScope></configuration></plugin>
点击maven-Testng-Lifecycle,分别点击maven的clean compile test package

最后在终端执行
➜ testng git:(master) ✗
mvn exec:java -Dexec.mainClass="com.interfaceframe.bg.testcase.tcirun"
tcirun为主函数 入口函数
20220701修改目录结构 改为
mvn exec:java -Dexec.mainClass="com.interfaceframe.testcase.tcirun"

如遇报错 java.lang.ClassNotFoundException: com.interfaceframe.bg.testcase.xx
可能是类名不规范或者是运行的类里无main函数,需要改为如下方式调junit的方法函数
public class hello {public static void main(String[] args) {new tcicommon430().autoRun();}
}
发现要先本地右击Run之后再mvn命令行的方式运行代码才可以过,想了很久决定重新新建maven工程。。。然后真的非常顺利的跑起来了。心得:配置pom时,有的插件/dependency版本很重要,不是所有的最新版本就行
重新整成maven工程后,pom配置的exec-maven-plugin可以为3.0.0版本了
<plugin><groupId>org.codehaus.mojo</groupId><artifactId>exec-maven-plugin</artifactId><version>3.0.0</version><executions><execution><goals><goal>java</goal></goals></execution></executions><configuration><classpathScope>test</classpathScope></configuration></plugin>如遇
[WARNING] Couldn't destroy threadgroup org.codehaus.mojo.exec.ExecJavaMojo$IsolatedThreadGroup[name=com.interfaceframe.testcase.tcirun,maxpri=10]
java.lang.IllegalThreadStateException
at java.lang.ThreadGroup.destroy (ThreadGroup.java:778)
at org.codehaus.mojo.exec.ExecJavaMojo.execute (ExecJavaMojo.java:293)
at org.apache.maven.plugin.DefaultBuildPluginManager.executeMojo (DefaultBuildPluginManager.java:137)
at org.apache.maven.lifecycle.internal.MojoExecutor.execute (MojoExecutor.java:208)
at org.apache.maven.lifecycle.internal.MojoExecutor.execute (MojoExecutor.java:154)
at org.apache.maven.lifecycle.internal.MojoExecutor.execute (MojoExecutor.java:146)
暂不解决
2. 查看centos的版本
[root@localhost ~]# cat /etc/redhat-release
CentOS Linux release 8.5.2111
拷贝本地文件到远程机器
scp xx.sh root@xxx:/www/data/script
拷贝远程文件到本地机器
scp -r root@xx:/opt/xx/xx/xx.img /Users/qa/Desktop
Permission denied, please try again.
SSH连接报错:Permission denied, please try again.的解决方法
2022.6.27 jar包升级为maven
问题1:
如遇Cannot resolve plugin org.apache.maven.pluginsmaven-war-plugin

IDEA日常填坑:Cannot resolve plugin org.apache.maven.pluginsmaven-war-plugin
同时检查Preference-Maven 的Maven home path 和 User settings file。 User settings file的setting.xml要放在Maven home path下面的conf(没有则新建目录)
Maven home path:选择 /usr/local/Cellar/maven/3.5.4/libexec
User settings file:/usr/local/Cellar/maven/3.5.4/conf/settings_20210913.xml

Maven home path填写 /usr/local/Cellar/maven/3.5.4/libexec
User settings file填写 /usr/local/Cellar/maven/3.5.4/conf/settings_20210913.xml

问题2:
UnsupportedOperationException之Collections$UnmodifiableList异常
报错内容如下:
java.lang.UnsupportedOperationException
at java.util.Collections$UnmodifiableList.sort(Collections.java:1331)
这个报错,牵扯到个unmodifiablerandomaccesslist这个list集合
具体解决方法:把methods添加到result
那就把返回的集合,再新弄个集合装起来
List<Calendar> result = Lists.newArrayList(calendars);
新弄个集合,就可以随心所欲的操作啦
至于,他为什么返回个不可编辑的集合,就是不想让你修改这个集合的内容
具体怎么个不想让你修改法,再说吧。反正就是不想让你修改
UnsupportedOperationException之Collections$UnmodifiableList异常
	@Overrideprotected List<FrameworkMethod> computeTestMethods() {List<FrameworkMethod> methods = super.computeTestMethods();// 20220627新增List<FrameworkMethod> result = Lists.newArrayList(methods);Collections.sort(result, new Comparator<FrameworkMethod>() {public int compare(FrameworkMethod method1, FrameworkMethod method2) {Case order1 = method1.getAnnotation(Case.class);Case order2 = method2.getAnnotation(Case.class);int orderNum1 = (order1 != null) ? order1.order() : DEFAULT_ORDER;int orderNum2 = (order2 != null) ? order2.order() : DEFAULT_ORDER;return orderNum1 - orderNum2;}});// 20220627删除如下2行
//		List<FrameworkMethod> methods_v2 = super.computeTestMethods();
//		methods_v2.addAll(methods);// 20220627新增returnreturn result;}
2022.6.25-6.26 jar包升级为maven
问题1:
由于jar包方式在centos一直运行失败,改为maven方式。
解决包冲突
maven的junit test omitted for conflict with

pom的dependency添加排除依赖
我们可以使用exclusions标记从项目依赖项中排除JUnit 4 JAR。 必须将其添加到负责拉出它的依赖项中,参考博客maven依赖冲突解决_Maven依赖树
<dependency><groupId>junit</groupId><artifactId>junit</artifactId><version>4.12</version><scope>test</scope><exclusions><exclusion><groupId>org.hamcrest</groupId><artifactId>hamcrest-core</artifactId></exclusion></exclusions></dependency><dependency><groupId>junit</groupId><artifactId>junit-dep</artifactId><version>4.11</version><scope>test</scope><exclusions><exclusion><groupId>org.hamcrest</groupId><artifactId>hamcrest-core</artifactId></exclusion></exclusions></dependency>问题2:
import org.junit.Test;
import org.junit.runner.RunWith;
@RunWith(OverrideRunner.class)
找不到包,右击Runwith, add ClassPath

问题3:
maven的omitted for duplicate
maven所引用的依赖包重复,就会出现(omitted for duplicate)字样,虽然不影响使用,但是作为强迫症患者还是很不舒服的
其实删除重复的dependency配置就好

问题4:
/Users/qa/Desktop/APInterfaceFrame/src/com/interfaceframe/bg/xmlutil/XmlUnit2.java:5:18
java: 无法访问org.testng.Assert
错误的类文件: /Users/qa/.m2/repository/org/testng/testng/7.6.0/testng-7.6.0.jar!/org/testng/Assert.class
类文件具有错误的版本 55.0, 应为 52.0
请删除该文件或确保该文件位于正确的类路径子目录中。
1. 本地通过create-react-app创建一个react项目
2. gitlab上创建一个仓库 需要在设置-SSH公钥-添加本地/Users/qa/.ssh/id_rsa.pub的文本内容
生成/添加SSH公钥 - Gitee.com
3. // 查看本地代码git 分支
git branch
// 查看本地代码关联的git仓库地址
git remote -v
// 删除远程关联的git仓库地址
git remote rm origin
git remote rm origine
// 本地代码关联新的仓库地址
git remote add origin 新地址(ssh)
// 再次查看本地代码关联的git仓库地址
git remote -v

4. 提交代码
git add *
git commit -m 'update'
把本地的项目代码提交到远程仓库:本地有几个分支提交几个
git push --set-upstream origin master
git push --set-upstream origin branchA
git push --set-upstream origin branchB
或者 git push origin master
如果提交失败,先更新代码:git pull origin master --allow-unrelated-histories
如果出现冲突,先解决代码里面的冲突, 然后再git add .和git commit -m 'xxx'
把本地的修改都提交到远程仓库上面:git push origin master
2022.6.24 Linux(centos8)搭建java环境详细步骤
1. 查看本地centos的版本
[root@localhost usr]# cat /etc/redhat-release
CentOS Linux release 8.5.2111
2. java官网下载jdk
Java Downloads | Oracle
3. 上传到centos8的服务器
rz jdk-18_linux-aarch64_bin.tar.gz
解压缩 tar -zxvf jdk-18_linux-aarch64_bin.tar.gz
mv jdk-18.0.1.1 /usr/local/soft/
cd /usr/local/soft/
修改配置文件,添加java环境变量
export JAVA_HOME=/usr/bin/java
export JRE_HOME=${JAVA_HOME}/jre
export CLASS_PATH=.:$JAVA_HOME/lib/dt.jar:$JAVA_HOME/lib/tools.jar:$JRE_HOME/lib
export PATH=$PATH:$JAVA_HOME/bin:$JRE_HOME/bin
[root@localhost soft]# vi /etc/profile
使配置生效:
[root@localhost soft]# source /etc/profile
查看java的版本,测试安装是否成功
[root@localhost soft]# java -version
openjdk version "1.8.0_312"
OpenJDK Runtime Environment (build 1.8.0_312-b07)
OpenJDK 64-Bit Server VM (build 25.312-b07, mixed mode)
参考博客centos8安装java jdk 13
在编译时应使用javac命令加-d选项,会自动生成包的目录,注意-d后面的'.',代表当前目录(test.java所在的目录)
javac -d . test.java
javac -d . tcicommon430.java
而在运行时的用java命令加包的路径,其中com.abc为package打包的目录
java com.abc.test
IDEA打包jar包详尽流程
centos查找已安装的jdk路径的方法_Centos_服务器之家
2022.6.22-06.23 Linux(centos8)安装nginx详细步骤
安装nginx如遇
Error: Failed to download metadata for repo 'appstream': Cannot prepare internal mirrorlist: No URLs in mirrorlist
首先,进入到 yum 的 repos 目录
cd /etc/yum.repos.d/
其次,修改 centos 文件内容
sed -i 's/mirrorlist/#mirrorlist/g' /etc/yum.repos.d/CentOS-*
sed -i 's|#baseurl=http://mirror.centos.org|baseurl=http://vault.centos.org|g' /etc/yum.repos.d/CentOS-*
然后,生成缓存更新(第一次更新,速度稍微有点慢,耐心等待两分钟左右)
yum makecache
最后,运行 yum update 并重新安装 vim
yum update -y
从CentOS 8开始,Nginx软件包在默认的CentOS存储库中可用。
在CentOS 8上安装Nginx只需输入以下内容即可:
sudo yum install nginx
安装完成后,使用以下命令启用并启动Nginx服务:
sudo systemctl enable nginx
sudo systemctl start nginx
要验证服务是否正在运行,请检查其状态:
sudo systemctl status nginx

或者ps -ef|grep nginx

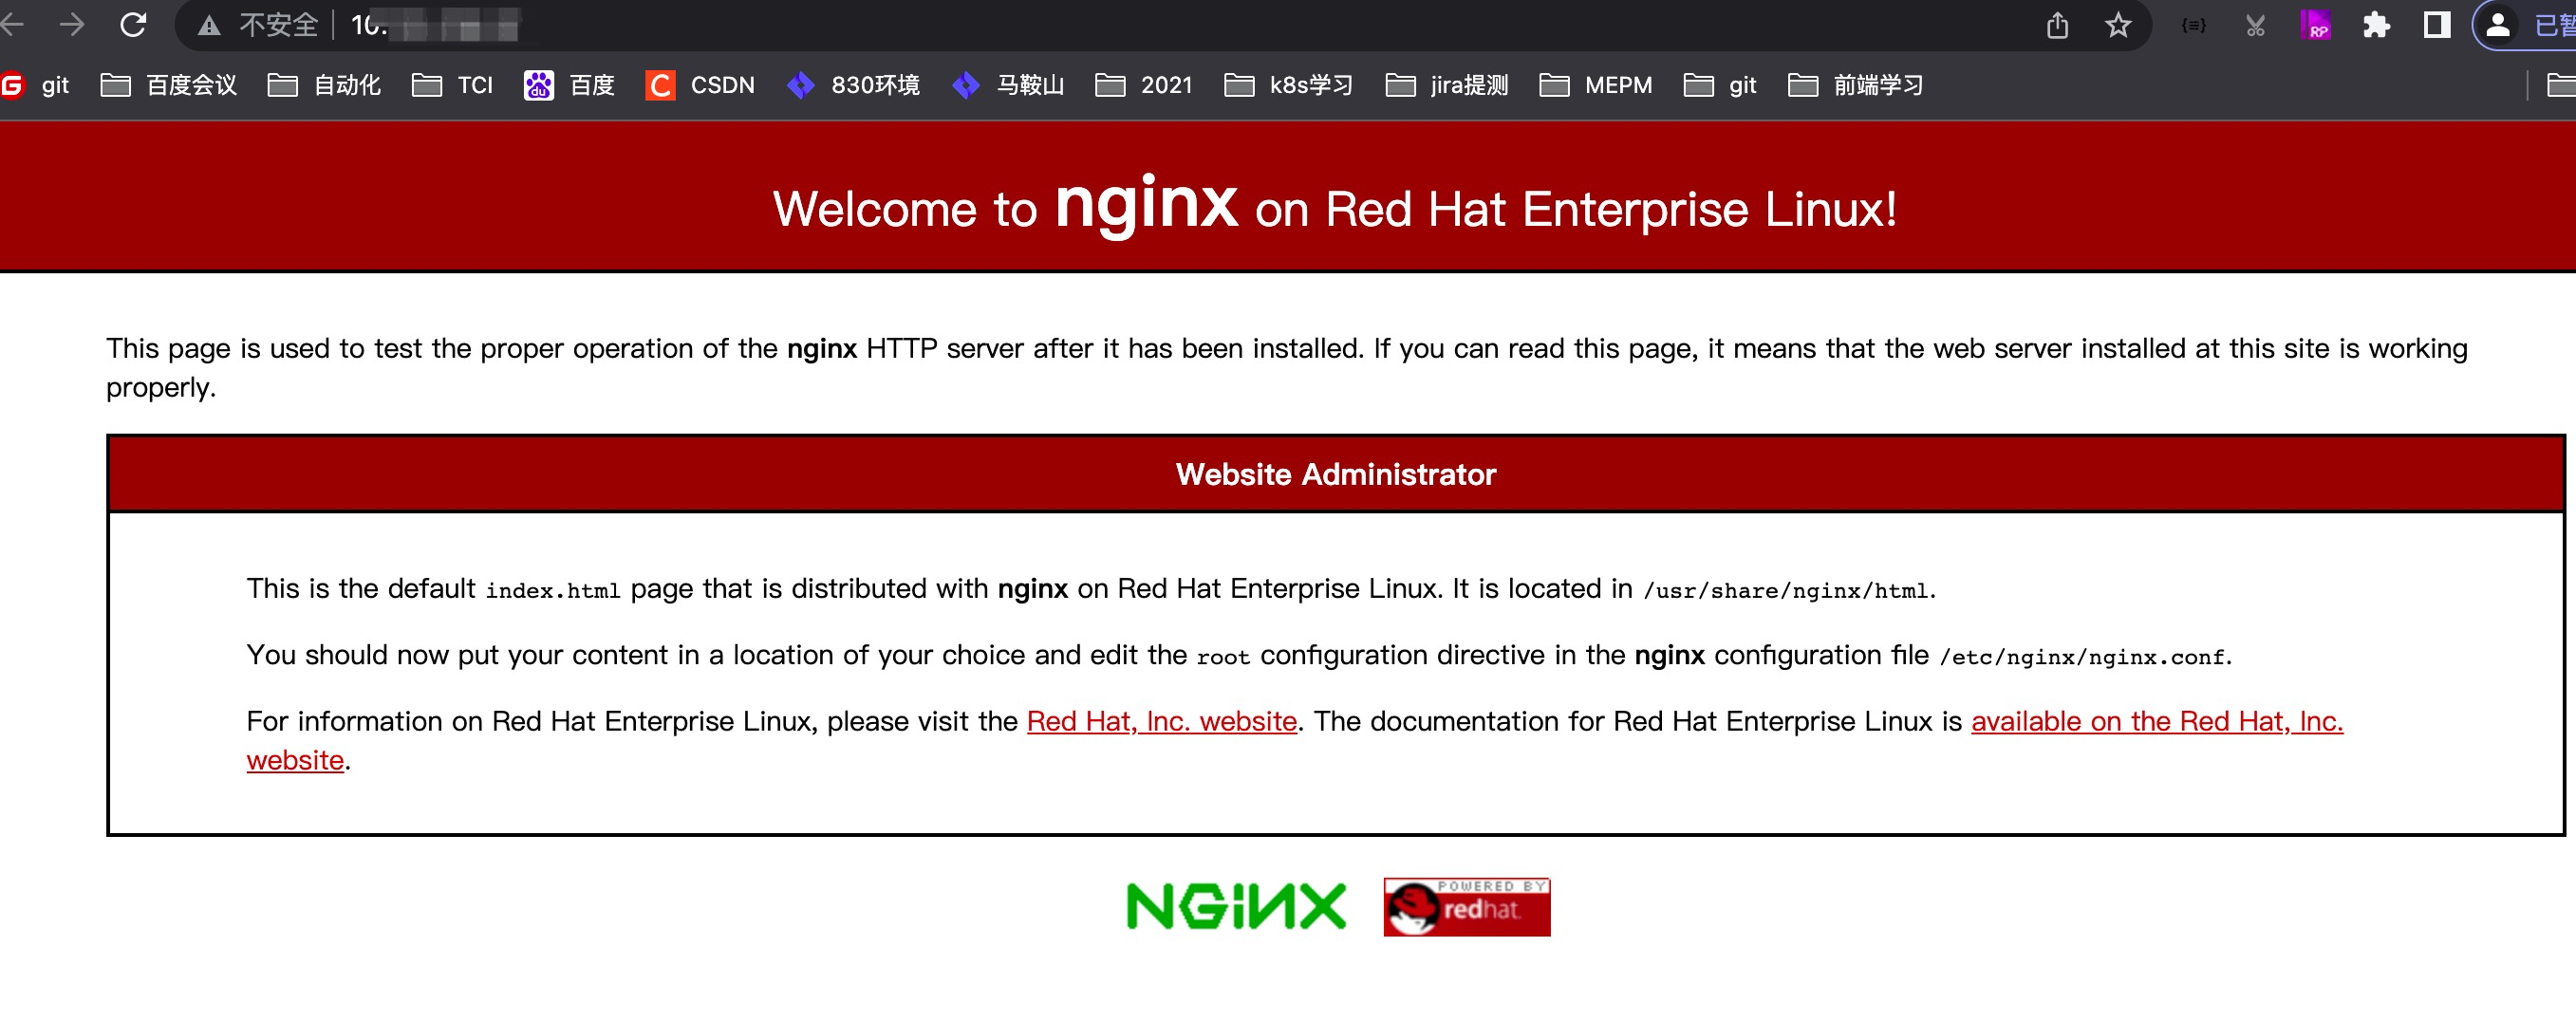
nginx安装成功,在浏览器访问你服务器的ip即可
一、查看nginx安装目录
ps -ef|grep nginx
[root@localhost testresultHtml]# ps -ef|grep nginx
root 78245 1 0 17:39 ? 00:00:00 nginx: master process /usr/sbin/nginx
nginx 78246 78245 0 17:39 ? 00:00:00 nginx: worker process
nginx 78247 78245 0 17:39 ? 00:00:00 nginx: worker process
nginx 78248 78245 0 17:39 ? 00:00:00 nginx: worker process
nginx 78249 78245 0 17:39 ? 00:00:00 nginx: worker process
nginx 78250 78245 0 17:39 ? 00:00:00 nginx: worker process
nginx 78251 78245 0 17:39 ? 00:00:00 nginx: worker process
nginx 78252 78245 0 17:39 ? 00:00:00 nginx: worker process
nginx 78253 78245 0 17:39 ? 00:00:00 nginx: worker process
root 78285 77771 0 18:25 pts/1 00:00:00 grep --color=auto nginx
二、查看配置文件nginxconf路径
nginx -t
[root@localhost testresultHtml]# nginx -t
nginx: the configuration file /etc/nginx/nginx.conf syntax is ok
nginx: configuration file /etc/nginx/nginx.conf test is successful
这条命令也可以用于检查配置文件是否正确。
当然也可以使用find命令进行文件查找
#从/根目录下查找文件名为nginxconf的文件 find / -name nginx.conf
[root@localhost testresultHtml]# find / -name nginx.conf
/etc/nginx/nginx.conf
#从/etc目录下查找文件名为nginxconf的文件 find /etc -name nginx.conf
查看nginx完整配置
# For more information on configuration, see:
#   * Official English Documentation: http://nginx.org/en/docs/
#   * Official Russian Documentation: http://nginx.org/ru/docs/user nginx;
worker_processes auto;
error_log /var/log/nginx/error.log;
pid /run/nginx.pid;# Load dynamic modules. See /usr/share/doc/nginx/README.dynamic.
include /usr/share/nginx/modules/*.conf;events {worker_connections 1024;
}http {log_format  main  '$remote_addr - $remote_user [$time_local] "$request" ''$status $body_bytes_sent "$http_referer" ''"$http_user_agent" "$http_x_forwarded_for"';access_log  /var/log/nginx/access.log  main;sendfile            on;tcp_nopush          on;tcp_nodelay         on;keepalive_timeout   65;types_hash_max_size 2048;include             /etc/nginx/mime.types;default_type        application/octet-stream;autoindex on;charset utf-8,gbk,utf-16,utf-32;# Load modular configuration files from the /etc/nginx/conf.d directory.# See http://nginx.org/en/docs/ngx_core_module.html#include# for more information.include /etc/nginx/conf.d/*.conf;server {listen       80 default_server;listen       [::]:80 default_server;server_name  _;#root         /usr/share/nginx/html;#root         /home/test;# root         /home/test/www/data/testng/testresultHtml;root         /home/test/www/data/testng;#index index.html index.htm tcicommon430_autoRun.html;# Load configuration files for the default server block.include /etc/nginx/default.d/*.conf;location / {}error_page 404 /404.html;location = /40x.html {}error_page 500 502 503 504 /50x.html;location = /50x.html {}}# Settings for a TLS enabled server.
#
#    server {
#        listen       443 ssl http2 default_server;
#        listen       [::]:443 ssl http2 default_server;
#        server_name  _;
#        root         /usr/share/nginx/html;
#
#        ssl_certificate "/etc/pki/nginx/server.crt";
#        ssl_certificate_key "/etc/pki/nginx/private/server.key";
#        ssl_session_cache shared:SSL:1m;
#        ssl_session_timeout  10m;
#        ssl_ciphers PROFILE=SYSTEM;
#        ssl_prefer_server_ciphers on;
#
#        # Load configuration files for the default server block.
#        include /etc/nginx/default.d/*.conf;
#
#        location / {
#        }
#
#        error_page 404 /404.html;
#            location = /40x.html {
#        }
#
#        error_page 500 502 503 504 /50x.html;
#            location = /50x.html {
#        }
#    }}
修改/etc/nginx/nginx.conf 配置文件后,需要重启nginx
sudo systemctl restart nginx
重启成功 nginx的进程时间变了
[root@localhost etc]# ps -ef|grep nginx
root 78312 1 0 18:31 ? 00:00:00 nginx: master process /usr/sbin/nginx
nginx 78313 78312 0 18:31 ? 00:00:00 nginx: worker process
nginx 78314 78312 0 18:31 ? 00:00:00 nginx: worker process
nginx 78315 78312 0 18:31 ? 00:00:00 nginx: worker process
nginx 78316 78312 0 18:31 ? 00:00:00 nginx: worker process
nginx 78317 78312 0 18:31 ? 00:00:00 nginx: worker process
nginx 78318 78312 0 18:31 ? 00:00:00 nginx: worker process
nginx 78319 78312 0 18:31 ? 00:00:00 nginx: worker process
nginx 78320 78312 0 18:31 ? 00:00:00 nginx: worker process
三、指定配置文件并启动nginx服务
nginx安装目录-cnginxconf配置文件目录
其中:参数“-c”指定了配置文件的路径,如果不加“-c”参数,Nainx会默认加载其安装目录的conf子目录中的nainxconf文件。
四、命令参数
/usr/ocal/nginx/sbin/nginx参数
Nginx的参数包括:
-C<path to config>:使用指定的配置文件而不是conf目录下的nginxconf。
-t:测试配置文件是否正确,在运行时需要重新加载配置的时候,此命令非常重要,用来检测所修改的配置文件是否有语法错误。 -v:显示nginx版本号。
-V:显示nginx的版本号以及编译环境信息以及编译时的参数。
检测新的配置文件:
/usr/local/nginx/conf#/usr/local/nginx/sbin/nginx-t-c/usr/local/nginx/conf/nginx.conf
2022.6.21 服务器部署java运行环境
把git仓库的代码拉到服务器
出现如下报错:
git@gitlab.xx.com's password:
Permission denied, please try again.
git@gitlab.xx.com's password:
s
git@gitlab.xx.com: Permission denied (publickey,gssapi-keyex,gssapi-with-mic,password).
fatal: Could not read from remote repository.

因为是纯净的服务器
Virtualization: kvm
Operating System: CentOS Linux 8
CPE OS Name: cpe:/o:centos:centos:8
Kernel: Linux 4.18.0-348.2.1.el8_5.x86_64
Architecture: x86-64
所以需要配置git
1.1 设置信息
git config --global user.name "username"
git config --global user.email "your@email.com"
//yourname是 gitlab的用户名,your@email是gitlab的邮箱
1.2 紧接着生成ssh
ssh-keygen -t rsa -C "your@email.com"(输入自己的邮箱)
后面出现的直接回车就可以
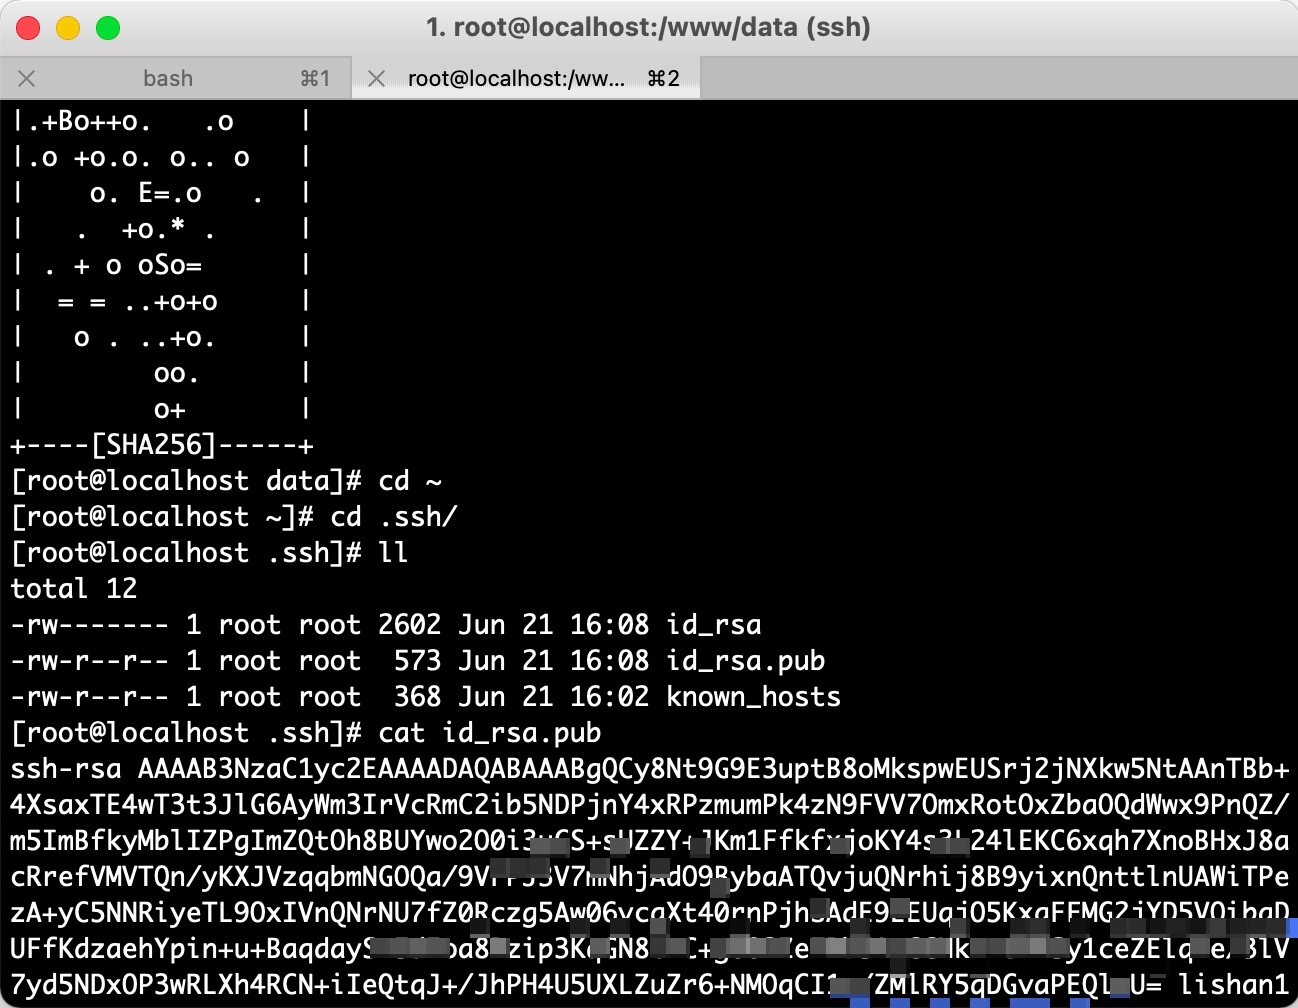
1.3 查看公钥
在/root/.ssh (~/.ssh/)找到id_rsa.pub
打开id_rsa.pub,复制全部内容拷贝到git的User setting - SSH Keys

2022.5.25封装工具类-delete请求方法
测试报告展示调整,英文的一目了然?自动化展示结果改为中文标题的了。。。。。。。
新增/Users/qa/Desktop/2021/code/APInterfaceFrame/src/com/interfaceframe/bg/method/Delete.java
package com.interfaceframe.bg.method;import com.httpclient.GetToken;
import com.interfaceframe.bg.util.MySSLSocketFactory;
import org.apache.commons.httpclient.Header;
import org.apache.commons.httpclient.HttpClient;
import org.apache.commons.httpclient.NameValuePair;
import org.apache.commons.httpclient.methods.DeleteMethod;
import org.apache.commons.httpclient.protocol.Protocol;
import org.apache.commons.httpclient.util.EncodingUtil;import java.util.ArrayList;
import java.util.Iterator;
import java.util.List;
import java.util.Map;public class Delete {public static String delete(String method, String url, Map<String, String> paramter) {try {// 20220525 解决javax.net.ssl.SSLHandshakeException: sun.security.validator.ValidatorException: PKIX path validation failed: java.security.cert.CertPathValidatorException: validity check failed// 增加下面两行代码Protocol myhttps = new Protocol("https", new MySSLSocketFactory(), 443);Protocol.registerProtocol("https", myhttps);// header必传参数Content-typeHeader header = new Header("Content-type", "application/json; charset=utf-8");String response = "";// HttpClient是Apache Jakarta Common下的子项目,用来提供高效的、最新的、功能丰富的支持HTTP协议的客户端编程工具包,并且它支持HTTP协议最新的版本和建议。// HttpClient已经应用在很多的项目中,比如Apache Jakarta上很著名的另外两个开源项目Cactus和HTMLUnit都使用了HttpClient。// 使用HttpClient发送请求、接收响应HttpClient httpClient = new HttpClient();if (url != null) {// NameValuePair是简单名称值对节点类型。多用于Java像url发送Post请求。在发送post请求时用该list来存放参数
//                getParamsList(url_online, params, count);// 预发环境value替换线上环境valueList<NameValuePair> qparams_pre = getParamsList_pre(paramter);if (qparams_pre != null && qparams_pre.size() > 0) {String formatParams = EncodingUtil.formUrlEncode(qparams_pre.toArray(new org.apache.commons.httpclient.NameValuePair[qparams_pre.size()]),"utf-8");url = url.indexOf("?") < 0 ? url + "?" + formatParams : url + "&" + formatParams;}
//                requestURL = url;//                System.out.println("第" + (count + 1) + "个请求,预发环境pre请求的url==" + url);DeleteMethod deleteMethod = new DeleteMethod(url);deleteMethod.addRequestHeader(header);// 9月9 header必传参数Accept设置为*/* 绝大数设置为application/json; charset=utf-8都正常,但是OpenStack的network接口会返回406
//                deleteMethod.addRequestHeader(new Header("Accept", "application/json; charset=utf-8"));// 10月22日,兼容不同系统传参// 11月24日,测试拓扑-mec-mec16的数据{{mec_api_gw}}/mec-engine/api/hosts?allow_anonymous=true 再次出现Accept的问题deleteMethod.addRequestHeader(new Header("Accept", "application/json, text/plain, */*"));
//                deleteMethod.addRequestHeader(new Header("Authorization", "application/json, text/plain, */*"));
//                String encoding = DatatypeConverter.printBase64Binary("admin:admin".getBytes("UTF-8"));  //username  password 自行修改  中间":"不可少deleteMethod.addRequestHeader(new Header("Authorization", "Bearer " + GetToken.tci2104Token()));int statusCode = httpClient.executeMethod(deleteMethod);System.out.println("请求状态码statusCode=" + statusCode + ",如果为204则表示删除成功");response = new String(deleteMethod.getResponseBody(), "utf-8");System.out.println("================================" + response);return response;}} catch (Exception e) {e.printStackTrace();}return "---------------";}// 参数格式化private static List<NameValuePair> getParamsList_pre(Map<String, String> paramsMap) {if (paramsMap != null && paramsMap.size() != 0) {List<NameValuePair> params = new ArrayList();Iterator var2 = paramsMap.entrySet().iterator();while (var2.hasNext()) {Map.Entry<String, String> map = (Map.Entry) var2.next();// 预发环境最新版本日志回放,请求参数打开以下if else,注释掉最后一行// 参数格式化,commons-httpclient自带的方法NameValuePair会自动将==转为=,还有特殊符号格式化// NameValuePair是简单名称值对节点类型。多用于Java像url_test发送Post请求。在发送post请求时用该list来存放参数params.add(new NameValuePair(map.getKey() + "", map.getValue() + ""));//                params.add(new NameValuePair(map.getKey() + "", map.getValue() + ""));}return params;} else {return null;}}
}
般 HttpPost 对传参 Json 的处理是:
// 中文处理
StringEntity se = new StringEntity(json, Consts.UTF_8);
httppost.setEntity(se);
HttpPost、HttpPut继承了HttpEntityEnclosingRequestBase类,所以有setEntity方法。详情请自行查看源码。
查看httpclient-4.2.3的源码可以发现,methods包下面包含HttpGet, HttpPost, HttpPut, HttpDelete等类来实现http的常用操作。
其中,HttpPost继承自 HttpEntityEnclosingRequestBase,HttpEntityEnclosingRequestBase类又实现了 HttpEntityEnclosingRequest接口,实现了setEntity的方法。
而HttpDelete继承自HttpRequestBase,没有实现setEntity的方法,因此无法设置HttpEntity对象。
而HttpDelete没有对应的setEntity()方法,那么怎么传递呢?
package net.dn.client;import java.io.IOException;
import java.net.URI;
import org.apache.http.Header;
import org.apache.http.annotation.NotThreadSafe;
import org.apache.http.client.ClientProtocolException;
import org.apache.http.client.methods.CloseableHttpResponse;
import org.apache.http.client.methods.HttpEntityEnclosingRequestBase;
import org.apache.http.entity.ContentType;
import org.apache.http.entity.StringEntity;
import org.apache.http.impl.client.CloseableHttpClient;
import org.apache.http.impl.client.HttpClients;
import org.apache.http.util.EntityUtils;@NotThreadSafe
class HttpDeleteWithBody extends HttpEntityEnclosingRequestBase {public static final String METHOD_NAME = "DELETE";public String getMethod() {return METHOD_NAME;}public HttpDeleteWithBody(final String uri) {super();setURI(URI.create(uri));}public HttpDeleteWithBody(final URI uri) {super();setURI(uri);}public HttpDeleteWithBody() {super();}
}public class ClientMain {public static void main(String[] args) throws ClientProtocolException, IOException {CloseableHttpClient httpclient = HttpClients.createDefault();String url = "http://localhost:8080/RESTfulDeleteWithBody/rest";HttpDeleteWithBody httpDelete = new HttpDeleteWithBody(url);StringEntity input = new StringEntity("John Dow", ContentType.APPLICATION_JSON);httpDelete.setEntity(input);  System.out.println("****REQUEST***************************************");System.out.println(url);Header requestHeaders[] = httpDelete.getAllHeaders();for (Header h : requestHeaders) {System.out.println(h.getName() + ": " + h.getValue());}CloseableHttpResponse response = httpclient.execute(httpDelete);System.out.println("****RESPONSE***************************************");System.out.println("----status:---------------------");System.out.println(response.getStatusLine());System.out.println("----header:---------------------");Header responseHeaders[] = response.getAllHeaders();for (Header h : responseHeaders) {System.out.println(h.getName() + ": " + h.getValue());}System.out.println("----content:---------------------");System.out.println(EntityUtils.toString(response.getEntity()));}
}
代码调用
HttpDeleteWithBody httpDelete = new HttpDeleteWithBody(url);// json 处理
httpdelete.setHeader("Content-Type", "application/json; charset=UTF-8");//or addHeader();
httpdelete.setHeader("X-Requested-With", "XMLHttpRequest");
//设置HttpDelete的请求参数
httpdelete.setEntity(new StringEntity(paramsJsonStr));
httpDelete.getParams().setParameter(CoreConnectionPNames.CONNECTION_TIMEOUT, 20000);
httpdelete.getParams().setParameter(CoreConnectionPNames.SO_TIMEOUT, 20000);
HttpResponse response = client.execute(httpdelete);
2022.5.24解决ssl证书报错(get请求)
/Users/qa/Desktop/2021/code/APInterfaceFrame/src/com/interfaceframe/bg/method/Get.java
/*** get 请求,只需将变动的参数传入params中即可** @param url* @return*/public static String get(String method, String url, Map<String, String> paramter) {try {// 2021.7.13 解决javax.net.ssl.SSLHandshakeException: sun.security.validator.ValidatorException: PKIX path validation failed: java.security.cert.CertPathValidatorException: validity check failed// 增加下面两行代码Protocol myhttps = new Protocol("https", new MySSLSocketFactory(), 443);Protocol.registerProtocol("https", myhttps);// header必传参数Content-typeHeader header = new Header("Content-type", "application/json; charset=utf-8");String response = "";// HttpClient是Apache Jakarta Common下的子项目,用来提供高效的、最新的、功能丰富的支持HTTP协议的客户端编程工具包,并且它支持HTTP协议最新的版本和建议。// HttpClient已经应用在很多的项目中,比如Apache Jakarta上很著名的另外两个开源项目Cactus和HTMLUnit都使用了HttpClient。// 使用HttpClient发送请求、接收响应HttpClient httpClient = new HttpClient();if (url != null) {// NameValuePair是简单名称值对节点类型。多用于Java像url发送Post请求。在发送post请求时用该list来存放参数
//                getParamsList(url_online, params, count);// 预发环境value替换线上环境valueList<org.apache.commons.httpclient.NameValuePair> qparams_pre = getParamsList_pre(paramter);if (qparams_pre != null && qparams_pre.size() > 0) {String formatParams = EncodingUtil.formUrlEncode(qparams_pre.toArray(new org.apache.commons.httpclient.NameValuePair[qparams_pre.size()]),"utf-8");url = url.indexOf("?") < 0 ? url + "?" + formatParams : url + "&" + formatParams;}
//                requestURL = url;//                System.out.println("第" + (count + 1) + "个请求,预发环境pre请求的url==" + url);GetMethod getMethod = new GetMethod(url);getMethod.addRequestHeader(header);// 9月9 header必传参数Accept设置为*/* 绝大数设置为application/json; charset=utf-8都正常,但是OpenStack的network接口会返回406
//                getMethod.addRequestHeader(new Header("Accept", "application/json; charset=utf-8"));// 10月22日,兼容不同系统传参// 11月24日,测试拓扑-mec-mec16的数据{{mec_api_gw}}/mec-engine/api/hosts?allow_anonymous=true 再次出现Accept的问题getMethod.addRequestHeader(new Header("Accept", "application/json, text/plain, */*"));int statusCode = httpClient.executeMethod(getMethod);System.out.println("请求状态码statusCode=" + statusCode);response = new String(getMethod.getResponseBody(), "utf-8");System.out.println("================================" + response);return response;}}catch(Exception e){e.printStackTrace();}return "---------------";}// 参数格式化private static List<NameValuePair> getParamsList_pre(Map<String, String> paramsMap) {if (paramsMap != null && paramsMap.size() != 0) {List<NameValuePair> params = new ArrayList();Iterator var2 = paramsMap.entrySet().iterator();while (var2.hasNext()) {Map.Entry<String, String> map = (Map.Entry) var2.next();// 预发环境最新版本日志回放,请求参数打开以下if else,注释掉最后一行// 参数格式化,commons-httpclient自带的方法NameValuePair会自动将==转为=,还有特殊符号格式化// NameValuePair是简单名称值对节点类型。多用于Java像url_test发送Post请求。在发送post请求时用该list来存放参数params.add(new NameValuePair(map.getKey() + "", map.getValue() + ""));//                params.add(new NameValuePair(map.getKey() + "", map.getValue() + ""));}return params;} else {return null;}}
}
新增 /Users/qa/Desktop/2021/code/APInterfaceFrame/src/com/interfaceframe/bg/util/MySSLSocketFactory.java
package com.interfaceframe.bg.util;import org.apache.commons.httpclient.ConnectTimeoutException;
import org.apache.commons.httpclient.params.HttpConnectionParams;
import org.apache.commons.httpclient.protocol.ProtocolSocketFactory;import javax.net.SocketFactory;
import javax.net.ssl.SSLContext;
import javax.net.ssl.TrustManager;
import javax.net.ssl.X509TrustManager;
import java.io.IOException;
import java.net.*;
import java.security.KeyManagementException;
import java.security.NoSuchAlgorithmException;
import java.security.cert.CertificateException;
import java.security.cert.X509Certificate;public class MySSLSocketFactory implements ProtocolSocketFactory {static {System.out.println(">>>>in MySSLSocketFactory>>");}private SSLContext sslcontext = null;private SSLContext createSSLContext() {SSLContext sslcontext = null;try {sslcontext = SSLContext.getInstance("SSL");sslcontext.init(null,new TrustManager[]{new TrustAnyTrustManager()},new java.security.SecureRandom());} catch (NoSuchAlgorithmException e) {e.printStackTrace();} catch (KeyManagementException e) {e.printStackTrace();}return sslcontext;}private SSLContext getSSLContext() {if (this.sslcontext == null) {this.sslcontext = createSSLContext();}return this.sslcontext;}public Socket createSocket(Socket socket, String host, int port,boolean autoClose) throws IOException, UnknownHostException {return getSSLContext().getSocketFactory().createSocket(socket, host,port, autoClose);}public Socket createSocket(String host, int port) throws IOException,UnknownHostException {return getSSLContext().getSocketFactory().createSocket(host, port);}public Socket createSocket(String host, int port, InetAddress clientHost,int clientPort) throws IOException, UnknownHostException {return getSSLContext().getSocketFactory().createSocket(host, port,clientHost, clientPort);}public Socket createSocket(String host, int port, InetAddress localAddress,int localPort, HttpConnectionParams params) throws IOException,UnknownHostException, ConnectTimeoutException {if (params == null) {throw new IllegalArgumentException("Parameters may not be null");}int timeout = params.getConnectionTimeout();SocketFactory socketfactory = getSSLContext().getSocketFactory();if (timeout == 0) {return socketfactory.createSocket(host, port, localAddress,localPort);} else {Socket socket = socketfactory.createSocket();SocketAddress localaddr = new InetSocketAddress(localAddress,localPort);SocketAddress remoteaddr = new InetSocketAddress(host, port);socket.bind(localaddr);socket.connect(remoteaddr, timeout);return socket;}}private static class TrustAnyTrustManager implements X509TrustManager {public void checkClientTrusted(X509Certificate[] chain, String authType)throws CertificateException {}public void checkServerTrusted(X509Certificate[] chain, String authType)throws CertificateException {}public X509Certificate[] getAcceptedIssuers() {return new X509Certificate[]{};}}
}
2022.5.19解决ssl证书报错(post请求)
javax.net.ssl.SSLHandshakeException: sun.security.validator.ValidatorException: PKIX path building failed: sun.security.provider.certpath.SunCertPathBuilderException: unable to find valid certification path to requested target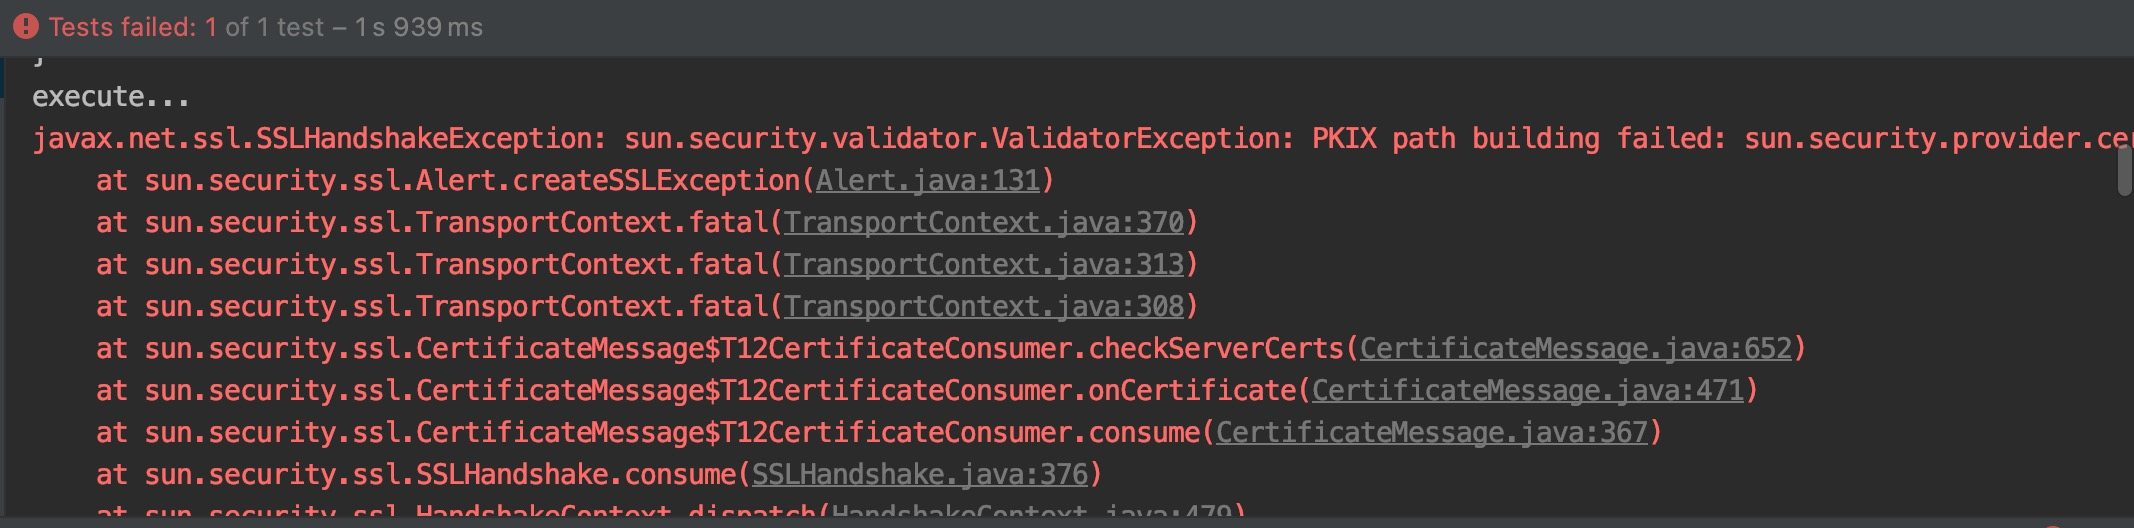
虽然以下博客没用 但我觉得不错
javax.net.ssl.SSLHandshakeException的解决办法
解决 javax.net.ssl.SSLHandshakeException: sun.security.validator.ValidatorException: PKIX path buildin
javax.net.ssl.SSLPeerUnverifiedException: Host name '10.121.140.30' does not match the certificate subject provided by the peer (OU=MyUnit, O=MyOrg, L=NY, ST=NY, C=US, EMAILADDRESS=none@none.com, CN=localhost)
解决办法:搜索SSL证书校验Java Client 忽略对服务端的SSL证书校验
参考【SSL证书校验】Java Client 忽略对服务端的SSL证书校验
代码如下
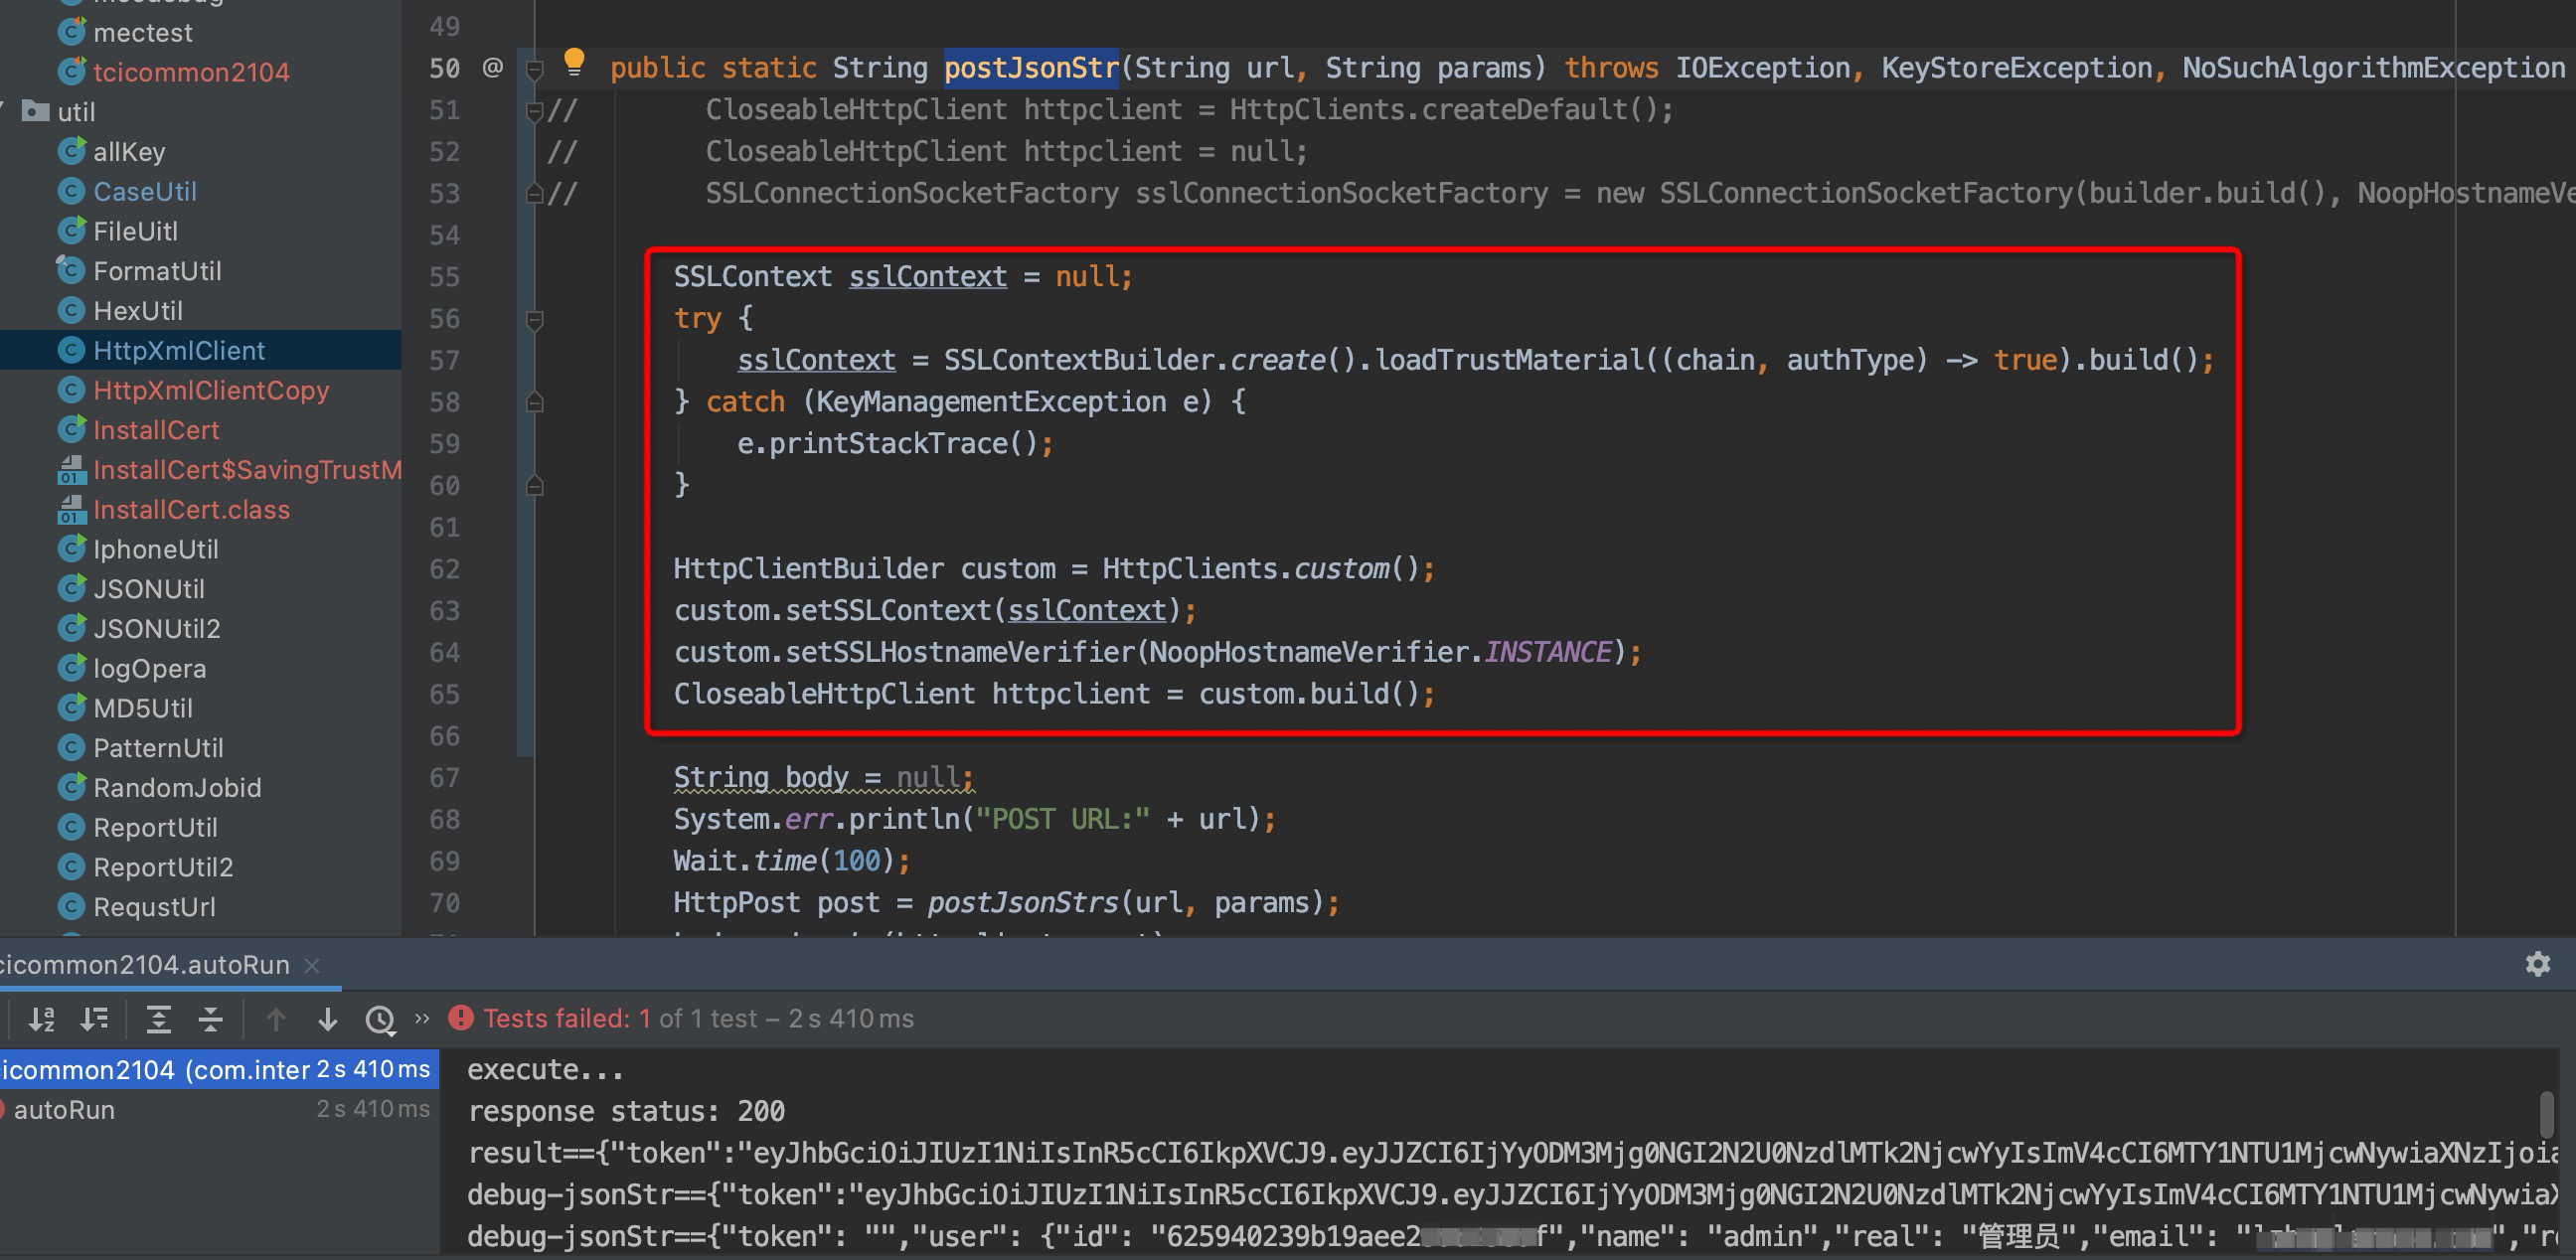
在/Users/qa/Desktop/2021/code/APInterfaceFrame/src/com/interfaceframe/bg/util/HttpXmlClient.java 修改postJsonStr方法。添加如下内容
SSLContext sslContext = null;try {sslContext = SSLContextBuilder.create().loadTrustMaterial((chain, authType) -> true).build();} catch (KeyManagementException e) {e.printStackTrace();}HttpClientBuilder custom = HttpClients.custom();custom.setSSLContext(sslContext);custom.setSSLHostnameVerifier(NoopHostnameVerifier.INSTANCE);CloseableHttpClient httpclient = custom.build();
2022.5.18新增 对https的封装-post请求
/*** 2022.5.18新增 对https接口请求的证书封装。post请求,https*/public static String sendHttps(String json, String URL) {StringBuilder stringBuilder = new StringBuilder();try {HttpsURLConnection connection = (HttpsURLConnection) new URL(URL).openConnection();connection.setHostnameVerifier((urlHostName, session) -> true);connection.setRequestMethod("POST");connection.setDoOutput(true);//write headerconnection.setRequestProperty("Content-type", "application/json; charset=utf-8");connection.setRequestProperty("Accept", "application/json, text/plain, */*");//write bodytry (PrintWriter writer = new PrintWriter(connection.getOutputStream())) {
//                Map<String, String> foo = new HashMap<>();
//                foo.put("name", "HTTP");
//                foo.put("age", "18");
//                writer.write(JSONObject.toJSONString(foo));writer.write(json);writer.flush();}//read responsetry (BufferedReader reader = new BufferedReader(new InputStreamReader(connection.getInputStream()))) {String line = "";while ((line = reader.readLine()) != null) {stringBuilder.append(line);}
//                System.out.println("debug-https返回结果==" + line);} finally {connection.disconnect();}} catch (Exception e) {e.printStackTrace();}//        System.out.println("https登录接口返回结果===" + stringBuilder.toString());return stringBuilder.toString();}static {try {trustAllHttpsCertificates();HttpsURLConnection.setDefaultHostnameVerifier((urlHostName, session) -> true);} catch (Exception e) {}}private static void trustAllHttpsCertificates() throws NoSuchAlgorithmException, KeyManagementException {TrustManager[] trustAllCerts = new TrustManager[1];trustAllCerts[0] = new TrustAllManager();SSLContext sc = SSLContext.getInstance("SSL");sc.init(null, trustAllCerts, null);HttpsURLConnection.setDefaultSSLSocketFactory(sc.getSocketFactory());}private static class TrustAllManager implements X509TrustManager {public X509Certificate[] getAcceptedIssuers() {return null;}public void checkServerTrusted(X509Certificate[] certs, String authType) {}public void checkClientTrusted(X509Certificate[] certs, String authType) {}}/*** post请求,http*/public static String doPost(String json, String URL) throws IOException {//json:请求url的参数String obj = null;// 创建默认的httpClient实例CloseableHttpClient httpclient = HttpClients.createDefault();// 创建httppostHttpPost httppost = new HttpPost(URL);// header必传参数Content-type、Accept
//        httppost.addHeader("Content-type", "application/json; charset=utf-8");
//        httppost.setHeader("Accept", "application/json");httppost.addHeader("Content-type", "application/json; charset=utf-8");httppost.setHeader("Accept", "application/json, text/plain, */*");System.out.println("URL==" + URL);//20220517新增 tci2104测试环境
//        if (URL.contains("10.121.140.30:8002")) {
//            httppost.addHeader("Authorization", "Bearer" + GetToken.tci2104Token());
//            System.out.println("tci2104带header的请求走到这里了==");
//
//        }
//
//        // cmo的dev环境
//        if (URL.contains("10.121.134.122:31651")) {
//            httppost.addHeader("X-Auth-Token", GetToken.devcmoToken());
//            System.out.println("mec带header的请求走到这里了==");
//
//        }try {StringEntity strEntity = new StringEntity(json, Charset.forName("UTF-8"));  //对参数进行编码,防止中文乱码strEntity.setContentEncoding("UTF-8");httppost.setEntity(strEntity);CloseableHttpResponse response = httpclient.execute(httppost);try {//获取相应实体HttpEntity entity = response.getEntity();if (entity != null) {obj = EntityUtils.toString(entity, "UTF-8");}// 获取相应实体Response-Headersorg.apache.http.Header[] allheaders = response.getAllHeaders();for (int i = 0; i < allheaders.length; i++) {
//                    System.out.println(allheaders[i]);if (allheaders[i].getName().contains("X-Subject-Token")) {String ostoken = allheaders[i].getValue();
//                        System.err.println("登录OpenStack的Response-Header的token为==" + ostoken);}}} finally {response.close();}} catch (Exception e) {e.printStackTrace();} finally {// 关闭连接,释放资源httpclient.close();}return obj;}// 参数格式化private static List<NameValuePair> getParamsList_pre(Map<String, String> paramsMap) {if (paramsMap != null && paramsMap.size() != 0) {List<NameValuePair> params = new ArrayList();Iterator var2 = paramsMap.entrySet().iterator();while (var2.hasNext()) {Map.Entry<String, String> map = (Map.Entry) var2.next();// 预发环境最新版本日志回放,请求参数打开以下if else,注释掉最后一行// 参数格式化,commons-httpclient自带的方法NameValuePair会自动将==转为=,还有特殊符号格式化// NameValuePair是简单名称值对节点类型。多用于Java像url发送Post请求。在发送post请求时用该list来存放参数params.add(new NameValuePair(map.getKey() + "", map.getValue() + ""));//                params.add(new NameValuePair(map.getKey() + "", map.getValue() + ""));}return params;} else {return null;}}
}
2022.5.11新增
maven仓库地址
https://mvnrepository.com/artifact/org.apache.maven.plugins/maven-failsafe-plugin/3.0.0-M6
5. super-jacoco
滴滴开源Super-jacoco:java代码覆盖率收集平台文档
4. jacoco
Jacoco--测试覆盖率工具
IDEA插件
IDEA自带Jacoco单元测试分析工具,操作步骤如下
4-1.选择编辑配置 “Edit Configurations”

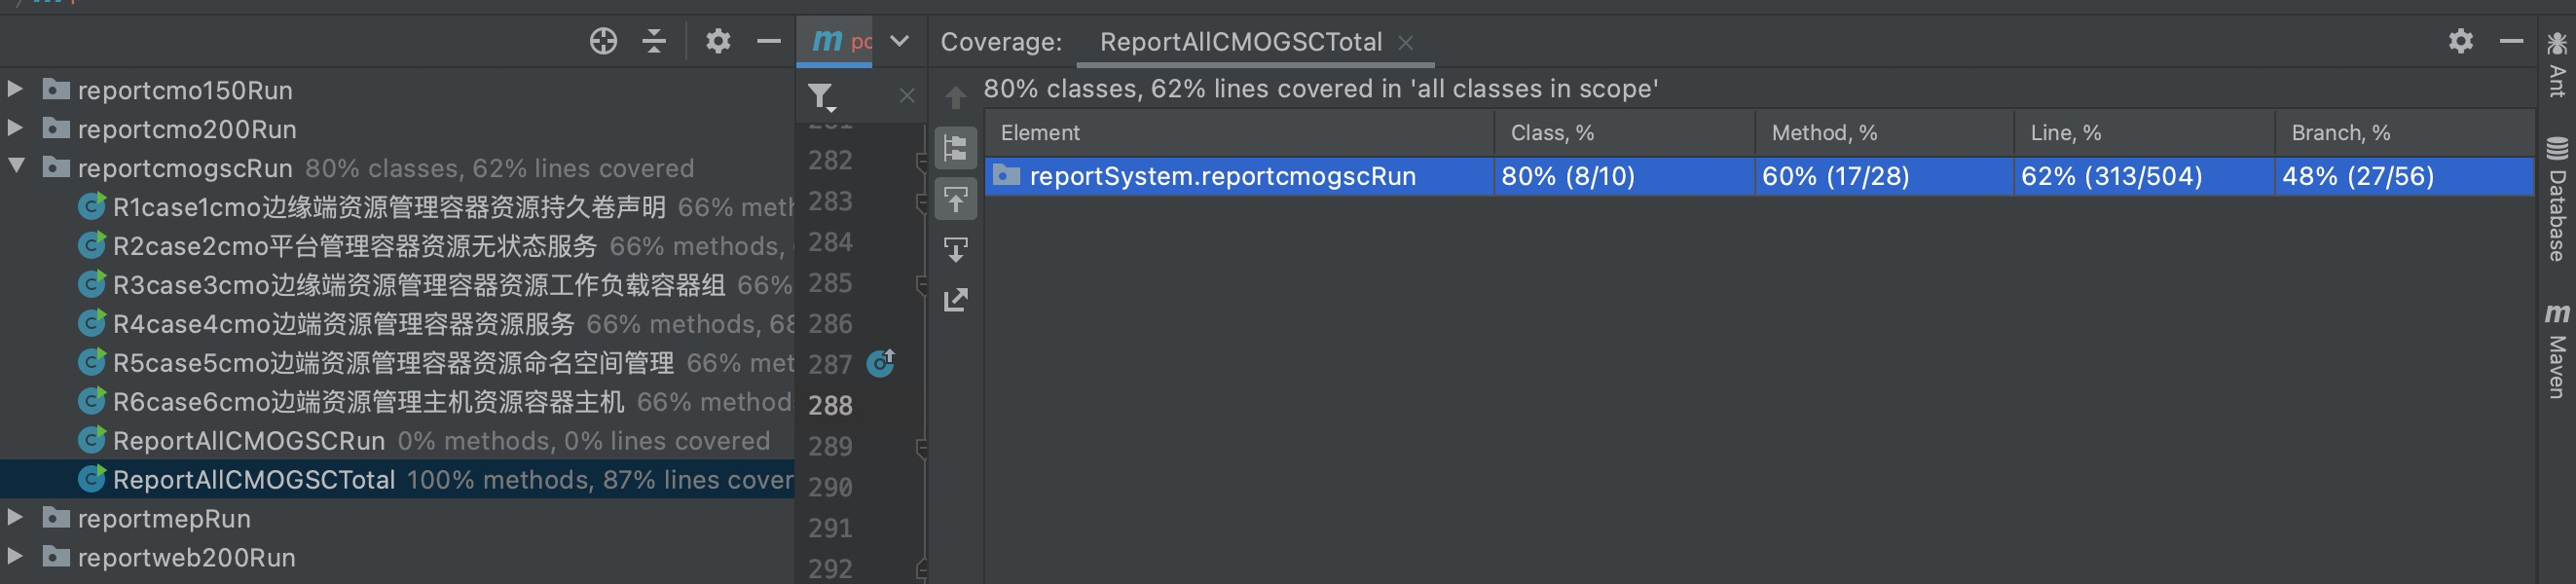
4-2.添加单元测试类型,选择被测文件,此处以TestNG为例,测试所有代码(不包含lib)

4-3.选择工具jacoco
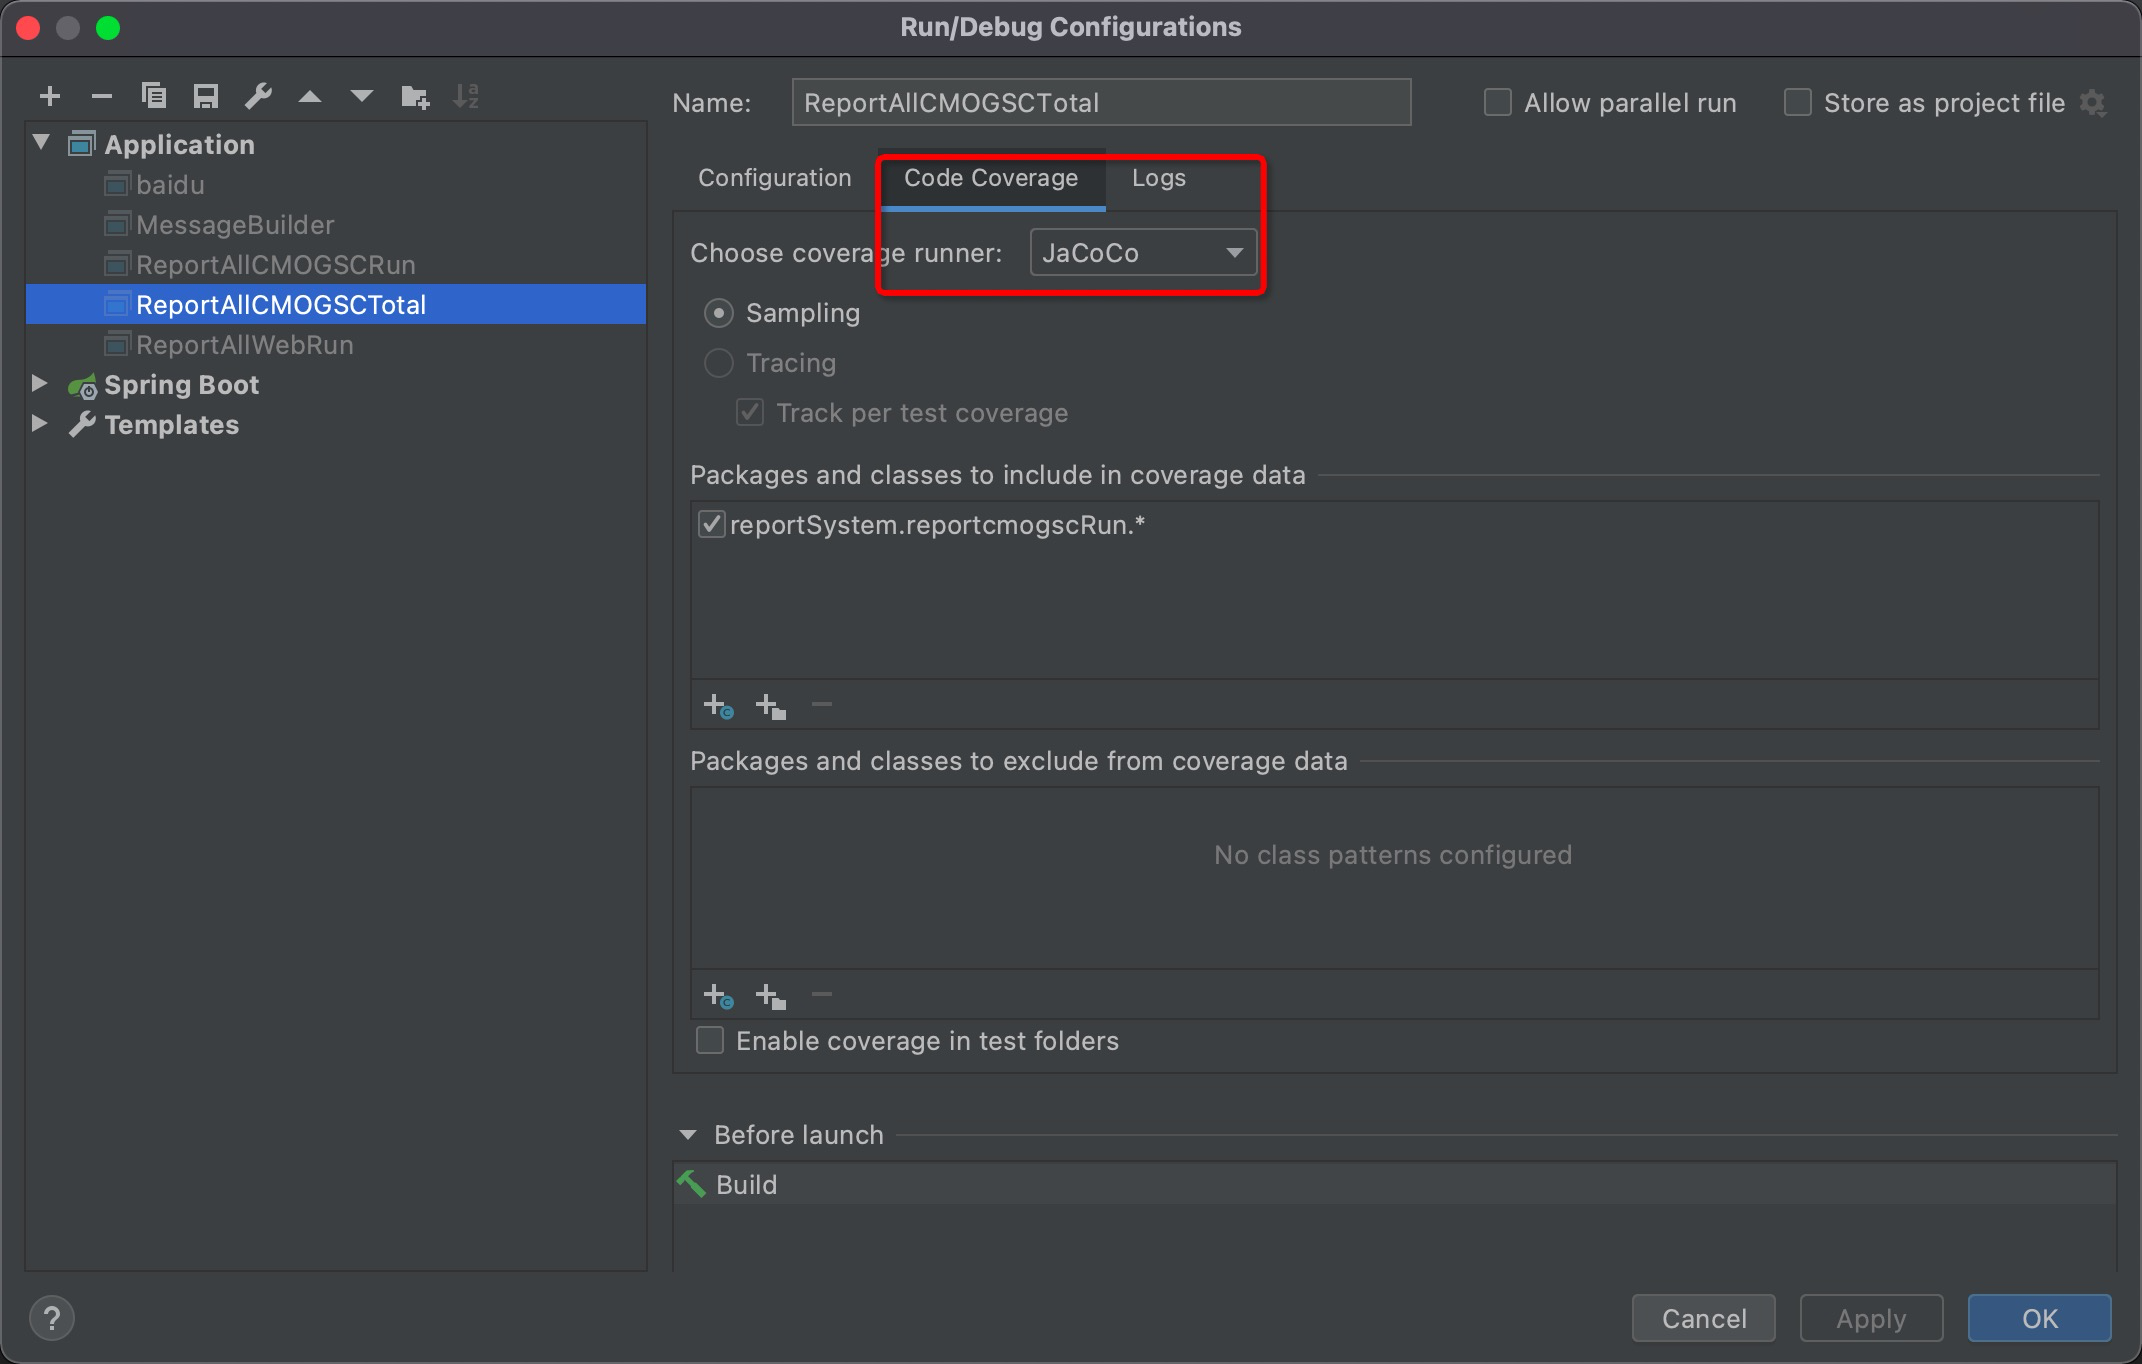
4-4.以覆盖率模式运行测试用例,点击第3个图标
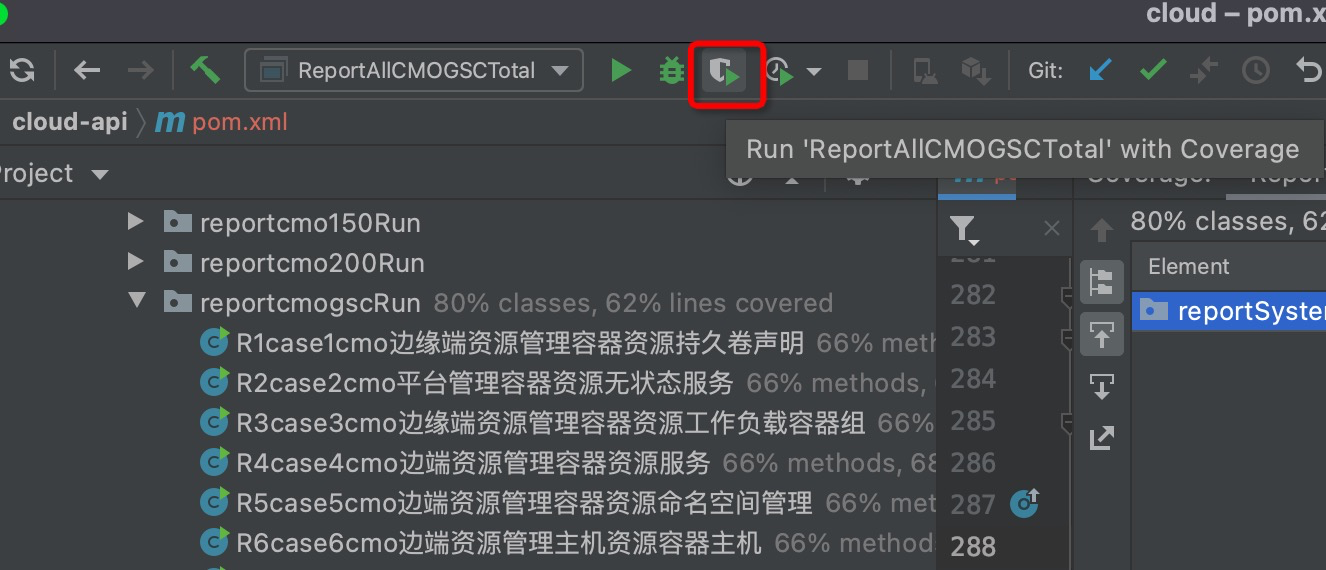
4-5.运行完成后自动生成测试报告
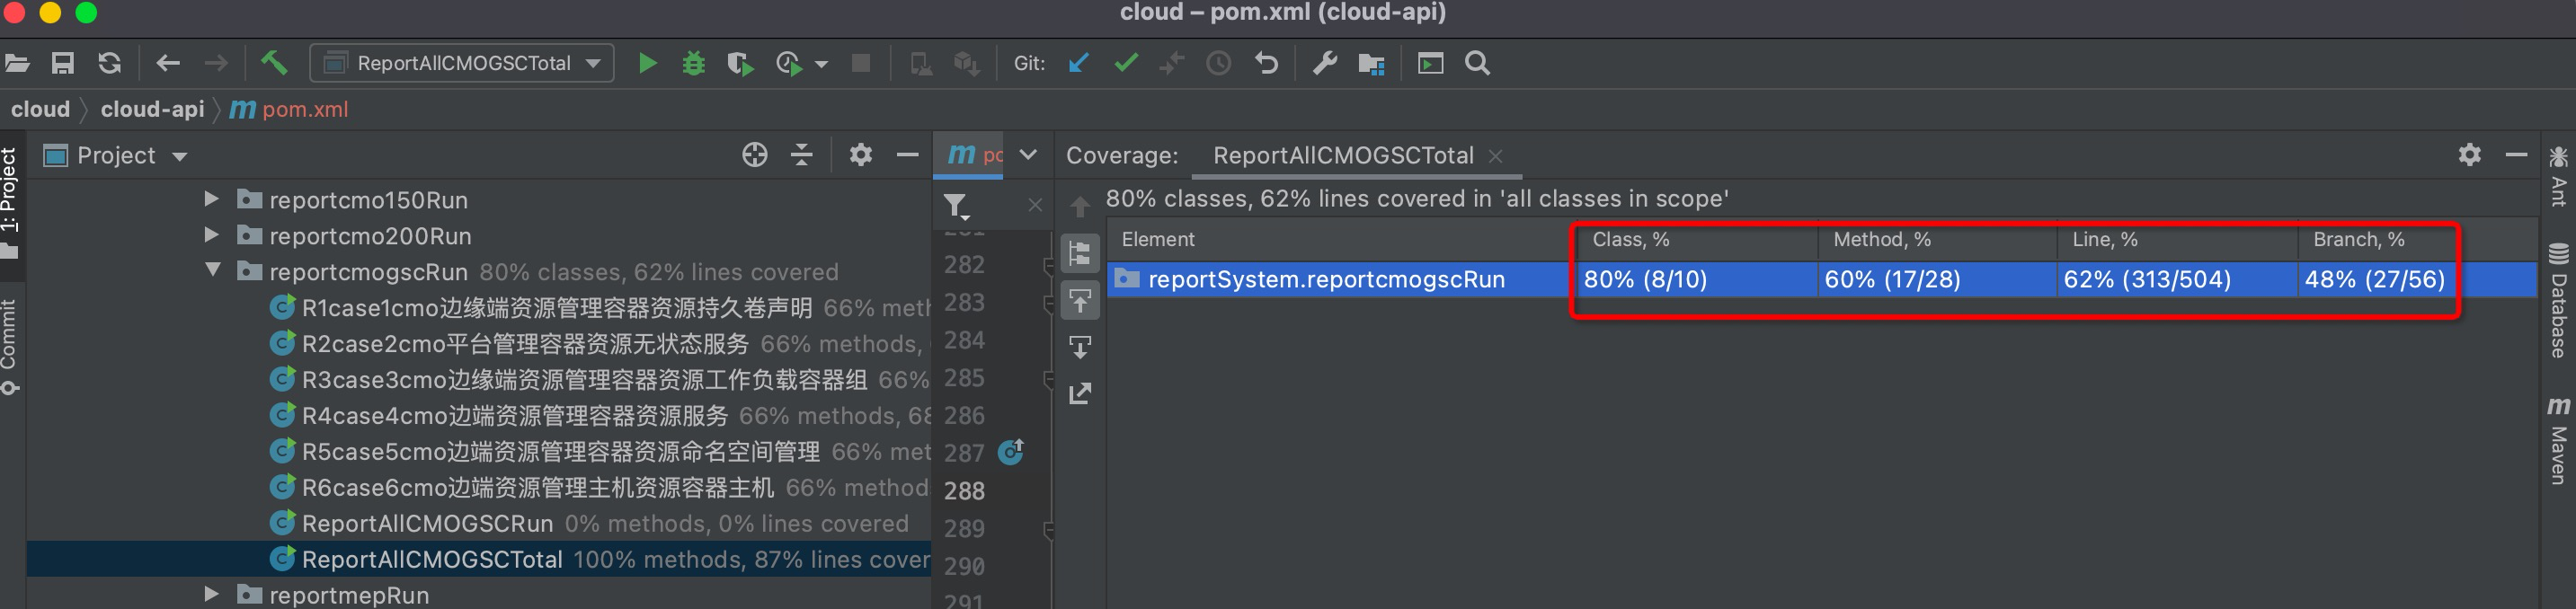
MAVEN
在pom.xml文件中添加以下插件后,运行 mvn test 即可在target/site/jacoco文件夹下生成报告。
如果想要跳过失败的测试用例,请使用 mvn test -Dmaven.test.failure.ignore=true
<plugin> <groupId>org.jacoco</groupId> <artifactId>jacoco-maven-plugin</artifactId> <version>0.8.2-SNAPSHOT</version> <executions> <execution> <id>default-prepare-agent</id> <goals> <goal>prepare-agent</goal> </goals> </execution> <execution> <id>default-report</id> <phase>test</phase> <goals> <goal>report</goal> </goals> </execution> <execution> <id>default-check</id> <goals> <goal>check</goal> </goals> </execution> </executions></plugin>复制代码运行时测试
jacoco支持程序运行中监控执行情况。下面介绍直接运行和tomcat服务器运行两种监控方式
3. 如遇
[ERROR] Failed to execute goal org.apache.maven.plugins:maven-compiler-plugin:3.8.1:compile (default-compile) on project cloud-api: Compilation failure
[ERROR] No compiler is provided in this environment. Perhaps you are running on a JRE rather than a JDK?

解决办法:mac Big Sur系统 mvn打包报错:No compiler is provided in this environment. Perhaps you are running on a JRE-阿里云开发者社区
macos的jdk下载地址 jdk-8u333-mac.dmg
Java Downloads | Oracle
➜ Home vim ~/.bash_profile 编辑配置文件
➜ Home java -version 查看java版本
java version "1.8.0_333"
Java(TM) SE Runtime Environment (build 1.8.0_333-b02)
Java HotSpot(TM) 64-Bit Server VM (build 25.333-b02, mixed mode)
➜ Home mvn -version 查看mvn版本
Apache Maven 3.5.4 (1edded0938998edf8bf061f1ceb3cfdeccf443fe; 2018-06-18T02:33:14+08:00)
Maven home: /usr/local/Cellar/maven/3.5.4/libexec
Java version: 1.8.0_333, vendor: Oracle Corporation, runtime: /Library/Internet Plug-Ins/JavaAppletPlugin.plugin/Contents/Home
Default locale: zh_CN, platform encoding: UTF-8
OS name: "mac os x", version: "11.2.1", arch: "x86_64", family: "mac"

如上发现
Java version 正确,但是 runtime 值为 /Library/Internet Plug-Ins/JavaAppletPlugin.plugin
进入 /Library/Internet Plug-Ins/ 目录,删除 /Library/Internet Plug-Ins/JavaAppletPlugin.plugin
重新执行 mvn -version runtime 正确,如下图所示(装了JDK9,JDK8也类似)。
cd /Library/Internet\ Plug-Ins
sudo rm -rf JavaAppletPlugin.plugin
mvn -version runtime

在本地重新执行➜ cloud git:(master) ✗ mvn clean test
[ERROR] No compiler is provided in this environment. Perhaps you are running on a JRE rather than a JDK? 报错没有了

如遇
错误:找不到或无法加载主类

cd /Library/Java/JavaVirtualMachines
sudo rm -rf jdk1.8.0_281.jdk

File - Project Structure - Project 编辑SDK
把/Library/Java/JavaVirtualMachines/jdk1.8.0_281.jdk/Contents/Home
改为

由于JDK版本升级了,所以这里也需要修改

qa@deMacBook-Pro-10:~$java -version
java version "1.8.0_333"
Java(TM) SE Runtime Environment (build 1.8.0_333-b02)
Java HotSpot(TM) 64-Bit Server VM (build 25.333-b02, mixed mode)
qa@deMacBook-Pro-10:~$mvn -version
Apache Maven 3.5.4 (1edded0938998edf8bf061f1ceb3cfdeccf443fe; 2018-06-18T02:33:14+08:00)
Maven home: /usr/local/Cellar/maven/3.5.4/libexec
Java version: 1.8.0_333, vendor: Oracle Corporation, runtime: /Library/Java/JavaVirtualMachines/jdk1.8.0_333.jdk/Contents/Home/jre
Default locale: zh_CN, platform encoding: UTF-8
OS name: "mac os x", version: "11.2.1", arch: "x86_64", family: "mac"

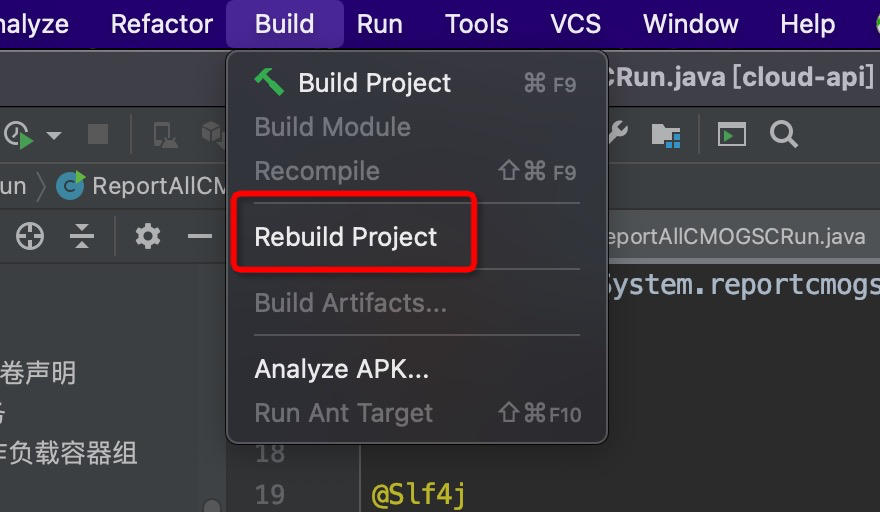
如果还是不行 菜单-Build-Rebuild Project
2. jacoco配置
Java单元覆盖率工具JaCoCo详细理解和使用(配置+示例)
1. Intellij IDEA出现错误error:java:⽆效的源发⾏版:11解决⽅法
Preference-Compiler-Java Compiler
module设置为8

pom文件的source target设置为8
<plugin><groupId>org.apache.maven.plugins</groupId><artifactId>maven-compiler-plugin</artifactId><configuration><source>8</source><target>8</target><encoding>UTF8</encoding></configuration>
</plugin>
这篇关于testng框架优化+centos服务器下搭建java自动化环境(centos8.5)的文章就介绍到这儿,希望我们推荐的文章对编程师们有所帮助!


