本文主要是介绍VD6283TX环境光传感器驱动开发(4)----移植闪烁频率代码,希望对大家解决编程问题提供一定的参考价值,需要的开发者们随着小编来一起学习吧!
VD6283TX环境光传感器驱动开发----4.移植闪烁频率代码
- 闪烁定义
- 视频教学
- 样品申请
- 源码下载
- 开发板设置
- 开发板选择
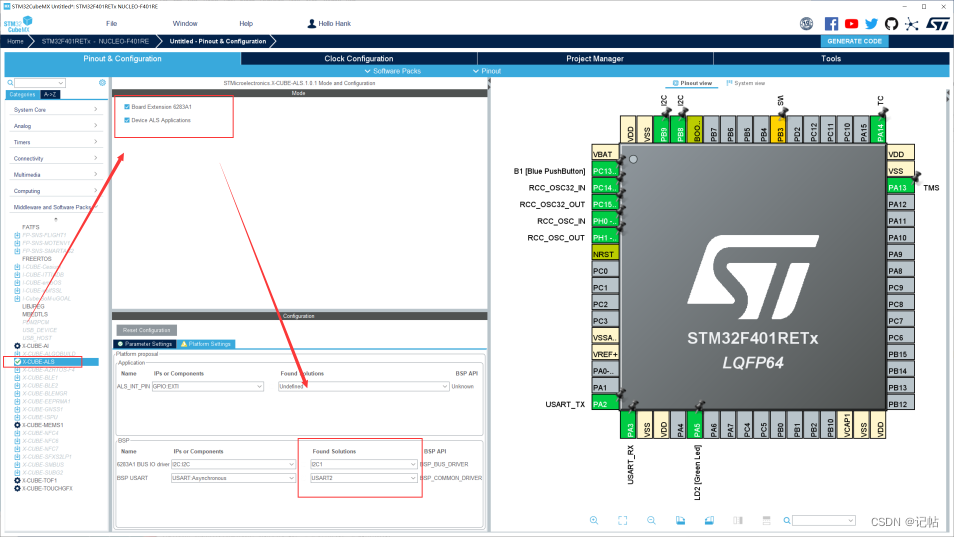
- IIC配置
- 串口配置
- 开启X-CUBE-ALS软件包
- 时钟树配置
- ADC使用定时器触发采样
- KEIL配置
- FFT代码配置
- app_x-cube-als.c
- 需要添加函数
闪烁定义
光学闪烁被定义为人造光源的脉动或波动的光现象。
在低频闪烁中,光是可见的(人眼能够察觉光的闪烁)。超过100 Hz的光学闪烁对于人眼来说不再可见,但仍然存在,可能对人体产生影响。
大多数类型的人造光源在连接到电力主网(家庭或商业办公室)时会发出闪烁,这主要取决于国家的电力频率,通常是50 Hz或60 Hz。
由于电流在光源中的交替流动,所有人造光源都会分别在50 Hz和60 Hz电力主网下发出100 Hz或120 Hz的闪烁频率。
为了消除可见的闪烁并减少对人体的影响,大多数发光二极管(LED)使用脉冲宽度调制(PWM)调光方法,以实现更高的闪烁频率。
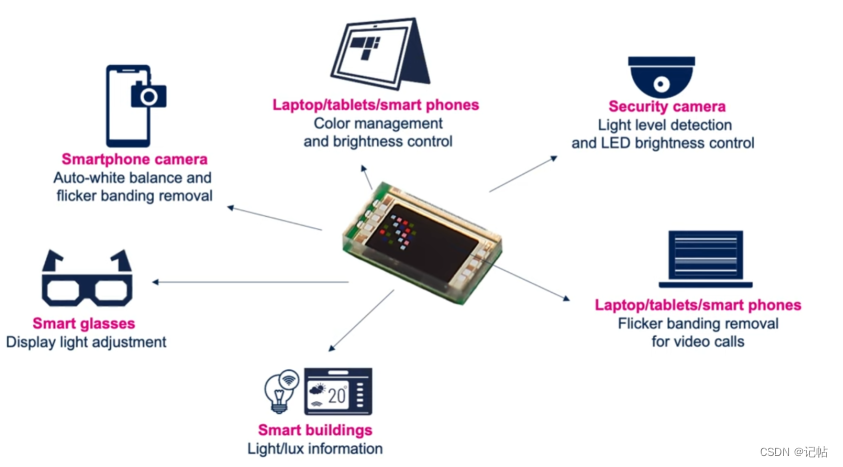
VD6283传感器可以检测光的闪烁频率,最高可达2 kHz。
最近在弄ST的课程,需要样片的可以加群申请:615061293 。
视频教学
https://www.bilibili.com/video/BV1xu4y1t75n/
VD6283TX环境光传感器驱动开发(2)----获取光强和色温
样品申请
https://www.wjx.top/vm/OhcKxJk.aspx#
源码下载
开发板设置
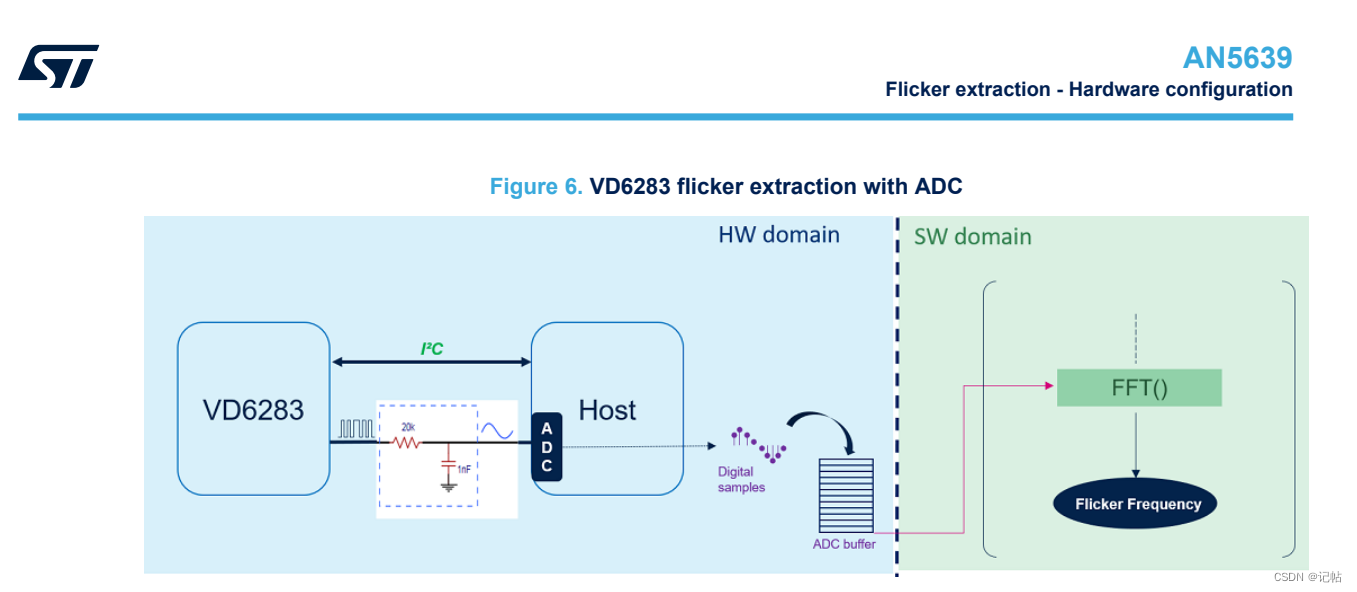
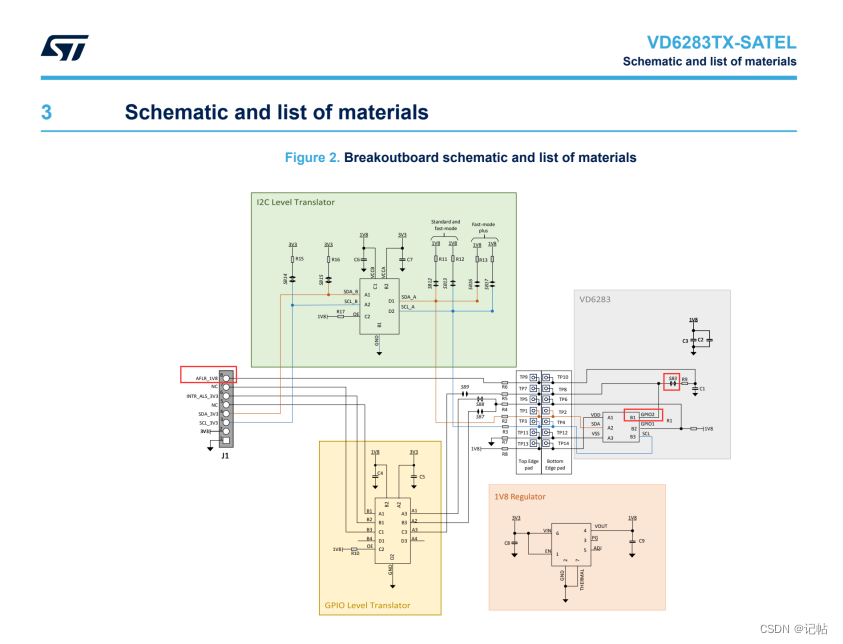
在手册种给出了,闪烁手册可以查看AN5639,资料链接如下。
https://www.st.com/content/ccc/resource/technical/document/application_note/group1/9f/7e/8c/ce/36/85/4c/08/DM00776948/files/DM00776948.pdf/jcr:content/translations/en.DM00776948.pdf

在AN5639手册中,需要对SB3进行连接。
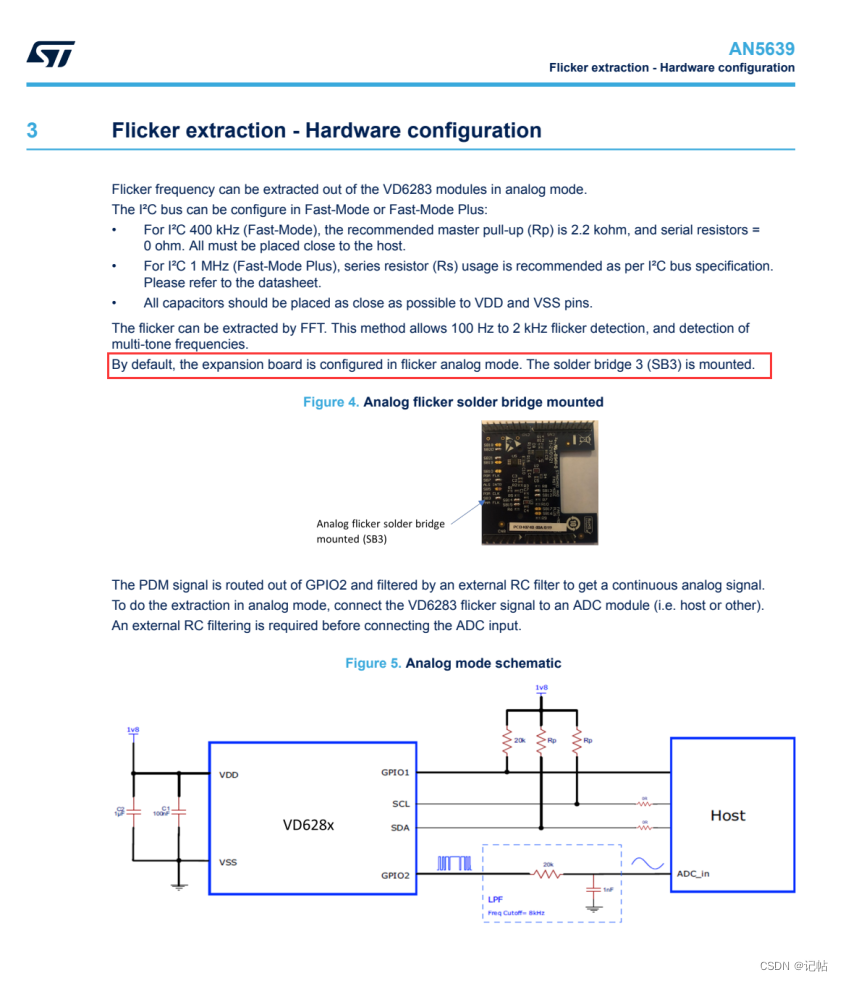
同时GPIO2需要接到MCU的ADC通道中。
查看X-NUCLEO-6283A1手册,可以看到VD6283TX的GPIO2连接到MCU的ADC端口0-2。
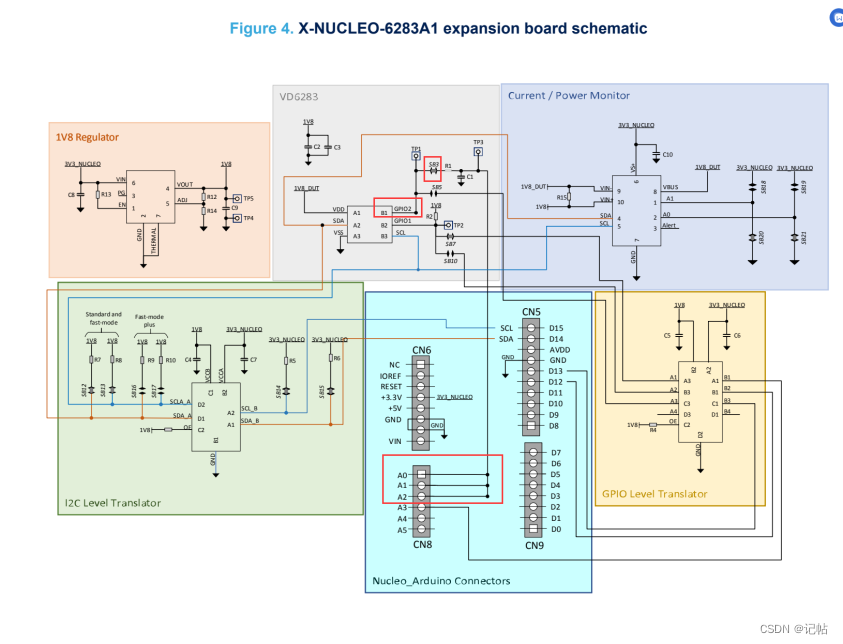
在VD6283TX-SATEL中,可以看到VD6283TX通过SB3连接到了AFLR_1V8。
需要将AFLR_1V8接到开发板的A0端口中。
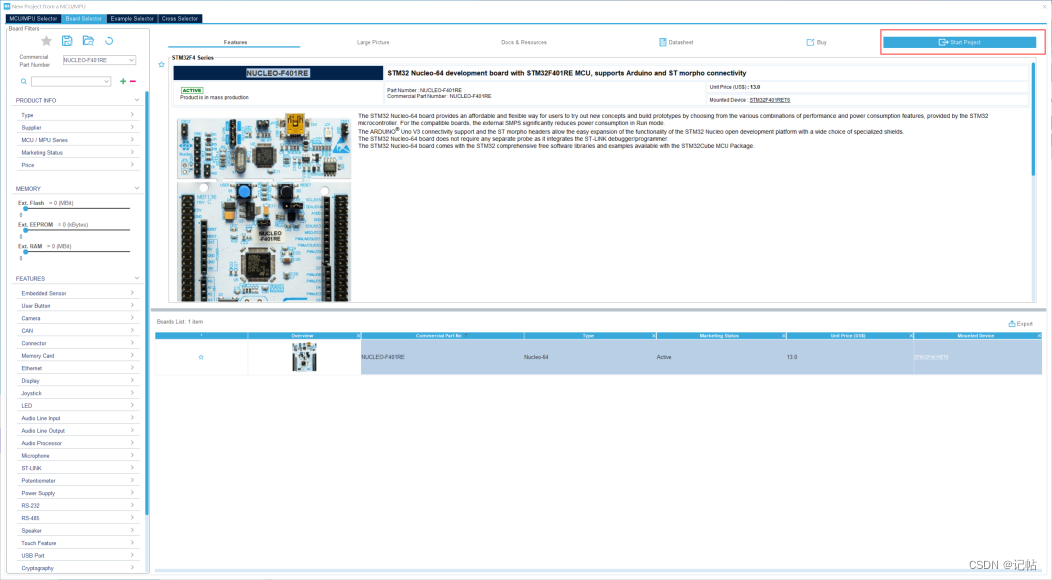
开发板选择
这里使用NUCLEO-F401RE 开发板。
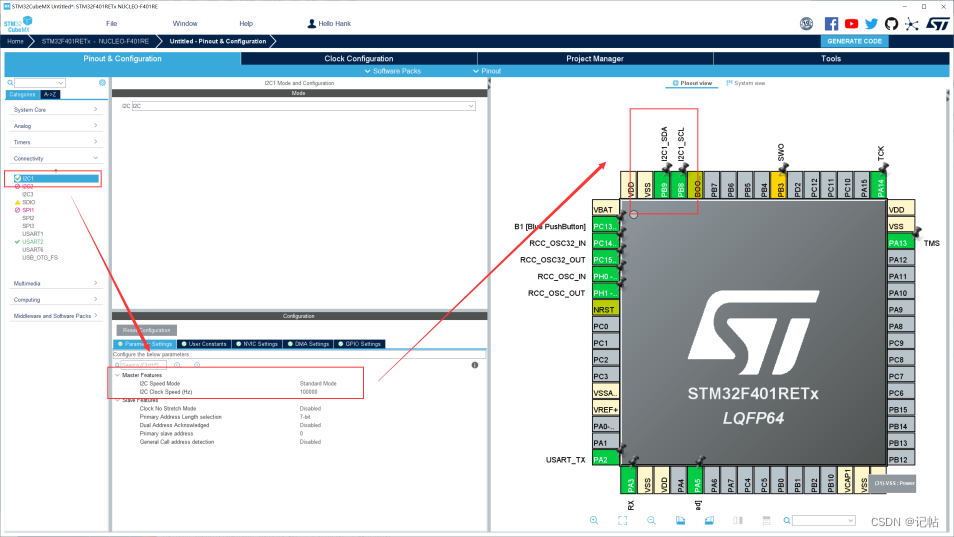
IIC配置
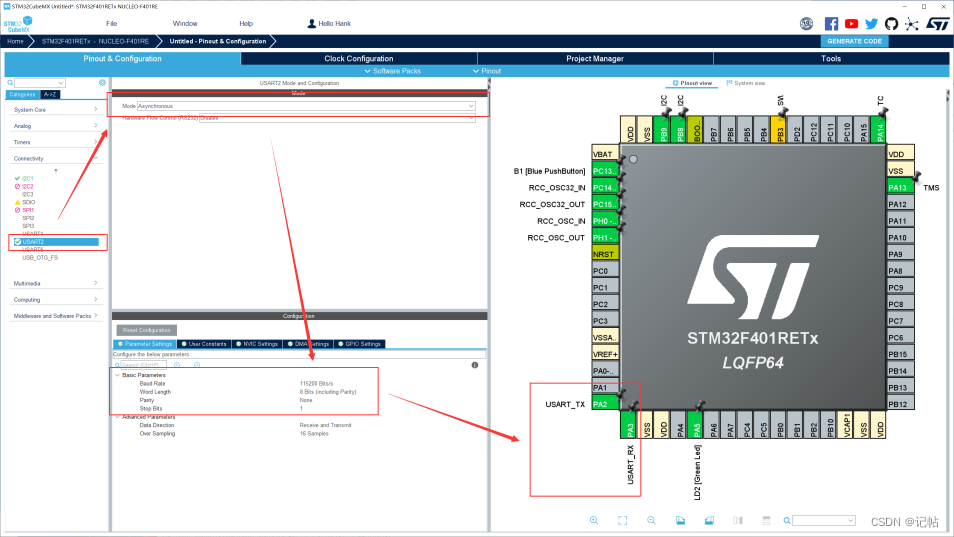
串口配置
开启X-CUBE-ALS软件包
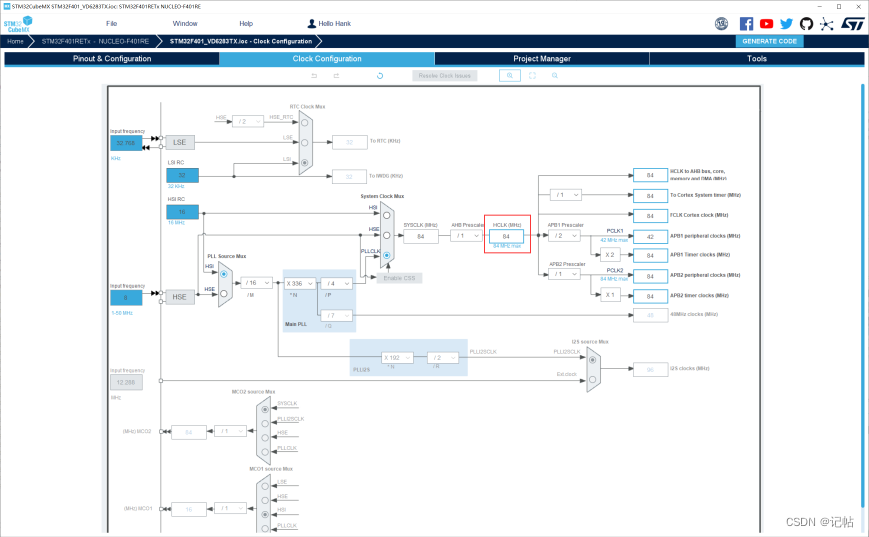
时钟树配置
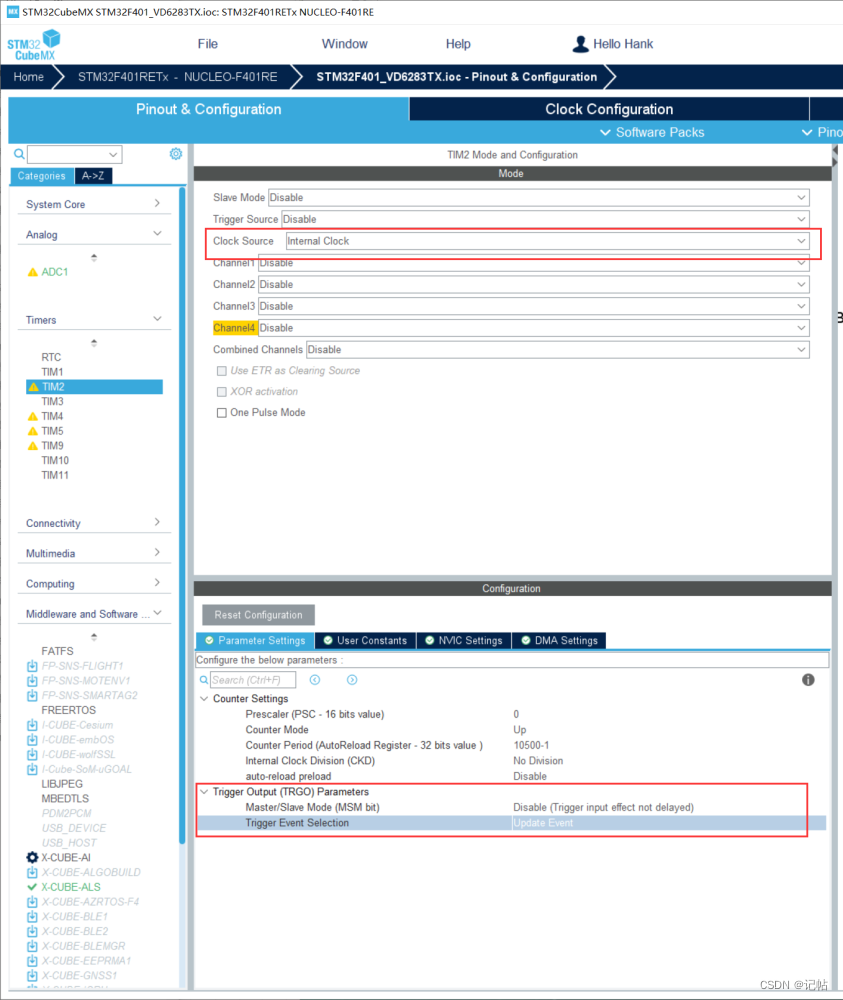
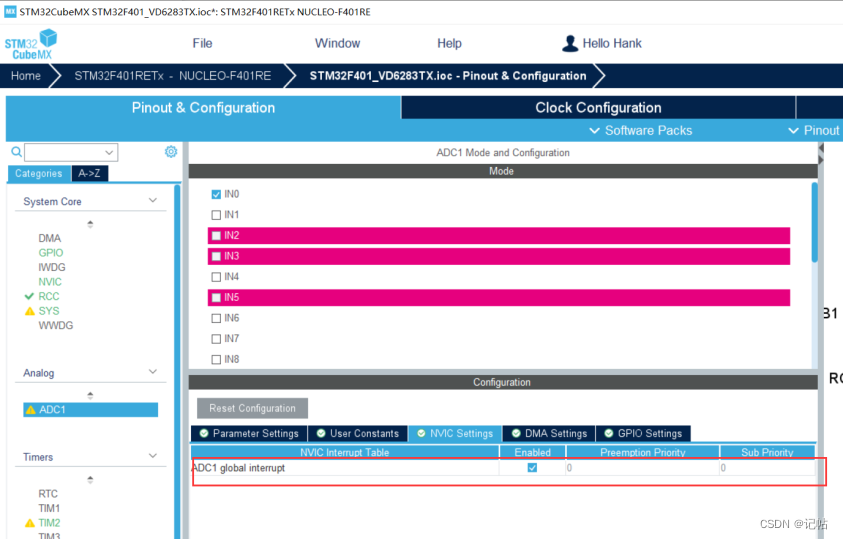
ADC使用定时器触发采样
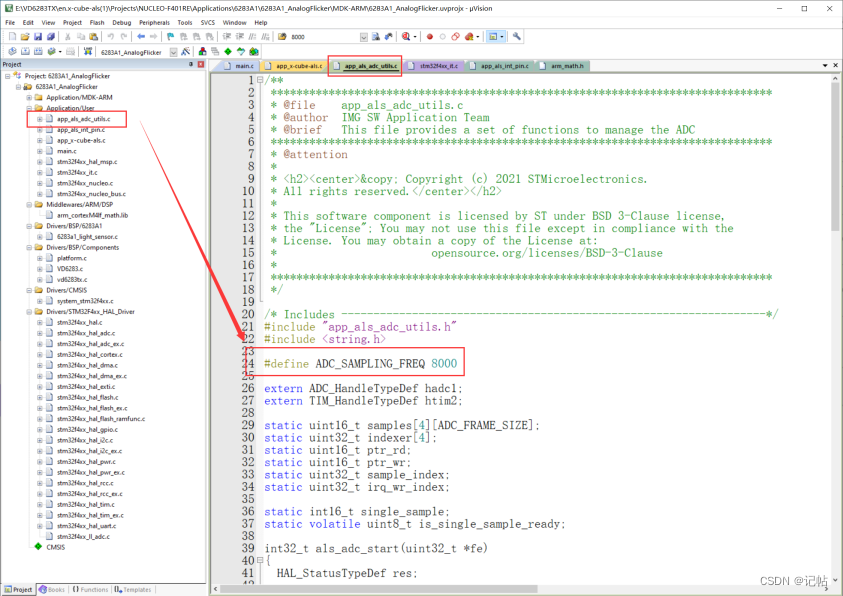
在app_als_adc_utils.c中,定义了ADC使用的频率,为8000Hz。
定时器的arr设置为10500-1,那么定时器频率为8000Hz。
Trigger Event Selection :update event 定时器自动更新。
配置ADC检测VD6283TX的GPIO2管脚的AD值。
设置触发方式为外部触发,选择刚刚配置的TIM2,触发方式为上升沿触发。
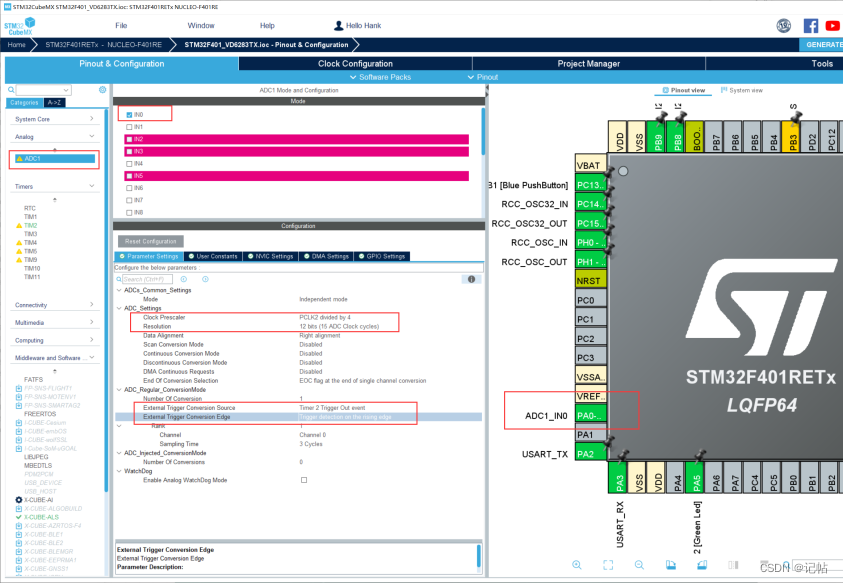
开启中断。
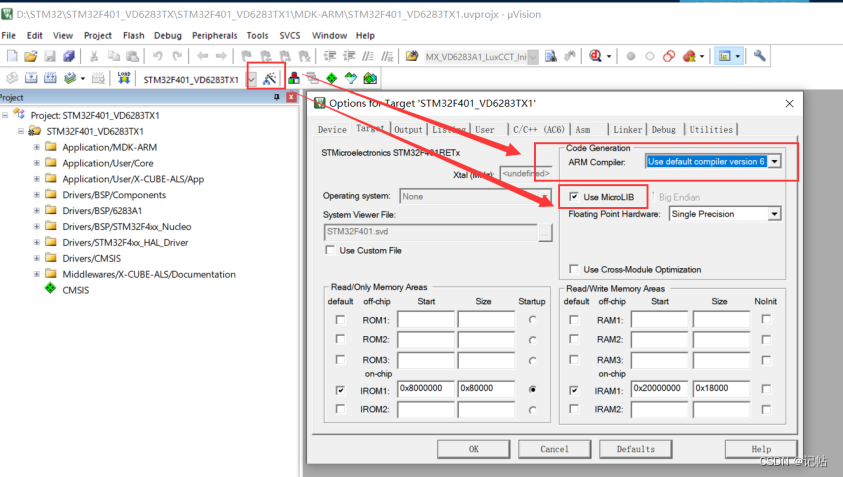
KEIL配置
FFT代码配置
arm_cortexM4lf_math.lib 库包含了一系列数学函数,特别是适用于基于Cortex-M4和Cortex-M7处理器的浮点运算单元的优化数学例程。这些例程涵盖了常见的数学运算,如信号处理、滤波、变换等。
arm_math.h 这个头文件包含了CMSIS-DSP库的函数声明、宏定义和结构体定义等,可以通过包含这个头文件,使用库中提供的各种数学函数,包括信号处理、滤波、变换等。
添加arm_cortexM4lf_math.lib文件。
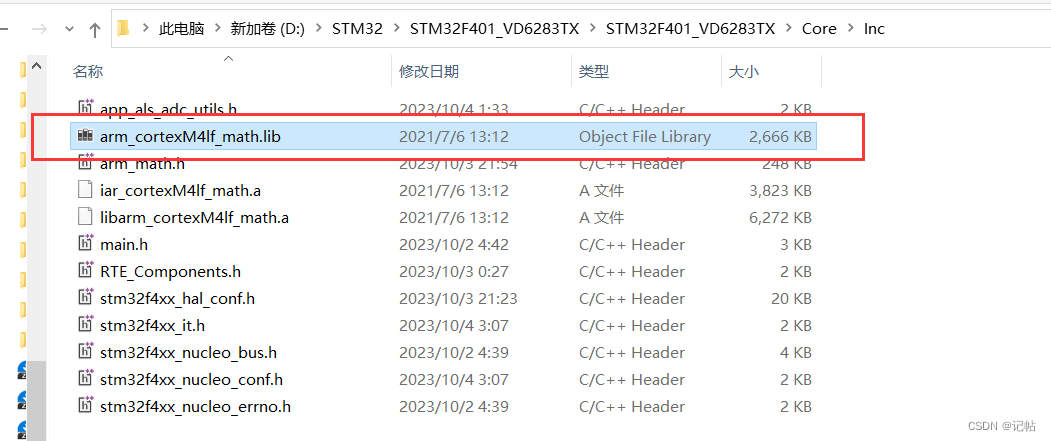
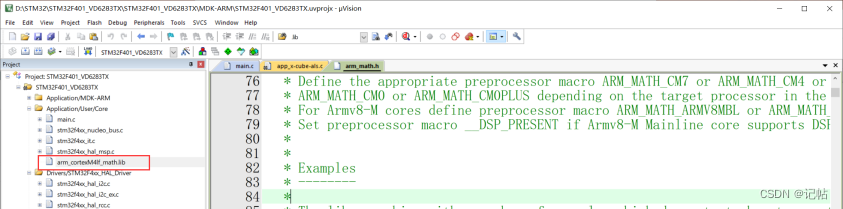
同时导入arm_math.h文件。
app_x-cube-als.c
由于需要进行FFT算法,所以需要添加对应数学头文件。
#define ARM_MATH_CM4
#include "arm_math.h"
#include "app_als_adc_utils.h"
添加对应的函数申明。
#define FLK_CHANNEL	(5U)/** Increasing the value of the FLK_DATA_SIZE symbol will increase* processing time, flicker accuracy and memory footprint*/
#define FLK_DATA_SIZE (1024U)
#define FFT_SIZE (FLK_DATA_SIZE)/* Private variables ---------------------------------------------------------*/
static uint8_t is_quit_requested;
static uint8_t is_autogain_requested;
static int16_t flk_data[FLK_DATA_SIZE];
volatile uint8_t ALS_EventDetected;/** The FFT of a real N-point sequence has even symmetry in the frequency domain.* The second half of the data equals the conjugate of the first half flipped in frequency.* Looking at the data, we see that we can uniquely represent the FFT using only N/2 complex numbers.* These are packed into the output array in alternating real and imaginary components:* X = { real[0], imag[0], real[1], imag[1], real[2], imag[2] ... real[(N/2)-1], imag[(N/2)-1 }*/
static arm_rfft_fast_instance_f32 instance_fft;
static float32_t fft_in[FLK_DATA_SIZE];
static float32_t fft_out_tmp[FFT_SIZE];
static float32_t fft_out[FFT_SIZE/2];/** The FFT of a real N-point sequence has even symmetry in the frequency domain.* The second half of the data equals the conjugate of the first half flipped in frequency.* Looking at the data, we see that we can uniquely represent the FFT using only N/2 complex numbers.* These are packed into the output array in alternating real and imaginary components:* X = { real[0], imag[0], real[1], imag[1], real[2], imag[2] ... real[(N/2)-1], imag[(N/2)-1 }*/
static arm_rfft_fast_instance_f32 instance_fft;static void MX_VD6283A1_AnalogFlicker_Process(void); static float32_t complex_abs(float32_t real, float32_t complex);
static void init_fft(arm_rfft_fast_instance_f32 *instance, uint32_t size);
static void perform_fft(arm_rfft_fast_instance_f32 *instance, int16_t *data, float32_t *ffti, float32_t *ffto, uint32_t size);
static void find_flk_freq(uint32_t fs, float32_t *ffto, uint32_t *freq, uint8_t skip_dc, uint32_t size);static int32_t flicker_autogain(uint8_t Instance, uint32_t *pAppliedGain, uint32_t timeoutMs);static void display_gain(uint32_t gain);
在MX_VD6283A1_LuxCCT_Init()函数中添加init_fft快速傅里叶变换初始化。
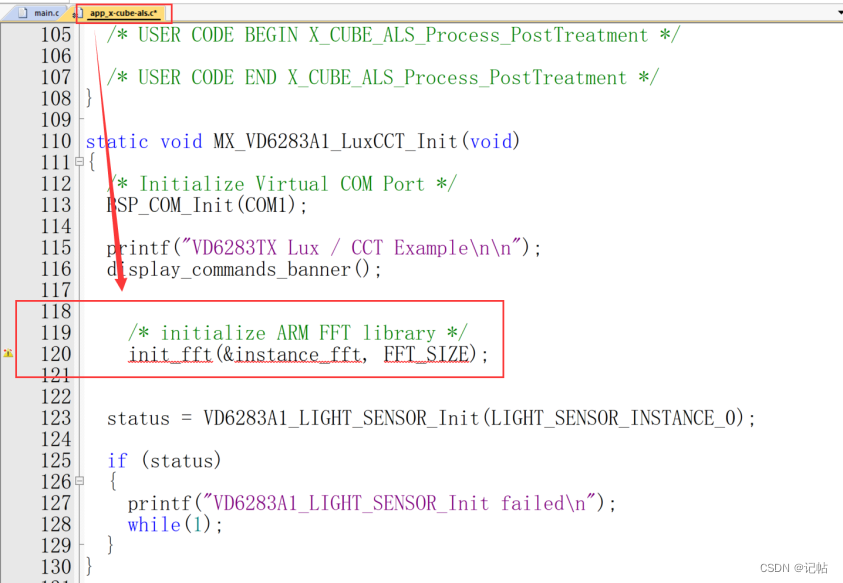
static void MX_VD6283A1_LuxCCT_Init(void)
{/* Initialize Virtual COM Port */BSP_COM_Init(COM1);printf("VD6283TX Lux / CCT Example\n\n");display_commands_banner();/* initialize ARM FFT library */init_fft(&instance_fft, FFT_SIZE);status = VD6283A1_LIGHT_SENSOR_Init(LIGHT_SENSOR_INSTANCE_0);if (status){printf("VD6283A1_LIGHT_SENSOR_Init failed\n");while(1);}
}
初始化完毕之后,添加频率获取函数。
static void MX_VD6283A1_AnalogFlicker_Process(void)
{uint32_t fs; /* sampling frequency */uint32_t pos = 0; uint32_t flk_freq = 0;uint32_t index;uint32_t current_gain;uint32_t current_exposure;/* initialize exposure time */VD6283A1_LIGHT_SENSOR_SetExposureTime(LIGHT_SENSOR_INSTANCE_0, 100000);VD6283A1_LIGHT_SENSOR_GetExposureTime(LIGHT_SENSOR_INSTANCE_0, ¤t_exposure);printf("Exposure set to %lu us\n", (unsigned long)current_exposure);/* initialize gain */flicker_autogain(LIGHT_SENSOR_INSTANCE_0, ¤t_gain, 1);printf("Channel %u gain set to", FLK_CHANNEL);display_gain(current_gain);status = als_adc_start(&fs);if (status){printf("ADC Start failed\n");while (1);}VD6283A1_LIGHT_SENSOR_StartFlicker(LIGHT_SENSOR_INSTANCE_0, FLK_CHANNEL, LIGHT_SENSOR_FLICKER_ANALOG);while (!is_quit_requested){status = als_adc_get_frame(&flk_data[pos], &index);/* fill the ADC frame buffer */if (status == 0){pos += ADC_FRAME_SIZE;}/* if the ADC frame buffer is full, then process it */if (pos == FLK_DATA_SIZE){perform_fft(&instance_fft, flk_data, fft_in, fft_out, FFT_SIZE);find_flk_freq(fs, fft_out, &flk_freq, 1, FFT_SIZE);pos = 0; /* reset position index */printf("Flicker freq: %4lu Hz\r", (unsigned long)flk_freq);fflush(stdout);if (is_autogain_requested == 1){VD6283A1_LIGHT_SENSOR_StopFlicker(LIGHT_SENSOR_INSTANCE_0);flicker_autogain(LIGHT_SENSOR_INSTANCE_0, ¤t_gain, 1);printf("Channel %u gain set to", FLK_CHANNEL);display_gain(current_gain);VD6283A1_LIGHT_SENSOR_StartFlicker(LIGHT_SENSOR_INSTANCE_0, FLK_CHANNEL, LIGHT_SENSOR_FLICKER_ANALOG);is_autogain_requested = 0;}}handle_cmd(get_key());}als_adc_stop();VD6283A1_LIGHT_SENSOR_StopFlicker(LIGHT_SENSOR_INSTANCE_0);VD6283A1_LIGHT_SENSOR_DeInit(LIGHT_SENSOR_INSTANCE_0);printf("Quitting the demo...\n");while (1);
}
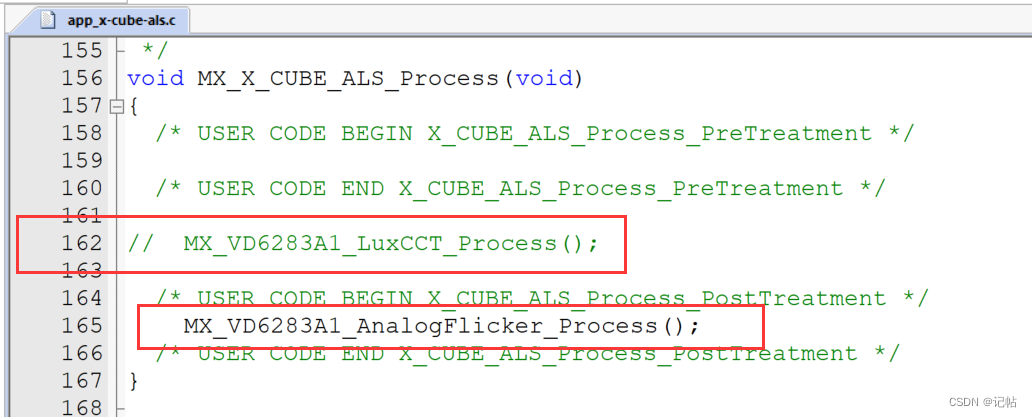
在MX_X_CUBE_ALS_Process函数中开启频率获取函数,关闭光强获取函数MX_VD6283A1_LuxCCT_Process。
添加增益设置函数。
/** @brief find and apply appropriate gain value depending on saturation value* @warning this function mustn't be called when a capture is ongoing*/
static int32_t flicker_autogain(uint8_t Instance, uint32_t *pAppliedGain, uint32_t timeoutMs)
{int32_t res;uint8_t i, j;uint8_t idx = 7; /* start with mid-table value */const uint8_t sat_limit = 2;uint32_t saturation;/* duplicate 0x42AB to avoid 100x and keep multiples of 2 for array size */const uint16_t Gains[] = {0x42AB, 0x42AB, 0x3200, 0x2154, 0x1900, 0x10AB, 0x0A00, 0x0723,0x0500, 0x0354, 0x0280, 0x01AB, 0x0140, 0x0100, 0x00D4, 0x00B5};/* clip timeout value */timeoutMs = timeoutMs == 0 ? 1 : timeoutMs;timeoutMs = timeoutMs >= 100 ? 100 : timeoutMs;for (i = 0; i <= 3; i++){VD6283A1_LIGHT_SENSOR_SetGain(Instance, FLK_CHANNEL, Gains[idx]);VD6283A1_LIGHT_SENSOR_GetGain(Instance, FLK_CHANNEL, pAppliedGain);res = VD6283A1_LIGHT_SENSOR_StartFlicker(Instance, FLK_CHANNEL, LIGHT_SENSOR_FLICKER_ANALOG);if (res)return res;/* read saturation value each ms so we can exit early if saturation detected */for (j = 0; j < timeoutMs; j++){HAL_Delay(1);res = VD6283A1_LIGHT_SENSOR_GetSaturation(Instance, &saturation);if (res)return res;if (saturation > sat_limit)break;}res = VD6283A1_LIGHT_SENSOR_StopFlicker(Instance);if (res)return res;/* update index to next value */if (i)idx += saturation > sat_limit ? 1 << (i - 1) : -(1 << (i - 1));else if (saturation > sat_limit)idx++;}/* clip index if it reaches max value */if (idx > 15) idx = 15;VD6283A1_LIGHT_SENSOR_SetGain(Instance, FLK_CHANNEL, Gains[idx]);res = VD6283A1_LIGHT_SENSOR_GetGain(Instance, FLK_CHANNEL, pAppliedGain);return res;
}
在下方添加函数的定义。
/** @brief initilize arm rfft library*/
static void init_fft(arm_rfft_fast_instance_f32 *instance, uint32_t size)
{arm_rfft_fast_init_f32(instance, size);
}
打印增益函数。
/** @brief normalize, convert and dislay gain */
static void display_gain(uint32_t gain)
{uint32_t g = (gain * 100) / 256;printf(" %3lu.%02lu\n", (unsigned long)g / 100, (unsigned long)(g % 100));
}
执行FFT。
/** @brief perform fft on the input buffer using arm rfft library*/
static void perform_fft(arm_rfft_fast_instance_f32 *instance, int16_t *flk, float32_t *ffti, float32_t *ffto, uint32_t size)
{uint32_t i;uint32_t index = 0;/* copy the ADC sampled signal into the fft input buffer* this allows to convert the data from int16_t to float32_t */for (i = 0; i < size; i++){ffti[i] = flk[i];}/* Perform the FFT on the input buffer:* results are packed in a way so that even indexes contain real values* and odd indexes contain the complex value of each bin.* Therefore the fft_output array contains FFT_SIZE / 2 bins */arm_rfft_fast_f32(instance, ffti, fft_out_tmp, 0);/* Calculate the magnitude for each bin from the temp fft output buffer */for (i = 0; i < size; i += 2){ffto[index] = complex_abs(fft_out_tmp[i], fft_out_tmp[i+1]);if (ffto[index] < 0) ffto[index] = 0;index++;}
}
查找峰值频率值。
/** @brief find peak frequency value*/
static void find_flk_freq(uint32_t fs, float32_t *ffto, uint32_t *freq, uint8_t skip_dc, uint32_t size)
{uint32_t i;uint32_t res;uint32_t index_max = 0;uint32_t limit = size / 2;float32_t max_value = -1;/* do not take account of the DC value if the flag skip_dc is set */skip_dc ? (i = 1) : (i = 0);/* run through the output array to detect the peak */for (; i < limit; i++){if (ffto[i] > max_value){index_max = i;max_value = ffto[i];}}/* convert index of the bin into frequency */res = (index_max * fs) / size;/* return the result if the pointer is valid */if (freq){*freq = res;}
}
计算一个复数的绝对值。
/** @brief compute absolute value of a complex number*/
static float32_t complex_abs(float32_t real, float32_t complex)
{float32_t res;arm_sqrt_f32(real * real + complex * complex, &res);return res;
}
需要添加函数
arm_cortexM4lf_math.lib 库包含了一系列数学函数,特别是适用于基于Cortex-M4和Cortex-M7处理器的浮点运算单元的优化数学例程。这些例程涵盖了常见的数学运算,如信号处理、滤波、变换等。
arm_math.h 这个头文件包含了CMSIS-DSP库的函数声明、宏定义和结构体定义等,可以通过包含这个头文件,使用库中提供的各种数学函数,包括信号处理、滤波、变换等。
app_als_adc_utils.c功能主要包括启动和停止ADC采样,获取采样数据,ADC采样速度设置,以及处理相关的硬件中断。
app_als_adc_utils.h是app_als_adc_utils.c对应头文件。
这篇关于VD6283TX环境光传感器驱动开发(4)----移植闪烁频率代码的文章就介绍到这儿,希望我们推荐的文章对编程师们有所帮助!


