本文主要是介绍opencv项目之画图(草原上的狼),希望对大家解决编程问题提供一定的参考价值,需要的开发者们随着小编来一起学习吧!
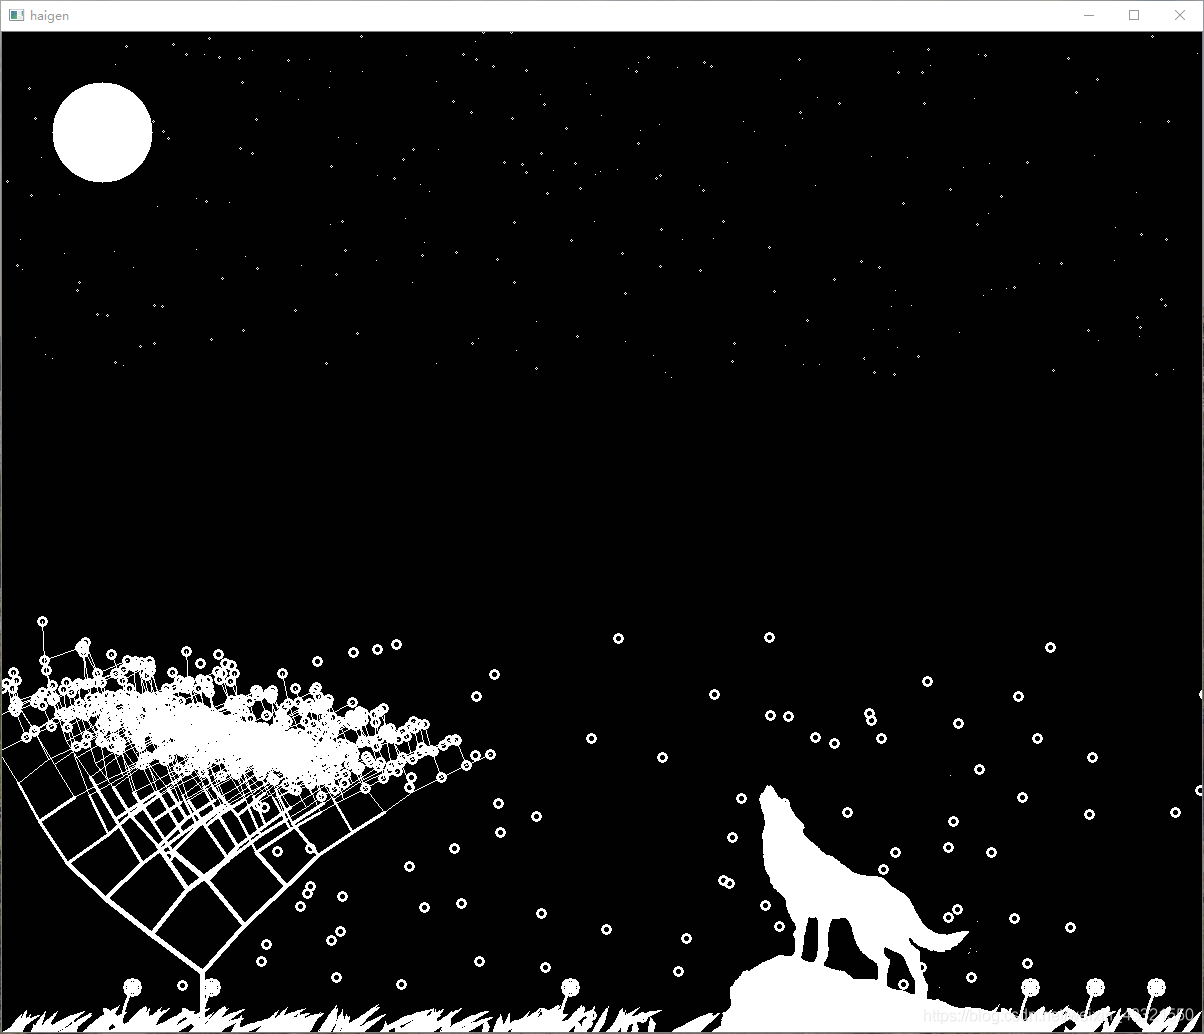
这个是编了一个夜晚草原上的狼。
结果图在最后。
import cv2
import numpy as np
import random
import time
import math#这是图片的大小
sx = 1000
sy = 1200
#窗口函数
def show(img, name = "haigen",time = 10):# cv2.namedWindow(name, cv2.WINDOW_NORMAL)cv2.imshow(name,img)cv2.waitKey(time)#画星星
def star(fi):#根据fi的大小来画星星的个数while fi >= 0:#确定星星的位置x = random.randint(0, 350)y = random.randint(0,sy)dot = random.randint(0,1)#根究dot的大小判断星星的大小cv2.circle(board,(y,x),dot,(255,255,255),dot)fi -= 1#画闪烁得星星
def ran_star():list = []#每次闪烁得个数for i in range(35):x = random.randint(0, 350)y = random.randint(0, sy)dot = random.randint(0, 1)list.append((x,y,dot))#画星星for x, y, dot in list:cv2.circle(board, (y, x), dot, (255, 255, 255), dot)show(board,time=10)#然后把星星注释掉for x,y,dot in list:cv2.waitKey(20)cv2.circle(board, (y, x), dot, (0, 0, 0), dot)#画树
def tree(n,l,star, end, fi):val = int(n / 2)if(val < 1):val = 1cv2.line(board,star,end,[255,255,255],val)if n > 0:# 右分支偏转角度b = random.random() * 15 + 40 - fi * 3# 左分支偏转角度c = random.random() * 20 + 80 - fi#这里是计算出接下来的偏角b = -bc = -cc += b# 下一个分支的长度d = l * (random.random() * 0.25 + 0.75)x,y = end#计算出下一个右分支中点的位置,根据数学x1 = int(x + l * math.cos(math.radians(b)))y1 = int(y + l * math.sin(math.radians(b)))#画右分支tree(n - 1,d,end,(x1,y1), fi + 1)# 计算出下一个左分支中点的位置,根据数学x1 = int(x + l * math.cos(math.radians(c)))y1 = int(y + l * math.sin(math.radians(c)))#画左分支tree(n - 1, d, end, (x1, y1), fi + 1)#如果遍历的层数大于六层就开始画树上的花if(fi > 6):#画树上的花cv2.circle(board,end,4,[255,255,255],2)#画飞起的花
def flower():list = []#刚开始离树进的花,就少一点for i in range(30):x = random.randint(m - 400, m - 50)y = random.randint(n - 60, n + 200)ori = board[x - 1:x + 10, y - 1:y + 10].copy()list.append((x,y, ori))cv2.circle(board, (y + 4, x + 4), 4, (255, 255, 255), 2)#后面的花多一点啊for i in range(75):x = random.randint(m - 400, m)y = random.randint(n + 200, sy)ori = board[x - 1:x + 10, y - 1:y + 10].copy()list.append((x,y, ori))cv2.circle(board, (y + 4, x + 4), 4, (255, 255, 255), 2)return list#画动态花
def ran_flower():list = []#10多多动态花list = []#运的花不宜太多for i in range(20):x = random.randint(m - 400, m - 50)y = random.randint(n - 60, sy)#需要画一个ori,为了消掉飞起的花ori = board[x - 1:x + 10,y - 1:y + 10].copy()# show(ori, "ori1")# show(ori, "ori2")list.append((x,y,ori))#加4的原因是更好的消去运动的花cv2.circle(board, (y + 4, x + 4), 4, (255, 255, 255), 2)show(board,time=500)#消去运动的花for x,y,ori in list:board[x - 1: x + 10, y - 1 : y + 10] = ori[0:11,0:11]#画地上的花
def leaf():high = 10for i in range(8):#画树叶n = random.randint(0,sy)cv2.ellipse(board,(n - 8,sx - high), (20,4), 45, 0, 360,(255,255,255),-1)cv2.ellipse(board,(n + 8, sx - high),(20, 4), 130, 0, 360, (255, 255, 255), -1)#画茎秆cv2.ellipse(board, (n + 4, sx - high - 10), (30, 6), 105, 0, 180, (255, 255, 255), 2)#画花cv2.circle(board,(n + 7, sx - high - 35),6, (255,255,255),-1)cv2.circle(board, (n + 7, sx - high - 35), 8, (255, 255, 255), 2)#画地上的草
def grass():for i in range(200):#草的位置site = random.randint(0,sy)#草的躺的角度angle = random.randint(100,160)#草的高度h = random.randint(0,10)#画草cv2.ellipse(board, (site + 4, sx - h), (30, 6), angle, 0, angle, (255, 255, 255), -1)#画狼
def wolf():#导入狼的图片img = cv2.imread("C:/Test/top.jpg")#转换成HSV的格式,进行分离图像hsv = cv2.cvtColor(img,cv2.COLOR_BGR2HSV)#cv2.inRange 进行图像的分离low = np.array([0,0,0])up = np.array([180,255,42])dst = cv2.inRange(hsv,low,up)#找到前景fg = cv2.cvtColor(dst,cv2.COLOR_GRAY2BGR)#找到图像的大小m,n = fg.shape[:2]#ORI 来寻找背景ori = board[ sx - m : sx, 700: 700 + n]mask = cv2.bitwise_not(dst)print("ori = ", ori.shape[:2])print("fg = ", fg.shape[:2])bg = cv2.add(fg,ori,mask=mask)#最后的图res = cv2.add(fg,bg)#加入原图像board[ sx - m : sx, 700: 700 + n] = res[0:m,0:n]show(res,"wolf")#函数开始的位置
#准备一个画板
board = np.ones((sx, sy, 3),np.uint8)
#画固定的星星
star(200)
#画月亮
cv2.circle(board, (100, 100), 50, (255, 255, 255), -1)
fi = 0
#树的起始位置
m = 1000
n = 200
#画树
tree(9,63, (n,m), (n, m - 60), fi)#递归7层
#画天上飞的花
flower()
#画花
leaf()
#画草地
grass()
#画狼
wolf()
#画闪烁的星星
while True:#每一次遍历一次就更新一次星星ran_star()#月亮要不断的刷新,否则会被星星干掉cv2.circle(board, (100, 100), 50, (255, 255, 255), -1)
图片
这是狼的图片

结果图
这篇关于opencv项目之画图(草原上的狼)的文章就介绍到这儿,希望我们推荐的文章对编程师们有所帮助!


