本文主要是介绍0基础学习PyFlink——事件时间和运行时间的窗口,希望对大家解决编程问题提供一定的参考价值,需要的开发者们随着小编来一起学习吧!
大纲
- 定制策略
- 运行策略
- Reduce
- 完整代码
- 滑动窗口案例
- 参考资料
在 《0基础学习PyFlink——时间滚动窗口(Tumbling Time Windows)》一文中,我们使用的是运行时间(Tumbling ProcessingTimeWindows)作为窗口的参考时间:
reduced=keyed.window(TumblingProcessingTimeWindows.of(Time.milliseconds(2))) \.apply(SumWindowFunction(),Types.TUPLE([Types.STRING(), Types.INT()]))
而得到的结果也是不稳定的。

这是因为每次运行时,CPU等系统资源的繁忙程度是不一样的,这就影响了最后的运行结果。
为了让结果稳定,我们可以不依赖运行时间(ProcessingTime),而使用不依赖于运行环境,只依赖于数据的事件时间(EventTime)。
一般,我们需要大数据处理的数据,往往存在一个字段用于标志该条数据的“顺序”。这个信息可以是单调递增的ID,也可以是不唯一的时间戳。我们可以将这类信息看做事件发生的时间。
那如何让输入的数据中的“事件时间”参与到窗口时长的计算中呢?这儿就要引入Watermark(水印)的概念。
假如我们把数据看成一张纸上的内容,水印则是这张纸的背景。它并不影响纸上内容的表达,只是系统要用它来做更多的事情。
将数据中表达“顺序”的数据转换成“时间”,我们可以使用水印单调递增时间戳分配器
定制策略
class ElementTimestampAssigner(TimestampAssigner):def extract_timestamp(self, value, record_timestamp)-> int:return int(value[1])…… # define the watermark strategywatermark_strategy = WatermarkStrategy.for_monotonous_timestamps() \.with_timestamp_assigner(ElementTimestampAssigner())
for_monotonous_timestamps会分配一个水印单调递增时间戳分配器,然后使用with_timestamp_assigner告知输入数据中“顺序”字段的值。这样系统就会根据这个字段的值生成一个单调递增的时间戳。这个时间戳相对顺序就和输入数据一样,是稳定的。
比如上图中,会分别用2,1,4,3……来计算时间戳。
运行策略
然后对原始数据使用该策略,这样source_with_wartermarks中的数据就包含了时间戳。
source_with_wartermarks=source.assign_timestamps_and_watermarks(watermark_strategy)
Reduce
这次我们使用TumblingEventTimeWindows,即事件时间(EventTime)窗口,而不是运行时间(ProcessingTime)窗口。
# keyingkeyed=source_with_wartermarks.key_by(lambda i: i[0]) # reducingreduced=keyed.window(TumblingEventTimeWindows.of(Time.milliseconds(2))) \.apply(SumWindowFunction(),Types.TUPLE([Types.STRING(), Types.INT()]))
(‘E’, 1) TimeWindow(start=0, end=2)
(‘E’, 3) (‘E’, 2) TimeWindow(start=2, end=4)
(‘E’, 4) (‘E’, 5) TimeWindow(start=4, end=6)
(‘E’, 6) (‘E’, 7) TimeWindow(start=6, end=8)
(‘E’, 8) (‘E’, 9) TimeWindow(start=8, end=10)
(‘E’, 10) TimeWindow(start=10, end=12)
(E,1)
(E,2)
(E,2)
(E,2)
(E,2)
(E,1)
多运行几次,结果是稳定输出的。
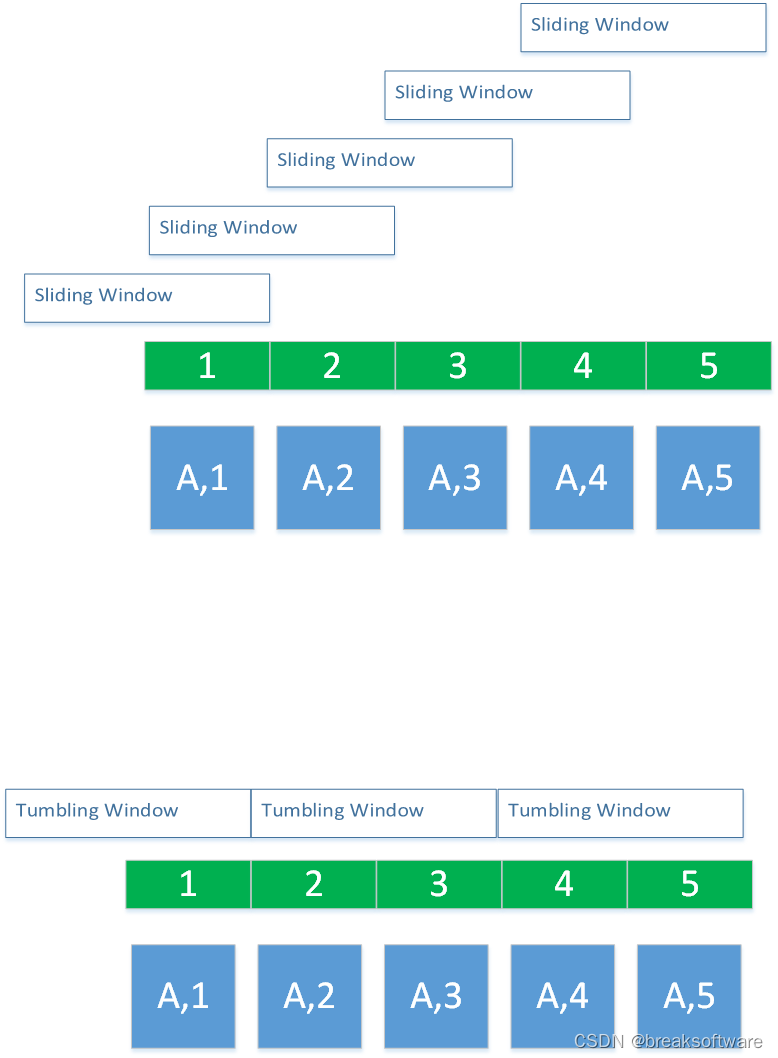
我们再多关注下TimeWindow中的start和end,它们是不重叠的、步长为2、左闭右开的区间。这个符合滚动窗口特性。
完整代码
from typing import Iterablefrom pyflink.common import Types, Time, WatermarkStrategy
from pyflink.datastream import StreamExecutionEnvironment, RuntimeExecutionMode, WindowFunction
from pyflink.datastream.window import TumblingEventTimeWindows, TimeWindow, TumblingProcessingTimeWindows, SlidingProcessingTimeWindows
from pyflink.common.watermark_strategy import TimestampAssignerclass ElementTimestampAssigner(TimestampAssigner):def extract_timestamp(self, value, record_timestamp)-> int:return int(value[1])class SumWindowFunction(WindowFunction[tuple, tuple, str, TimeWindow]):def apply(self, key: str, window: TimeWindow, inputs: Iterable[tuple]):print(*inputs, window)return [(key,  len([e for e in inputs]))]word_count_data = [("E",3),("E",1),("E",4),("E",2),("E",6),("E",5),("E",7),("E",8),("E",9),("E",10)]def word_count():env = StreamExecutionEnvironment.get_execution_environment()env.set_runtime_mode(RuntimeExecutionMode.STREAMING)# write all the data to one fileenv.set_parallelism(1)source_type_info = Types.TUPLE([Types.STRING(), Types.INT()])# define the source# mappgingsource = env.from_collection(word_count_data, source_type_info)# source.print()# define the watermark strategywatermark_strategy = WatermarkStrategy.for_monotonous_timestamps() \.with_timestamp_assigner(ElementTimestampAssigner())source_with_wartermarks=source.assign_timestamps_and_watermarks(watermark_strategy)# keyingkeyed=source_with_wartermarks.key_by(lambda i: i[0]) # reducingreduced=keyed.window(TumblingEventTimeWindows.of(Time.milliseconds(2))) \.apply(SumWindowFunction(),Types.TUPLE([Types.STRING(), Types.INT()]))# # define the sinkreduced.print()# submit for executionenv.execute()if __name__ == '__main__':word_count()
滑动窗口案例
from typing import Iterablefrom pyflink.common import Types, Time, WatermarkStrategy
from pyflink.datastream import StreamExecutionEnvironment, RuntimeExecutionMode, WindowFunction
from pyflink.datastream.window import SlidingEventTimeWindows, TimeWindow
from pyflink.common.watermark_strategy import TimestampAssignerclass ElementTimestampAssigner(TimestampAssigner):def extract_timestamp(self, value, record_timestamp)-> int:return int(value[1])class SumWindowFunction(WindowFunction[tuple, tuple, str, TimeWindow]):def apply(self, key: str, window: TimeWindow, inputs: Iterable[tuple]):print(*inputs, window)return [(key,  len([e for e in inputs]))]word_count_data = [("E",3),("E",1),("E",4),("E",2),("E",6),("E",5),("E",7),("E",8),("E",9),("E",10)]def word_count():env = StreamExecutionEnvironment.get_execution_environment()env.set_runtime_mode(RuntimeExecutionMode.STREAMING)# write all the data to one fileenv.set_parallelism(1)source_type_info = Types.TUPLE([Types.STRING(), Types.INT()])# define the source# mappgingsource = env.from_collection(word_count_data, source_type_info)# source.print()# define the watermark strategywatermark_strategy = WatermarkStrategy.for_monotonous_timestamps() \.with_timestamp_assigner(ElementTimestampAssigner())source_with_wartermarks=source.assign_timestamps_and_watermarks(watermark_strategy)# keyingkeyed=source_with_wartermarks.key_by(lambda i: i[0]) # reducingreduced=keyed.window(SlidingEventTimeWindows.of(Time.milliseconds(2), Time.milliseconds(1))) \.apply(SumWindowFunction(),Types.TUPLE([Types.STRING(), Types.INT()]))# # define the sinkreduced.print()# submit for executionenv.execute()if __name__ == '__main__':word_count()
(‘E’, 1) TimeWindow(start=0, end=2)
(‘E’, 1) (‘E’, 2) TimeWindow(start=1, end=3)
(‘E’, 3) (‘E’, 2) TimeWindow(start=2, end=4)
(‘E’, 3) (‘E’, 4) TimeWindow(start=3, end=5)
(‘E’, 4) (‘E’, 5) TimeWindow(start=4, end=6)
(‘E’, 6) (‘E’, 5) TimeWindow(start=5, end=7)
(‘E’, 6) (‘E’, 7) TimeWindow(start=6, end=8)
(‘E’, 7) (‘E’, 8) TimeWindow(start=7, end=9)
(‘E’, 8) (‘E’, 9) TimeWindow(start=8, end=10)
(‘E’, 9) (‘E’, 10) TimeWindow(start=9, end=11)
(‘E’, 10) TimeWindow(start=10, end=12)
(E,1)
(E,2)
(E,2)
(E,2)
(E,2)
(E,2)
(E,2)
(E,2)
(E,2)
(E,2)
(E,1)
通过TimeWindow的信息,我们看到这是一个步长为1、长度为2左闭右开的窗口。这个符合滑动窗口特点。
参考资料
- https://nightlies.apache.org/flink/flink-docs-release-1.18/zh/docs/dev/datastream/event-time/built_in/
- https://nightlies.apache.org/flink/flink-docs-release-1.18/zh/docs/learn-flink/streaming_analytics/
这篇关于0基础学习PyFlink——事件时间和运行时间的窗口的文章就介绍到这儿,希望我们推荐的文章对编程师们有所帮助!


