本文主要是介绍Cesium实战 - 实现大气云层效果,希望对大家解决编程问题提供一定的参考价值,需要的开发者们随着小编来一起学习吧!
Cesium实战 - 实现大气云层效果
- 主要思路
- 核心代码
- 完整代码
- 在线示例
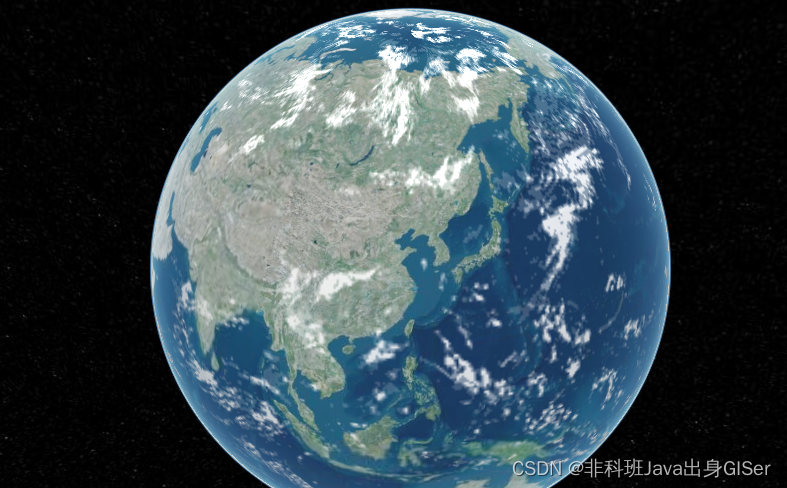
在实际开发中,一般会有天气的效果,雨雪雾比较常见,相关的博客也很多,但是关于云层的天气效果还是比较少,而官方只有云朵效果,没有云层,本文介绍一下大气云层的效果。
本文包括主要思路、核心代码和在线示例三部分。
主要思路
1. 添加矩形带有高度的矩形包裹地球。
实现思路也比较简单:既然是大气云层效果,那么必然是覆盖在地球之上的,开始想着使用球体来实现地球覆盖效果。
但是经过尝试,发现不太合适,需要将球心设置在地心,半径大于地球半径,不合理,于是放弃。
后来相当,地球范围无非是 [-180, -90, 180, 90],那么在地球上覆盖一个矩形(Rectangle)应该就可以。
尝试之后,发现非常完美;大气云层应该有高度,给矩形设置高度即可。
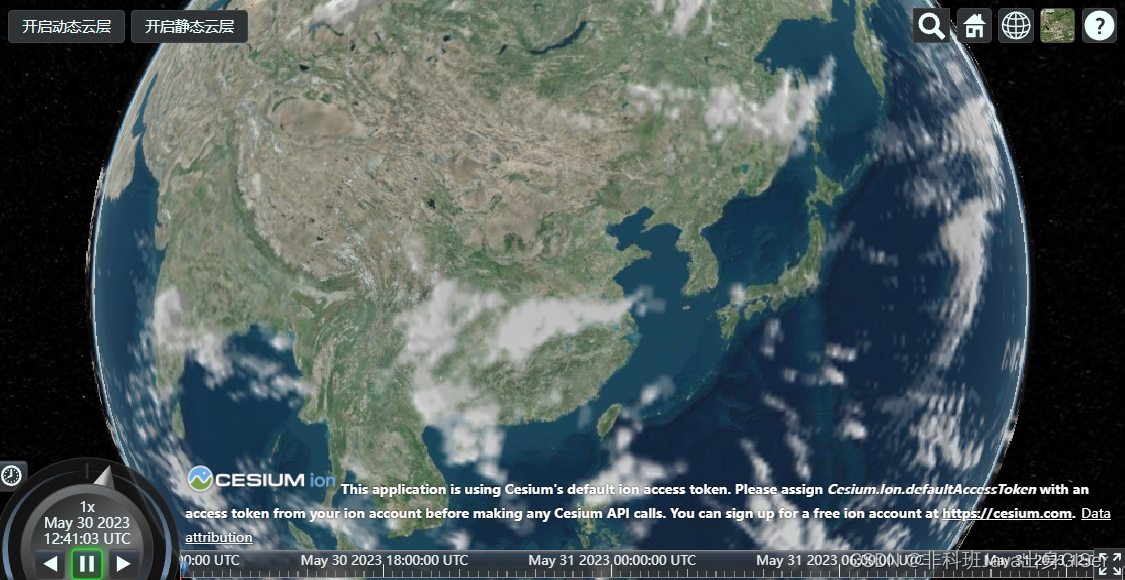
2. 给矩形设置动态效果,使云层动起来。
添加矩形之后,添加图片材质,虽然看起来是云层,但是云层并没有动,看起来不太合理。
于是,通过着色器给图片材质增加了一个动态效果,这样看起来云层是动态的,比较切近实际。
核心代码
1. 初始化以及参数。
// 初始化地球
const viewer = new Cesium.Viewer("cesiumContainer",{animation: false, //是否创建动画小器件,左下角仪表baseLayerPicker: false, //是否显示图层选择器fullscreenButton: false, //是否显示全屏按钮geocoder: false, //是否显示geocoder小器件,右上角查询按钮homeButton: false, //是否显示Home按钮infoBox: false, //是否显示信息框sceneModePicker: false, //是否显示3D/2D选择器scene3DOnly: false, //如果设置为true,则所有几何图形以3D模式绘制以节约GPU资源selectionIndicator: false, //是否显示选取指示器组件timeline: false, //是否显示时间轴navigationHelpButton: false, //是否显示右上角的帮助按钮baselLayerPicker: false, // 将图层选择的控件关掉,才能添加其他影像数据shadows: true, //是否显示背影shouldAnimate: true,terrainProvider : new Cesium.CesiumTerrainProvider({url: "http://data.marsgis.cn/terrain", // 高程地形地址minimumLevel: 0, // 高程最小等级maximumLevel: 16, // 高程最大等级requestWaterMask: true,requestMetadata: true,})
});const entities = viewer.entities;// 云层图片
const image = 'https://openlayers.vip/examples/resources/earth_cloud.png';// 云层颜色,一般设置为白色
const color = new Cesium.Color(1.0, 1.0, 1.0, 1);// 用于计算云层速度
const time = 20;// 图片材质
const imageMaterial = new Cesium.ImageMaterialProperty({image: image
});
2. 创建矩形实体对象。
// 创建矩形实体
const entity = entities.add({rectangle: {coordinates: Cesium.Rectangle.fromDegrees(-180.0, -90.0, 180.0, 90.0),material: imageMaterial,},
});
3. 动态效果控制类。
// 动态云层效果类
function CloudEffectMaterialProperty() {this._definitionChanged = new Cesium.Event();this.speed = 200;this.color = color;this._image = image;this.time = time;const durationDefault = 100000;this.duration = 100 / this.speed * durationDefault;this._time = new Date().getTime();}Object.defineProperties(CloudEffectMaterialProperty.prototype, {isConstant: {get: function() {return false;}},definitionChanged: {get: function() {return this._definitionChanged;}},color: Cesium.createPropertyDescriptor('color')
});
CloudEffectMaterialProperty.prototype.getType = function(time) {return 'CloudEffect';
};
CloudEffectMaterialProperty.prototype.getValue = function(time, result) {if (!Cesium.defined(result)) {result = {};}result.color = Cesium.Property.getValueOrClonedDefault(this._color, time, Cesium.Color.WHITE, result.color);result.time = ((new Date().getTime() - this._time) % this.duration) / this.duration;return result;
};
CloudEffectMaterialProperty.prototype.equals = function(other) {return (this === other ||(other instanceof CloudEffectMaterialProperty &&Cesium.Property.equals(this._color, other._color) &&Cesium.Property.equals(this.speed, other.speed)));
}
;
Cesium.Material.CloudEffectType = 'CloudEffect';
Cesium.Material.CloudEffectImage = image;
Cesium.Material.CloudEffectColor = color;
Cesium.Material.CloudEffectSource = `
czm_material czm_getMaterial(czm_materialInput materialInput){czm_material material = czm_getDefaultMaterial(materialInput);vec2 st = materialInput.st;vec4 colorImage = texture(image, vec2(fract(st.s + time),st.t));material.alpha = colorImage.a * color.a  ;material.diffuse = color.rgb  ;return material;
}
`;Cesium.Material._materialCache.addMaterial(Cesium.Material.CloudEffectType, {fabric: {type: Cesium.Material.CloudEffectType,uniforms: {color: Cesium.Material.CloudEffectColor,image: Cesium.Material.CloudEffectImage,time: time},source: Cesium.Material.CloudEffectSource},translucent: function(material) {return true;}
});
3. 创建云层动态效果。
// 创建云层对象
const entity = entities.add({rectangle: {coordinates: Cesium.Rectangle.fromDegrees(-180.0, -90.0, 180.0, 90.0),material: imageMaterial,},
});// 定位至云层对象
viewer.zoomTo(viewer.entities);Sandcastle.addToolbarButton("开启动态云层", function () {alert('动态云层!');entity.rectangle.height = 0;entity.rectangle.extrudedHeight = 100000;entity.rectangle.material = new CloudEffectMaterialProperty();
});Sandcastle.addToolbarButton("开启静态云层", function () {alert('静态云层!');entity.rectangle.height = undefined;entity.rectangle.extrudedHeight = undefined;entity.rectangle.material = imageMaterial;
});
完整代码
<!DOCTYPE html>
<html lang="en">
<head><!-- Use correct character set. --><meta charset="utf-8"/><!-- Tell IE to use the latest, best version. --><meta http-equiv="X-UA-Compatible" content="IE=edge"/><!-- Make the application on mobile take up the full browser screen and disable user scaling. --><metaname="viewport"content="width=device-width, initial-scale=1, maximum-scale=1, minimum-scale=1, user-scalable=no"/><title>Cesium model popup</title><link rel="stylesheet" href="./popup.css" type="text/css"><script src="http://openlayers.vip/examples/csdn/Cesium.js"></script><script src="./cesium_init.js"></script><script src="http://www.openlayers.vip/examples/resources/jquery-3.5.1.min.js"></script><script src="./CesiumPopup.js"></script><style>@import url(./Widgets/widgets.css);html,body,#cesiumContainer {width: 100%;height: 100%;margin: 0;padding: 0;overflow: hidden;}</style><script>var _hmt = _hmt || [];(function () {var hm = document.createElement("script");hm.src = "https://hm.baidu.com/hm.js?f80a36f14f8a73bb0f82e0fdbcee3058";var s = document.getElementsByTagName("script")[0];s.parentNode.insertBefore(hm, s);})();</script>
</head>
<body>
<div id="cesiumContainer"></div>
<script>// 创建三维球const viewer = new Cesium.Viewer("cesiumContainer",{animation: false, //是否创建动画小器件,左下角仪表baseLayerPicker: false, //是否显示图层选择器fullscreenButton: false, //是否显示全屏按钮geocoder: false, //是否显示geocoder小器件,右上角查询按钮homeButton: false, //是否显示Home按钮infoBox: false, //是否显示信息框sceneModePicker: false, //是否显示3D/2D选择器scene3DOnly: false, //如果设置为true,则所有几何图形以3D模式绘制以节约GPU资源selectionIndicator: false, //是否显示选取指示器组件timeline: false, //是否显示时间轴navigationHelpButton: false, //是否显示右上角的帮助按钮baselLayerPicker: false, // 将图层选择的控件关掉,才能添加其他影像数据shadows: true, //是否显示背影shouldAnimate: true,terrainProvider : new Cesium.CesiumTerrainProvider({url: "http://data.marsgis.cn/terrain", // 高程地形地址minimumLevel: 0, // 高程最小等级maximumLevel: 16, // 高程最大等级requestWaterMask: true,requestMetadata: true,})
});
const entities = viewer.entities;const image = 'https://openlayers.vip/examples/resources/earth_cloud.png';const color = new Cesium.Color(1.0, 1.0, 1.0, 1);const time = 20;const imageMaterial = new Cesium.ImageMaterialProperty({image: image
});function CloudEffectMaterialProperty() {this._definitionChanged = new Cesium.Event();this.speed = 200;this.color = color;this._image = image;this.time = time;const durationDefault = 100000;this.duration = 100 / this.speed * durationDefault;this._time = new Date().getTime();}Object.defineProperties(CloudEffectMaterialProperty.prototype, {isConstant: {get: function() {return false;}},definitionChanged: {get: function() {return this._definitionChanged;}},color: Cesium.createPropertyDescriptor('color')
});
CloudEffectMaterialProperty.prototype.getType = function(time) {return 'CloudEffect';
};
CloudEffectMaterialProperty.prototype.getValue = function(time, result) {if (!Cesium.defined(result)) {result = {};}result.color = Cesium.Property.getValueOrClonedDefault(this._color, time, Cesium.Color.WHITE, result.color);result.time = ((new Date().getTime() - this._time) % this.duration) / this.duration;return result;
};
CloudEffectMaterialProperty.prototype.equals = function(other) {return (this === other ||(other instanceof CloudEffectMaterialProperty &&Cesium.Property.equals(this._color, other._color) &&Cesium.Property.equals(this.speed, other.speed)));
}
;
Cesium.Material.CloudEffectType = 'CloudEffect';
Cesium.Material.CloudEffectImage = image;
Cesium.Material.CloudEffectColor = color;
Cesium.Material.CloudEffectSource = `
czm_material czm_getMaterial(czm_materialInput materialInput){czm_material material = czm_getDefaultMaterial(materialInput);vec2 st = materialInput.st;vec4 colorImage = texture(image, vec2(fract(st.s + time),st.t));material.alpha = colorImage.a * color.a  ;material.diffuse = color.rgb  ;return material;
}
`;Cesium.Material._materialCache.addMaterial(Cesium.Material.CloudEffectType, {fabric: {type: Cesium.Material.CloudEffectType,uniforms: {color: Cesium.Material.CloudEffectColor,image: Cesium.Material.CloudEffectImage,time: time},source: Cesium.Material.CloudEffectSource},translucent: function(material) {return true;}
});const entity = entities.add({rectangle: {coordinates: Cesium.Rectangle.fromDegrees(-180.0, -90.0, 180.0, 90.0),material: imageMaterial,},
});viewer.zoomTo(viewer.entities);</script>
</body>
</html>
在线示例
示例中展示了, 三维地图大气云层效果。
Cesium 沙盒示例
这篇关于Cesium实战 - 实现大气云层效果的文章就介绍到这儿,希望我们推荐的文章对编程师们有所帮助!


