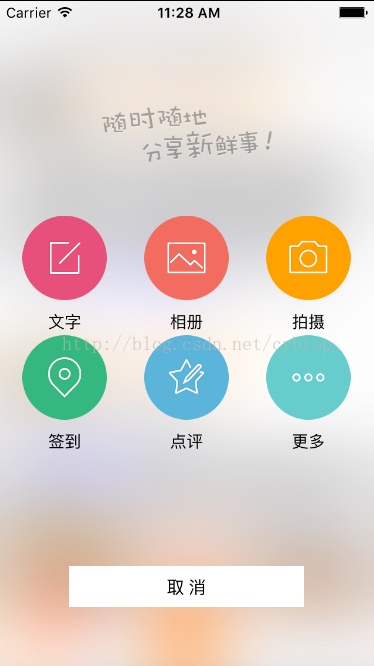
本文主要是介绍iOS带弹跳动画发布界面,希望对大家解决编程问题提供一定的参考价值,需要的开发者们随着小编来一起学习吧!
项目中经常会用到带弹跳动画发布界面
// PublishView.m
// UIImage+ImageEffects.h 苹果蒙化图片的分类 pop.h弹跳动画框架 EJExtension.h模型转换框架
// ComposeModel 用于设置按钮文字与图片的模型,在本地设置plist文件保存image(按钮图片)和text(按钮文字)
#import "PublishView.h"
#import "BSVerticalButton.h"
#import "UIImage+ImageEffects.h"
#import "pop.h"
#import "MJExtension.h"
#import "ComposeModel.h"
@interface PublishView ()
/** 取消按钮 */
@property (nonatomic, weak) UIButton *cancelButton;
@end
@implementation PublishView
/** 全局 window_ */
static UIWindow *window_;
/** 显示发布view */
+ (void)show{
// 添加一个独立的window是为了隔离点击事件
window_ = [[UIWindow alloc]initWithFrame:[UIScreen mainScreen].bounds];
window_.hidden = NO;
PublishView *publish = [[PublishView alloc]init];
publish.frame = window_.bounds;
[window_ addSubview:publish];
}
- (instancetype)initWithFrame:(CGRect)frame
{
self = [super initWithFrame:frame];
if (self) {
UIImageView *imageView = [[UIImageView alloc]initWithImage:[self getEffectImage]];
[self addSubview:imageView];
[self setupUI];
}
return self;
}
- (void)setupUI{
//这里用自定义的 window 是为了隔绝点击事件 不让点击事件传到后面控制器的view上去
// 按钮弹跳动画时让view本身不能点击
self.userInteractionEnabled = NO;
// 从plis文件获得一个模型数组
NSArray *buttonModelArray = [ComposeModel mj_objectArrayWithFilename:@"buttonImage.plist"];
CGFloat button_w = 72;
CGFloat button_h = button_w + 30;
NSInteger maxLoc = 3; //最多列数
//按钮弹跳动画停止后的起始 y 值
CGFloat buttonEnd_y = ([[UIScreen mainScreen] bounds].size.height - button_h * 2) / 2;
//最开始在屏幕外上方的的起始 y 值
CGFloat buttonBegin_y = buttonEnd_y - [[UIScreen mainScreen] bounds].size.height;
//按钮的起始间隙值
CGFloat buttonStartMargin = 20;
//中间的一个按钮相对于两边按钮的间隙
CGFloat buttonMargin = ([[UIScreen mainScreen] bounds].size.width - buttonStartMargin * 2 - button_w * maxLoc) / (maxLoc - 1);
for (NSInteger i = 0; i < buttonModelArray.count; ++i) {
// BSVerticalButton 自定义的垂直排布按钮
BSVerticalButton *button = [[BSVerticalButton alloc]init];
button.tag = i;
[self addSubview:button];
[button addTarget:self action:@selector(buttonClick:) forControlEvents:UIControlEventTouchUpInside];
ComposeModel *composeModel = buttonModelArray[i];
[button setImage:[UIImage imageNamed:composeModel.image] forState:UIControlStateNormal];
[button setTitle:composeModel.text forState:UIControlStateNormal];
[button setTitleColor:[UIColor blackColor] forState:UIControlStateNormal];
button.titleLabel.font = [UIFont systemFontOfSize:14];
NSInteger loc = i % maxLoc; //例号
NSInteger row = i / maxLoc; //行号
CGFloat button_x = buttonStartMargin + loc * (button_w + buttonMargin);
CGFloat buttonBginAnimation_y = buttonBegin_y + (button_h * row); //弹跳前的 y 值
CGFloat buttonEndAnimation_y = buttonEnd_y + (button_h * row); //弹跳后的 y 值
//创建pop弹簧动画对象
POPSpringAnimation *animation = [POPSpringAnimation animationWithPropertyNamed:kPOPViewFrame];
animation.beginTime = CACurrentMediaTime() + i * 0.1; //动画开始时间
animation.springBounciness = 10; //弹簧增强 0-20
animation.springSpeed = 8; //弹簧速度 0-20
animation.fromValue = [NSValue valueWithCGRect:CGRectMake(button_x, buttonBginAnimation_y, button_w, button_h)];
animation.toValue = [NSValue valueWithCGRect:CGRectMake(button_x, buttonEndAnimation_y, button_w, button_h)];
//中间的按钮添加动画
[button pop_addAnimation:animation forKey:nil];
}
// 添加品牌logo
UIImageView *topImageView = [[UIImageView alloc]initWithImage:[UIImage imageNamed:@"compose_slogan"]];
topImageView.center = CGPointMake([[UIScreen mainScreen] bounds].size.width * 0.5, [[UIScreen mainScreen] bounds].size.height * 0.2 - [[UIScreen mainScreen] bounds].size.height);
[self addSubview:topImageView];
// POPBasicAnimation 基本的动画
// POPSpringAnimation 弹簧动画
// POPDecayAnimation 减速动画
// POPCustomAnimation 自定义动画
//创建pop弹簧动画对象
POPSpringAnimation *animation = [POPSpringAnimation animationWithPropertyNamed:kPOPViewCenter];
animation.beginTime = CACurrentMediaTime() + buttonModelArray.count * 0.001; //动画开始时间
animation.springBounciness = 10; //弹簧增强 0-20
animation.springSpeed = 10; //弹簧速度 0-20
CGFloat center_x = [[UIScreen mainScreen] bounds].size.width * 0.5;
CGFloat endCenter_y = [[UIScreen mainScreen] bounds].size.height * 0.2;
CGFloat beginCenter_y = endCenter_y - [[UIScreen mainScreen] bounds].size.height;
animation.fromValue = [NSValue valueWithCGPoint:CGPointMake(center_x, beginCenter_y)];
animation.toValue = [NSValue valueWithCGPoint:CGPointMake(center_x, endCenter_y)];
animation.completionBlock = ^(POPAnimation *anim, BOOL finished){
NSLog(@"-------这里可以写动画结束后所要执行的代码...");
// view本身开启交互
self.userInteractionEnabled = YES;
};
//给顶部的图片添加动画
[topImageView pop_addAnimation:animation forKey:nil];
// 底部取消按钮
UIButton *cancelButton = [UIButton buttonWithType:UIButtonTypeSystem];
[cancelButton setTitle:@"取 消" forState:UIControlStateNormal];
cancelButton.titleLabel.font = [UIFont systemFontOfSize:15];
[cancelButton setTitleColor:[UIColor blackColor] forState:UIControlStateNormal];
[cancelButton setBackgroundColor:[UIColor whiteColor]];
[cancelButton addTarget:self action:@selector(cancelButtonClick:) forControlEvents:UIControlEventTouchUpInside];
[self addSubview:cancelButton];
self.cancelButton = cancelButton;
}
- (void)cancelButtonClick:(UIButton *)button{
// 退出时执行动画 方法的参数block传空
[self animationWithBlock:nil];
}
- (void)layoutSubviews{
[super layoutSubviews];
// 取消按钮位置大小
CGPoint center = self.cancelButton.center;
center.x = self.center.x;
self.cancelButton.center = center;
CGRect frame = self.cancelButton.frame;
frame.origin.y = self.frame.size.height * 0.85;
frame.size = CGSizeMake(200, 35);
self.cancelButton.frame = frame;
}
- (void)buttonClick:(UIButton *)button{
[self animationWithBlock:^{
switch (button.tag) {
case 0:
NSLog(@"文字");
break;
case 1:
NSLog(@"相册");
break;
case 2:{
NSLog(@"拍摄");
}
break;
case 3:
NSLog(@"签到");
break;
case 4:
NSLog(@"点评");
break;
case 5:
NSLog(@"更多");
break;
default:
break;
}
}];
}
/** 退出时与点出了某个按钮时执行的弹跳动画后销毁 window_ 移除 这个蒙板 view ,如果block参数completionBlock有值先销毁window_后再执行这个block里的代码块 */
- (void)animationWithBlock:(void (^) ())completionBlock{
NSLog(@"----%@\n",self.subviews);
//退出的时候这里用自定义的 window 是为了隔绝点击事件 不让点击事件传到后面控制器的view上去
// view本身不能点
self.userInteractionEnabled = NO;
// 选移除取消按钮
[self.cancelButton removeFromSuperview];
for (NSInteger i = 1; i < self.subviews.count; ++i) {
UIView *view = self.subviews[i];
//创建pop基本动画对象
POPBasicAnimation *animation = [POPBasicAnimation animationWithPropertyNamed:kPOPViewCenter];
// POPSpringAnimation *animation = [POPSpringAnimation animationWithPropertyNamed:kPOPViewCenter];
animation.beginTime = CACurrentMediaTime() + (i-1) * 0.1; //动画开始时间
// 如果用这个基类 POPBasicAnimation 动画的执行节奏(一开始很慢, 后面很快)
animation.timingFunction = [CAMediaTimingFunction functionWithName:kCAMediaTimingFunctionEaseIn];
CGPoint center = view.center; //取出中心点
animation.toValue = [NSValue valueWithCGPoint:CGPointMake(center.x , center.y + [[UIScreen mainScreen] bounds].size.height)];
if (i == self.subviews.count-1) { //说明是最后一个 view在做动画,就让执行结束的 block
// 动画结束时调用的 block
animation.completionBlock = ^(POPAnimation *anim, BOOL finished){
NSLog(@"取消时 这里可以写动画结束后所要执行的代码...");
[self removeFromSuperview];
window_ = nil; //销毁自定义的 window
!completionBlock ? : completionBlock();
};
}
//给顶部的图片添加动画
[view pop_addAnimation:animation forKey:nil];
}
}
- (void)touchesBegan:(NSSet<UITouch *> *)touches withEvent:(UIEvent *)event{
[self animationWithBlock:nil];
}
// 获得一个磨纱蒙板 image 图片
- (UIImage *)getEffectImage{
UIWindow *window = [UIApplication sharedApplication].keyWindow; //获取当前 window
UIGraphicsBeginImageContext(window.size); //开启window大小的图形上下文
CGContextRef ref = UIGraphicsGetCurrentContext(); //开启图形上下文
[window.layer renderInContext:ref]; //把window图层 渲染到图形上下文当中
UIImage *image = UIGraphicsGetImageFromCurrentImageContext(); //获取图片
UIGraphicsEndImageContext(); //关闭图形上下文
image = [image applyLightEffect]; //调用 image 分类方法 使图片调成蒙板状态
return image;
}
@end
项目中用到的垂直布局自定义按钮 BSVerticalButton
#import "BSVerticalButton.h"
@implementation BSVerticalButton
- (instancetype)initWithFrame:(CGRect)frame
{
self = [super initWithFrame:frame];
if (self) {
[self setupUI];
}
return self;
}
- (void)awakeFromNib{
[super awakeFromNib];
[self setupUI];
}
- (void)setupUI{
self.titleLabel.textAlignment = NSTextAlignmentCenter;
}
- (void)layoutSubviews{
[super layoutSubviews];
//按钮内部图片 frame
CGRect imageViewFrame = self.imageView.frame;
imageViewFrame.origin.x = 0;
imageViewFrame.origin.y = 0;
imageViewFrame.size.width = self.bounds.size.width;
imageViewFrame.size.height = self.bounds.size.width;
self.imageView.frame = imageViewFrame;
//按钮内部label frame
CGRect titleLabelFrame = self.titleLabel.frame;
titleLabelFrame.origin.x = 0;
titleLabelFrame.origin.y = self.imageView.frame.size.height + 10;
titleLabelFrame.size.width = self.bounds.size.width;
self.titleLabel.frame = titleLabelFrame;
//按钮自身大小
CGRect buttonBounds = self.bounds;
buttonBounds.size.width = self.imageView.frame.size.width;
buttonBounds.size.height = self.imageView.bounds.size.height + self.titleLabel.bounds.size.height + 10;
self.bounds = buttonBounds;
}
@end
这篇关于iOS带弹跳动画发布界面的文章就介绍到这儿,希望我们推荐的文章对编程师们有所帮助!


