本文主要是介绍LVI-SAM安装与测试,希望对大家解决编程问题提供一定的参考价值,需要的开发者们随着小编来一起学习吧!
1 介绍
就在昨天,LVI-SAM开源了,它是一个lidar-visual-inertial里程计和建图系统,在系统级别结合了LIO-SAM和Vins-Mono的优势。作者之前还开源了LeGO-LOAM和LIO-SAM,膜拜并致敬。
Github:https://github.com/TixiaoShan/LVI-SAM
论文:https://arxiv.org/abs/2104.10831
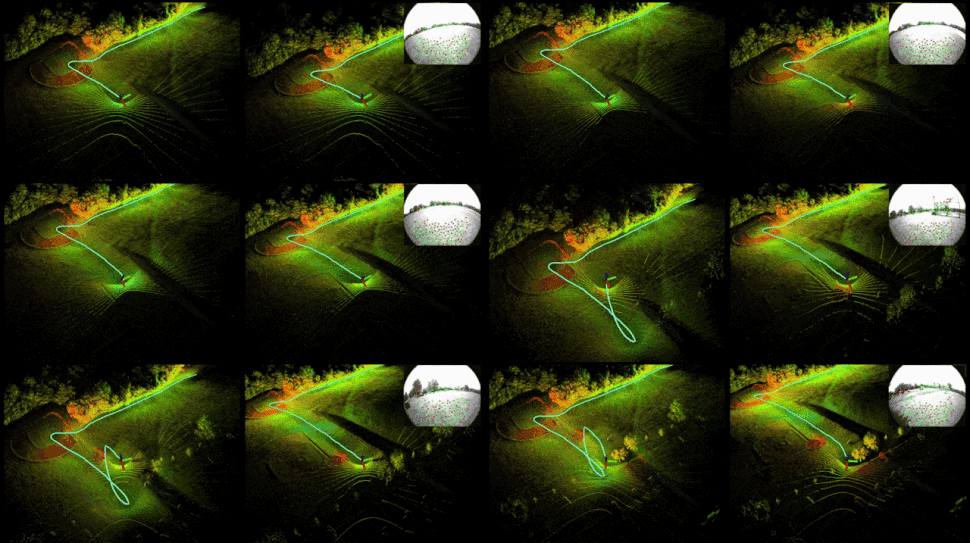
Demo:

PS:上传这个gif真不容易,原始文件大小为12.5MB,经过一系列的裁剪,缩放,压缩操作,变成4.7MB,这才成功上传。
论文摘要:
We propose a framework for tightly-coupled lidar-visual-inertial odometry via smoothing and mapping, LVI-SAM, that achieves real-time state estimation and map-building with high accuracy and robustness. LVI-SAM is built atop a factor
graph and is composed of two sub-systems: a visual-inertial system (VIS) and a lidar-inertial system (LIS). The two sub-systems are designed in a tightly-coupled manner, in which the VIS leverages LIS estimation to facilitate initialization. The accuracy of the VIS is improved by extracting depth information for visual features using lidar measurements. In turn, the LIS utilizes VIS estimation for initial guesses to support scan-matching. Loop closures are first identified by the VIS and further refined by the LIS. LVI-SAM can also function when one of the two sub-systems fails, which increases its robustness in both texture-less and feature-less environments. LVI-SAM is extensively evaluated on datasets gathered from several platforms over a variety of scales and environments. Our implementation is available at https://git.io/lvi-sam.
系统结构图:

更详细的内容,请阅读论文,本篇博客只关注安装和测试。
2 安装
2.1 安装依赖
需要安装以下依赖:
- ROS
- GTSAM
- Ceres
1.安装ROS
kinetic和melodic版本都适用,根据Ubuntu系统版本安装对应版本即可。
以安装ROS Kinetic为例:
# install [ros] kinetic"
# "Make sure your os is ubuntu 16.04. or you should install other distribution of ros"
# refer to http://wiki.ros.org/kinetic/Installation/Ubuntu
sudo sh -c 'echo "deb http://packages.ros.org/ros/ubuntu $(lsb_release -sc) main" > /etc/apt/sources.list.d/ros-latest.list'
sudo apt-key adv --keyserver 'hkp://keyserver.ubuntu.com:80' --recv-key C1CF6E31E6BADE8868B172B4F42ED6FBAB17C654
sudo apt-get update
sudo apt-get install ros-kinetic-desktop-full
echo "source /opt/ros/kinetic/setup.bash" >> ~/.bashrc
source ~/.bashrc
sudo apt install python-rosdep python-rosinstall python-rosinstall-generator python-wstool build-essential
sudo rosdep init
rosdep update
2.安装GTSAM
wget -O ~/Downloads/gtsam.zip https://github.com/borglab/gtsam/archive/4.0.2.zip
cd ~/Downloads/ && unzip gtsam.zip -d ~/Downloads/
cd ~/Downloads/gtsam-4.0.2/
mkdir build && cd build
cmake -DGTSAM_BUILD_WITH_MARCH_NATIVE=OFF ..
sudo make install -j4
3.安装Ceres
sudo apt-get install -y libgoogle-glog-dev
sudo apt-get install -y libatlas-base-dev
wget -O ~/Downloads/ceres.zip https://github.com/ceres-solver/ceres-solver/archive/1.14.0.zip
cd ~/Downloads/ && unzip ceres.zip -d ~/Downloads/
cd ~/Downloads/ceres-solver-1.14.0
mkdir ceres-bin && cd ceres-bin
cmake ..
sudo make install -j4
注意:如果自己电脑上已经安装了其他版本的GTSAM或Ceres,可以先尝试编译,看看是否成功。如果报错,就需要安装作者指定的版本了。
2.2 编译
cd ~/catkin_ws/src
git clone https://github.com/TixiaoShan/LVI-SAM.git
cd ..
catkin_make
注意:如果电脑运行内存较小,建议使用catkin_make -j1命令编译,否则电脑会死机。
3 数据集
采集数据的传感器套件包括:
- LiDAR: Velodyne VLP-16
- Camera: FLIR BFS-U3-04S2M-CS
- IMU: MicroStrain 3DM-GX5-25
- GPS: Reach RS+

本文所用数据集可从Google Drive下载,下载链接为:
https://drive.google.com/drive/folders/1q2NZnsgNmezFemoxhHnrDnp1JV_bqrgV?usp=sharing
注意:所提供的bag文件中的图像均为压缩格式。因此,launch/include/module_sam.launch的最后一行有解压缩命令。即:
<!-- Image conversion -->
<node pkg="image_transport" type="republish" name="$(arg project)_republish" args="compressed in:=/camera/image_raw raw out:=/camera/image_raw" output="screen" respawn="true"/>
如果你自己的bag文件记录了原始图像数据,请注释此解压缩命令。
手持数据集采集环境:

4 运行
1.配置参数
在config文件夹中的.yaml文件中配置传感器参数。
为了快速测试,这里采用默认参数。
2.运行launch文件
roslaunch lvi_sam run.launch
报错:
terminate called after throwing an instance of 'image_transport::TransportLoadException'what():  Unable to load plugin for transport 'compressed', error string:
According to the loaded plugin descriptions the class image_transport/compressed_sub with base class type image_transport::SubscriberPlugin does not exist. Declared types are  image_transport/raw_sub
[lvi_sam_republish-11] process has died [pid 27659, exit code -6, cmd /opt/ros/kinetic/lib/image_transport/republish compressed in:=/camera/image_raw/compressed raw out:=/camera/image_raw __name:=lvi_sam_republish
安装ros-kinetic-image-transport-plugins:
sudo apt install ros-kinetic-image-transport-plugins
3.播放bag文件
rosbag play handheld.bag
作者提供了3个bag,其中handheld.bag大小相对较小,所以先用这个测试。

查看handheld.bag的信息:
rosbag info /path/to/handheld.bag
输出:
path:        /path/to/handheld.bag
version:     2.0
duration:    27:22s (1642s)
start:       Jul 10 2020 00:01:19.49 (1594310479.49)
end:         Jul 10 2020 00:28:42.42 (1594312122.42)
size:        9.6 GB
messages:    1716700
compression: none [10736/10736 chunks]
types:       sensor_msgs/CompressedImage [8f7a12909da2c9d3332d540a0977563f]sensor_msgs/Imu             [6a62c6daae103f4ff57a132d6f95cec2]sensor_msgs/NavSatFix       [2d3a8cd499b9b4a0249fb98fd05cfa48]sensor_msgs/PointCloud2     [1158d486dd51d683ce2f1be655c3c181]
topics:      /camera/image_raw/compressed    49283 msgs    : sensor_msgs/CompressedImage/gps/fix                         8215 msgs    : sensor_msgs/NavSatFix      /imu_correct                   821457 msgs    : sensor_msgs/Imu            /imu_raw                       821456 msgs    : sensor_msgs/Imu            /points_raw                     16289 msgs    : sensor_msgs/PointCloud2
运行截图:

但是还有一个问题,终端报错:
[lvi_sam_visual_odometry-9] process has died [pid 5906, exit code -11, cmd /LVI-SAM_ws/devel/lib/lvi_sam/lvi_sam_visual_odometry __name:=lvi_sam_visual_odometry
[lvi_sam_visual_odometry-9] restarting process
process[lvi_sam_visual_odometry-9]: started with pid [5959]
[ INFO] [1619149659.416106352]: ----> Visual Odometry Estimator Started.
可以看出是lvi_sam_visual_odometry节点崩溃了,由于module_sam.launch中的lvi_sam_visual_odometry节点存在respawn="true"参数,所以会重启崩溃的节点。即:
<node pkg="$(arg project)" type="$(arg project)_visual_odometry" name="$(arg project)_visual_odometry" output="screen" respawn="true"/>
暂时不知道lvi_sam_visual_odometry节点崩溃的原因,先到这里,后续继续跟踪吧。
上面的测试是在Ubuntu 16.04系统上进行的,我又在Ubuntu 18.04系统上测试了一下,没有出现lvi_sam_visual_odometry节点崩溃的问题。运行截图:

不要高兴太早,可以看出,轨迹和地图飘了,同时终端输出警告信息:
[ WARN] [1619181869.418229923]: Large velocity, reset IMU-preintegration!
[ WARN] [1619181915.626756290]: image discontinue! reset the feature tracker!
[ WARN] [1619181915.627181759]: restart the estimator!
[ WARN] [1619181921.062276696]: Large bias, reset IMU-preintegration!
[ WARN] [1619181932.393410513]: Large velocity, reset IMU-preintegration!
[ WARN] [1619181933.702082376]: throw img, only should happen at the beginning
[ WARN] [1619181934.043777764]: TF to MSG: Quaternion Not Properly Normalized
尝试降低bag的播放速度:
rosbag info /path/to/handheld.bag -r 0.5
最终生成的全局点云地图:


地图没有明显漂移,轨迹也与采集路线基本一致。

综上,得到以下结论:
- 使用Ubuntu 18.04系统
- 降低bag文件的播放速度,经测试,0.5倍速可实现良好效果
这篇关于LVI-SAM安装与测试的文章就介绍到这儿,希望我们推荐的文章对编程师们有所帮助!


