本文主要是介绍基于python 自写Tobii VI-T滤波器,希望对大家解决编程问题提供一定的参考价值,需要的开发者们随着小编来一起学习吧!
文章目录
- 官网参考文档
- Gap fill-in interpolation
- Eye selection
- Noise reduction
- Velocity calculator
- I-VT classifier
- Merge adjacent fixations
- 官方文档
- python 代码
- GITHUB c代码
官网参考文档
Tobii的默认注视点滤波器是I-VT,官方给出了参考文档《The Tobii I-VT Fixation Filter》。今天学习了一下,这里做个笔记。
主要看第三小节“The Tobii Studio implementation of the Tobii I-VT filter”的内容,简单概述I-VT滤波器的基本操作流程:内插fixations=>眼动位置确定=>降噪处理=>速度计算=>分类=>临近注视区合并。
整个流程的关键参数就在下面这张图中,下面分别介绍具体操作流程:

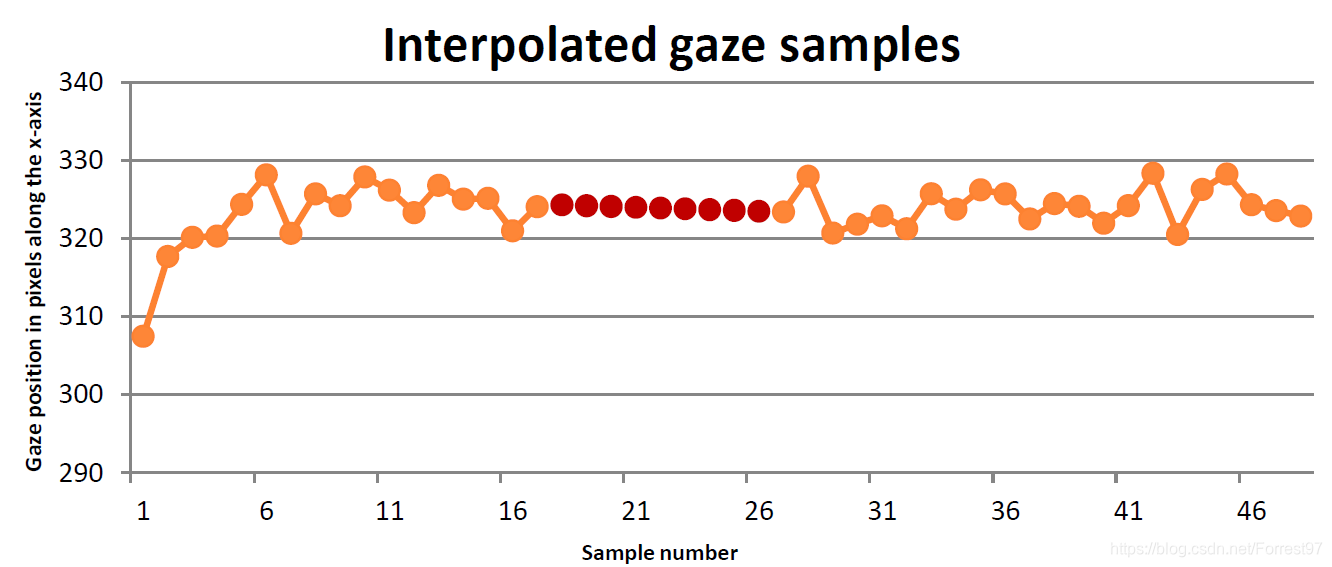
Gap fill-in interpolation
主要目的是将一些missing的fixations通过内插的方式填补上,关键的参数‘Max gap length’。为避免将一些由于被试眨眼,转头和遮挡等非采取误差导致数据填补,系统默认设置Max gap length小于正常眨眼的时间,一般为75mm。(通常2~6秒就要眨眼一次,每次眨眼要用0.2~0.4秒钟时间)
对于数据的填补就是简单线性内插即可。
Eye selection
相对很好理解,由于采集的两只眼的眼动信息,需要选取以哪只眼的fixations位置为准。可选择的有左右眼,以及平均。我们选择avarage就好,即两只眼都采集到数据时去两者位置的平均,只有一只眼时只取一只眼的数据。
Noise reduction
Tobii采用的non-weighted moving-average filter,也是一个很好理解的滤波方式,即连续取某一个时刻前N和后N个样本点,取平均位置。
y [ n ] = 1 2 ∗ N + 1 ∑ k = − N N x [ n − k ] y[n]=\frac{1}{2 * N+1} \sum_{k=-N}^{N} x[n-k] y[n]=2∗N+11k=−N∑Nx[n−k]
显然样本点的个数将直接影响fixations的位置曲线,样本点越多曲线越平滑,对应的眼动速度也越低。这样操作虽然能消除噪音的影响也会对影响数据准确度,所以需要合适选取数据。
采样时间间隔乘以N需要远小于眼跳的时间间隔。

相比均值降噪,中位数降噪能减少对过度区域的过平滑操作。

Velocity calculator
为方便分类阈值的设定,这里眼动速度一般采用视角,桌面式的眼动仪器因为知道被试与刺激物的纵向距离,视角便可以方便计算得到。

视角速度的计算就是两个注视点的距离除以一个时间间隔,其中window length需要进行合理设置,经验选取20ms可以有效降噪且避免打乱数据。
v t 1 t 2 = ∣ s t 1 − s t 2 ∣ ∣ t 1 − t 2 ∣ v_{t_{1} t_{2}}=\frac{\left|s_{t_{1}}-s_{t_{2}}\right|}{\left|t_{1}-t_{2}\right|} vt1t2=∣t1−t2∣∣st1−st2∣
I-VT classifier
接下来就是根据velocity threshold对注视点进行分类了,默认设置为30°/s。但是根据数据的信噪比,需要合理调整阈值。每秒的眼跳次数为2-5次,眼跳持续时间10-100ms,一次注视的时间约200-500ms,可据此检验阈值设置的可靠性。比如下图左侧,噪声较多,阈值需要设置大一些,右侧噪声少,阈值设当设置小一些。

Merge adjacent fixations
对于临近的注视点处理,主要基于三个参数:
max time between fixations: 75ms(大约75超过眼跳,应该时眨眼等行为)
max angle between fixations: 0.5°(小于这个数值,合并)
merge adjacent fixations: 60ms (小于一次注视的时长合并)
意思都很好理解了,提出的机理是根据文献中人的行为特点决定的,比如最后一个参数注视时长是人视觉观察物体,并提取关键信息所必须的最短时长。
至此便完成了对眼动数据的滤波处理。
官方文档
https://www.tobiipro.com/learn-and-support/learn/steps-in-an-eye-tracking-study/data/how-are-fixations-defined-when-analyzing-eye-tracking-data/
python 代码
粗略写了一个,后续再更新
import matplotlib as mpl
import glob, os, cv2, time
import json, csv, math
import numpy as np
import pandas as pd
import seaborn as sns
import matplotlib.pyplot as plt
from scipy import signal
import matplotlib.gridspec as gridspec
import matplotlibmatplotlib.rcParams['font.size'] = 16
matplotlib.rcParams['figure.titlesize'] = 16
# matplotlib.rcParams['figure.figsize'] = figsz
matplotlib.rcParams['font.family'] = ['Times New Roman']
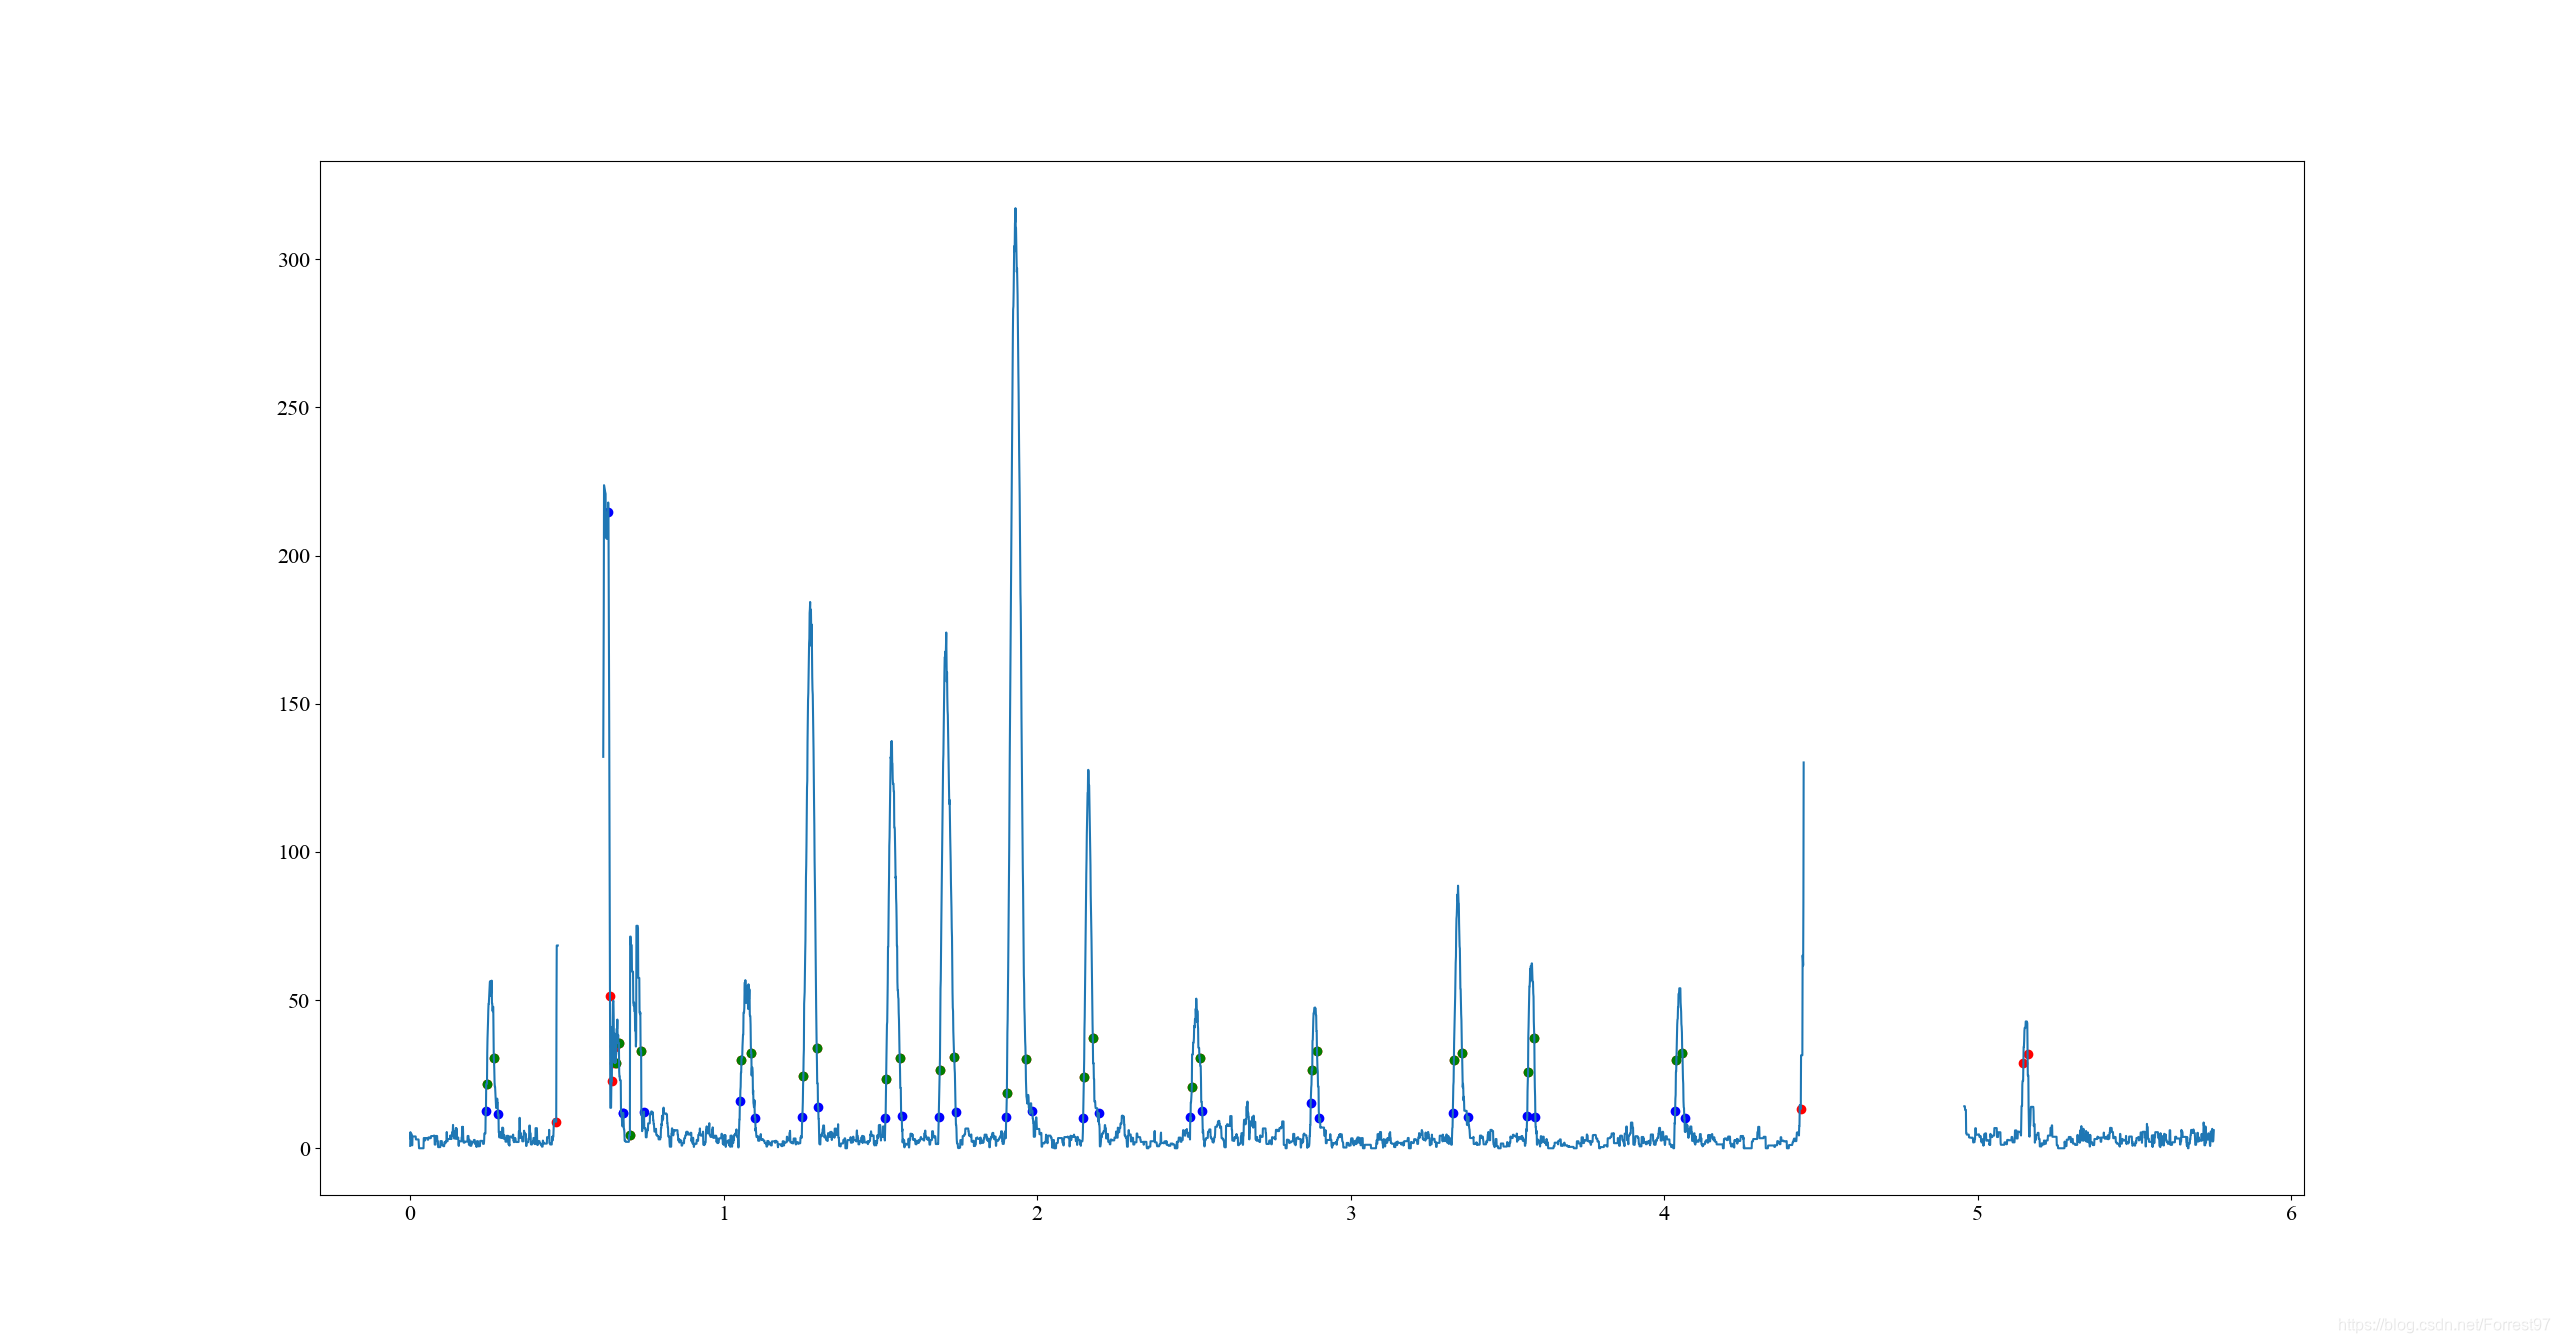
matplotlib.rcParams['axes.unicode_minus']=Falsedef read_json(json_file):with open (json_file, 'r') as f:res_data = json.load(f)return res_datadef get_fixation_list(fixation_dict):# 删除最后一帧画面的眼动fixation_dict.pop('frame{:0>6}'.format(len(fixation_dict)-1))fixations=[]for key, fix in fixation_dict.items():fixations.extend(fix)return fixationsclass Tobii_IVT_filter():'''filter_mode: fixation/attention/user_define'''def __init__(self, sample_fps,filter_mode, seating_dis=650, screen= (527.1, 296.5),resolution=[1280,720], **filter_kwargs):self.sample_fps = sample_fpsself.filter_mode=filter_modeself.seat_dis = seating_disself.resolution=resolutionself.screen_w = screen[0]self.screen_h = screen[1]if filter_mode=='fixation':self.fixation_filter()elif filter_mode=='attention':self.attention_filter()else:self.user_defined_filter(**filter_kwargs)def fixation_filter(self, ):self.max_gap_length=75self.noise_window_size=3self.velocity_window_size=20self.velocity_threshold=30self.merge_max_time=75self.merge_max_angle=0.5self.discard_min_duration=60def attention_filter(self, ):self.max_gap_length=75self.noise_window_size=3self.velocity_window_size=20self.velocity_threshold=100self.merge_max_time=75self.merge_max_angle=0.5self.discard_min_duration=60def user_defined_filter(self, **filter_kwargs):self.max_gap_length=filter_kwargs['max_gap_length']self.noise_window_size=filter_kwargs['noise_window_size']self.velocity_window_size=filter_kwargs['velocity_window_size']self.velocity_threshold=filter_kwargs['velocity_threshold']self.merge_max_time=filter_kwargs['merge_max_time']self.merge_max_angle=filter_kwargs['merge_max_angle']self.discard_min_duration=filter_kwargs['discard_min_duration']def filter_process(self,fixations):fixations_gap=self.GapFill(fixations)fixations_merge=self.MovingMedian(fixations_gap)# self.scatter_plot1([np.array(fixations), np.array(fixations_gap),# np.array(fixations_merge)])velocity_list = self.VelocityCal(fixations_merge)self.scatter_plot2(velocity_list)self.FixClassifier(fixations_merge, velocity_list)def GapFill(self, fixations):# 小于interval_num 需要内插interval_num = self.sample_fps*self.max_gap_length/1000fix_len = len(fixations)nan_index = np.isnan(fixations)[:,0]# FT定义为开始 TF定义为结束start_idx, end_idx = [], []for ii in range(fix_len-2):if (nan_index[ii] == False) & \(nan_index[ii+1] == True) :start_idx.append(ii)if (nan_index[ii] == True) & \(nan_index[ii+1] == False):end_idx.append(ii)for start, end in zip(start_idx, end_idx):# print('start_idx:{}, end_idx:{}'.format(start, end), \# nan_index[start:end+2])# print('start_idx:{}, end_idx:{}'.format(start, end), \# 'fixation_array:',fixations[start:end+2])nan_len = end-startif nan_len<interval_num:px = [fixations[start][0], fixations[end+1][0]]py = [fixations[start][1], fixations[end+1][1]]interx = ((px[1]-px[0])*np.arange(nan_len+1)/float(nan_len+1)+px[0]).tolist()intery = ((py[1]-py[0])*np.arange(nan_len+1)/float(nan_len+1)+py[0]).tolist()# fixations[]for ii in range(1, len(interx)):fixations[start+ii]=[interx[ii], intery[ii]]# print('\n Post: start_idx:{}, end_idx:{}'.format(start, end), \# 'fixation_array:',fixations[start:end+2])return fixationsdef MovingMedian(self, fixations):fixations = np.array(fixations)num = self.noise_window_sizefor ii in range(num, len(fixations)-num):fix_slice = fixations[ii-num: ii+num+1]det_x = fix_slice[:,0].max()-fix_slice[:,0].min()det_y = fix_slice[:,1].max()-fix_slice[:,1].min()if det_x>det_y: median_idx = np.argsort(fix_slice[:,0])[num]else: median_idx = np.argsort(fix_slice[:,1])[num]fixations[ii,:] = fix_slice[median_idx,:]return fixations.tolist()def angle_pixel(self, ):angle_h = math.degrees(math.atan2(self.screen_h, self.seat_dis))angle_w = math.degrees(math.atan2(self.screen_w, self.seat_dis))angle_h_pixel = angle_h/self.resolution[1]angle_w_pixel = angle_w/self.resolution[0]return angle_h_pixeldef VelocityCal(self, fixations):fixations = np.array(fixations)fixations[:,0] = fixations[:,0]*1280fixations[:,1] = fixations[:,1]*720num = int(self.sample_fps*self.velocity_window_size/1000)angle_h_pixel = self.angle_pixel()vel_list = []for ii in range(len(fixations)-num):# 换算成像素start = np.array(fixations[ii])end = np.array(fixations[ii+num])dist = np.sqrt(sum(np.power((end - start), 2)))vel = dist*angle_h_pixel*1000/self.velocity_thresholdvel_list.append(vel)return vel_listdef FixClassifier(self, fixations, velocity):fixations = np.array(fixations)fixations[:,0] = fixations[:,0]*1280fixations[:,1] = fixations[:,1]*720velocity = np.array(velocity)# nan替换为100,不替换nan比任何数都笑index = np.where(np.isnan(velocity)==True)velocity[index]=100fix_idx = velocity>self.velocity_threshold# FT定义为开始 TF定义为结束start_idx, end_idx = [], []for ii in range(len(velocity)-1):if (fix_idx[ii] == False) & \(fix_idx[ii+1] == True) :start_idx.append(ii)if (fix_idx[ii] == True) & \(fix_idx[ii+1] == False):end_idx.append(ii)num_fixation = len(start_idx) print('number fixations:', num_fixation)# max angleangle_h_pixel = self.angle_pixel()max_angle=[]for start, end in zip(start_idx, end_idx):point_s = fixations[start]point_e = fixations[end]dist = np.sqrt(sum(np.power((point_e-point_s),\2)))*angle_h_pixelif dist<self.merge_max_angle:max_angle.append([start, end])print('less than max angle(0.5):', len(max_angle))# max time between fixations to remove blinksnum = int(self.sample_fps*self.merge_max_time/1000)num_blink=[]for start, end in zip(start_idx, end_idx):if end-start>num:# start_idx.remove(start)# end_idx.remove(end)num_blink.append([start,end])print('greater than blink(75ms) number:', len(num_blink))# print('number fixations:', len(start_idx))# minimum fixation durationnum = int(self.sample_fps*self.discard_min_duration/1000)num_short_fix = []for idx, start in enumerate (start_idx):if idx==0: end=0elif idx==len(start_idx): end=len(start_idx)else: end=start_idx[idx-1]if start-end<num:num_short_fix.append([end, start])print('shorter than fixation(60ms) number:', len(num_short_fix))def scatter_plot1(self, data):fig, ax = plt.subplots(figsize=(8,4.5))end = len(data[0])*(1/self.sample_fps)x = np.arange(0, end ,1/self.sample_fps)ax.plot(x, data[0], label=['raw_x', 'raw_y'])ax.plot(x, data[1], label=['gap_fill_x', 'gap_fill_y'])ax.plot(x, data[2], label=['merge_x', 'merge_y'])plt.legend()plt.show()def scatter_plot2(self, data):fig, ax = plt.subplots(figsize=(8,4.5))end = len(data)*(1/self.sample_fps)x = np.arange(0, end ,1/self.sample_fps)ax.plot(x, data, label='velocity')plt.show()if __name__ == '__main__':fixation_path = './postprocess_data/fixation.json'fixation_list = read_json(fixation_path)fixations = get_fixation_list(fixation_list)Filter = Tobii_IVT_filter(1200, 'fixation')Filter.filter_process(fixations)在使用的过程中发现了一些小问题:
- 眼跳最大速度在阈值速度附近时候会出现一个眼跳多个开始结束点的情况;
- 眨眼的周围区间会出现大量失真的速度点,这些点会影响眼跳区间的确定;
- 以速度阈值确定的区间并不是眼跳的区间,需要进一步以更小的阈值确定正确的区间;
- 在数据噪声比较明显的时候,会出现开始和结尾不匹配成对的情况,因此相比上面先找出所有区间,再进行筛选的逻辑。更好准确的策略应该是一对对的找区间,确保每个区间的正确性。
GITHUB c代码
https://github.com/uxifiit/GazeToolkit
这篇关于基于python 自写Tobii VI-T滤波器的文章就介绍到这儿,希望我们推荐的文章对编程师们有所帮助!


