本文主要是介绍uniapp接入腾讯地图实现定位导航功能。,希望对大家解决编程问题提供一定的参考价值,需要的开发者们随着小编来一起学习吧!
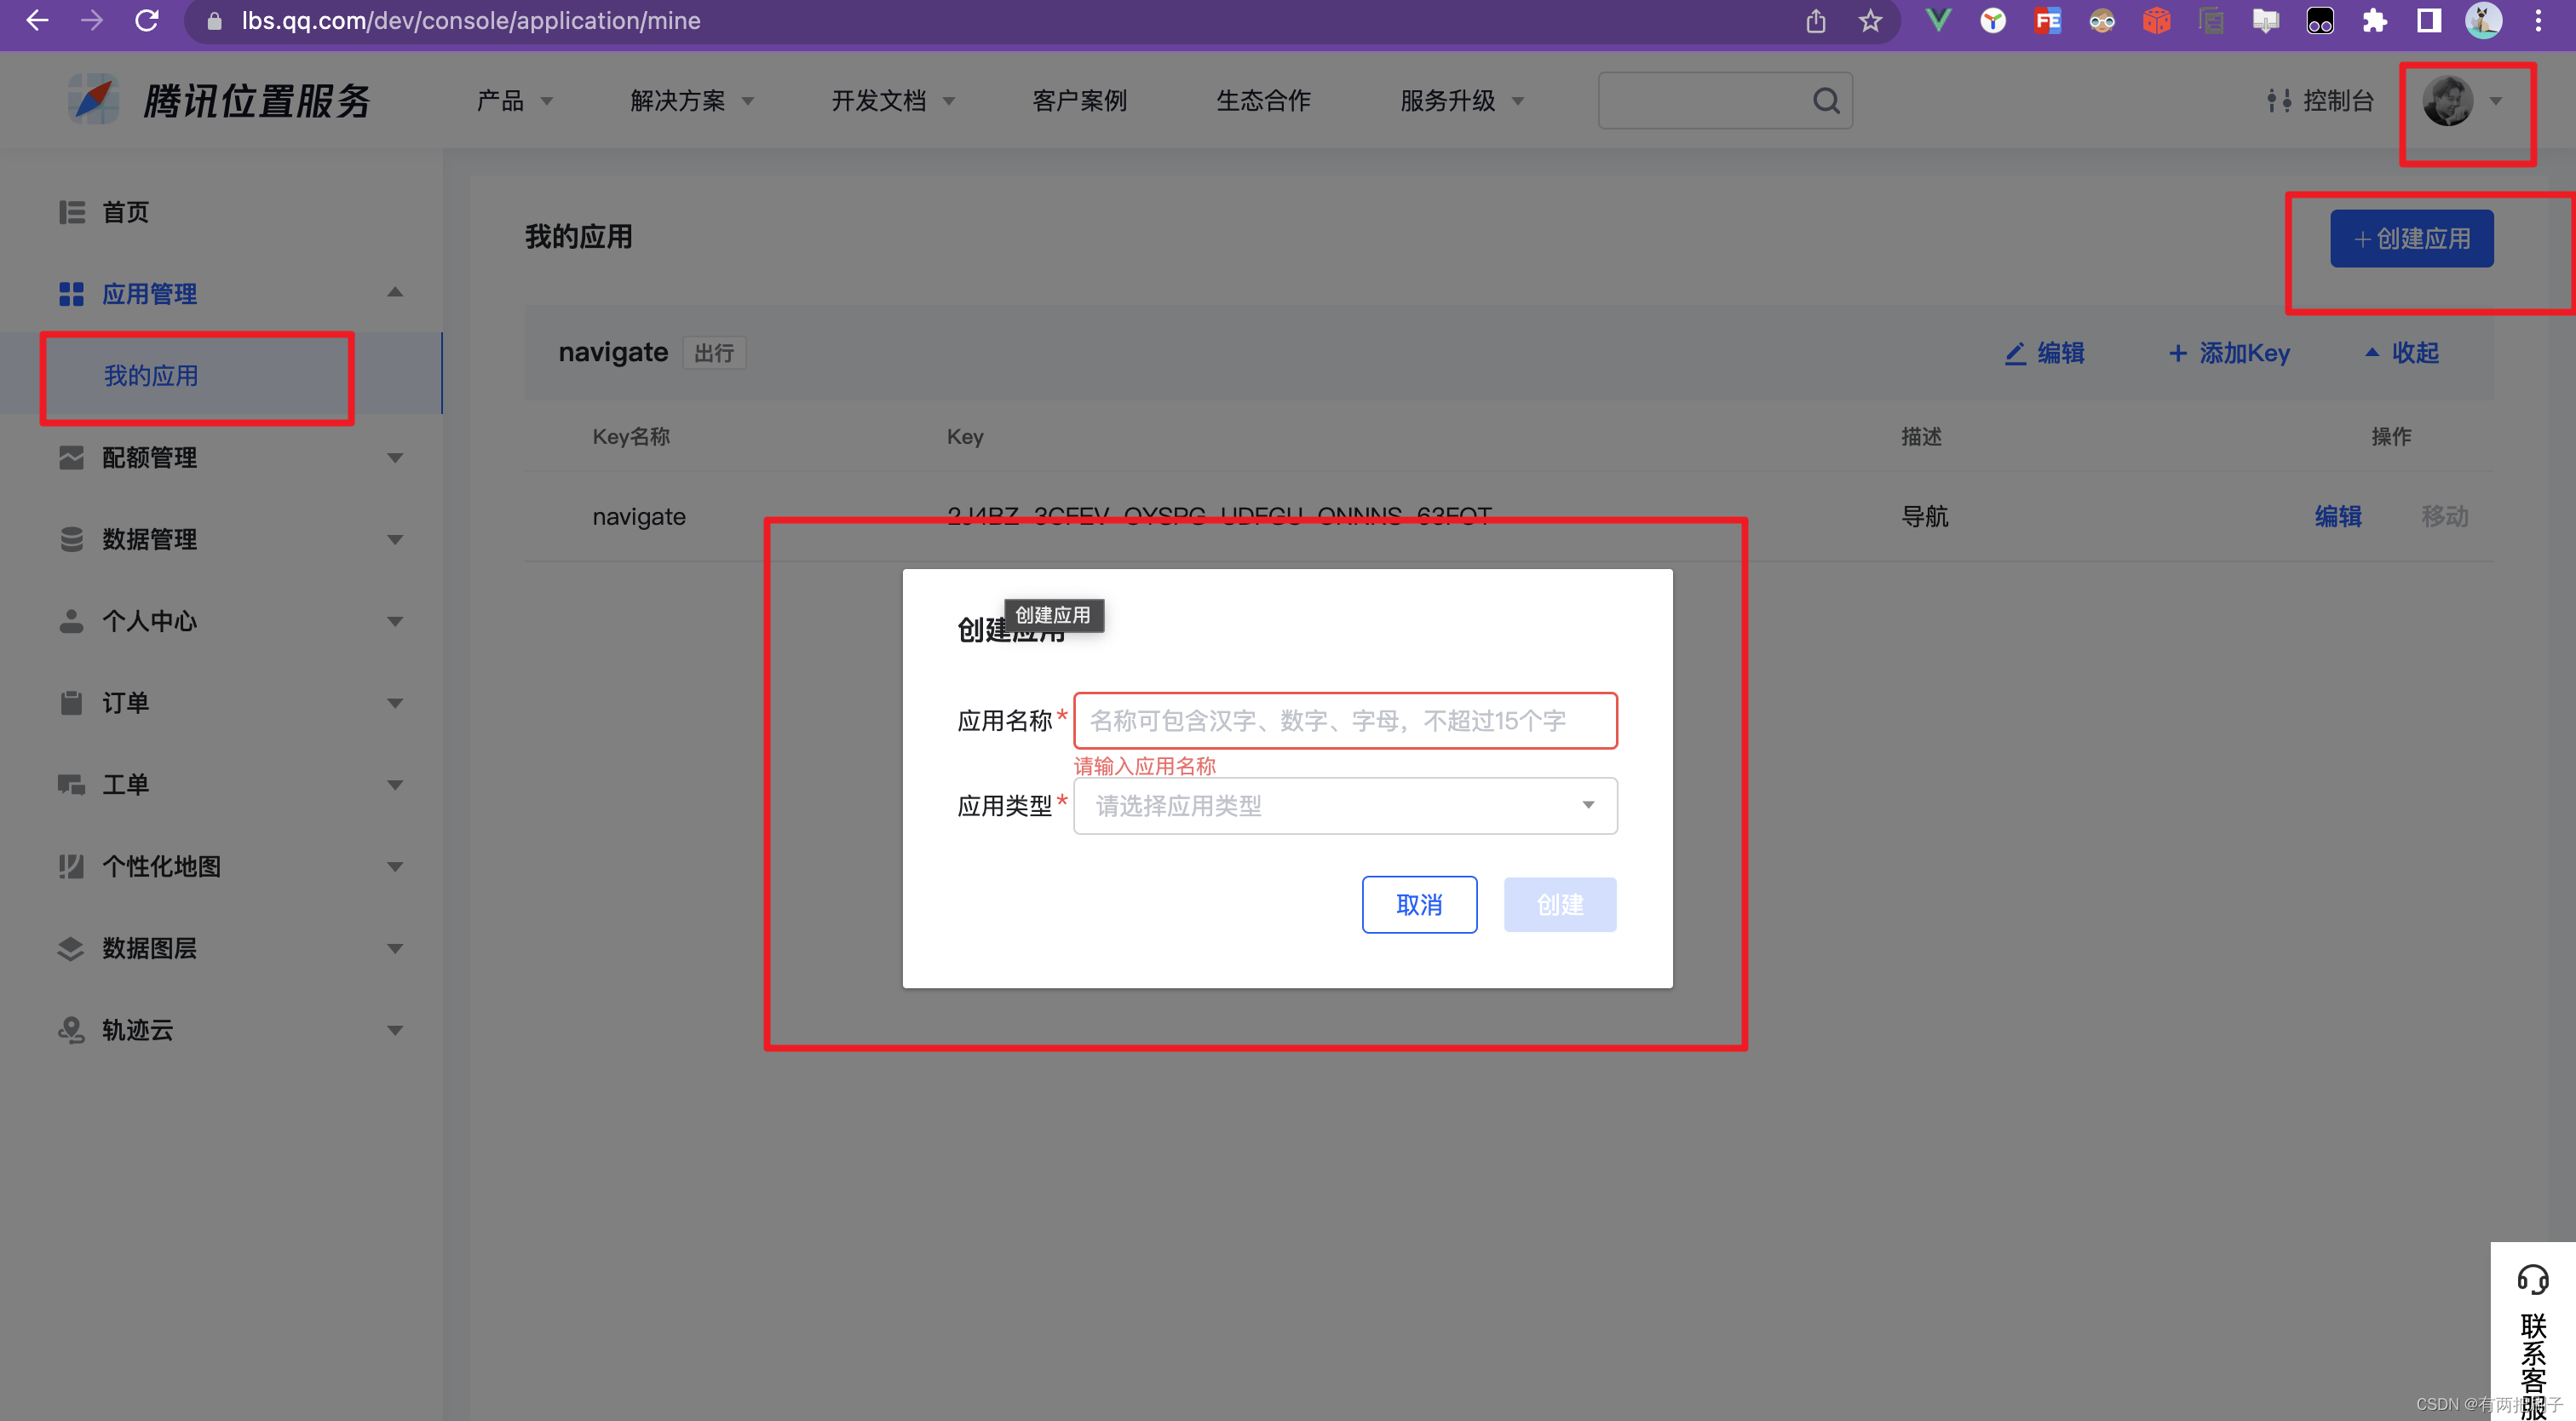
打开腾讯地图的官网注册账号登陆进入,滑入我的头像开发者信息:https://lbs.qq.com/service/webService/webServiceGuide/webServiceOverview
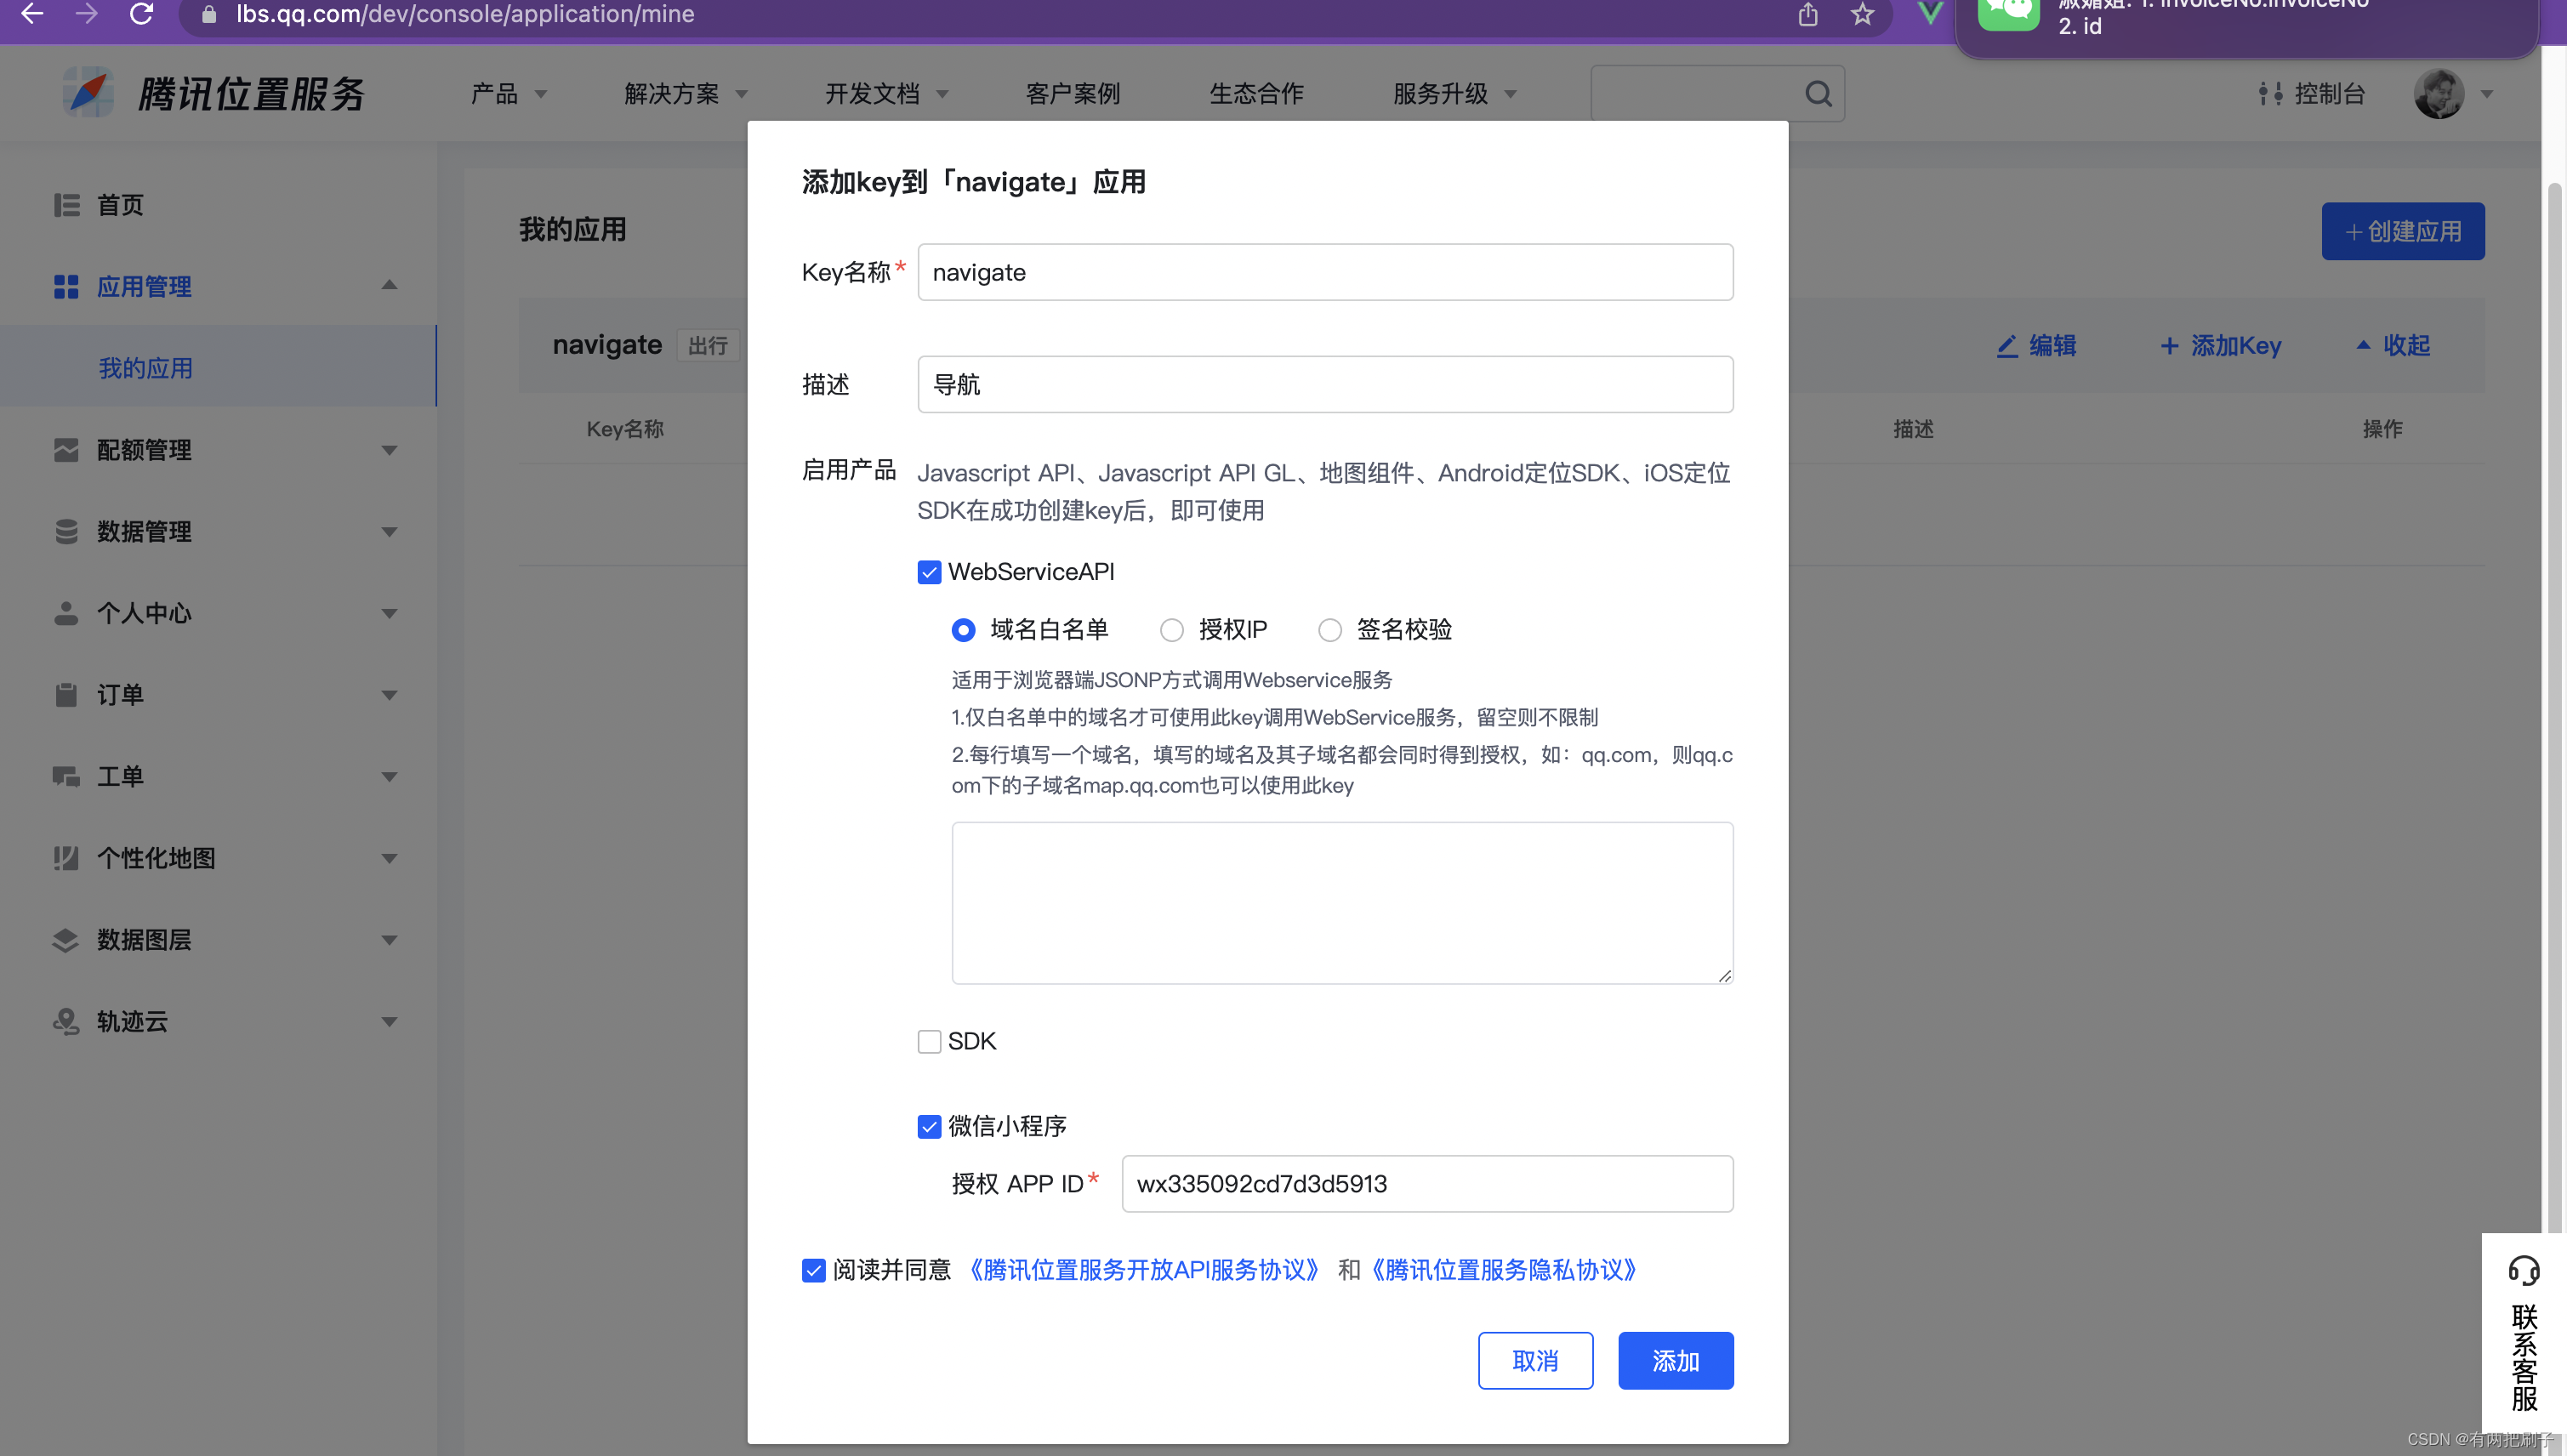
2 找到添加的应用,添加key
3 webService API 查询

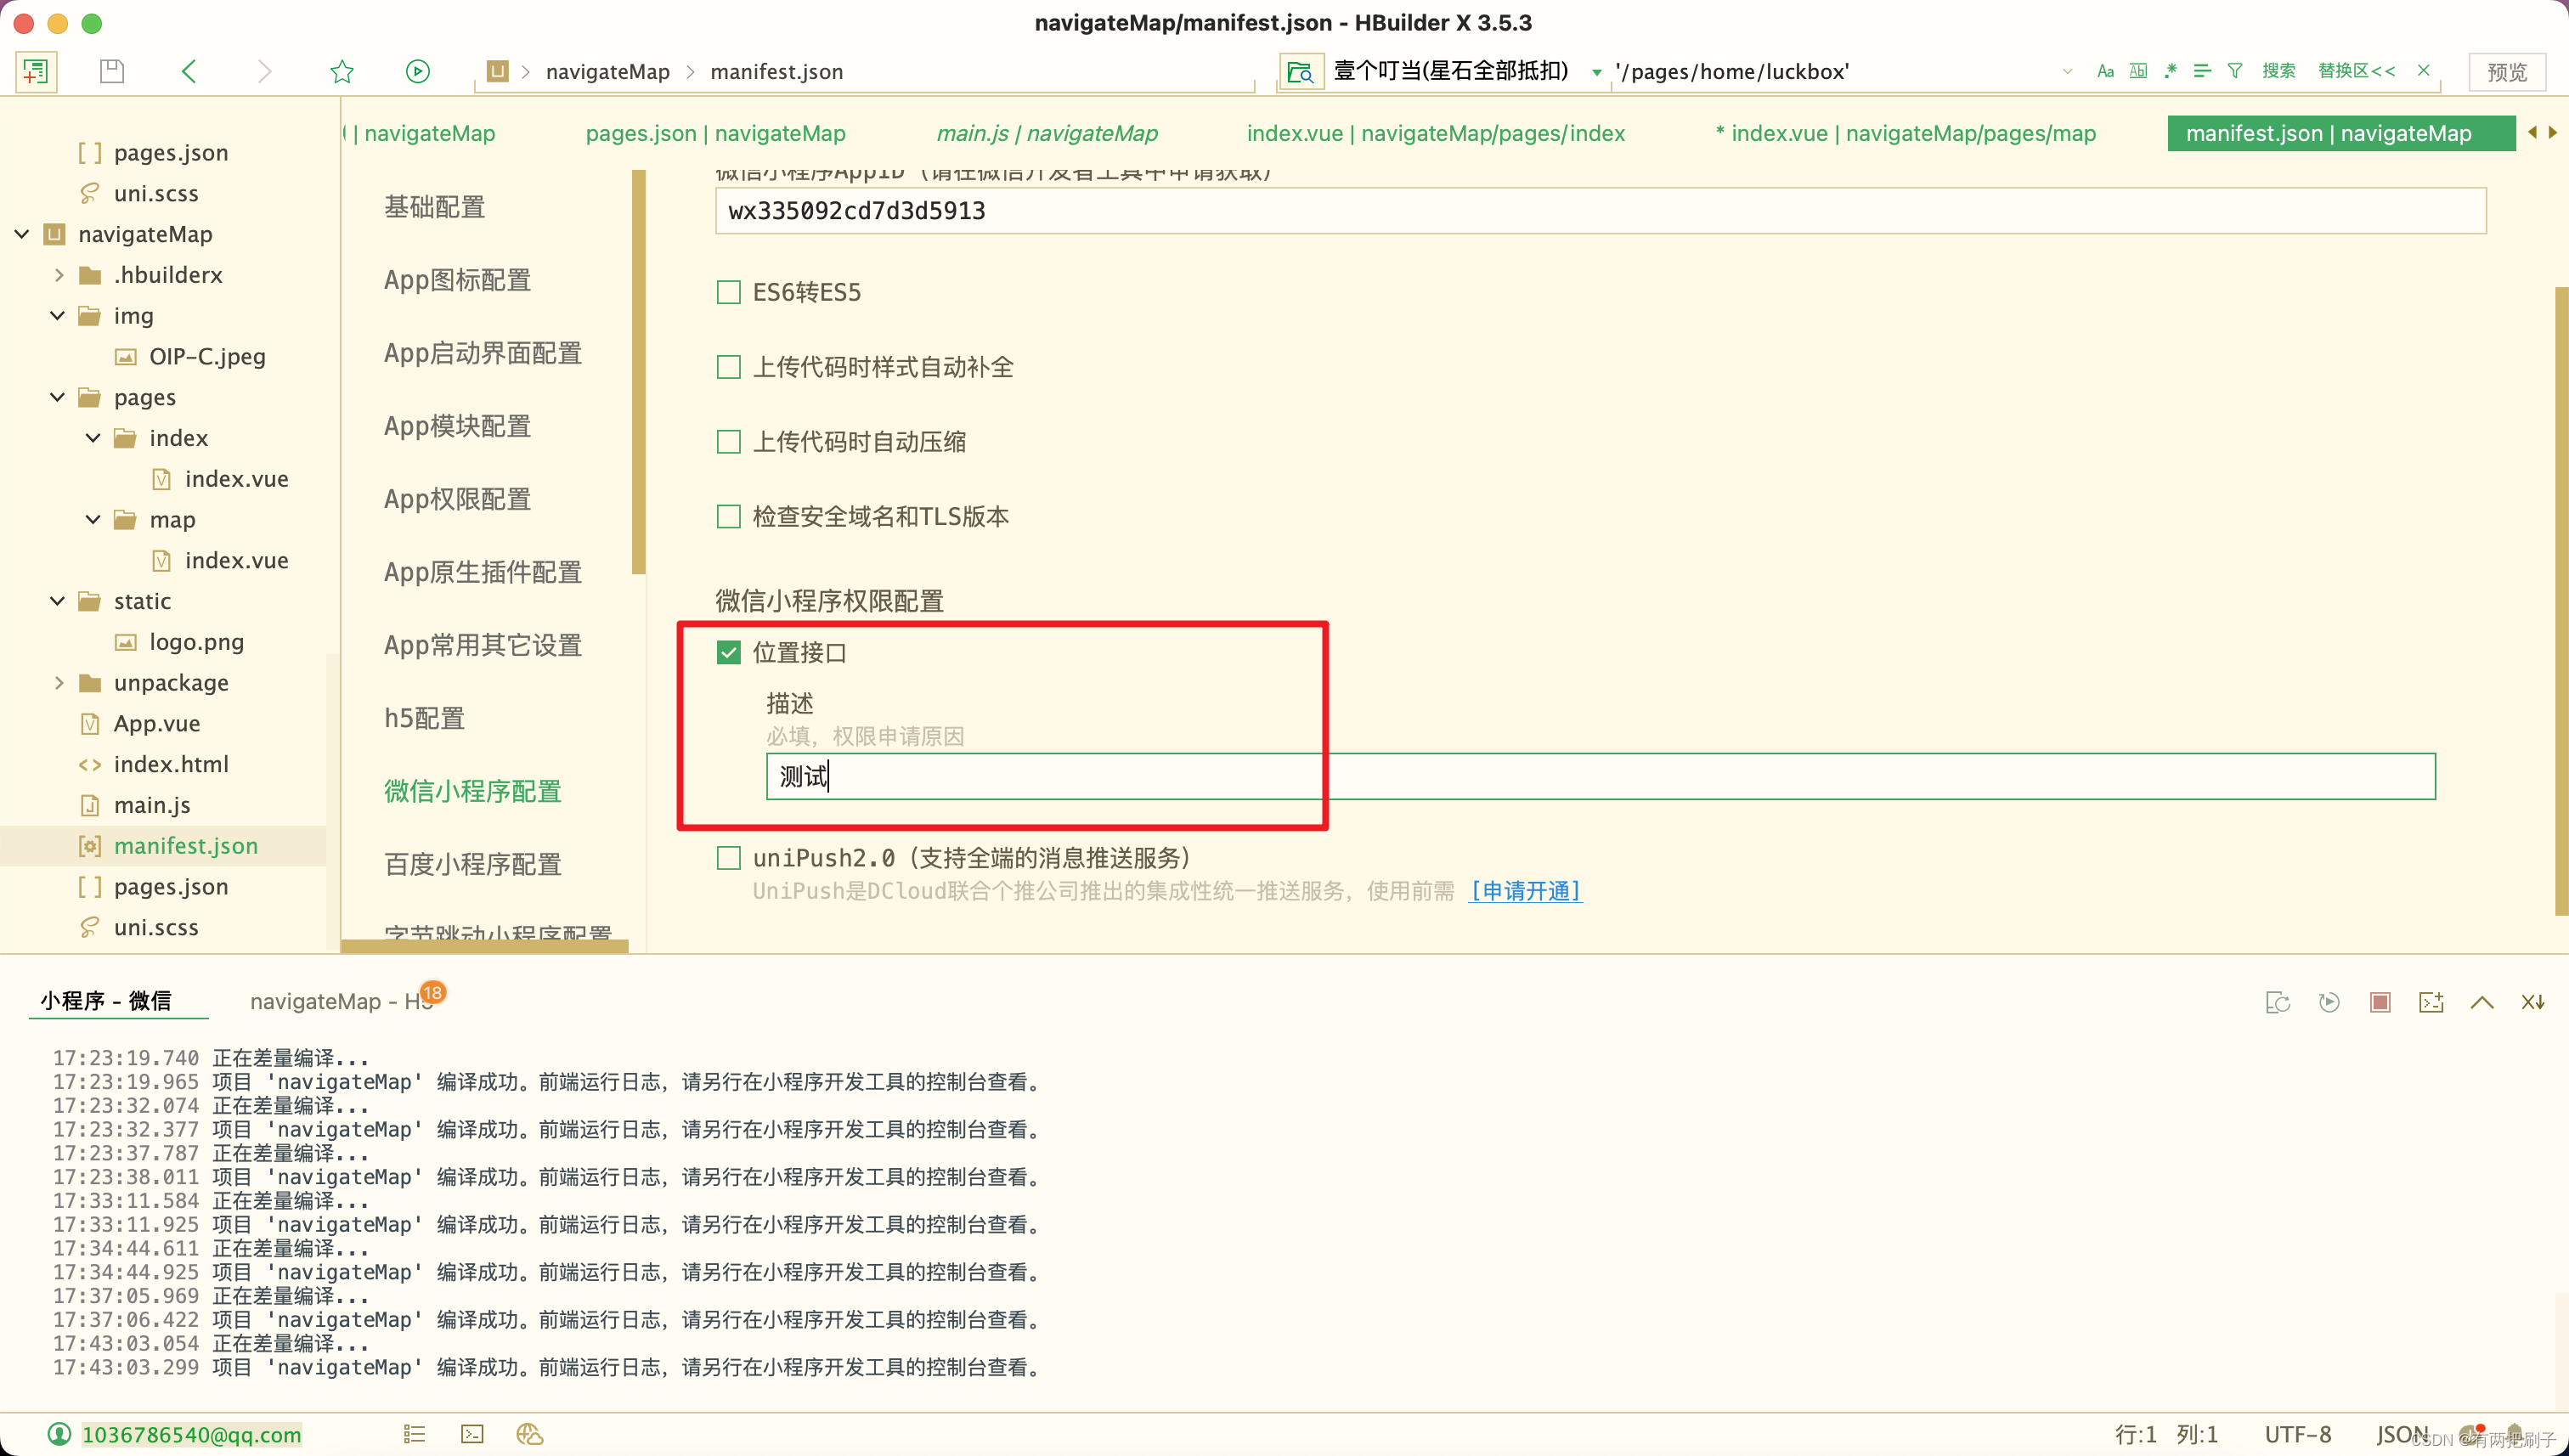
4 然后在manifest.json 中设置如下,以及小程序id
uniapp用到的api
uni.getLocation 获取当前的地理位置、速度。当用户离开小程序后,此接口无法调用。
uni.openLocation 使用微信内置地图查看位置
this.mapDom = uni.createMapContext('mapDom') 获取map id=mapDom 的实例
this.mapDom.includePoints includePoints 缩放视野展示所有经纬度
bug uni.getLocation 不触发直接将基础库调整为 2.17.0
首页代码
<template><view class=""><div class="header"><view class="content">你要去哪里:<view class="text-area"><text @click="toMap()" class="title">{{title}}</text></view></view><input @input="changeCity" v-model="city" type="text" height="50" /><ul v-show="isShowSearch"><li @click="getCityHandle(item.address)" v-for="item in suggestionData" :key="item.id">{{item.address}}</li></ul></div></view></template><script>import {Debounce} from '../../utils/debounce.js'export default {data() {return {title: '出发',key: '2J4BZ-3CFEV-OYSPG-UDFGU-ONNNS-63FOT',city: '河南省鹤壁市浚县',locationConfig: null,noClick: true,suggestionData: null,isShowSearch:false}},onLoad() {},methods: {toMap() {this.getPosition((location) => {uni.navigateTo({url: `/pages/map/index?lat=${ location.lat}&lng=${ location.lng}&city=${this.city}`})})},getPosition(callback) {uni.request({url: `https://apis.map.qq.com/ws/geocoder/v1/?address=${this.city}&key=${this.key}`,success: ({data}) => {callback(data.result.location)},})},getCityHandle(val) {this.city = valthis.isShowSearch = false},changeCity: Debounce(function(e) {this.isShowSearch = trueconsole.log(432);this.city = e.target.valueuni.request({url: `https://apis.map.qq.com/ws/place/v1/suggestion?key=${this.key}&keyword=${this.city}`,success: ({data}) => {console.log(423, data.data);this.suggestionData = data.data},})}, 1000)}}
</script><style>ul {height: auto;width: 90%;overflow: scroll;}ul li {margin: 2px;width: 100%;height: auto;border-radius: 10upx;background-color: #ccc;padding: 10upx;box-sizing: border-box;}.content {display: flex;margin-bottom: 20upx;}.logo {height: 200rpx;width: 200rpx;margin-top: 200rpx;margin-left: auto;margin-right: auto;margin-bottom: 50rpx;}.text-area {display: flex;justify-content: center;border: 1px solid #ccc;width: 30%;border-radius: 10upx;}.title {font-size: 36rpx;color: #8f8f94;}.header {width: 100%;height: 30upx;padding: 30upx;}.header input {width: 90%;border: 1px solid #ccc;border-radius: 10upx;}
</style>
地图页面
<template><view class=""><view class="page-body"><view class="page-section page-section-gap"><map style="width: 100%; height: 75vh;" id="mapDom"show-location :latitude="latitude" :longitude="longitude" :markers="covers"show-location@updated="lodingMap"></map><div @click="backPositionHandle" class="positionIcon"></div></view></view><view class="footer"><h3>你的目的地</h3><view class="descriptive">{{city}}</view><button class="position" @click="getHereHandle">到这里</button></view></view></template><script>export default {data() {return {latitude: 0,longitude: 0,covers: [{id: 1,width: 50,height: 50,latitude: 0,longitude: 0,iconPath: '../../static/1.gif'}, ],city:'',flag:false}},onReady() {this.mapDom = uni.createMapContext('mapDom')console.log(423,this.mapDom);},onLoad(option) {this.covers[0].latitude = Number(option.lat)this.covers[0].longitude = Number(option.lng)this.city = option.city//  uni.getLocation 不触发直接将基础库调整为 2.17.0uni.getLocation({type: 'gcj02',success: (res) => {console.log('当前位置的经度:' + res.longitude);console.log('当前位置的纬度:' + res.latitude);this.latitude = Number(res.latitude)this.longitude = Number(res.longitude)// 获取位置成功之后进行缩放,直观的看到坐标// includePoints 缩放视野展示所有经纬度this.mapDom.includePoints({padding:[140,50,140,50],points:[//第一个是我的位置{latitude:this.latitude,longitude:this.longitude},// 第二个是店铺的位置{latitude:this.covers[0].latitude,longitude:this.covers[0].longitude}]})}});},methods:{// 地图初始化完成后触发lodingMap() {console.log(423);this.flag = true},getHereHandle() {if(!this.flag) return// let plugin = requirePlugin('routePlan');// let key = '2J4BZ-3CFEV-OYSPG-UDFGU-ONNNS-63FOT';  //使用在腾讯位置服务申请的key// let referer = 'navigateMap';   //调用插件的app的名称// let endPoint = JSON.stringify({  //终点//   'name': '北京西站',//   'latitude': 39.894806,//   'longitude': 116.321592// });// wx.navigateTo({//   url: 'plugin://routePlan/index?key=' + key + '&referer=' + referer + '&endPoint=' + endPoint// });uni.openLocation({latitude:this.covers[0].latitude,    //维度longitude: this.covers[0].longitude, //经度name: this.city,    //目的地定位名称scale: 15,    //缩放比例// address: "河南省鹤壁市浚县"    //导航详细地址})},backPositionHandle() {if(!this.flag) returnthis.mapDom.moveToLocation();}}}
</script><style>.page-section-gap {position: relative;}.footer{width: 100%;height: 25vh;background-color: #fff;box-sizing: border-box;padding: 20upx  40upx 0 40upx;display: flex;flex-direction: column;border-radius: 22upx;}.position{height: 90upx;line-height:90upx;background-color: #3d89f0;color: #fff;width: 100%;}.descriptive{font-size: 30upx;margin: 30upx 0 30upx 0;}.positionIcon {width: 40upx;height: 40upx;border-radius: 50%;position: absolute;bottom: 40upx;right: 40upx;background-image: url('https://tse2-mm.cn.bing.net/th/id/OIP-C.fCPxTGJccQvVdqrNFqrMRwHaHa?pid=ImgDet&rs=1');background-size: 100% 100%;}
</style>
/utils/debounce.js 防抖方法
export  const Debounce = (fn, wait) => {let delay = wait|| 500let timerreturn function () {let args = arguments;if (timer) {clearTimeout(timer)}let callNow = !timertimer = setTimeout(() => {timer = null}, delay)if (callNow) fn.apply(this, args)}
}
这篇关于uniapp接入腾讯地图实现定位导航功能。的文章就介绍到这儿,希望我们推荐的文章对编程师们有所帮助!


